Objective
In this project, we will connect an Infrared remote control receiver to Raspberry Pi. After an IR remote controller key is pressed, Raspberry Pi will decode the signal and display the key code on the terminal.
Unlike most of other online tutorials, this project just uses basic GPIO function to decode IR signal. No need to install LIRC. This is a good news for beginners who are not familiar with LIRC library configuration.
If you want to learn IR programming with LIRC library, check this tutorial: https://osoyoo.com/2016/12/15/raspberrypi-ir-remote/
Hardware Parts List:
| 1 pc |
Raspberry Pi 2/3/zero x 1 |
 |
| 1 pc |
8GB MicroSD memory card x 1preinstalled Raspbian OS. |
 |
| 1 pc |
VS1838B x 1 |
 |
| 1 pc |
Infrared Remote Controller x 1 |
 |
| 1 pc |
breadboard x 1 |
 |
| 1 pc |
GPIO breakout kit(optional) |
 |
| some |
Jumper Wires |
 |
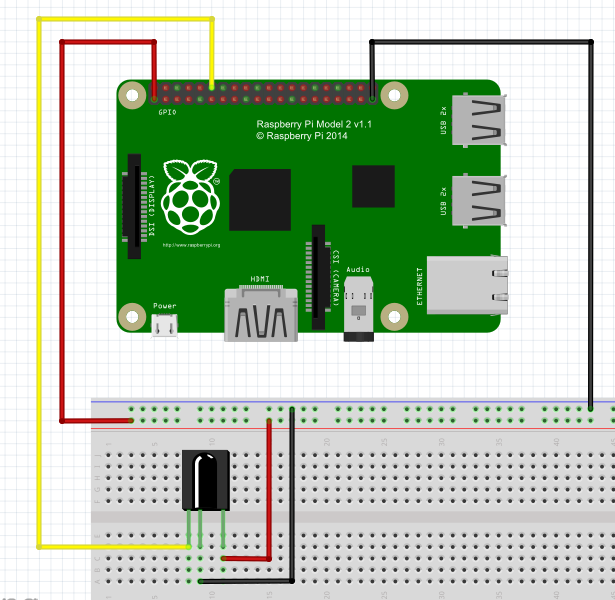
Circuit Connection Graph


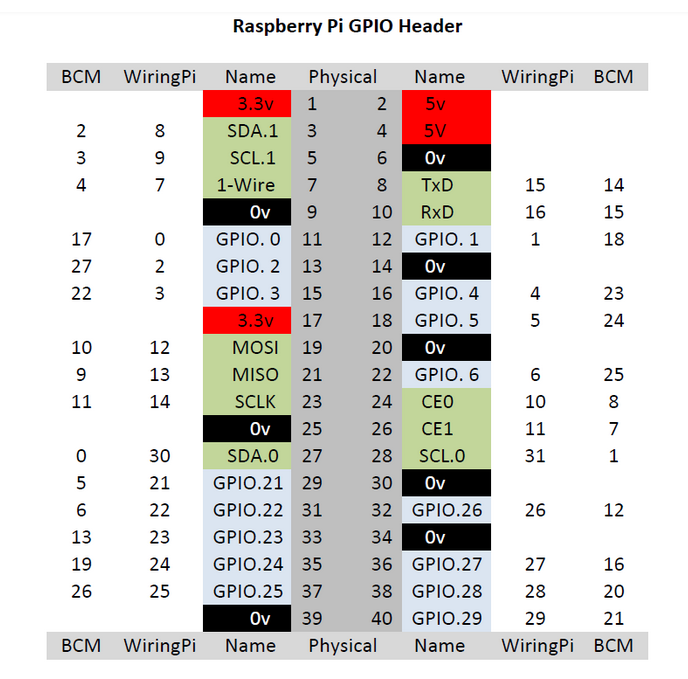
From above table, you can see our IR signal pin is connected to Wiring Pi#1 (Physical Pin#12).
Software Installation :
Option 1) To program in Python
Please download the python file by following terminal command:
wget -q http://osoyoo.com/driver/pi/ir.py -O ir.py
Then run the python code by following command
python ir.py
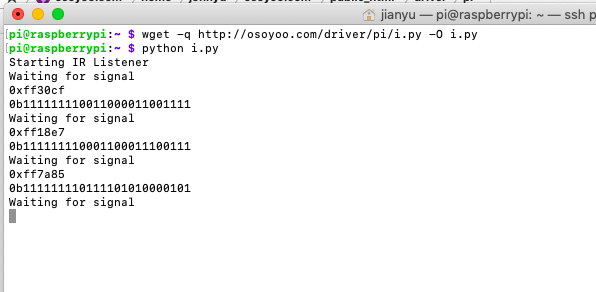
Put your IR remote close to IR receiver, press any key, you will see the key’s IR hex code and binary code.
For example, when you press number 1, 2 , 3 keys , you will see following result in terminal:

To exit the python program, press ctrl-C and click any key in IR remote controller.
Option 2) To program in C++
Please download the C++ code file by following terminal command:
wget -q http://osoyoo.com/driver/pi/ir.cpp -O ir.cpp
Then Install WiringPi GPIO library by following command if you haven’t installed it.
sudo apt-get install wiringpi
Now we can compile the ir.cpp code file with g++ compiler command :
g++ -Wall -o ir ir.cpp -lwiringPi
Finally we can run the program by following command:
./ir
Now press number 1,2,3 keys in IR remote , you will see following result
pi@raspberrypi:~ $ ./ir
setup wiringPi
waiting data
IR code: f730cf
IR code: ff18e7
IR code: ff7a85
To use the IR remote to control some external device like LED etc, you can read following project:
https://osoyoo.com/2017/07/07/ir-remote/


