The OSOYOO Espro board is a credit-card-sized, mini ALL-IN-ONE Motor Control Board. It integrates an ESP32 MCU and an L293DD H-Bridge dual-channel motor control module, allowing users to program two sets of motors directly via the Arduino IDE to control a robot car’s movement.
In This project, we will use ESPro board to drive an OSOYOO 5-point tracking sensor module to make a line tracking project.
Pre-Connected GPIO pins between ESP32 and I/O devices
| L293 Pin |
ESP32 GPIO |
Function |
| IN1 |
23 |
Motor A Direction 1 |
| IN2 |
25 |
Motor A Direction 2 |
| IN3 |
26 |
Motor B Direction 1 |
| IN4 |
27 |
Motor B Direction 2 |
| ENA |
16 |
Motor A Speed (PWM) |
| ENB |
17 |
Motor B Speed (PWM) |
5-Point Line Tracking Module
The tracking sensor pins are mapped to the following ESP32 digital/analog inputs:
| Tracking Module |
S1 |
S2 |
S3 |
S4 |
S5 |
VCC |
GND |
| ESP32 GPIO |
33 |
35 |
34 |
39 |
36 |
3V3 |
GND |
It is important that the Line Tracking module is installed in the backside of robot Car if you start from the lesson 1 basic movement project.
Step 1)Install ESP32 Arduino Board
Connect the Espro Board to Desktop or Laptop computer with Type-C USB cable.
In Arduino Setting->Preference, please copy and past following link into Board Manager Url field:
https://raw.githubusercontent.com/espressif/arduino-esp32/gh-pages/package_esp32_index.json
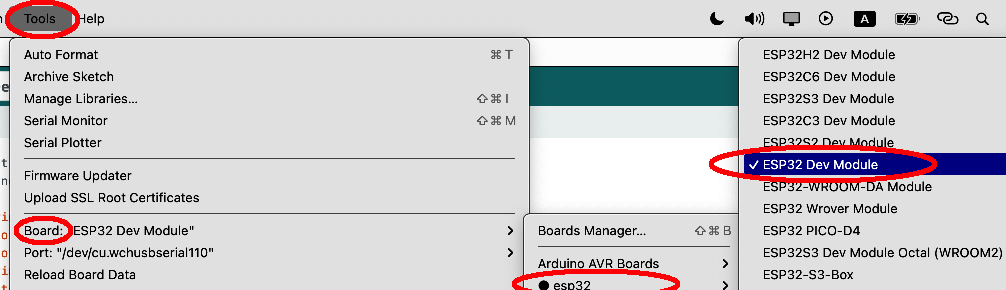
After you select OK, then in Tool->Board , then select esp32 ->ESP32 Dev Module
Then Select correct port which matches ESP32 board.
Step 2) Download Correct Sample Code and Upload to Arduino.
Sample Code:
https://github.com/osoyoo/espro_tracking/blob/master/espro-tracking.ino