Caution: This Installation guide is about customized image which is combinated 3.5″ LCD driver and a fresh OS (Raspbian, Kali, or Ubuntu). It’s simple to install both 3.5″ LCD driver and a fresh OS at once. If you don’t want to install customized image, please click the link as followed:
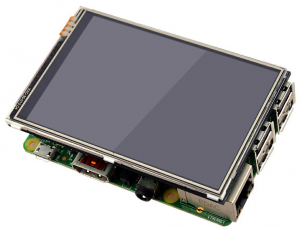
Step 1: Connecting touch screen LCD display to your Raspberry Pi

Step 2: Download LCD screen driver RAR file from Driver Download Tutorial Page
Step 3: Using WinRAR to unzip the driver image file downloaded from step 2). If you don’t have WinRAR, please download from WinRAR official website
Step 4: Prepare an newly formatted MicroSD memory card(TF card) with USB microSD card reader, recommend sizes are 8G, 16G, 32G. If you don’t know how to format MicroSD card, please download SDFormatter fromhttps://www.sdcard.org/downloads/formatter_4/.
Step 5: Download the Win32DiskImager utility from Sourceforge
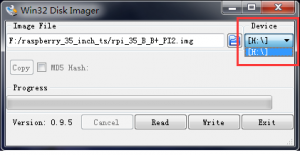
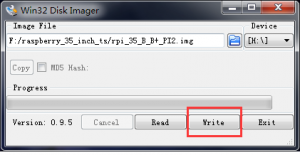
Step 6: Using Win32DiskImager to write image file(from Step 3) into MicroSD card.


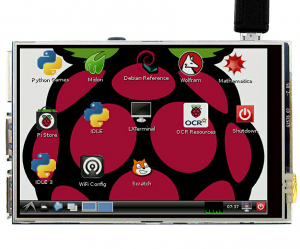
Step 7: Exit the imager and eject the MicroSD card, and now, insert MicroSD card into your raspberry pi and power it up. You should see the display come alive in a few seconds as following graph:
Attention:
Ubuntu OS login name:ubuntu password:ubuntu
Kali OS login name:root password:toor

Authorized Sellers:


how to enable spi ? ls /dev/spi* result ls: cannot access /dev/spi*: No such file or directory
To enable SPI, pls try to the following way:
1) run shell command: sudo raspi-config
2) Then select Advance Options and enable SPI
I already tried this
1) run shell command: sudo raspi-config
2) Then select Advance Options and enable SPI
/boot/config.txt, dtoverlay=spi-on not work :/
sorry **dtparam=spi=on**
Do you mean you want to change the SPI value of the LCD? It can’t change, but just to enable SPI when you connect the LCD with your raspberry pi.
hi
is it possible to switch monitor or backlight off from raspbian shell?
or to configure to go to sleep when not in use?
thanks
It can’t configure to go to sleep when not in use
the above question is for version 6.3
also, what is the controller used for version 6.3 please?
Touch Screen Controller: XPT2046
thanks very much for a prompt reply.
i do have another question:
is it possible to make version 6.3 screen work with standard raspbian fbtft drivers? (in forums often also called norto’s drivers)?
I’m sorry we don’t research for this.
I understand, but this would be an extremely helpful feature.
I am happy to research and try this myself, but would need more information from you to start.
Ideally, it would help hugely if you could send me the source code for the
I understand, but this would be an extremely helpful feature.
I am happy to research and try this myself, but would need more information from you to start.
Ideally, it would help hugely if you could send me the source code for the drivers you supply.
or at least details about which chip is used to control the LCD (not the touchscreen but the LCD itself)
thanks
The supply don’t agree to give us the source code
naughty them and silly them, this would help improve their sales – many people on forums complain about it not working with fbtft
but thank you very much for your help elaine 🙂
We have chatted with the supplier for many times, but they don’t allow to give us.
How do you rotate the screen 90 degrees? Currently it is landscape I would like to use it as portrait. Thank you
Do you mean you want to rotate the display of the LCD?
If so, it can’t rotate the display.
Yes, I want to be able to use it like this:
_________
| |
|vertical|
| screen |
| |
| |
| |
———-
Sorry for the poor attempt at representing the screen.
Any change the drivers could support rotation?
I’m sorry the LCD can’t support rotation.
When i connect the raspberry pi to Tv with Hdmi, there is no picture/video on the TV. But on the screen there is picture/video.how can i temporarily disable the video on lcd in order to get the video with hdmi
Change 3.5’’ LCD display to HDMI display:
1) Input command: cd LCD_show_v6_1_2, then press enter button.
2) Input command: ./LCD_dhmi, press enter button.
3) The raspberry will reboot.
4) Your HDMI should be display correctly.
starting from which directory?
default is /home/pi and there is no such directory as “LCD_show_v6_1_2” in /home/pi
Raspbian Direction: Pi.
If you don’t find, pls refresh raspberry pi.
dont work on kaliOS…
Hi friend,
Do you solve this issue?
I’m sorry that there are something wrong with our website before, and I can’t see your comment.
If any query, please feel free to contact with my email address: [email protected].
Elaine
Hello, some programs do not fit on the screen, so I can not click the OK button for example. How do I fix this? The resolution of my screen is 480 x 320. Thanks.
PS. Raspberry Pi Configuration is an example.
Please try to press “ctrl+alt+f1”
and then enter command “sudo raspi-config”
to esc the window, please press “ctrl+alt+f7”
After I install the supplied OS my RPI boots up and uses the touchscreen as intended. If I run the apt-get upgrade the screen no longer works after a reboot. Is there a way to stop this from happening?
The OS is combinated with 3.5″ LCD driver. You can’t upgrade the OS. You can try the link:
For Raspbian: https://osoyoo.com/2016/09/13/install-raspberry-pi-3-5-touch-screen-driver-for-raspbian-jessie/
For Ubuntu: https://osoyoo.com/2016/09/13/install-raspberry-pi-3-5-touch-screen-driver-for-ubuntu-mate/
What about updating the packages that come with it?
I have a version 1.1 2017/2/1 model… your downloads only show 2.x and up.
Which version do I download?
Pls try the link: https://drive.google.com/file/d/0B6yht2NfeHVjZ0Y4S214UTAyQnc/view?usp=sharing
What worries me most now is that the screen returned to the original whiteness state at the first apt-get upgrade command. To be sure, I reinstalled the Raspbian version provided by Osoyoo again and ran the apt-get update / apt-get upgrade command before installing any other non-system packages and still got the same erratic behavior from the screen. It seems that if I want my Osoyoo LCD to continue working I can not run a full update procedure. Is there any way to not crash the view and keep the system up to date? This would be ideal. Another thing that needs to be implemented is the ability to switch between screens without the need to prepare another system on another card. I do not need two screens working at the same time, but I’d like to rely on automatic screen signal adressing.I think this is the most desired feature for Raspberry Pi users right now. Thanks.
Hi. Can we use this display with RuneAudio?
it can’t display with RuneAudio.
How do I install the tft driver on a card I already use the raspbian?
Could you send me a tutorial?
Please try the link: https://osoyoo.com/2016/09/13/install-raspberry-pi-3-5-touch-screen-driver-for-raspbian-jessie/
Tks 😉
Download the driver (don’t open it)
Copy it to your RaspberryPi
Login to your Pi:
$ tar -xzf LCD_show_v6_1_3.tar.gz
$ cd LCD_show_v6
and run:$ ./LCD35_v
pi reboots and working 😉
Tks 😉
Tks 🙂
it works perfectly
I would like to use the 3.5″ LCD display with USB mouse and keyboard. Is that possible or does the touch screen portion need to be disabled somehow?
Do you mean the USB mouse and keyboard can work with the touch function?
Yes, it can.
I have installed the driver image into an SD card and then I inserted into the raspberry pi but results showing an white blank screen not at all changing.pls help
How can I calibrate the touchscreen (ver. 6.3)?
Please update the kernel to 4.9 or give the driver this is crap man.
Sorry its working, thanks for the driver and support!
Hi there,
I am running Kali linux and would like to use the hdmi to the tv, how do I go about doing that? I tried to follow the instructions above but it appears to be for rasperian and unsure which path to start. Currently I am on the root of cmd
Dears,
I got the image of raspbian with diver version 6.3 but I am not able to extract it, every time I extract it I got error I am not able to move on, I m stuck here. I have ma raspberry pi 3 with the screen but not able to use them.
Please advise.
Thank you,
Fadi
I got the same error downloading from kookye page but after poking links I got rpi_35_v6_1_2_3_jessie_kernel_4_4_50 which I can extract. But when I tried to use this image on the RP I only got a white screen
hi
i bought this kedei spi tftlcd 6.3 . to use on rpi 2.
downloaded rpi_35_v6_1_2_3_stretch_kernel_4_13_16.rar from your link. lcd started after reboot but the touch does not work…
if i turn spi on, the pi gets so slow it takes ages (5 min) to open a terminal window and same to uparrow to a previous command takes minutes…
and now i cant get back to use hdmi. done as ur guide tells. after reboot desktopn is still on the lcd
any ideas ?
Turning on spi in hdmi mode pi runs flawless
And when ./LCD35_v it almost freezes
Hi,
I have a Raspberry Pi 3, and TFT screen version 6.3. I’ve followed the instructions and installed Raspian from the recommended download. When I start the Raspberry Pi, all I get are 4 Raspberry images on the screen and some writing that I can’t read.
I’ve formatted the card and tried a lesser build (6.2) but this is still the same, please advise.
trying to run kali Linux but gets stuck on freeing unused kernel memory
any one know a soloution
Hello all,
Actually, there is an install procedure that is quite easy and works on ANY linux based OS on the PI. After following different proceedures and NONE of them worked, the following link will provide you with the fastest and most fool-proof procedure. I found it easy and worked right away.
https://www.raspberrypi.org/forums/viewtopic.php?t=175616
This is for screens that have the KeDei logo appear as soon as you power it.
is there gonna be support for Raspberry pi3B+ anytime soon?
Good question! I tried over 3 days to install the drivers, but nothing…I have PI 3 B+ and the Spi LCD v6.3. I tried all the OS from this website (and Kedei.net), but my PI doesn’t want to start. White screen on the LCD and that rainbow logo on the TV. I think the image is not recognized by the 3 B+. If I try to install just the driver on a fresh raspian (from original site), after reboot my PI does’t start anymore. Some boot errors appear…
Hello, i downloaded the ubuntu image and the display works fine.
but the password you give above seems to be incorrect. the user is pi@pi-dekstop, not ubuntu. the pw isnt ubuntu… please give me the correct pw. thank you
i downloaded raspbian… same. that sucks.
Hi friend,
Do you solve this issue?
I’m sorry that there are something wrong with our website before, and I can’t see your comment.
If any query, please feel free to contact with my email address: [email protected].
Elaine
Hello, I have 3 screens version 6.3 . I just reinstalled one of my RPi 3B+ and I got revered colours, if I sed the screen back on the other RPi it works fine. the same with the 2 other screens.
I redo all by two ways:
1) using the full image you propose : colors are reverted
2) using a fresh image and adding the drivers : colors are reverted
is-it possible the driver has an issue with that version or RPi ?
Hello,
I recently got a Raspberry Pi screen — the KeDei 3.5 inch SPI TFT LCD (480×320, 16bit/18bit, version 6.3, 2016/11/1).
Unfortunately, the links to download the drivers are no longer working or do not contain any files.
I would like to use this screen with a Raspberry Pi Pico 2 W.
Could you please share the drivers with me or let me know how I can get them?
Thank you in advance for your help!
hi, Are you using this screen for Raspberry Pi or Raspberry Pi Pico? This screen is designed for Raspberry Pi which is a Single Board Computer(SBC), not for Raspberry Pi Pico which is a MCU(microcontroller). SBC and MCU are totally different items.
Sorry, that was my mistake — I’m actually using a Pi ZERO 2 W, not a Pi Pico.