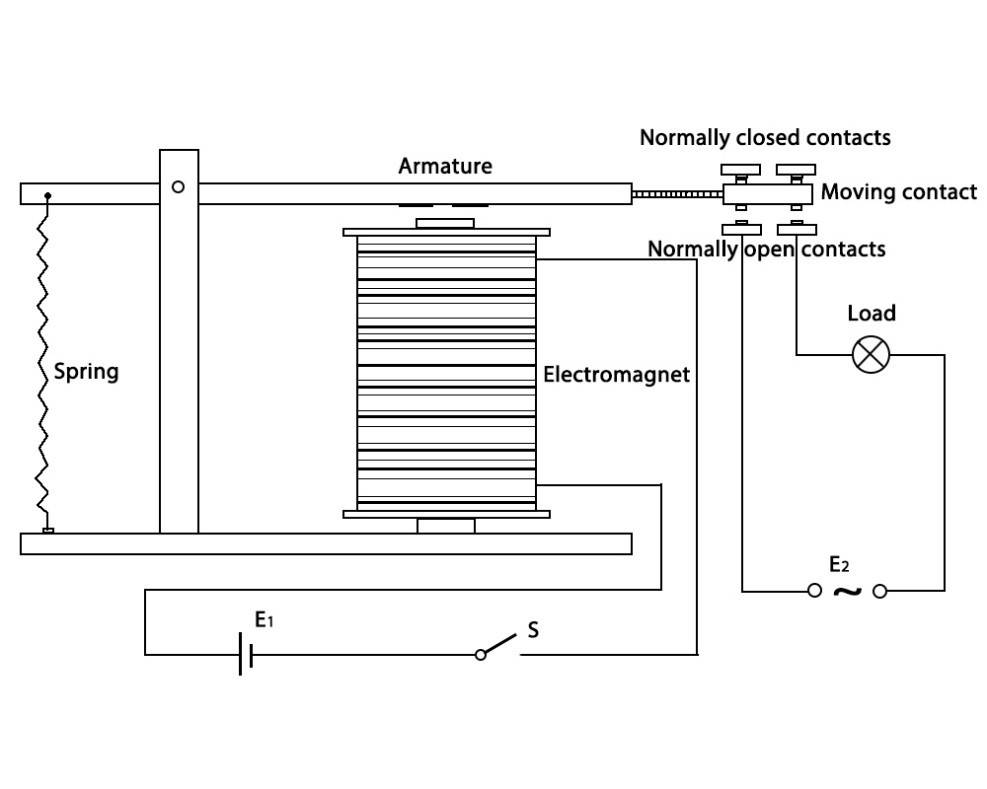
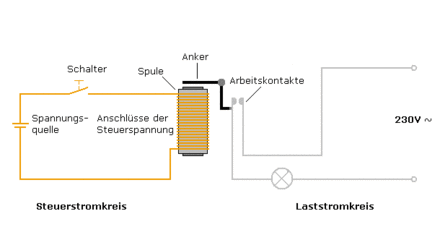
Work Principle
Relay is an electronic switch which allows low power digital signal to turn on/off a high power circuit. A relay has at least one pair of input pins and one pair output pins(output switch). When input gets digital signal 1 (high voltage), Relay will make output switch on. If Input pins get digit zero, it will make output switch off.
The construction and working of a relay can be understood from the below diagram.
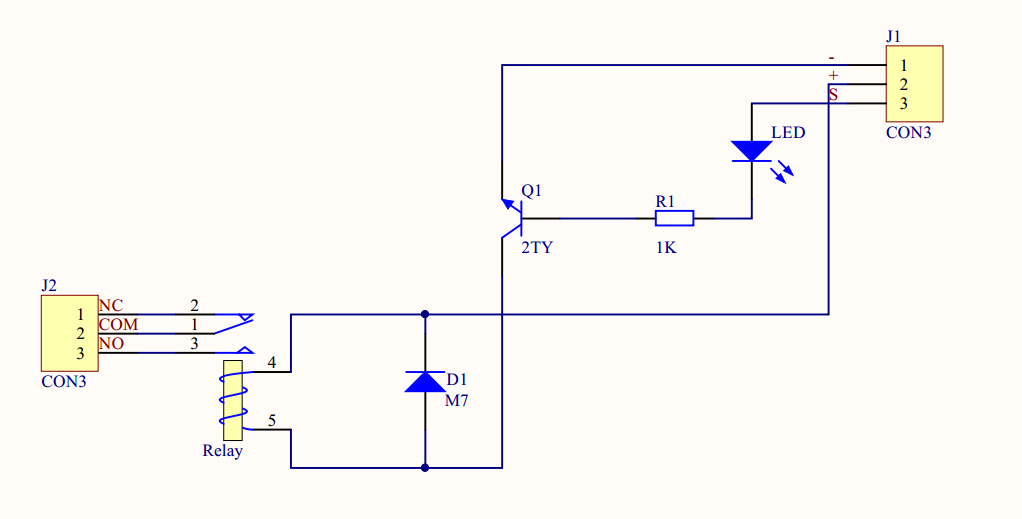
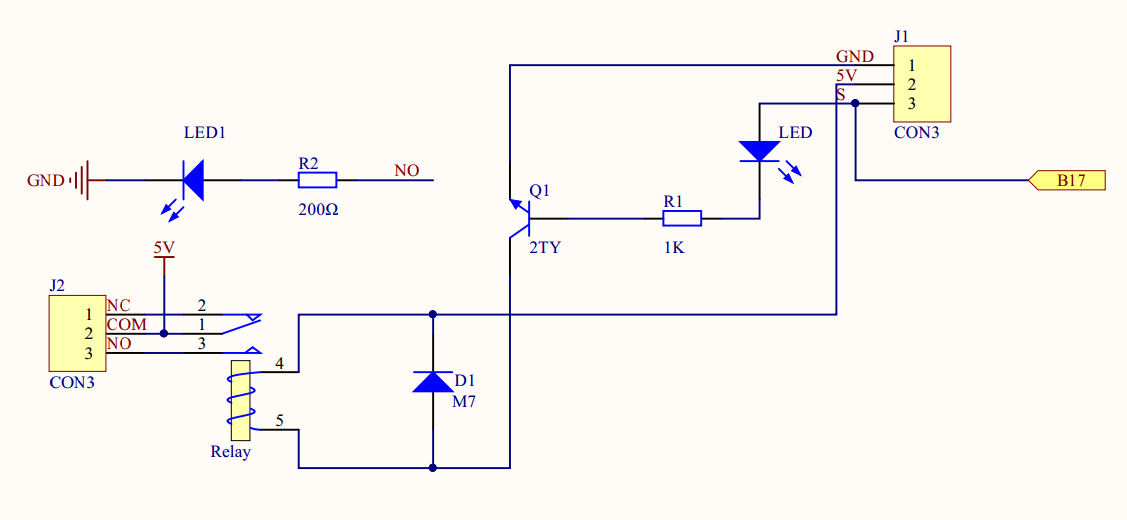
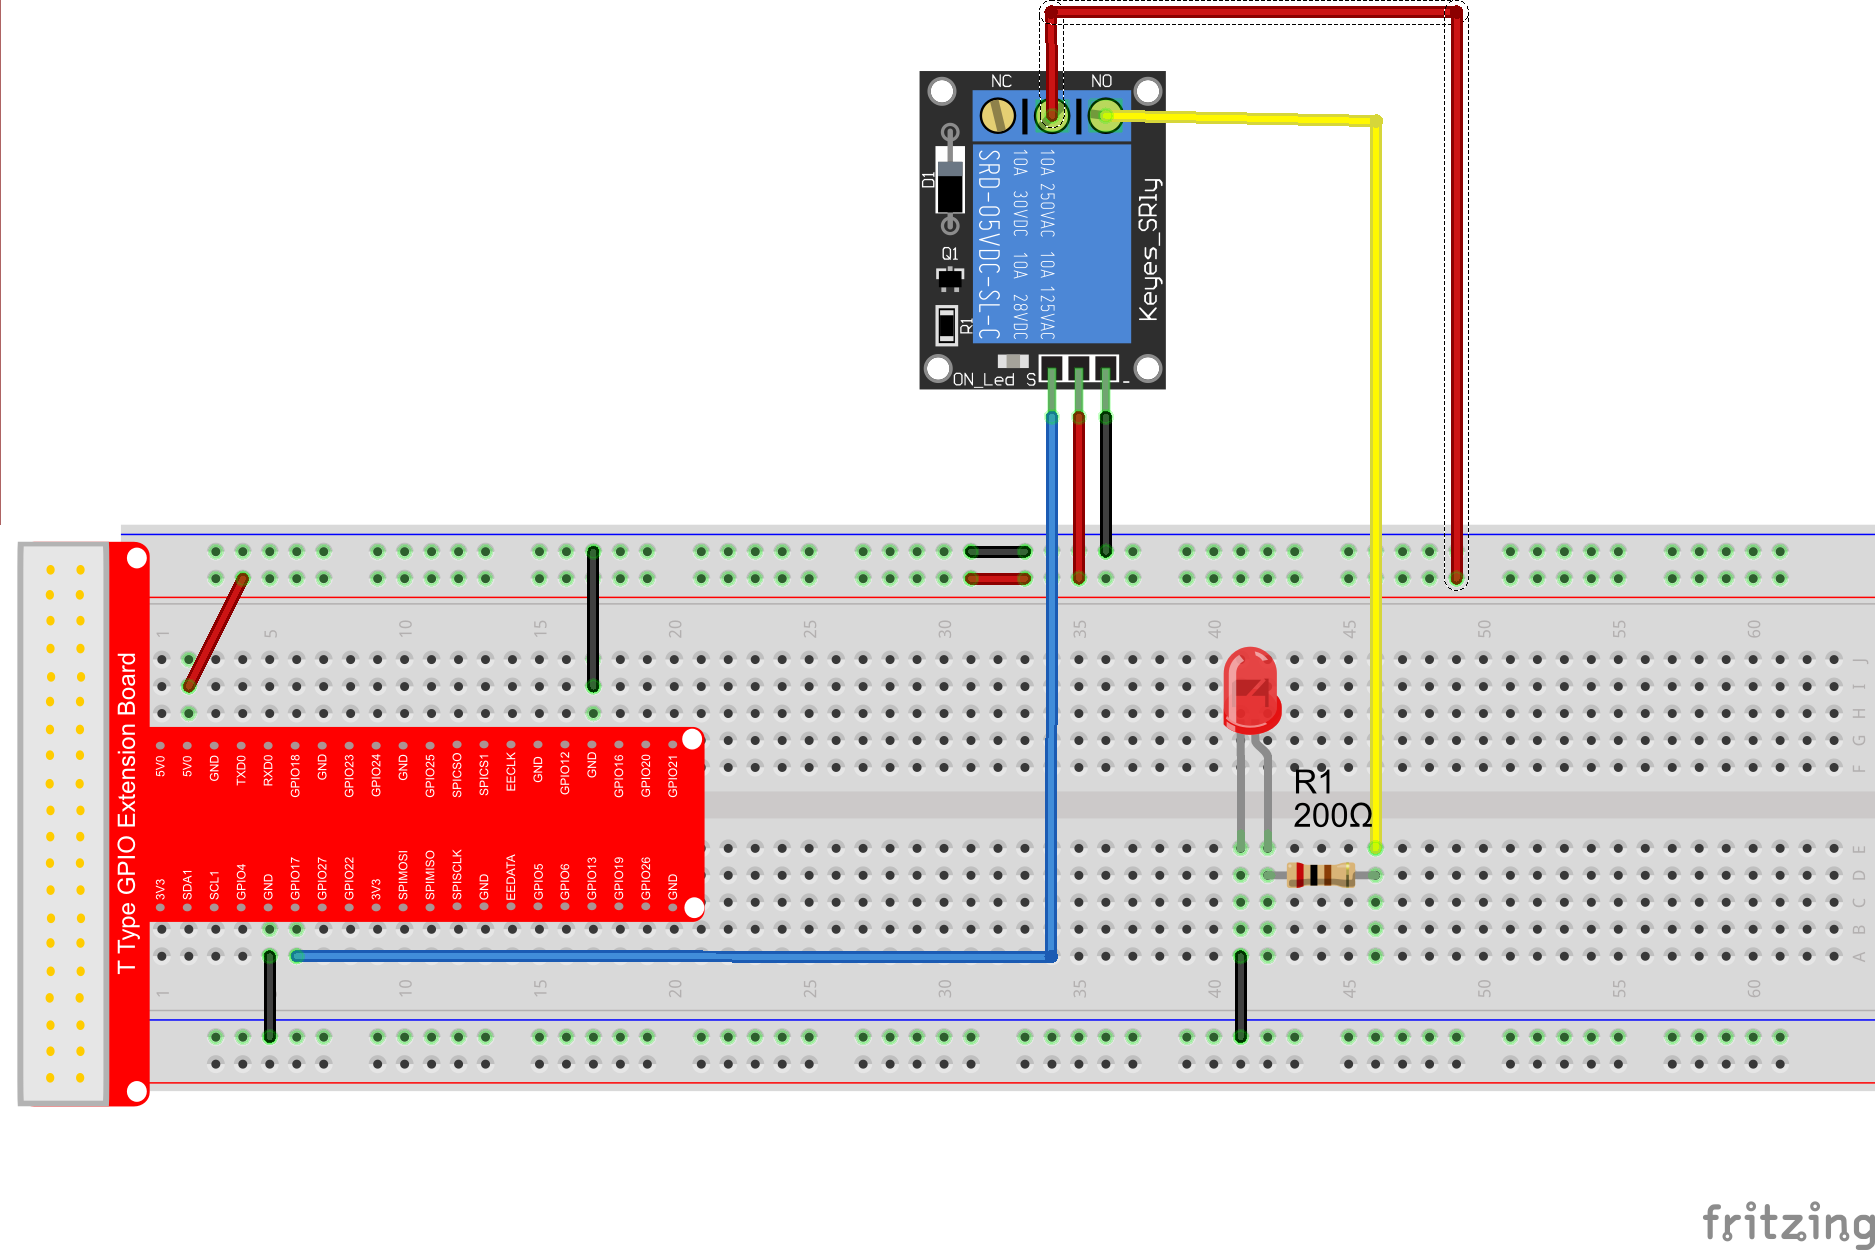
Hardware Setup
Assembling the Circuit as per following Connection Graph, the relay output to LED, the relay signal lead to Raspberry Pi GPIO 0(BCM_GPIO 17). When a high voltage is applied to relay, the LED will light up. when a low voltage(0V) is applied to relay. The LED will turn off.
Sample Code
We’ll provide two kinds of codes for C language users and Python language users.
For C Language users, please follow the next step:
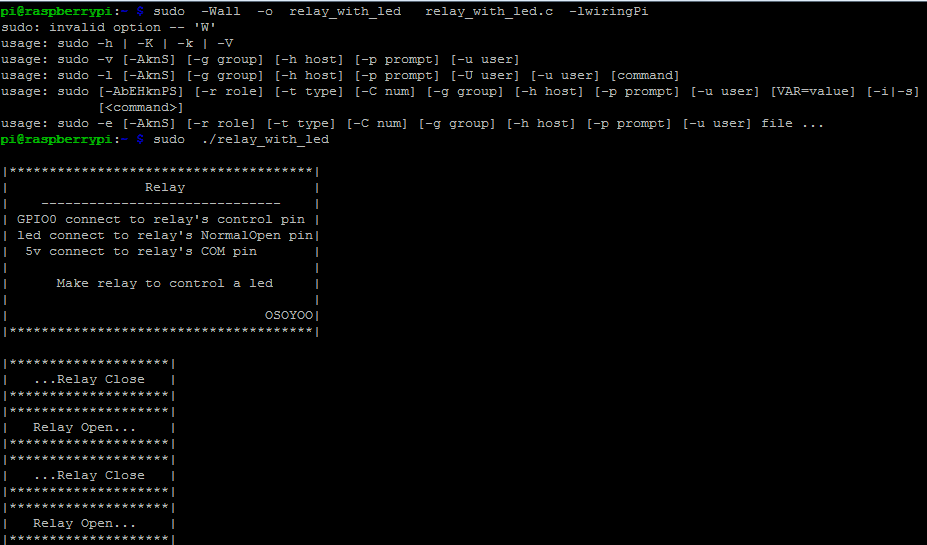
If you want to customize the sample code file , you can use nano editor to edit source code by typing following command: sudo nano relay_with_led.c
Step 2) Compile Code
C language is high level language. Before running the project, the source code needs to be compiled as an executable file. Please compile the relay_with_led.c file by typing following command: gcc -Wall -o relay_with_led relay_with_led.c -lwiringPi Note: gcc: is GNU Compiler Collection. If you want to write your own C code and compile to run it, you need to master gcc. for more information about gcc, please visit here -Wall: to get more error when compile the code -o: to name the compiled file. You can name the file as your like. here we name as relay_with_led flow_led.c: means the original file which is compiled -lwiringPi: is to load the library wiringPi (l is short for library)
Step 3)Run the program sudo ./relay_with_led
Step 4) Test Result
Once run the program, the replay will make tick-tock sound. In addition, you should see the LED Blink.
C language Code Analysis
#include < wiringPi.h >
#includeM < stdio.h >
#include < stdlib.h >

#define  RelayPin  0

int main(void){
    if(wiringPiSetup() == -1){ //when initialize wiring failed, print messageto screen
        printf("setup wiringPi failed !");
        exit(1);
    }

    pinMode(RelayPin, OUTPUT);   //set GPIO0 output

    printf("\n");
    printf("|**************************************|\n");
    printf("|                 Relay                |\n");
    printf("|    ------------------------------    |\n");
    printf("| GPIO0 connect to relay's control pin |\n");
    printf("| led connect to relay's NormalOpen pin|\n");
    printf("|  5v connect to relay's COM pin       |\n");
    printf("|                                      |\n");
    printf("|      Make relay to control a led     |\n");
    printf("|                                      |\n");
    printf("|                                OSOYOO|\n");
    printf("|**************************************|\n");
    printf("\n");

    for(;;){
        // disconnect
        printf("|********************|\n");
        printf("|   ...Relay Close   |\n");
        printf("|********************|\n");
        digitalWrite(RelayPin, LOW);
        delay(1000);
        // connect
        printf("|********************|\n");
        printf("|   Relay Open...    |\n");
        printf("|********************|\n");
        digitalWrite(RelayPin, HIGH);
        delay(1000);
    }

    return 0;
}
For Python language user:
If your Raspberry Pi is connected with a Monitor through HDMI cable,then you can program in Python 3(IDLE) GUI environment directly,for more details please visit:
If your Pi is not connected with a monitor, you can use command line to remote access Pi through ssh client. for more details, please visit:
Step 1) download relay_with_led.py file by typing following command in terminal:
If you want to customize the sample code file , you can use nano editor to edit source code by typing following command:
sudo nano relay_with_led.py
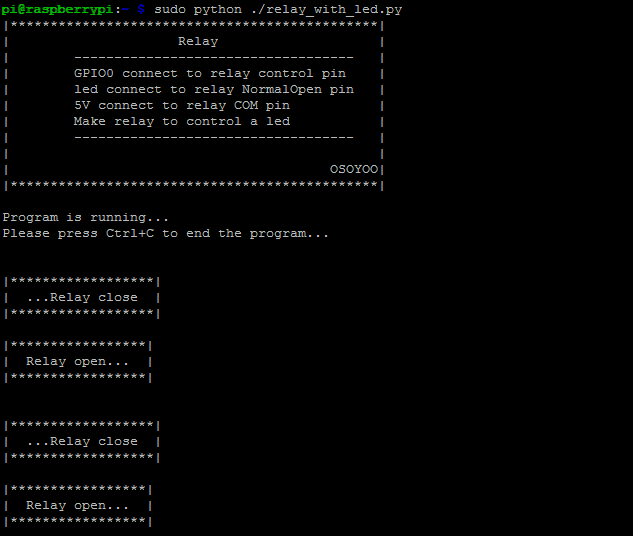
Step 2) Run Program
sudo python ./relay_with_led.py
Step 3) Test Result
Once run the program, the replay will make tick-tock sound. In addition, you should see the LED Blink.
Python language Code Analysis
import RPi.GPIO as GPIO
import time

# set BCM_GPIO 17 as relay pin
RelayPin = 17

#print message at the begining ---custom function
def print_message():
    print ('|**********************************************|')
    print ('|                     Relay                    |')
    print ('|        -----------------------------------   |')
    print ('|        GPIO0 connect to relay control pin    |')
    print ('|        led connect to relay NormalOpen pin   |')
    print ('|        5V connect to relay COM pin           |')
    print ('|        Make relay to control a led           |')
    print ('|        -----------------------------------   |')
    print ('|                                              |')
    print ('|                                        OSOYOO|')
    print ('|**********************************************|\n')
    print ('Program is running...')
    print ('Please press Ctrl+C to end the program...')
    print ('\n')

#setup function for some setup---custom function
def setup():
    GPIO.setwarnings(False)
    #set the gpio modes to BCM numbering
    GPIO.setmode(GPIO.BCM)
    #set RelayPin's mode to output,and initial level to LOW(0V)
    GPIO.setup(RelayPin,GPIO.OUT,initial=GPIO.LOW)

#main function
def main():
    #print info
    print_message()
    while True:
        print ('|******************|')
        print ('|  ...Relay close  |')
        print ('|******************|\n')

        #disconnect
        GPIO.output(RelayPin,GPIO.LOW)
        time.sleep(1)

        print ('|*****************|')
        print ('|  Relay open...  |')
        print ('|*****************|\n')
        print ('')
        #connect
        GPIO.output(RelayPin,GPIO.HIGH)
        time.sleep(1)

#define a destroy function for clean up everything after the script finished
def destroy():
    #turn off relay
    GPIO.output(RelayPin,GPIO.LOW)
    #release resource
    GPIO.cleanup()
#
# if run this script directly ,do:
if __name__ == '__main__':
    setup()
    try:
            main()
    #when 'Ctrl+C' is pressed,child program destroy() will be executed.
    except KeyboardInterrupt:
        destroy()