Note: ALL OSOYOO Products for Arduino are Third Party Board which is fully compatitable with Arduino
Authorized Online Retailers:
Content
- Introduction
- Preparations
- About the button
- Connection
- Upload Sketch
- Program Running Result
Introduction
In this lesson,we will show how to use an active buzzer to make some noise.

Preparations
Hardware
- OSOYOO Basic Board (Fully compatible with Arduino UNO rev.3) x 1
- Breadboard x 1
- Active Bzzer x 1
- M/M jumpers
- USB Cable x 1
- PC x 1
Software
Arduino IDE (version 1.6.4+)
About Buzzer
As a type of electronic buzzer with integrated structure, buzzers, which are supplied by DC power, are widely used in computers, printers, photocopiers, alarms, electronic toys, automotive electronic devices, telephones, timers and other electronic products for voice devices. Buzzers can be categorized as active and passive ones (see the following picture). Turn the pins of two buzzers face up, and the one with a green circuit board is a passive buzzer, while the other enclosed with a black tape is an active one.
The difference between an active buzzer and a passive buzzer is:
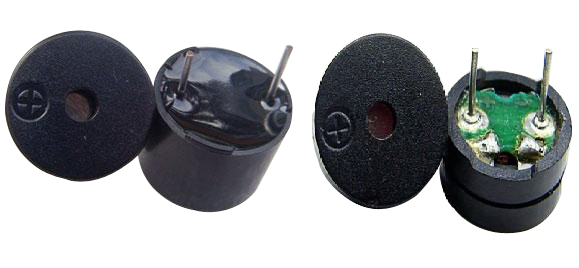
An active buzzer has a built-in oscillating source, so it will make sounds when electrified. But a passive buzzer does not have such source, so it will not tweet if DC signals are used; instead, you need to use square waves whose frequency is between 2K and 5K to drive it. The active buzzer is often more expensive than the passive one because of multiple built-in oscillating circuits.In this lesson, we use the active buzzer.
Note:
The active buzzer has built-in oscillating source, so it will beep as long as it is electrified, but it can only beep with a fixed frequency.
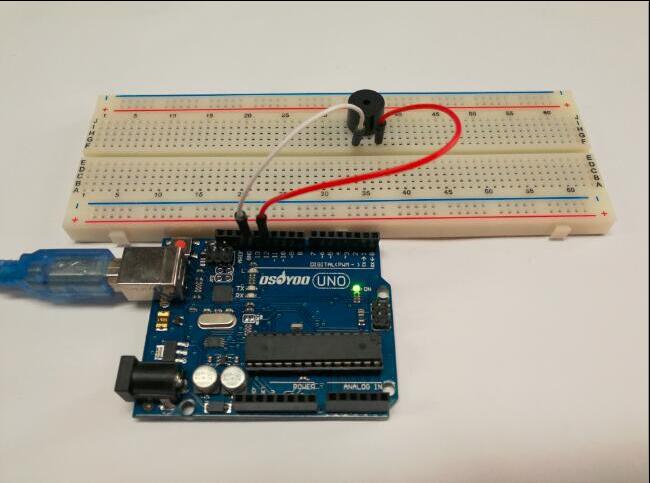
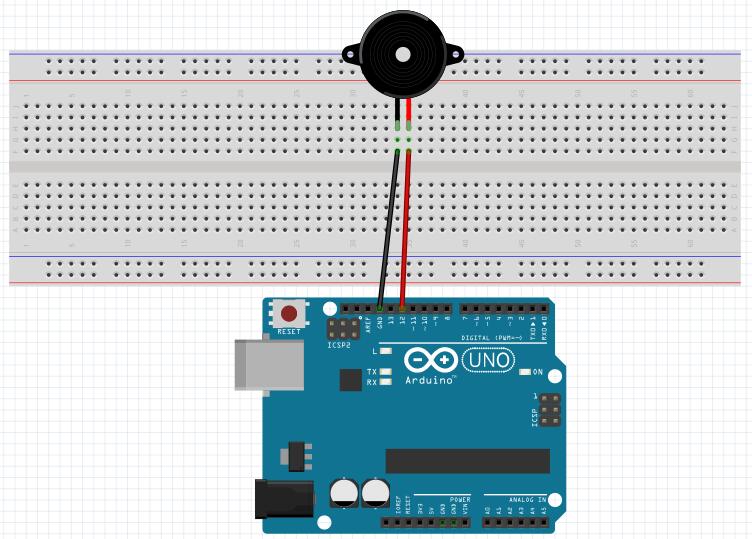
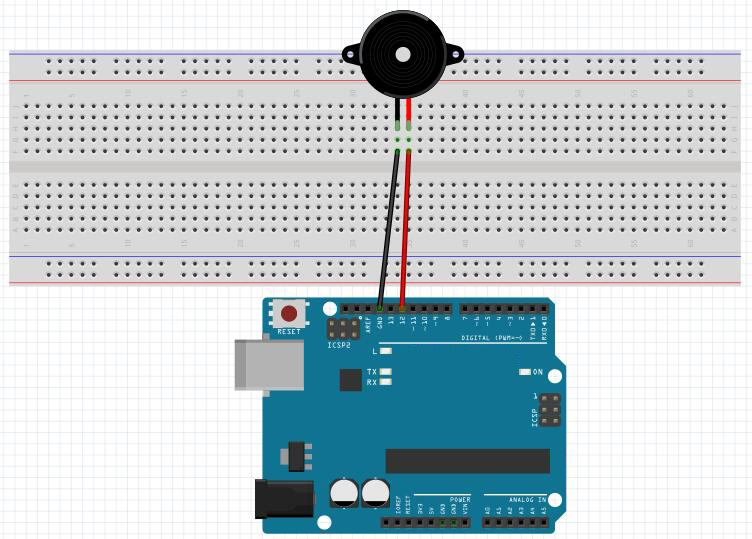
Connection
In this part, the only thing on the breadboard is the active buzzer. One pin of the active buzzer goes to GND connection and the other to digital pin 12.Build the circuit as below:
Upload Sketch
After above operations are completed, connect the OSOYOO Basic Board to your computer using the USB cable. The green power LED (labelled PWR) should go on.
Code Program
You can download the sketch from this link or copy below code to your Arduino IDE window:
int buzzer = 12;//the pin of the active buzzer
void setup() {
pinMode(buzzer,OUTPUT);//initialize the buzzer pin as an output
}
void loop() {
unsigned char i;
while(1)
{ //output an frequency
for(i=0;i<80;i++) {
digitalWrite(buzzer,HIGH);
delay(1);//wait for 1ms
digitalWrite(buzzer,LOW);
delay(1);//wait for 1ms
} //output another frequency
for(i=0;i<100;i++) {
digitalWrite(buzzer,HIGH);
delay(2);//wait for 2ms
digitalWrite(buzzer,LOW);
delay(2);//wait for 2ms
}
}
}
Compile and upload
Open the Arduino IDE and select corresponding board type and port type for your OSOYOO Basic Board.

After compile this sketch, simply click the “Upload” button in the environment. Wait a few seconds – you should see the RX and TX leds on the board flashing. If the upload is successful, the message “Done uploading.” will appear in the status bar.
Running Result
A few seconds after the upload finishes, you should hear the buzzer beep.
Note again:
The active buzzer has built-in oscillating source, so it will beep as long as it is electrified, but it can only beep with a fixed frequency.