
| Buy from US |
Buy from UK |
Buy from DE |
Buy from IT |
Buy from FR |
Buy from ES |
 |
 |
 |
 |
 |
 |
I. Objective:
In this lesson, we will use 2 black/white tracking sensors to read data and automatically guide the smart car to move along the black track line in the white ground.
II. How It Work:
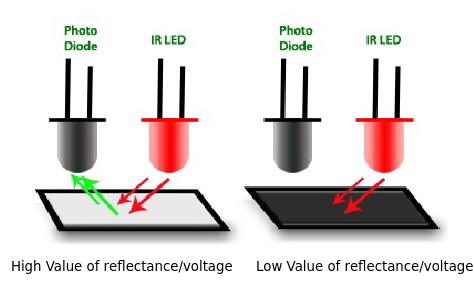
There are two probe on tracking sensor module,one is sender diode(IR LED) and the other one is receiver diode(Photo Diode).
If the tracking sensor is not on black track,the infrared ray from IR LED can be reflected and received by photo diode. The sensor will output low level.
If the tracking sensor is on black track,the infrared ray from IR LED can not be reflected and not received by photo diode. The sensor will output high level.
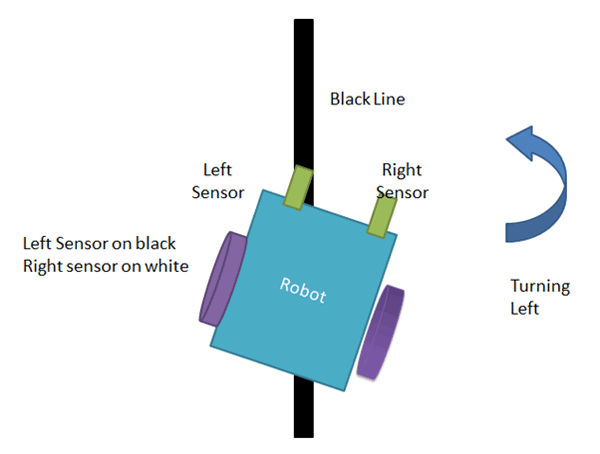
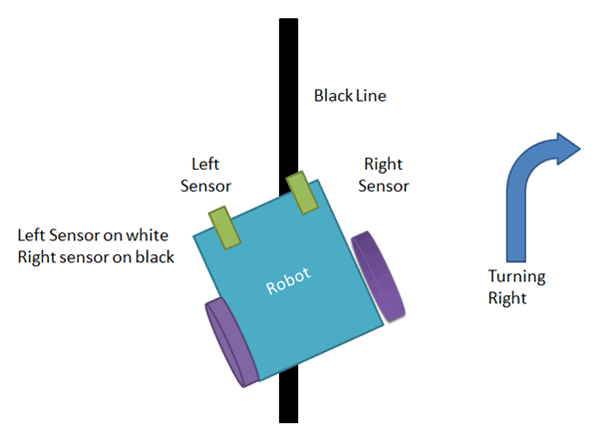
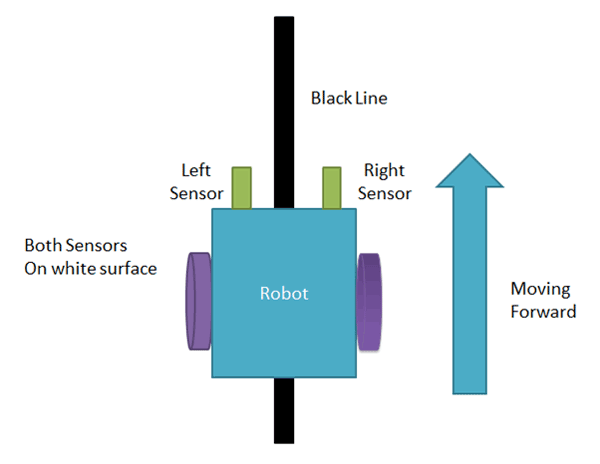
There are 2 tracking sensor on left and right. When the left tracking sensor on black line, the tank car will turn left. When the right tracking sensor on black line, the tank car will turn right. When the left and right tracking sensor on both sideways of black line, the tank car will go straight. When both tracking sensor are on black line,the tank car will stop.
III. Software Installation:
Step 1: Install latest Arduino IDE (If you have Arduino IDE version after 1.1.16, please skip this step)
Download Arduino IDE from https://www.arduino.cc/en/Main/Software?setlang=en , then install the software.
Step 2:Download Lesson 5 sample code from http://www.kookye.com/download/car/tank_robot_lesson5.zip , unzip the download zip file tank_robot_lesson5.zip, you will see a folder called tank_robot_lesson5.
Step 3: Connect UNO R3 board to PC with USB cable, Open Arduino IDE -> click file -> click Open -> choose code “tank_robot_lesson5.ino” in tank_robot_lesson5 folder, load the code into arduino.

Step 4: Choose corresponding board and port for your project,upload the sketch to the board.

IV. Understanding the Code:
Step 1: Define the pinout of left and right tracking sensor.
#define LFSensor_1 A0 //line follow sensor1
#define LFSensor_2 A1 //line follow sensor2
Step 2:Read the signal from tracking sensor and store the signal value.
void read_sensor_values()
{
  sensor[0]=digitalRead(LFSensor_1);
  sensor[1]=digitalRead(LFSensor_2);
}
Step 3:Control the tank car movement. The structure of auto_tarcking() can get the left and right sensor signal via call the structure of read_sensor_values(),then judge the signals via “if “control structure.
void auto_tarcking(){
  read_sensor_values();
  if((sensor[0]==LOW)&&(sensor[1]==HIGH)){ //The right sensor is on the black line.The left sensor is on the white line
    set_motorspeed(M_SPEED1,M_SPEED1);
    turn_right(250);
  }
  else if((sensor[0]==HIGH)&&(sensor[1]==LOW)){//The right sensor is on the white line.The left sensor is on the black line
    set_motorspeed(M_SPEED1,M_SPEED1);
    turn_left(250);
  }
  else if((sensor[0]==LOW)&&(sensor[1]==LOW)){//The left an right sensor are on the white line.
    set_motorspeed(M_SPEED2,M_SPEED2);
    go_ahead();
  }
  else if((sensor[0]==HIGH)&&(sensor[1]==HIGH)){//The left an right sensor are on the blac
V. Hardware Installation:
Step 1: Install ESP8266 Expansion Board on UNO R3 board.

Step 2: Turn the switch of esp8266 to “1” and “2” position, as the following photo shows.

Step 3: Move the wire connected to pinout(GND,VCC,DO) in tracking sensor to the counterpart pin in expansion Board as the following picture.
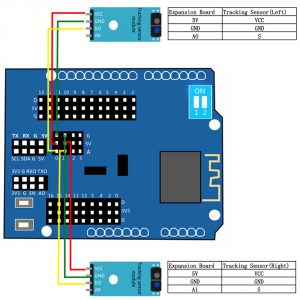
Step 4: Put two 12865 batteries in battery box and turn the swith of box to “ON”.
(If you have finished the above steps on lesson one, please skip these step)
Step 5:Testing. Press the OK button to make the tank car go along with black line.Press “o” to make the tank car stop.
Prepare a black track (the width of the black track line is more than 20mm and less than 30mm) in white ground.Please make sure that the width of black track line is less than the 1/3 distance of two tracking sensors. Please note, the bend angle of track can’t be larger than 90 degree. If the angle is too large, the car will move out of the track. Turn on the car and put the middle of tracking sensor module facing over black track, and then the car will move along the black track.
Note: Please adjust the sensitivity of tracking sensor as per the follow way and check the wire connections if the tracking sensor can not work as expected.
Connect ESP8266 wifi board to tracking sensor as the following graph. Put the Expansion board on UNO R3 board and connect Arduino UNO to PC with USB cable.Then adjust the potentiometer on the tracking sensor with cross screwdriver until you get the best sensitivity status: the signal indicate LED light will turn on when sensor is above white ground, and the signal LED will turn off when the sensor is above black track.
Your browser does not support the video tag.
Youtube link–https://youtu.be/VnSSC3FWFr0


