In this lesson, we will learn how to let the robot car has vision to see front environment and how to control the robot car through web browser or mobile APP.
To complete this task, we need install a web server software called “mjpg-streamer” in Raspberry Pi, this software will catch video from Robot Car camera and send the video to a web page.
We also need to install another web server software called “WebIOPi” in Raspberry Pi. This software will allow user to use browser to remotely control Raspberry Pi GPIO input/output and therefore control the movement of our robot motor.
Hardware Installation
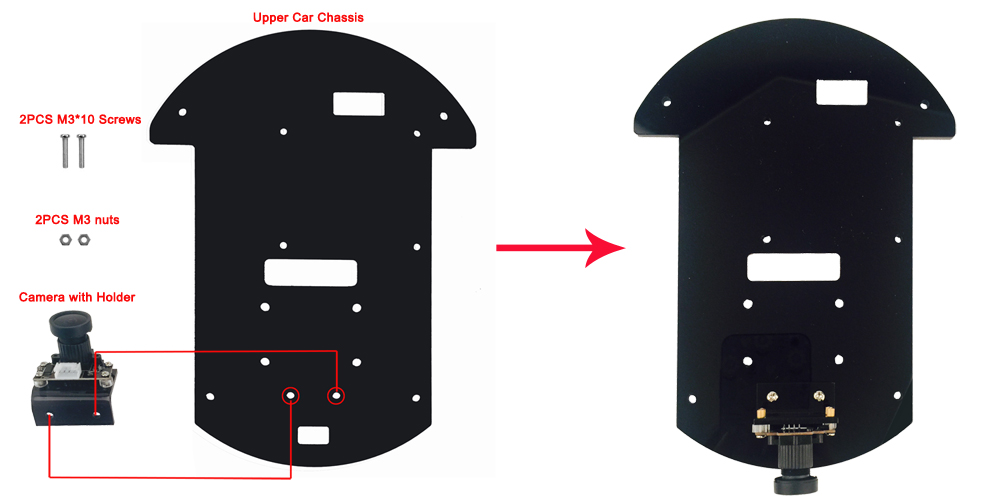
If you don’t install camera in lesson1, please install and connect camera as following pictures. If you have already installed and connected these, please skip this step.
Software Installation
Complex Installation Guide
If you are advanced user, you might want to install webiopi and mjpg-streamer by yourself in order to customize some feature such as port number etc. If this is the case, you can take following steps 1 to 8 to install and config webiopi and mjpeg-streamer separately. If you are a beginner, please avoid use this advanced guide. Just take simple guide which will make installation much easier for you.
Note:
1. If your micro SD card has pre-installed Osoyoo Robot Image,please skip Step 1 to Step 8 and direct Run Step 9: Testing
2. Please keep the Raspberry Pi on battery power when using SSH to send command to Raspberry Pi terminal remotely.
Step 1: Download WebIOPi installation package by running following terminal commands(skip this step if your micro SD card has pre-installed Osoyoo Robot Image)
cd ~
sudo  apt-get  install  rpi.gpio  -y
mkdir osoyoo-robot
mkdir osoyoo-robot/cam-robot
cd   osoyoo-robot/cam-robot
wget  http://osoyoo.com/driver/WebIOPi-0.7.1.tar.gz
wget  http://osoyoo.com/driver/mjpg-streamer.tar.gz
wget  http://osoyoo.com/driver/robot.tar.gz
tar  -xzvf  WebIOPi-0.7.1.tar.gz
tar  -xzvf   mjpg-streamer.tar.gz
tar  -xzvf  robot.tar.gz
Following Step 2 to 4 are for WebIOPI server Installation
Step 2: Download and install WebIOPi patch by running following terminal command(skip this step if your micro SD card has pre-installed Osoyoo Robot Image)
cd ~/osoyoo-robot/cam-robot/WebIOPi-0.7.1/
wget http://osoyoo.com/driver/webiopi-pi2bplus.patch
patch -p1 -i webiopi-pi2bplus.patch
Step 3: Install WebIOPi by running following terminal command(skip this step if your micro SD card has pre-installed Osoyoo Robot Image) sudo ./setup.sh
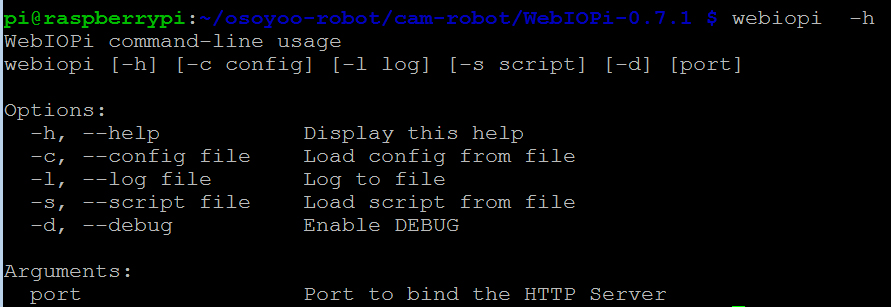
You need verify the installation by typing following command webiopi -h
If WebIOPi is installed successfully, you will see following message in terminal, otherwise you might need redo the download and installation.
Step 4: Run webiopi by typing following command:(skip this step if your micro SD card has pre-installed Osoyoo Robot Image)
sudo webiopi -d -c /etc/webiopi/config
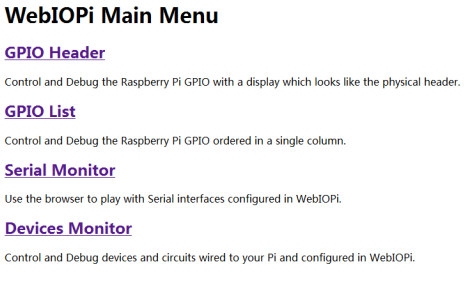
Use a browser in another computer (your computer/PAD/Phone in same LAN of your Pi) to visit your Pi’s IP address with port “8000” ( i.e http://192.168.0.115:8000, please replace 192.168.0.115 with your Pi’s local IP address), your browser will show WebIOPi login page. You need use default WebIOPi user name “webiopi” and default password “raspberry” to login to the server. Once you are logged into WebIOPi page, you will see WebIOPI Main Menu as following. If you can not see this page , you need to reinstall the WebIOPI software.
Please press “Ctrl” + “C” then “Ctrl” + “Z” in your terminal to end WebIOPi running.
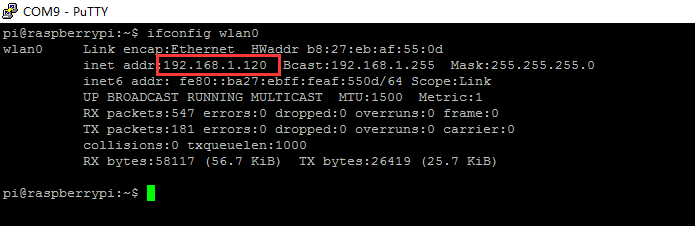
Note: If you don’t know your raspberry pi IP address, type following command in your terminal, ifconfig wlan0
Your raspberry Pi IP address is in the right side of the word inet addr:
Following Step 5 to 7 is for mjpg-streamer server Installation
Step 5: If you are using CSI camera , please take following action as per step A and B. (If you are using USB camera which comes with the car, please skip this step)(skip this step if your micro SD card has pre-installed Osoyoo Robot Image)
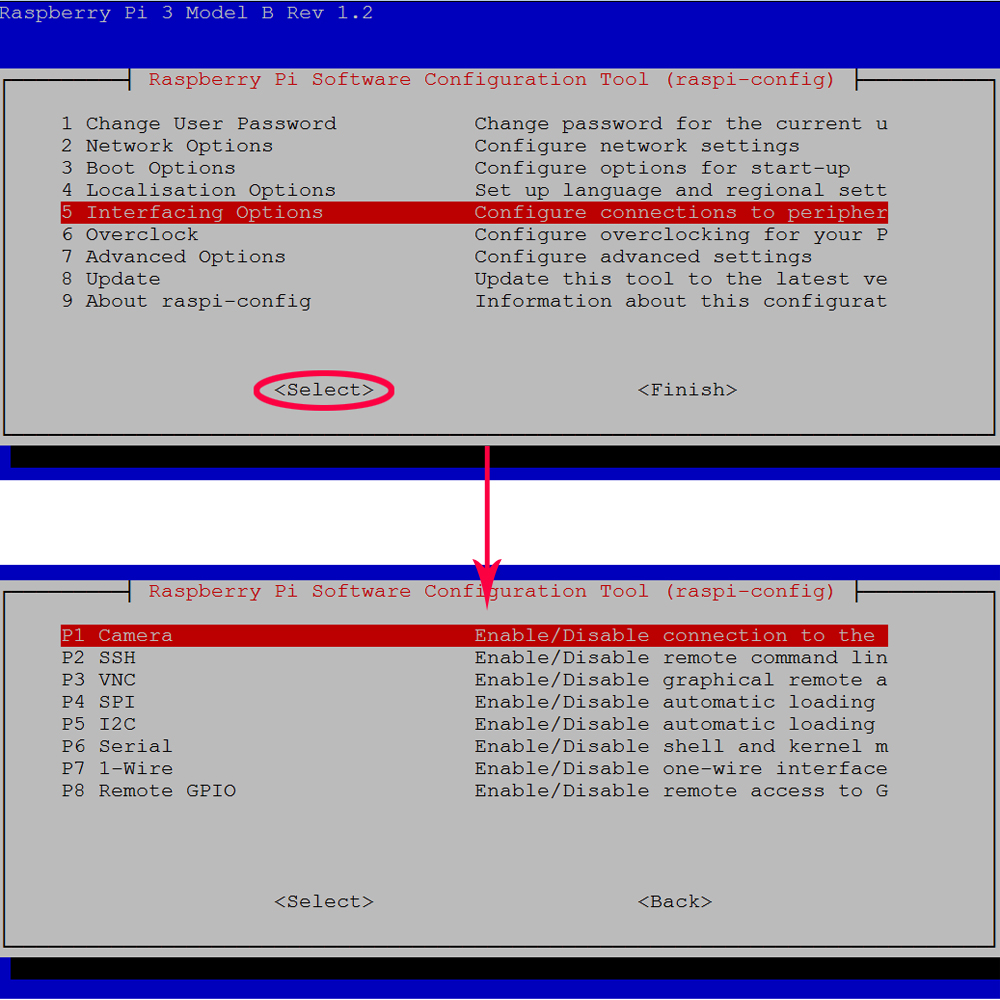
A. enable camera in Raspberry Pi (If you don’t enable I2C, please follow the steps as below:) sudo raspi-config
B. edit “/etc/modules” file by typing following command(otherwise /dev has no camera device node) sudo nano /etc/modules
Please add the following line in the bottom of the “/etc/modules” file, and then press “ctrl” + “x” and then “y” to save the file and press “enter” exist nano editor bcm2835-v4l2
Step 6: download and install mjpg-streamer support library by typing following command(skip this step if your micro SD card has pre-installed Osoyoo Robot Image)
Step 7: Compile mjpg-streamer(skip this step if your micro SD card has pre-installed Osoyoo Robot Image)
Firstly, edit the configuration file “input_uvc.c” by typing following command cd ~/osoyoo-robot/cam-robot/mjpg-streamer/plugins/input_uvc
sudo nano input_uvc.c
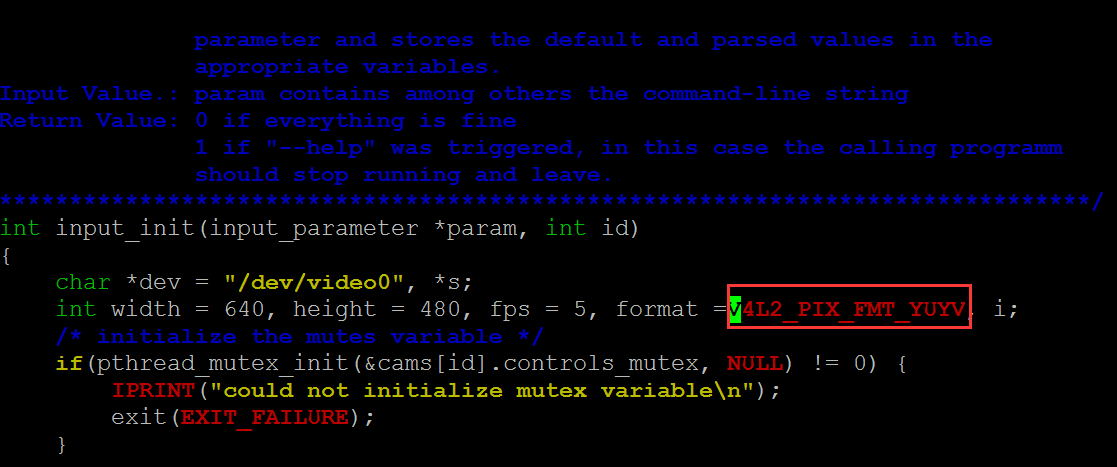
Find following line(you can use “ctrl” + “W” to search the line when you enter nano editor)
int width=640, height=480, fps=5, format=V4L2_PIX_FMT_MJPEG
Replace the string V4L2_PIX_FMT_MJPEG with new string V4L2_PIX_FMT_YUYV
Then press “ctrl” + “x” and then “y” to save the file and press “enter” exist nano editor
Secondly, we need compile the source code with following commands: cd ~/osoyoo-robot/cam-robot/mjpg-streamer sudo nano utils.c
comment the concerned includes in mjpg-streamer/utils.c line 32 & 33 : //#include < linux/stat.h >
//#include < sys/stat.h >
Then press “ctrl” + “x” and then “y” to save the file and press “enter” exist nano editor
Thirdly, Run command as following: make all
Fourthly, test camera installation: Plug your camera into Raspberry Pi, then type following command: ls /dev/video*
You should see following result in your terminal, “/dev/video0” is the camera installed in Pi
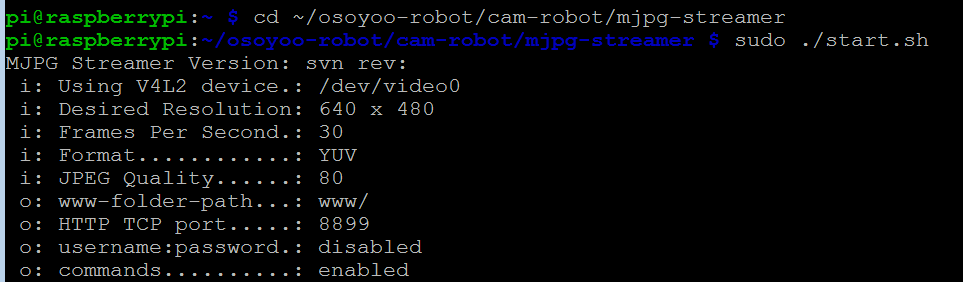
At last, Run mjpg-streamer Server by typing following command in terminal: cd ~/osoyoo-robot/cam-robot/mjpg-streamer
sudo ./start.sh
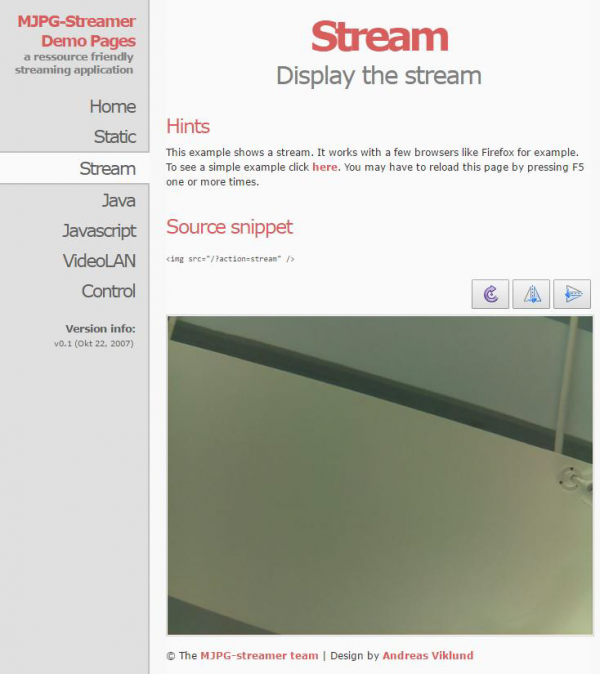
Now use browser in another computer to access your Raspberry Pi IP address with port 8899 (i.e, if your Pi IP address is 192.168.0.115, visit http://192.168.0.115:8899 in your browser), you will see following image. Click Stream button in left menu, you will see the real time video captched by the camera in your Raspberry Pi
You can use Ctrl C command in terminal to end the mjpg-streamer server
Step 8: To combine webiopi and mjpg-streamer into same webpage which allows we “see” video from camera and control Robot Car with brower, we need change some default setting of WebIOPi and MJPG-streamer. To do so, we need to edit config file by typing following command and modify this file as Modification A, Modification B, Modification C:(skip this step if your micro SD card has pre-installed Osoyoo Robot Image)
sudo nano /etc/webiopi/config
Modification A: replace webiopi default script python file which allow us to send control signal to Pi from Browser, please add following pink line into “/etc/webiopi/config” file
[SCRIPTS]
# Load custom scripts syntax :
# name = sourcefile
#each sourcefile may have setup, loop and destroy functions and macros
#myscript = /home/pi/WebIOPi-0.7.1/examples/scripts/macros/script.py
myscript = /home/pi/osoyoo-robot/cam-robot/robot/script.py
Modification B. change webiopi default html file path by adding following pink line:
# Use doc-root to change default HTML and resource files location
#doc-root = /home/pi/WebIOPi-0.7.1/examples/servo-control
doc-root = /home/pi/osoyoo-robot/cam-robot/robot
Modification C. Add PCA9685 address into config by addling following pink line
[DEVICES]]
# Device configuration syntax:
# name = device [args...]
# name   : used in the URL mapping
#device : device name
#args   : (optional) see device driver doc
#If enabled, devices configured here are mapped on REST API /device/name
#Devices are also accessible in custom scripts using deviceInstance(name)
#See device driver doc for methods and URI scheme available

# Raspberry native UART on GPIO, uncomment to enable
# Don't forget to remove console on ttyAMA0 in /boot/cmdline.txt
# And also disable getty on ttyAMA0 in /etc/inittab
#serial0 = Serial device:ttyAMA0 baudrate:9600

# USB serial adapters
#usb0 = Serial device:ttyUSB0 baudrate:9600
#usb1 = Serial device:ttyACM0 baudrate:9600

#temp0 = TMP102
#temp1 = TMP102 slave:0x49
#temp2 = DS18B20
#temp3 = DS18B20 slave:28-0000049bc218

#bmp = BMP085

#gpio0 = PCF8574
#gpio1 = PCF8574 slave:0x21

#light0 = TSL2561T
#light1 = TSL2561T slave:0b0101001

#gpio0 = MCP23017
#gpio1 = MCP23017 slave:0x21
#gpio2 = MCP23017 slave:0x22
pwm0 = PCA9685 slave:0x40
#pwm1 = PCA9685 slave:0x41

#adc0 = MCP3008
#adc1 = MCP3008 chip:1 vref:5
#dac1 = MCP4922 chip:1
Finally, press “ctrl” + “x” and then “y” to save the file and press “enter” exist nano editor
Testing Server Installation
Now you can put your car on the ground and turn on the power-switch in battery box. We need to use SSH to control the car. So you must enable SSH with raspi-config command before testing. If you are using windows, please use download Putty to ssh your Pi, if you are using MacBook, please directly use ssh command in terminal.
Step 1. To start mjpg-streamer, in ssh terminal, please type followinig command: cd ~/osoyoo-robot/cam-robot/mjpg-streamer
sudo ./start.sh
Step 2. To start webiopi, please open another ssh window and type following command: sudo webiopi -d -c /etc/webiopi/config
Control the car with browser
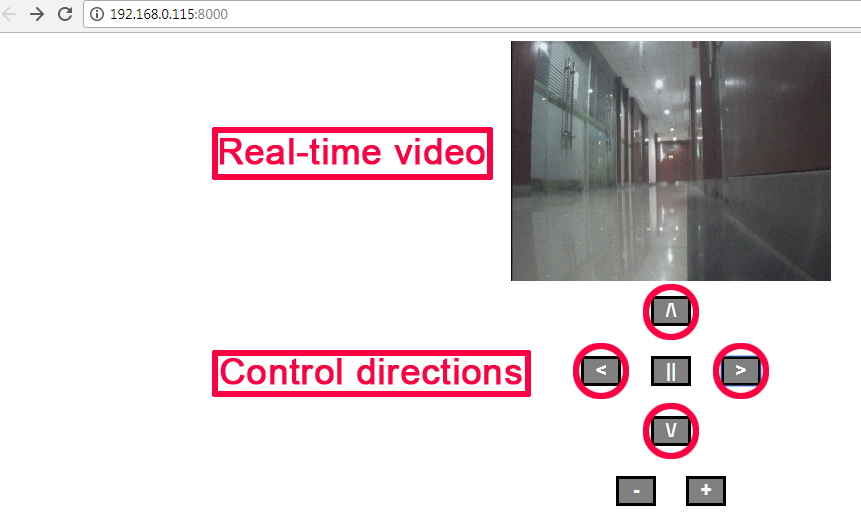
Now you can use your browse to acess Raspberry IP with port 8000(i.e, if your Pi IP address is 192.168.0.115, please visit http://192.168.0.115:8000, you will see following picture in your browser, click arrow buttons, you can make car moving to your desired directions.
Android and iOS App
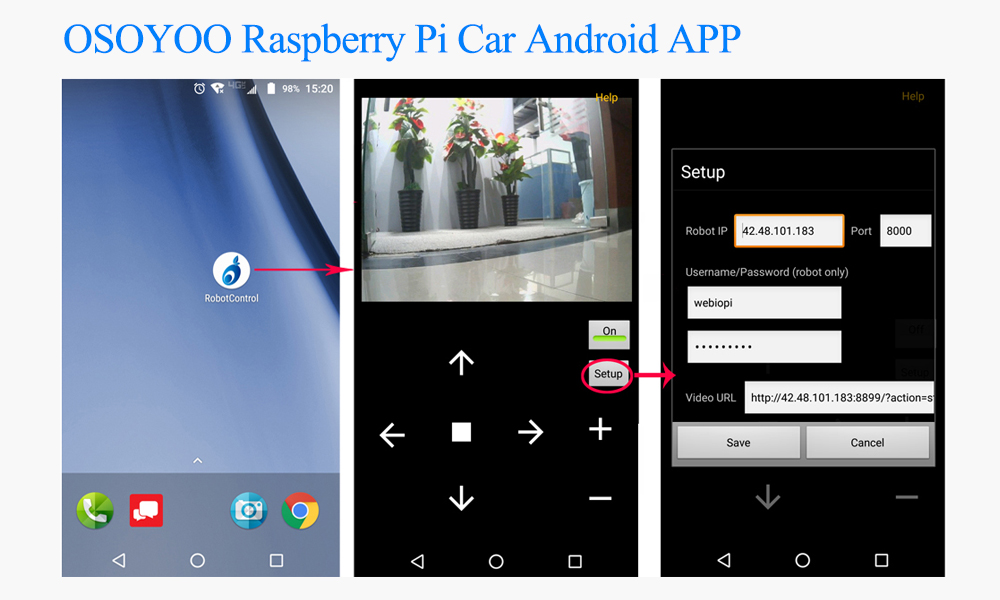
You can also use our free Android App or Apple App instead of browser to control the car.
For Apple iOS user, please search Osoyoo raspberry Pi Robot Car in Apple APP store ,download and install it.
Run the App, click set up and enter config page set the fields as following:
Robot IP:
your raspberrr pi ip Port: 8000 Video URL:http://your_raspberry_pi_ip:8899/?action=stream(please use IP such as 192.168.0.16 to replace your_raspberry_pi_ip) User Name: webiopi Password: raspberry
Click Save button and exit config page
Now you can use the arrow buttons in App to control the car