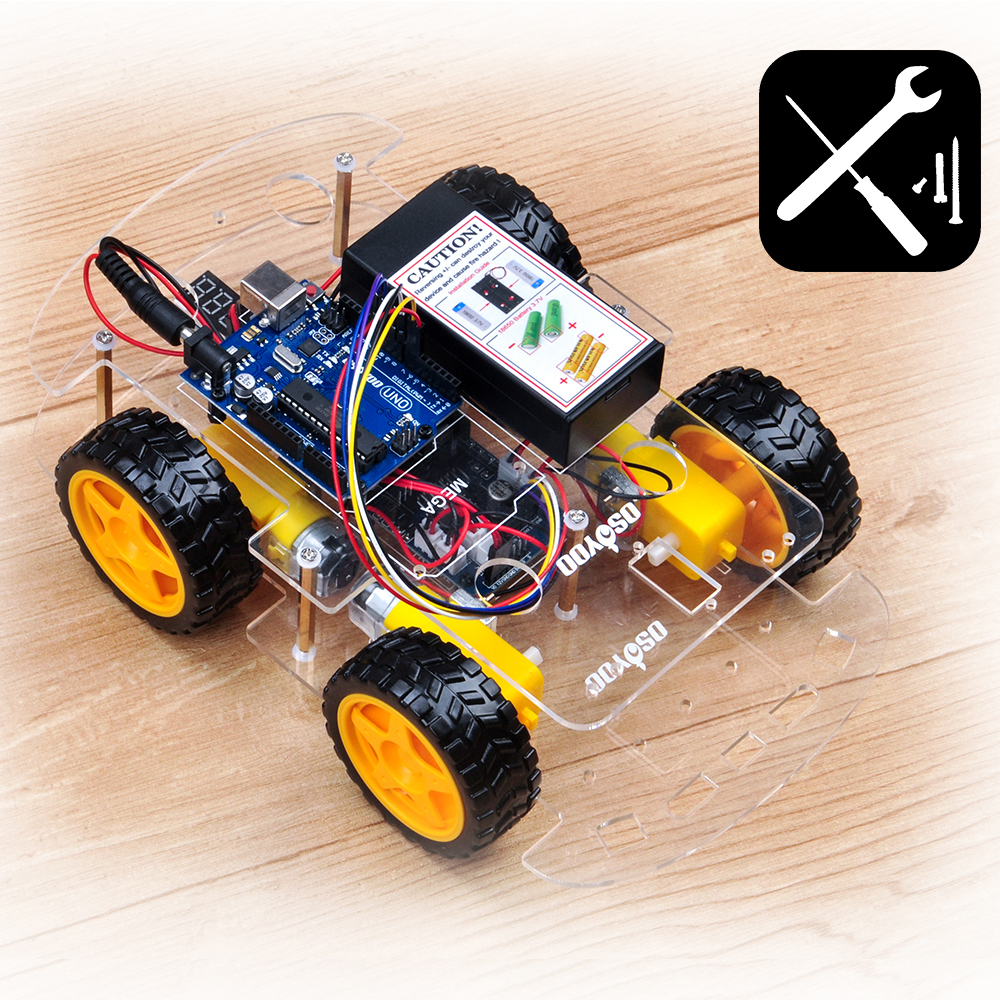
In this “Hello World” version lesson, we will install the most important framework in the smart car and program the car to do some simple movements. If you have passed the test movement of this lesson, it means OSOYOO basic board, voltage meter, motor control module, motors, batteries,chassis and wire connections between these parts are all functioning well.
As your experiments in future lessons are all based on frame work of Lesson One, it is very important to test the installation and sample code in this Lesson properly.
Hardware Installation
Install devices
1) Remove the protective film on upper and low car chassis (Each car chassis has one protective film)
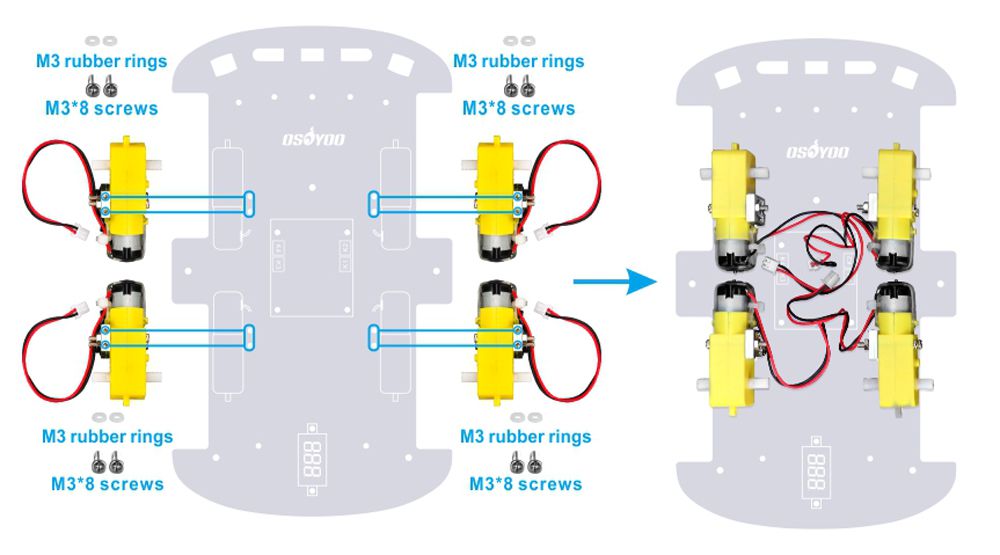
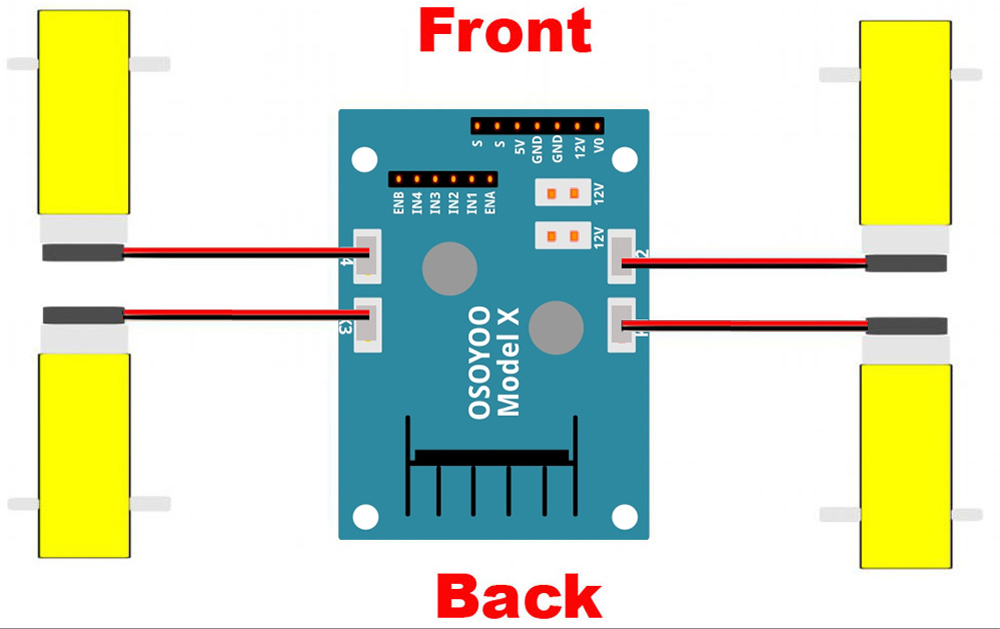
2) Install 4 motors with Metal Motor Holders as follows
3) Install 4 motors on lower car chassis with screw M3*8 (screws in metal motor holder package)
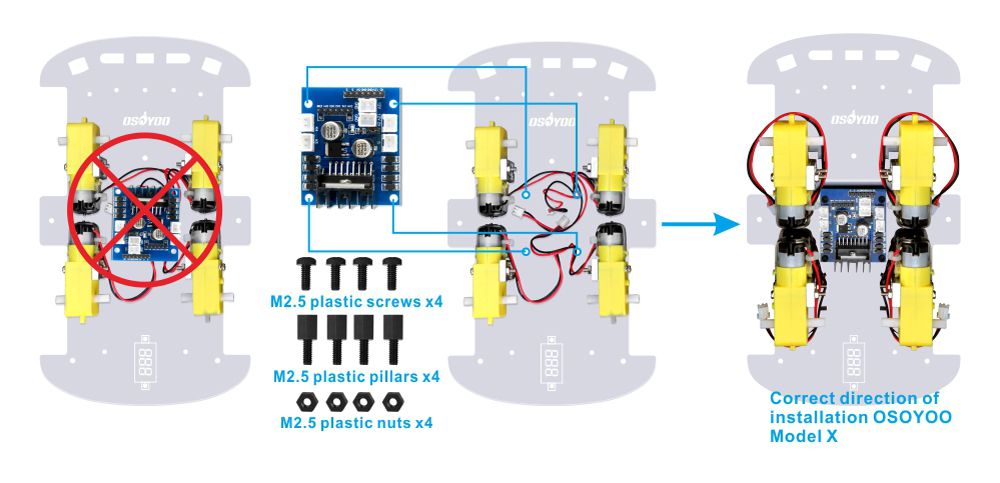
4) Install OSOYOO MODEL X motor driver module to lower car chassis with 4pcs M2.5 plastic screws, plastic pillars and plastic nuts. (Please make sure you install the OSOYOO MODEL X motor driver module in correct direction.)
5) Install voltage meter on low car chassis with 2pcs M2.5 plastic screws, plastic pillars and plastic nuts
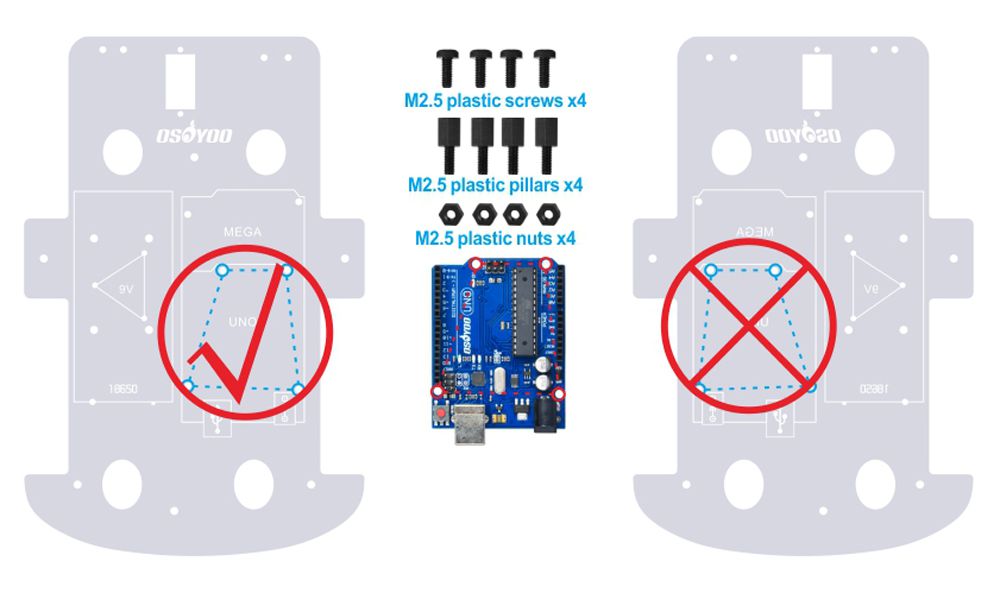
6) InstallOSOYOO basic board on upper car chassis with 4pcs M2.5 plastic screws, plastic pillars and plastic nuts. (Please make sure you install the board at the correct side)
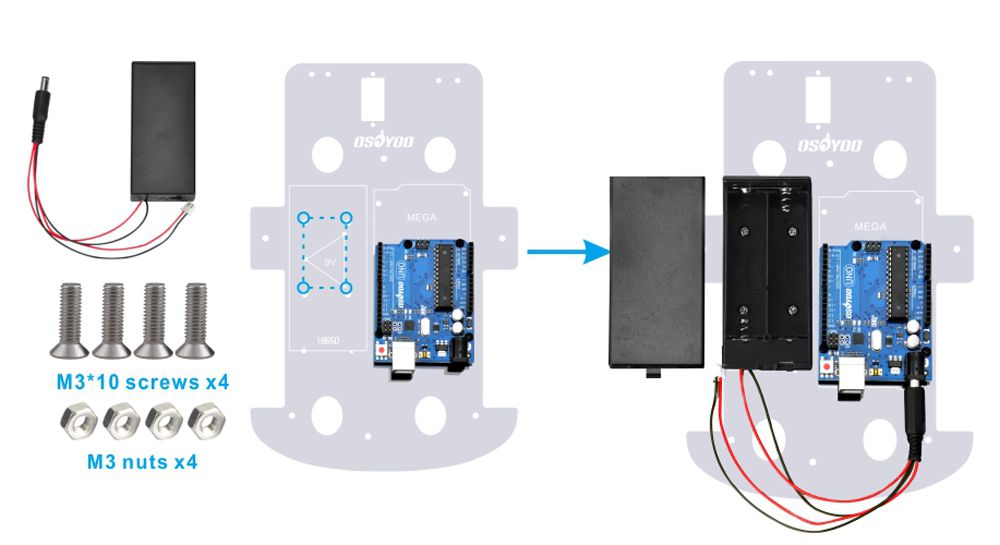
7) In these package, there are two kind of battery box. We recommend to install battery box for 18650 batteries. Install this Battery Box on upper chassis with 4pcs M3 x 10 screws and M3 nuts.
To make you can test the car ASAP, we provide a battery box for 9V battery. Please install this Battery Box on upper chassis with 3pcs M2 x 10 screws and M2 nuts.
Connection
1) Connect 4 motors to OSOYOO MODEL X motor driver module K1 to K4 sockets as per following graph:
2) Connect Voltage Meter to OSOYOO MODEL X motor driver module with 3pin female to female jumper wires as below connection diagram
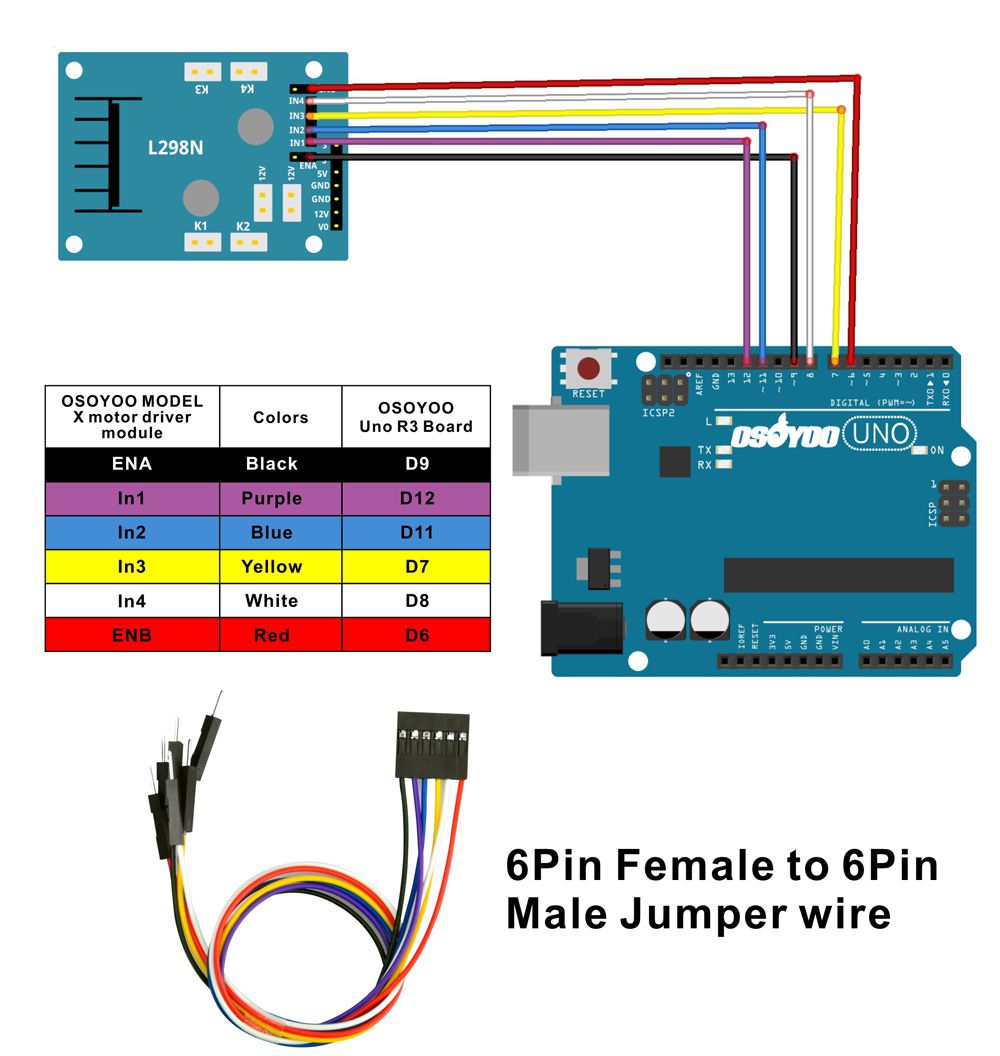
3) Connect D6, D7, D8, D9, D11, D12 to OSOYOO MODEL X motor driver module 6 control pins with 6pin female to 6pin male jumper wires as per following graph
Caution:
When insert/remove this 6-pin plug into Model X 6-pin male socket, please hold the black plastic pin-holder to do operation. Never drag the wires to pull the plug out of the socket, otherwise it will damage the wires.
4) Connect the board, battery box (battery box for 18650 batteries or for 9V battery), and OSOYOO MODEL X motor driver module according below connection diagram
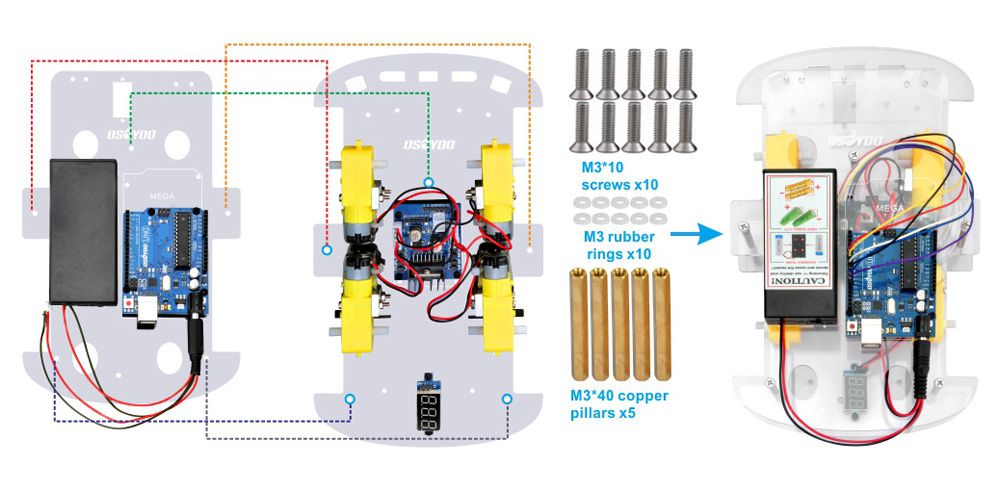
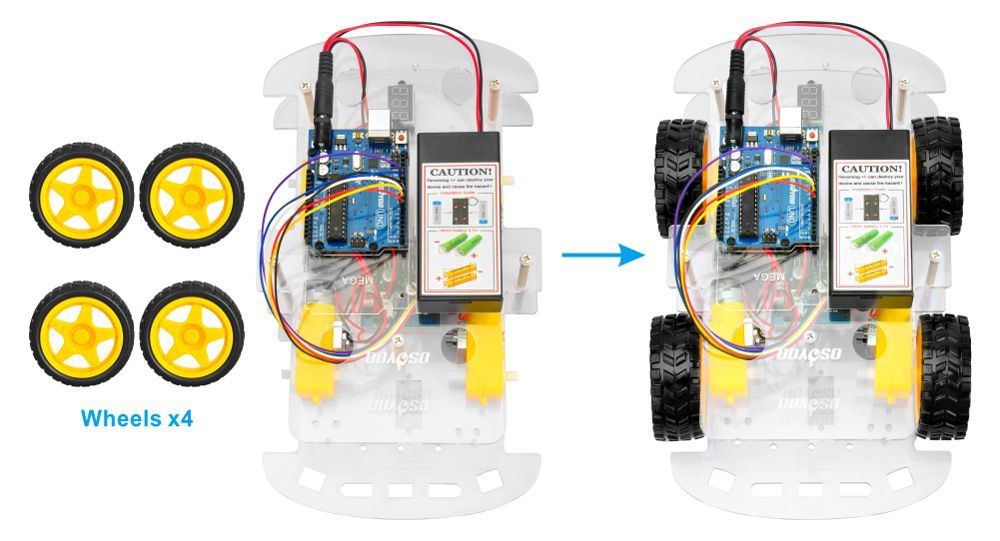
5)Connect upper chassis to lower chassis with five copper pillars and fix copper pillars with 10pcs M3*10 screws and 10pcs M3 rubber rings, then install 4 wheels onto the motors.
Now hardware installation is almost down. Before we install 18650 batteries into the box, we need burn the sample code into board First.
Step 1: Install latest Arduino IDE (If you have Arduino IDE version after 1.1.16, please skip this step). Download Arduino IDE from https://www.arduino.cc/en/Main/Software?setlang=en , then install the software.
Step 2: Download Lesson One sample code from https://osoyoo.com/driver/v2smartcar-lesson1.zip , unzip the download zip file smartcar-lesson1.zip, you will see a folder called v2smartcar-lesson1.
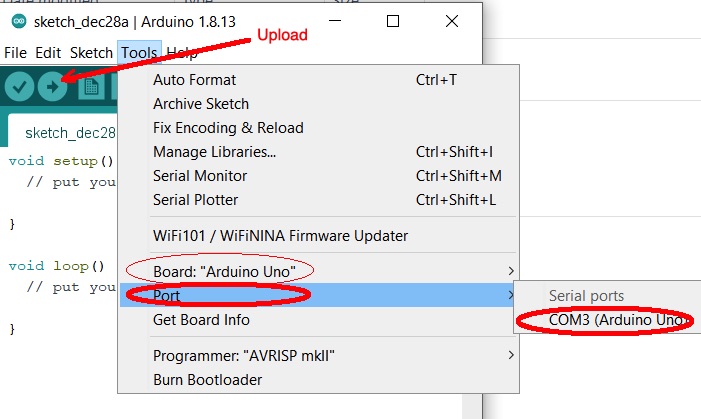
Step 3: Connect OSOYOO basic board to PC with USB cable, Open Arduin IDE -> click file -> click Open -> choose code “v2smartcar-lesson1.ino” in smartcar-lesson1 folder, load the code into the board. (Notice: Shut off your battery or Unplug your power adapter when upload sketch code to the board.)
Step 4: Choose corresponding board/port for your project, upload the sketch to the board.
Final Testing:
Note:
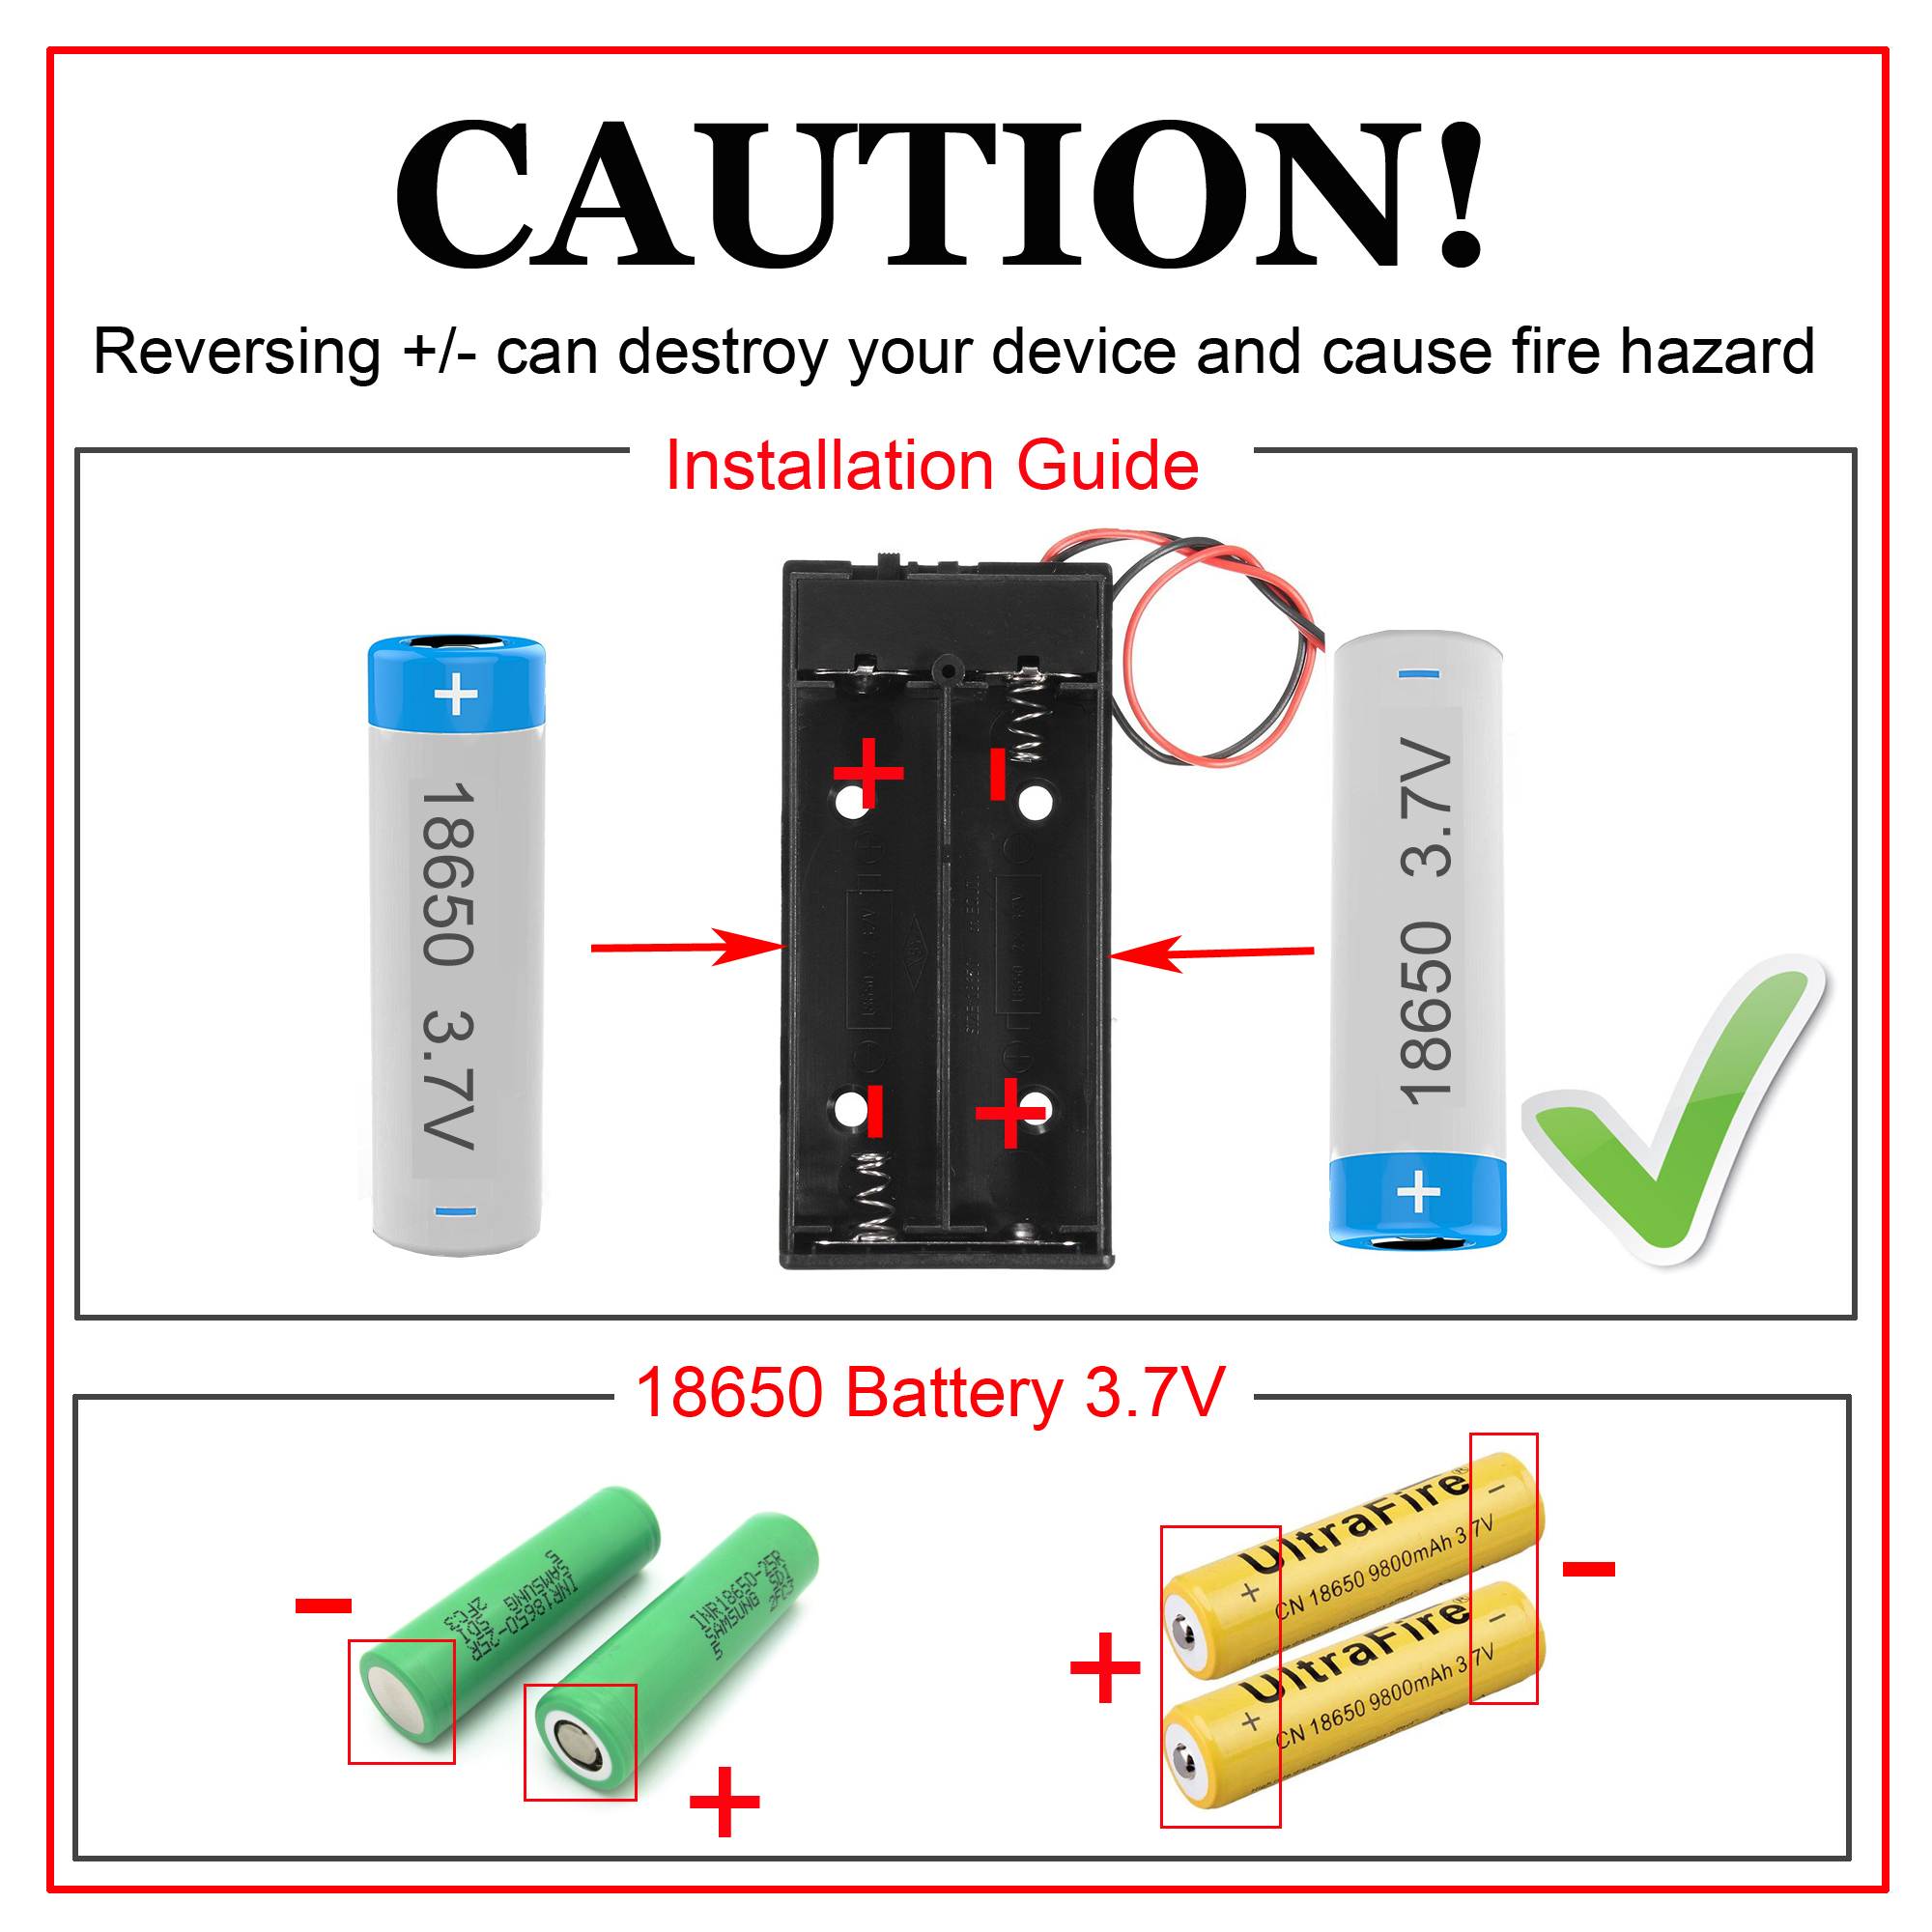
1) Recommend 18650 batteries as these batteries can make the car run smoothly.
2) The 18650 batteries we used in lessons are around 65 mm (2.56 inch) long, without an internal protection circuit.
3) Check the box instruction and make sure polar direction is correct, otherwise it can destroy your device and cause fire hazard.
Please install your 18650 batteries in battery box for 18650 as per following instruction:
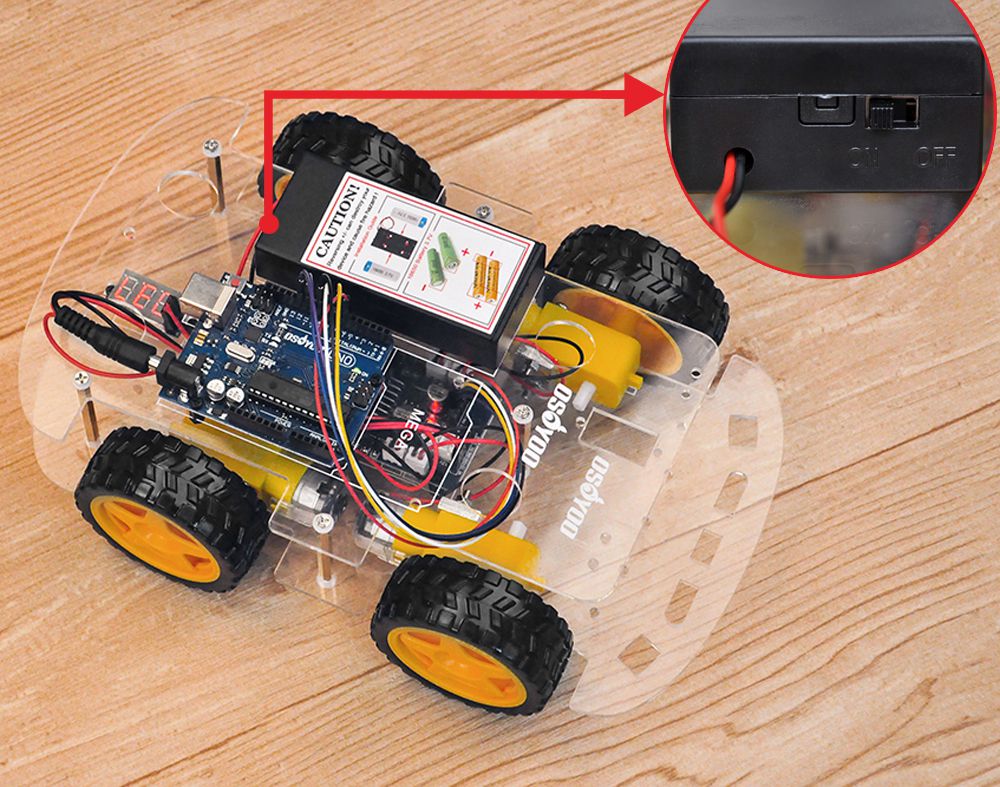
Disconnect the car from PC, put battery into battery box. When you put the car on the ground and turn on the switch on battery box if you install battery box for 18650, the car should go forward 2 seconds, then go backward 2 seconds, then left turn for 2 seconds, then right turn for 2 seconds, then stop. (If the car does not move as per above mentioned result, you should check your wire connection, battery voltage (must over 7.2v).)
Dear Support Team,
Good day, I received Osoyoo robot car as a gift from my father.
I assembled the car, downloaded and uploaded the required code for lesson 1 as per instruction in the video. But it did not work as it was supposed to, the car was supposed to go forward, backward, left and right for 2 seconds. i also reassured the car assembly and re-uploaded the code. But still the problem persists.
Hi,
Are you willing to take a photo about the wiring from Model X to UNO board to send my email address: [email protected]?
No worry and we’ll try my best to solve your issue.
Elaine
please help I thought i was doing well but the issue is my car will go left right back then forward!! what could i of did wrong
also i notice the picture to attached the motors cant be correct if you are looking at the wire colors….the connectors can only go in one way
IT WILL NOT MATCH THE PICTURE!!
PLEASE ADVISE!!
may be this is a updated cb and old picture??
Please take a video about issue of the car movement, and screenshot about the problem about Arduino IDE and send to my email address: [email protected]
I too am following everything perfectly, wiring is correct, upload said it went fine…..but when I put the car on the ground and turn on the battery, nothing happens??? Please help! Thank you!
Which voltage does the voltage meter show? Which kind of battery do you use? Are you willing to take a video or photo and send to me about the connection and send to my email: [email protected]
I’m trying to help a friend build this and we’ve hit a snag. Currently using a 9V for testing the motors will only run if one is plugged in and even then only for a moment. Am I required to use the 18650 batteries even for testing?
We test the robot with 9V 650mAh rechargeable battery, and it works well for about 15 minutes.
If you want the robot works for longer time, you may need a 18650 batteries.
I followed all the directions for the building of the smart car. However, after loading all the codes and building all the hardware together, the car moves only forward in 2-second increments. It just goes for 2 seconds forward, stops, keeps on going for another 2 secs, repeat. Could someone help me figure this out?
Hello, I responded a few days ago with pictures of the smart car configuration via email @ [email protected]. Please respond as soon as possible. Thanks! 🙂
I got a email from [email protected] with a photo. Is it from you.
If not, please take a photo about the connections to my email address: [email protected].
Thanks!


.jpg)


Dear Support Team,
Good day, I received Osoyoo robot car as a gift from my father.
I assembled the car, downloaded and uploaded the required code for lesson 1 as per instruction in the video. But it did not work as it was supposed to, the car was supposed to go forward, backward, left and right for 2 seconds. i also reassured the car assembly and re-uploaded the code. But still the problem persists.
Request your help to fix the issue.
Thank you!!
Hi,
Are you willing to take a photo about the wiring from Model X to UNO board to send my email address: [email protected]?
No worry and we’ll try my best to solve your issue.
Elaine
I have responded with the images from my mail [email protected]. Please check and respond
please help I thought i was doing well but the issue is my car will go left right back then forward!! what could i of did wrong
also i notice the picture to attached the motors cant be correct if you are looking at the wire colors….the connectors can only go in one way
IT WILL NOT MATCH THE PICTURE!!
PLEASE ADVISE!!
may be this is a updated cb and old picture??
Hi Pat,
Are you willing to take a photo and video about the problem and send to my email addressl: [email protected].
Elaine
Everything works fine, but my car wont go forward like shown in the video, i double checked the cables but the problem still persists
Also i do not see Arduino/genuino uno. for me it shows only arduino uno
Please take a video about issue of the car movement, and screenshot about the problem about Arduino IDE and send to my email address: [email protected]
I too am following everything perfectly, wiring is correct, upload said it went fine…..but when I put the car on the ground and turn on the battery, nothing happens??? Please help! Thank you!
Which voltage does the voltage meter show? Which kind of battery do you use? Are you willing to take a video or photo and send to me about the connection and send to my email: [email protected]
Hi
All works great!!! I am new to this how can i modified the sketch so the car will repeat the movements?? thank you for the support!!
Why is it everybody else gets a reply?? Hello??
Nevermind, I see the response now. Thank you!
would be nice if you respond to my request! thank you!
I’m trying to help a friend build this and we’ve hit a snag. Currently using a 9V for testing the motors will only run if one is plugged in and even then only for a moment. Am I required to use the 18650 batteries even for testing?
We test the robot with 9V 650mAh rechargeable battery, and it works well for about 15 minutes.
If you want the robot works for longer time, you may need a 18650 batteries.
where to find configuration.h ?!
this car does not need configuration.h file. You just download code from https://osoyoo.com/driver/v2smartcar-lesson1.zip, it will work.
Hello,
I followed all the directions for the building of the smart car. However, after loading all the codes and building all the hardware together, the car moves only forward in 2-second increments. It just goes for 2 seconds forward, stops, keeps on going for another 2 secs, repeat. Could someone help me figure this out?
Hello,
Please check wirings from Model X module to UNO board.
You can take photos to my email address: [email protected]
Elaine
Hello, I responded a few days ago with pictures of the smart car configuration via email @ [email protected]. Please respond as soon as possible. Thanks! 🙂
Hi,
I connected as per instructions and downloaded code. But the car is not moving. Using 9V battery and checked voltage is 8+ V.
I got a email from [email protected] with a photo. Is it from you.
If not, please take a photo about the connections to my email address: [email protected].
Thanks!