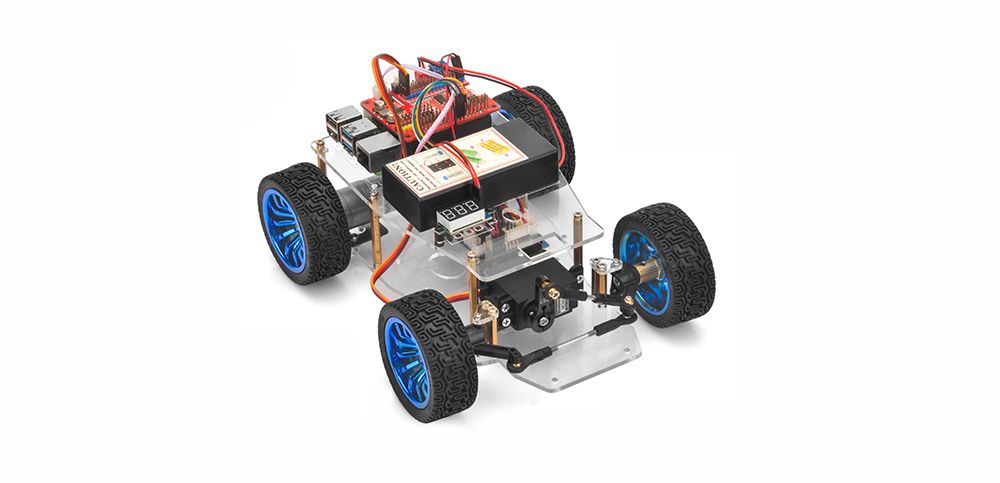
In this tutorial, we will simply tell you how to install Raspberry Pi OS for the Raspberry pi and how to use console to control raspberry pi. We’ll use OSOYOO Servo Steer Smart Car for Raspberry Pi to do some simple movements. Once the car installation is completed, it is very important to test the installation and sample code. If you have passed the test movement of this lesson, it means Raspberry pi, motors, battery, model X board, servo motor and wire connections between these parts are all functioning well, and you can move on other sample lessons
If you don’t complete the frame of car, please review lesson 1
Servo Steer Smart Car for Raspberry Pi (with raspberry pi board) x1
Micro SD card (more than 8GB) x1
Micro SD card reader x1
OSOYOO 5 inches DSI touch screen for Raspberry Pi x1
Here are the steps to install the Raspberry Pi Legacy OS: Step 1: Download Raspberry Pi Buster Operation System(OS) and burn it onto SD card(skip this step if your SD card has pre-installed Rpi Buster OS Image).
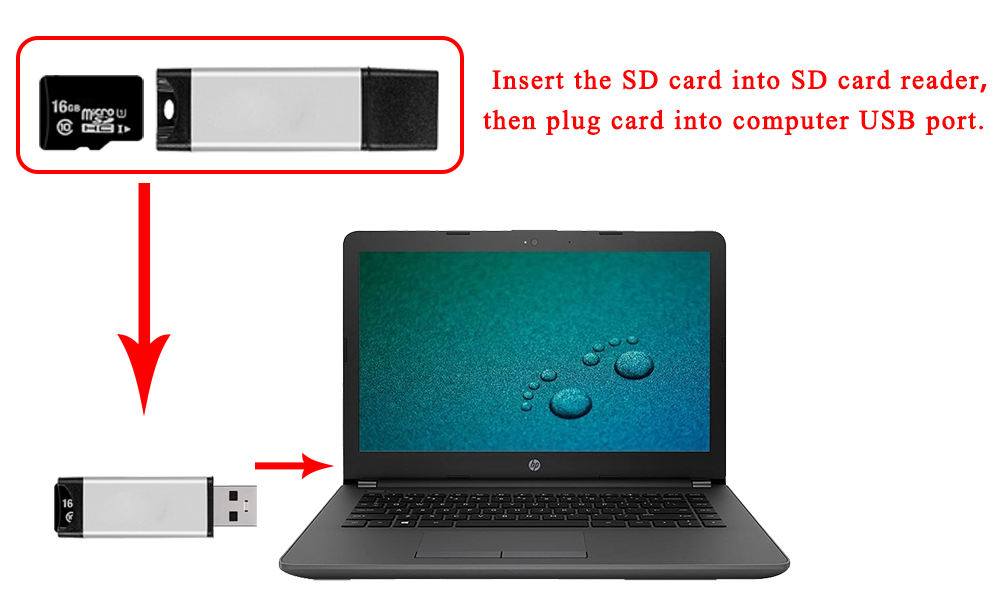
Prepare a new Micro SD card (more than 8GB) and insert it in USB micro SD card reader, and connect USB micro SD card reader with your PC.
A. Using console directly
Note: A screen monitor is needed when you use the console directly.
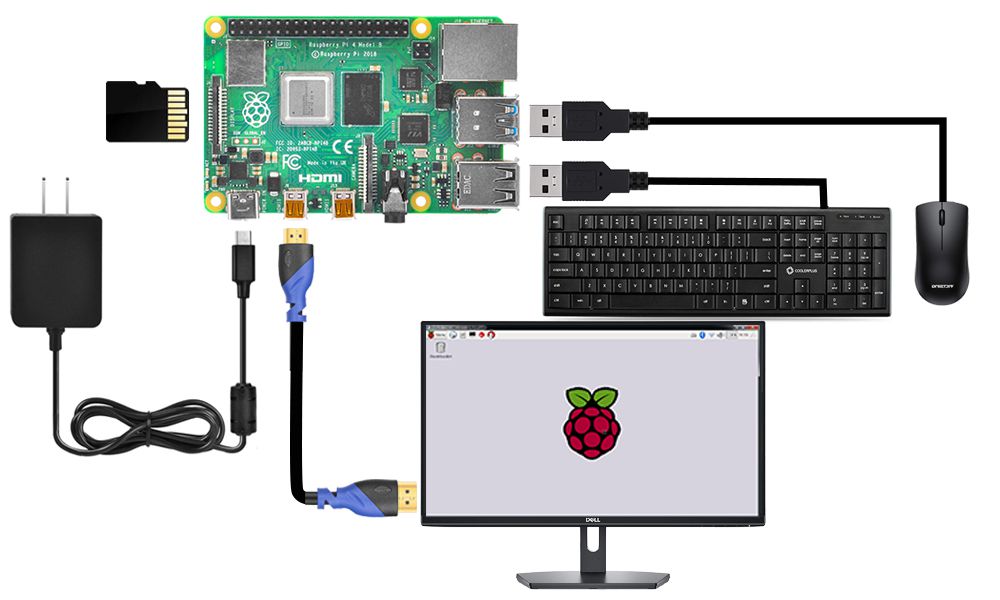
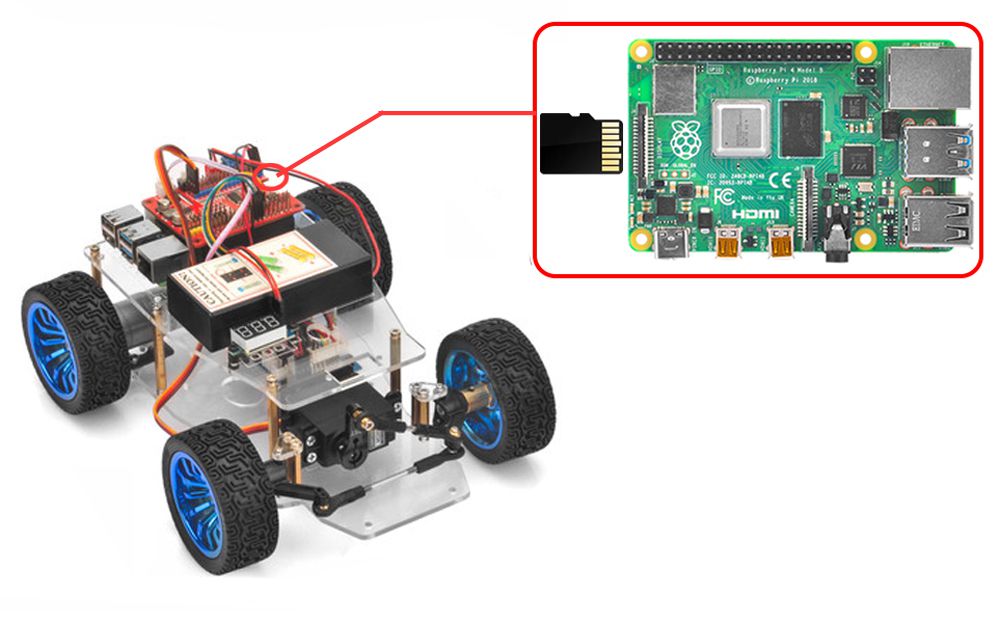
1. Connect Raspberry Pi to your HDMI monitor or TV. Put a keyboard and mouse into Raspberry Pi USB ports. Insert SD card into the slot on your Raspberry Pi as following:
2. Please click the Lan icon at the right-upper conner, and select your WIFI SSID, and enter the pass word of your wifi to connect wifi hotspot. Then you can see the console full screen.
3. If you move over the Lan icon, and get the notice as following:
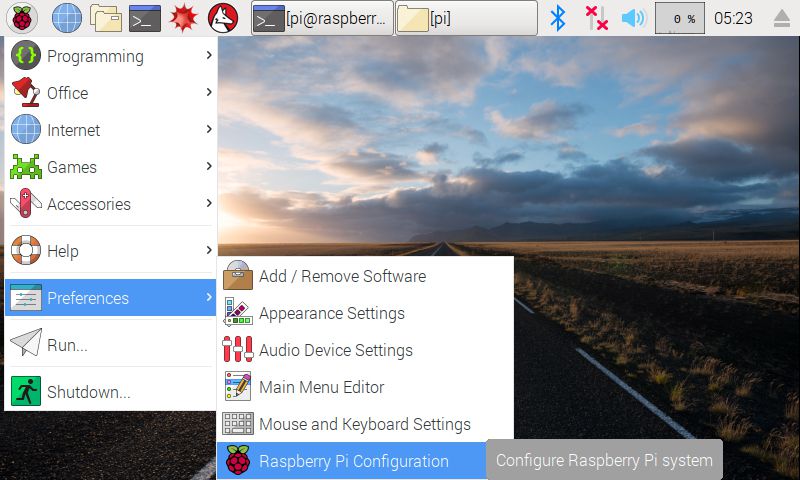
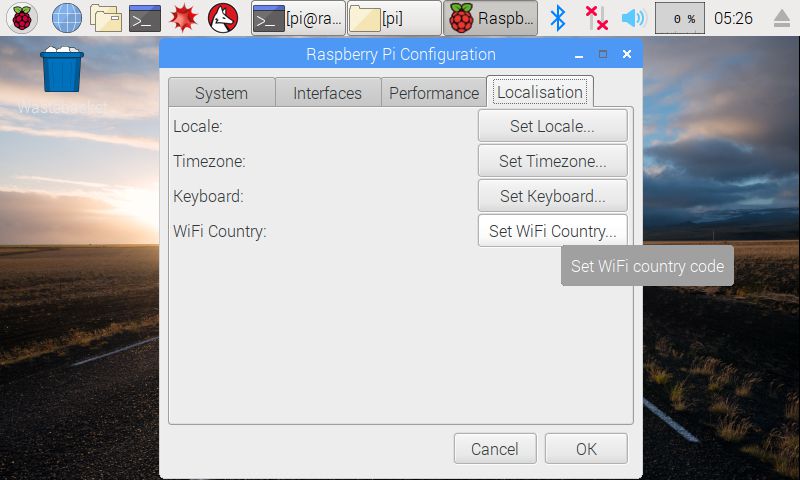
4. Please click configure the WIFI localisation as following:
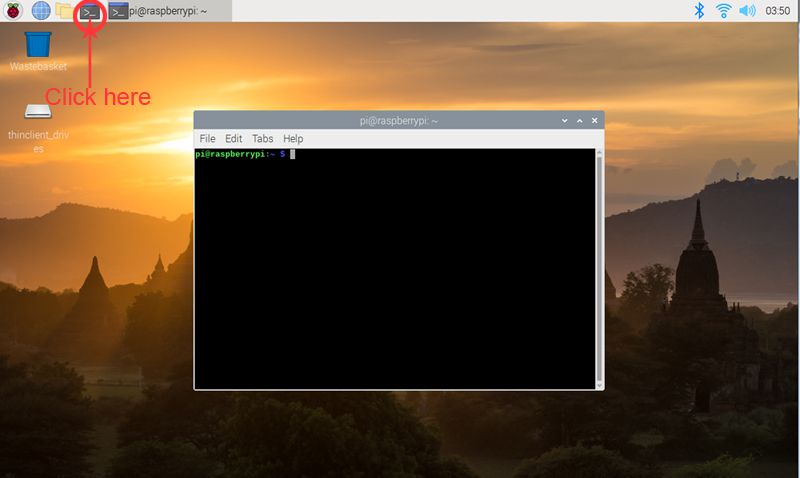
5. Click the icon of Terminal on the screen, or press CTRL+ALT+T simultaneously, then a terminal will pop up as follows:
6. Find out the IP address of the RPi. Method A: Connect your Pi to monitor and mouse, click LAN or WIFI icon to get the IP address as following photo
Method B: you can also find the IP address by typing terminal command :
hostname -I
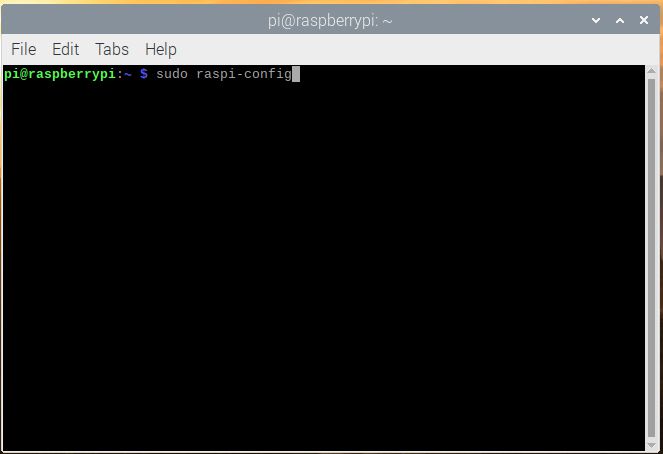
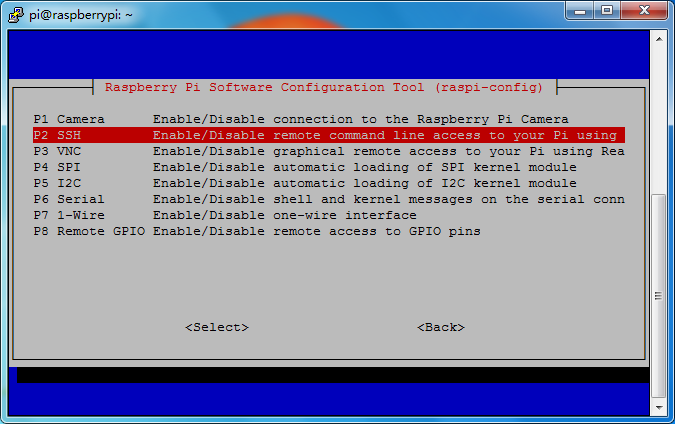
7. Enable SSH
typing terminal command :
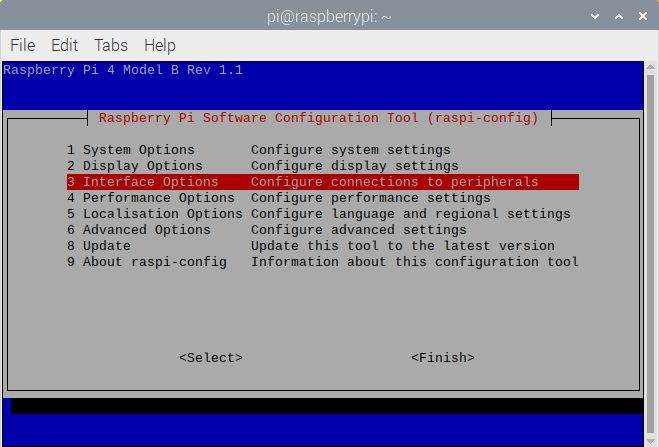
sudo raspi-config
Go to configuration menu, go to Interface Options ->SSH -> Select -> Yes -> Finish (Note: please use “arrows” on keyboard to position the cursor where you want to go and press “enter” to confirm the select)
B. Using console remotely
Note: For 2016-11-25 release or above, SSH (a protocol securing remote login session and other network service) is Disabled by default. Therefore, when you need to log in remotely, you need to enable ssh firstly.
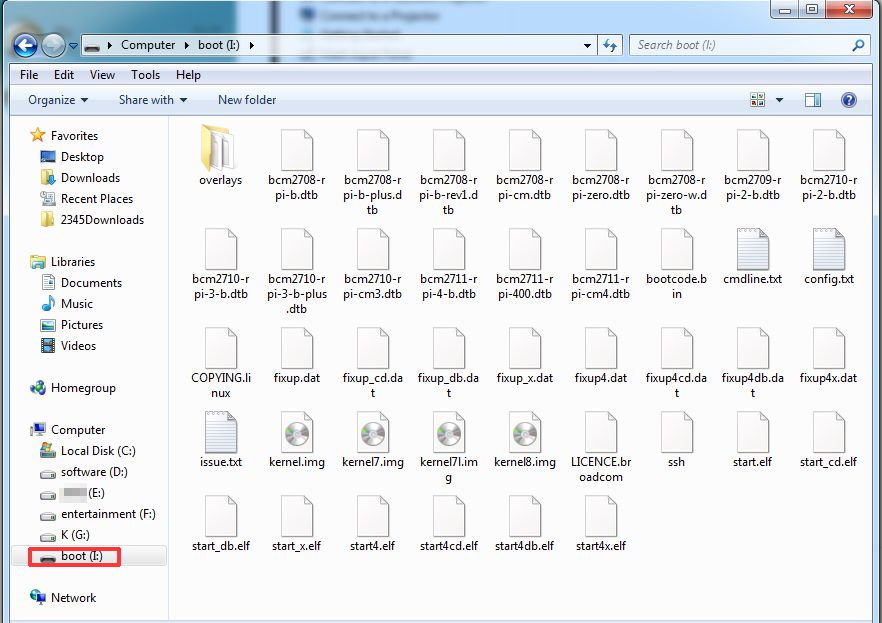
1. Insert Micro SD card which is burn with Raspberry Pi OS in USB micro SD card reader, and connect USB micro SD card reader with your PC.
2. Open this micro SD card in your computer
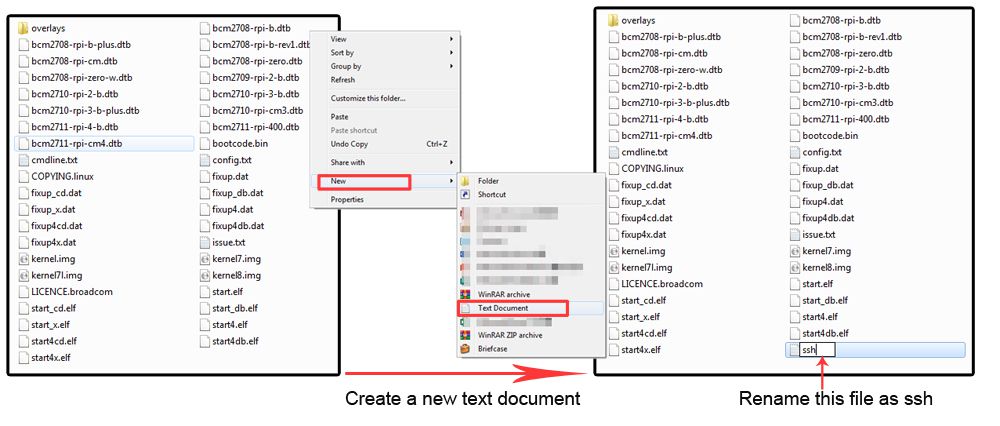
3. Create a txt. file and renamed “ssh” under /boot/ to enable it.
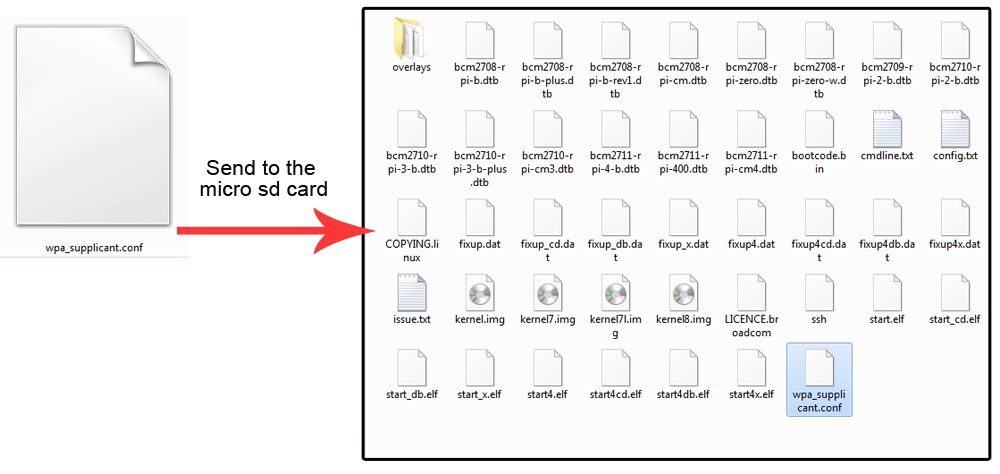
4. Download the file “wpa_supplicant.conf” and then use Notepad++ to open this file, and edit the SSID and PSK to your own wifi SSID and password and save this file:
ssid="Your wifi-A ssid"
psk="ssid password"
The content of “wpa_supplicant.conf” as following:
5.Send the file “wpa_supplicant.conf” from your PC to the micro SD card
6. Plug the MicroSD card into the Raspberry Pi and then power on the Raspberry Pi.
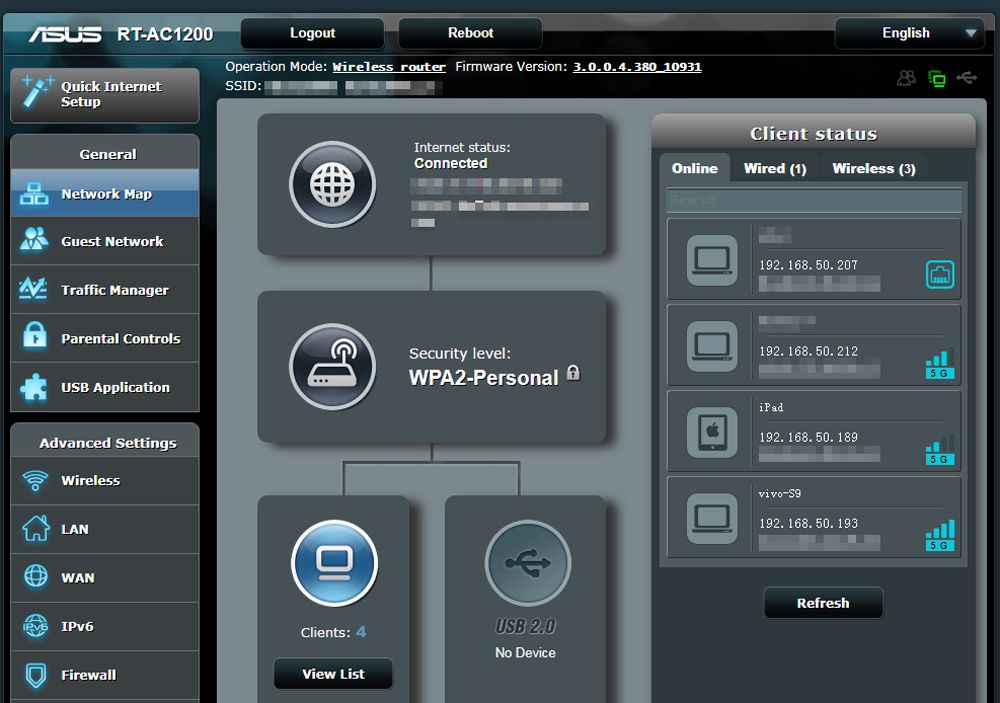
7. Login the WIFI router and check the IP address of your Raspberry Pi (Or you can use someIP address scan APP to scan the IP address)
8. Use ssh tool to control Raspberry Pi remotely
Remark: For three platforms: Windows, Mac and Linux, it might be a little bit different to do this.
(1) Linux and Mac users can easily log into the Raspberry Pi via ssh. On Linux or Mac, find Terminal and open it.
Type in ssh pi@IP address(ssh is the tool for remote login; pi is the user name, and as the name suggests, your RPi’s IP address) and then press Enter to confirm. For example:
ssh [email protected]
If you get a prompt that no ssh is found, you need to install a ssh tool like Ubuntu and Debian by yourself:
sudo apt-get install ssh
(2) For Windows users, you may use a ssh tool to log into Raspberry Pi remotely, like PuTTY.
Step 1. Download PuTTY from: https://www.chiark.greenend.org.uk/~sgtatham/putty/ and install this exe. in your Windows PC
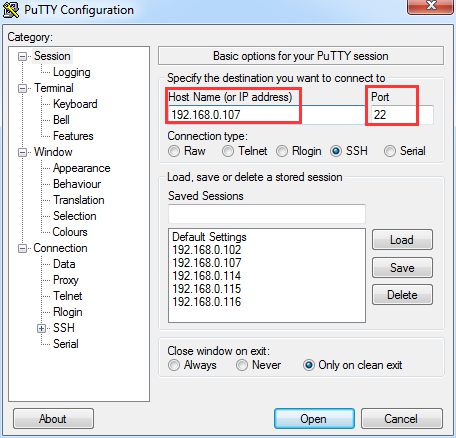
Step 2. Open PuTTY and click Session on the left tree-alike structure (generally it’s collapsed upon PuTTY startup):
Step 3. Enter the IP address you got into the textbox under Host Name (or IP address) and 22 under Port (by default it is 22) ,then click open.
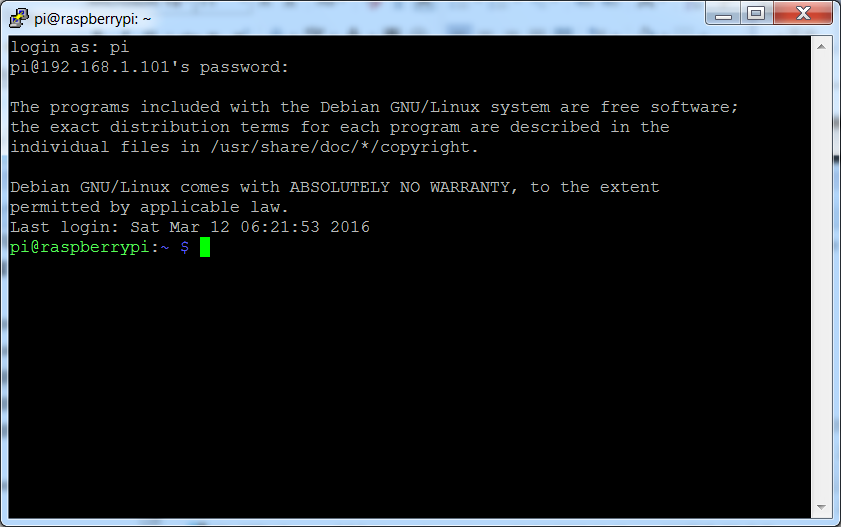
Step 4. Note that when you first log in to the Raspberry Pi with the IP address, you’ll be prompted with a security reminder. Just click Yes. When the PuTTY window prompts login as: type in the user name: pi, and password: raspberry (the default one, if you haven’t changed it). Note: when you’re typing the password in, the window shows nothing just null, but you’re in fact is typing things in. So just focus on typing it right and press Enter. After you log in the RPi successfully, the window will display as follows:
For other platforms, please contact your supplier.
After learning how to install Raspberry Pi OS and use the console of Raspberry Pi, you can follow the next steps to test the frame work of the robot car in lesson1.
Note: In our sample lessons, we use Windows PC as the remote console device and PuTTY as the ssh tool
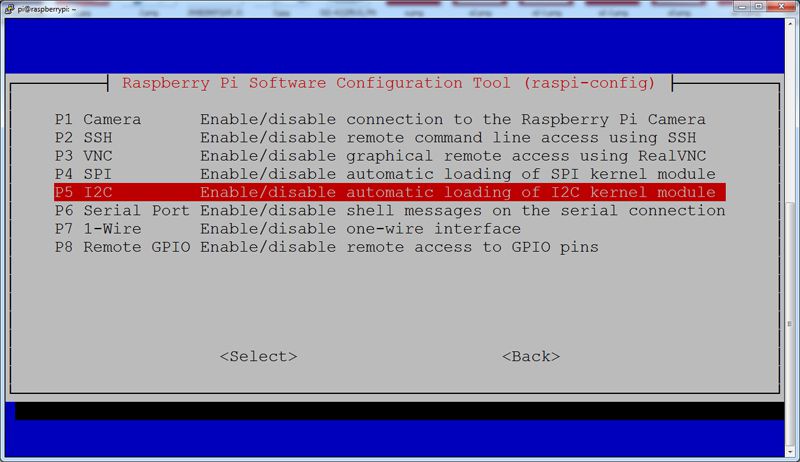
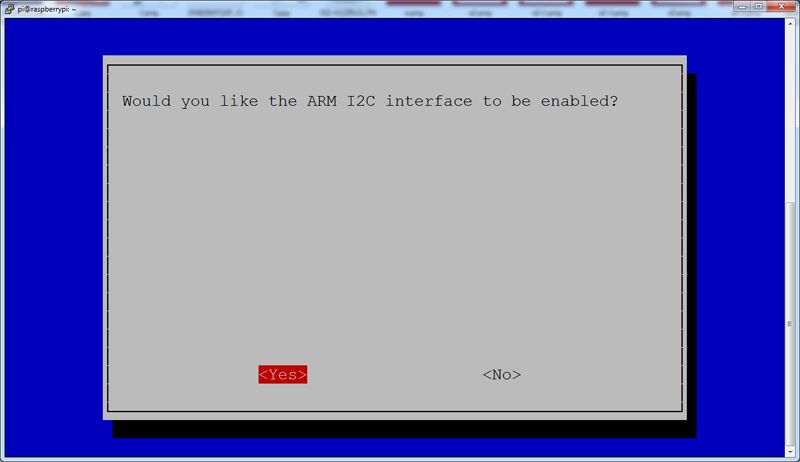
Step 1: Power the car and run the following command and enable the I2C (I2C is a protocol which will be used to exchange data with I2C device)
sudo raspi-config
Then select Interface Options->I2C->Select->Yes->Finish
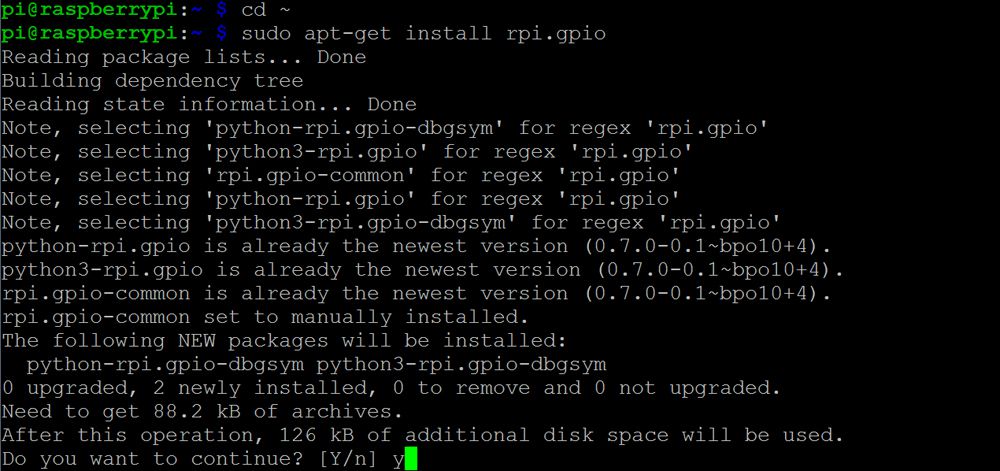
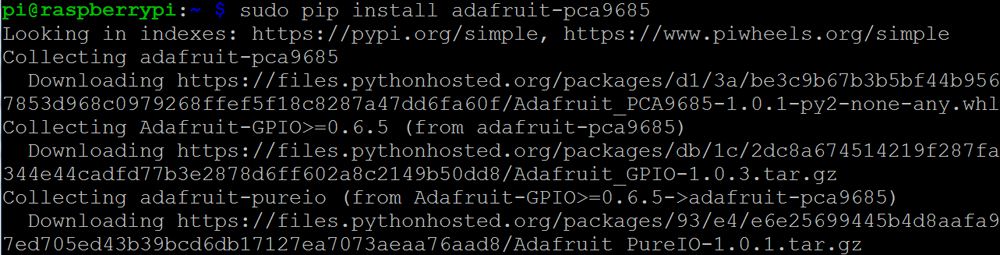
Step 2: Install GPIO and pca9685 PWM Library by running the following three commands:
sudo pip install  --break-system-packages adafruit-circuitpython-pca9685
sudo pip install  --break-system-packages adafruit-circuitpython-servokit

If you are using old bulleye OS, you can use following command to install pca9685 driver:
Note: we suppose you are using latest Raspbian OS which comes with pip and Flask, if you are using other OS, please google solution to install pip and Flask first
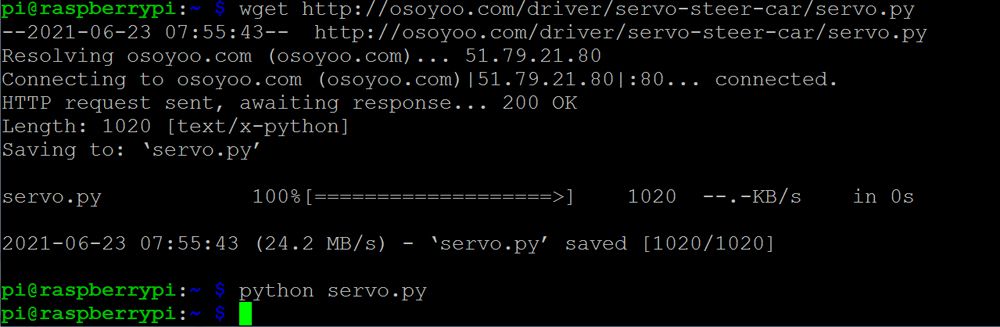
Step 3: Run following two commands to find the front value of the servo :
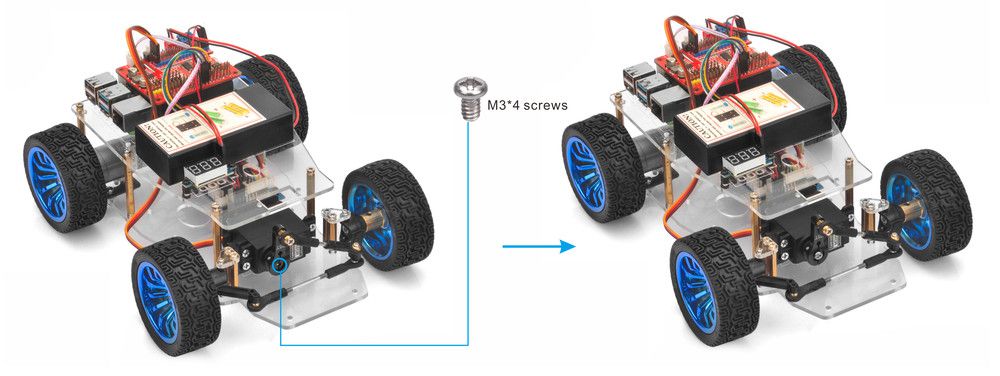
Step 4: If your steering servo does not facing face to center front direction, then you have two options:
Option 1 ) Turn off the power and remove the horn from the servo motor. Install the arm as the follow picture. and then install M3*4 screws on the middle of the horn to fix the horn.
Option 2) Install M3*4 screws on the middle of the horn to fix the horn and enter the following command in terminal:
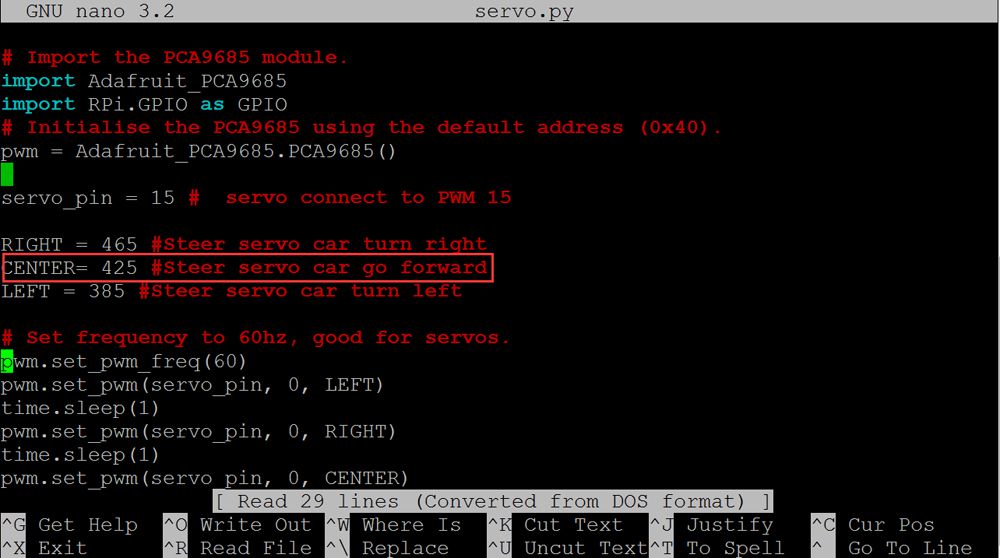
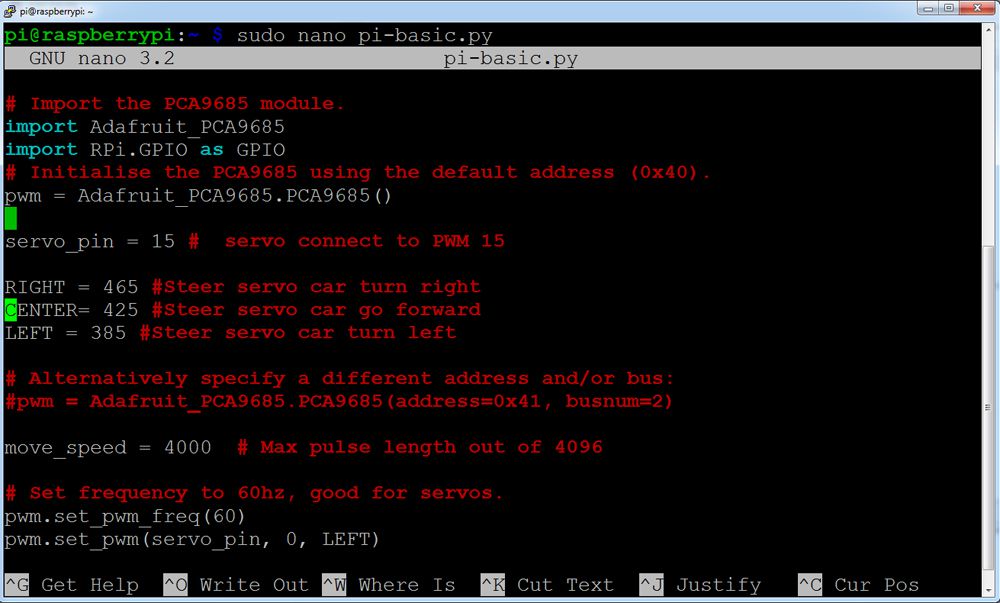
sudo nano servo.py
You can change the default value of line 20
CENTER= 425 #Steer servo car go forward
If your steering wheels tends to left, increase the value from 425 to 430, 435, 440 …
If your steering wheels tends to right, decrease the value from 425 to 420, 415, 410 …
Then click “ctrl” + “x”, and then Y to save this file and run the command: python servo.py again. Repeat these steps until your steering wheels finally faces to front, and write down this value to change the lesson2,3,4,5,6 code and make steering servo always facing front at default FRONT value
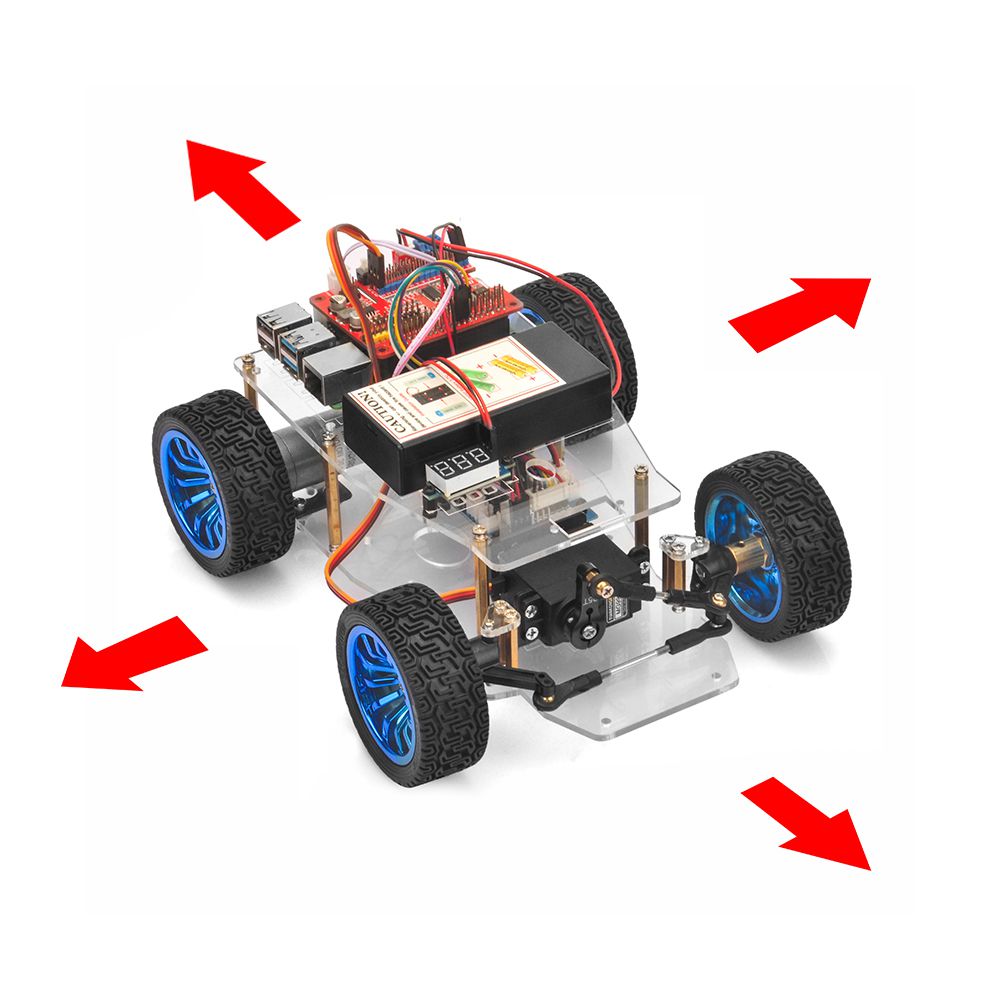
1. Power the car and type the following two commands in the terminal:
2. After above python is running, you motors will move forward and then move backward , and turn left for then turn right, then back to right and finally back to left.
3. Please run the following command to change the default value 425 in line 20 as the FRONT value. If you align the wheel direction manually, please skip this step.
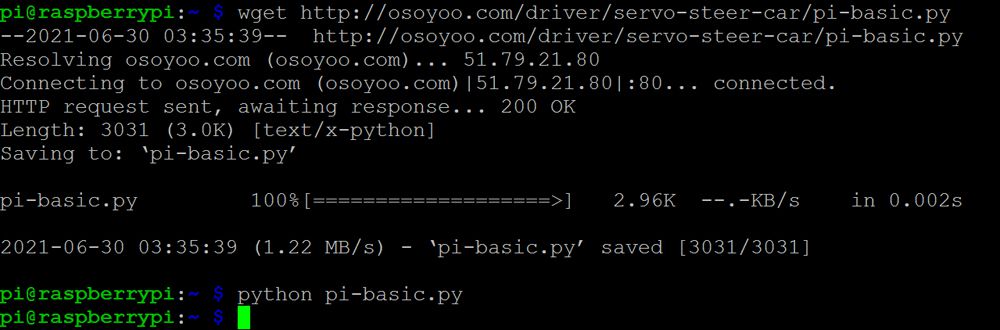
sudo nano pi-basic.py
You can download the sample python code from https://osoyoo.com/driver/p3-car/v3car-basic.py and read it via Notepad++. If you have some basic python knowledge, you can easily understand how to customize the code for your own application.
In additional to Python Programming language, you can use C++ to do the same basic movement project. We have write a sample C++ programming tutorial for Raspberry Pi 5. Here is the tutorial link: https://osoyoo.com/driver/README-P3.md


 3. If you
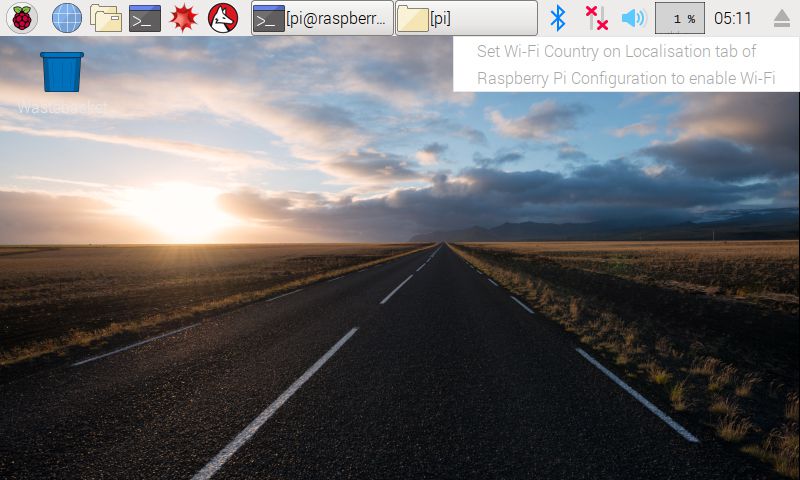


 After learning how to install Raspberry Pi OS and use the console of Raspberry Pi, you can follow the next steps to test the frame work of the robot car in lesson1.