MKS board is an control board for RepRap Prusa i3 3D compatible printer. This board has integrated Arduino Mega2560 and Ramps1.4 control board and make the circuit installation much simpler than before.
MKS Board has following three sub-version:
| sub-version |
Picture |
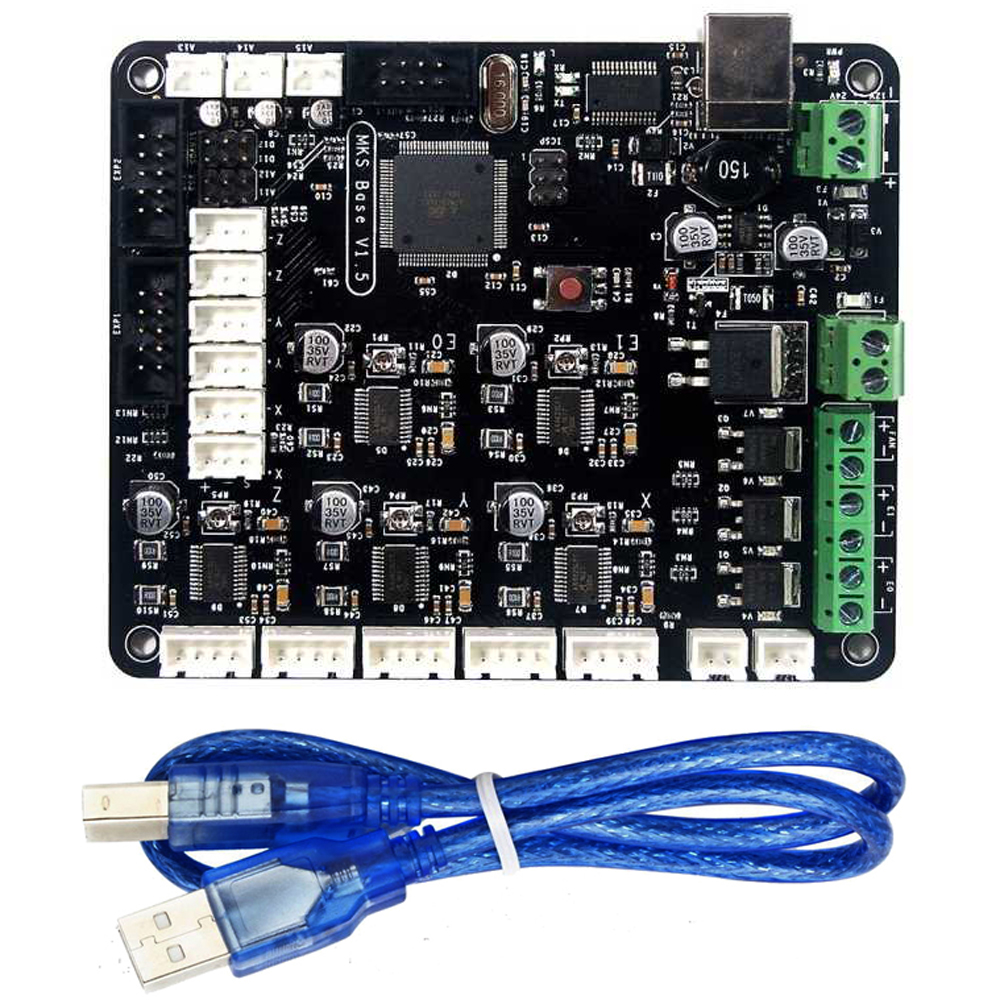
| MKS Base V1.5 |
 |
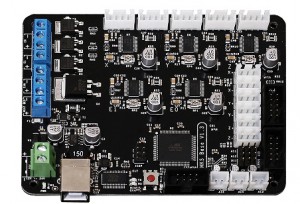
| MKS Base V1.4 |
 |
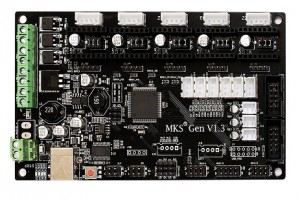
| MKS Gen V1.4 |
 |
MKS Base board integrated 5 servo control model which does not included in MKS Gen 1.4 board. All other features of these two boards are same. We can use same Marlin firmware for both boards.
Please take following steps to install the software in order to let your printer work properly.
Prerequisite:
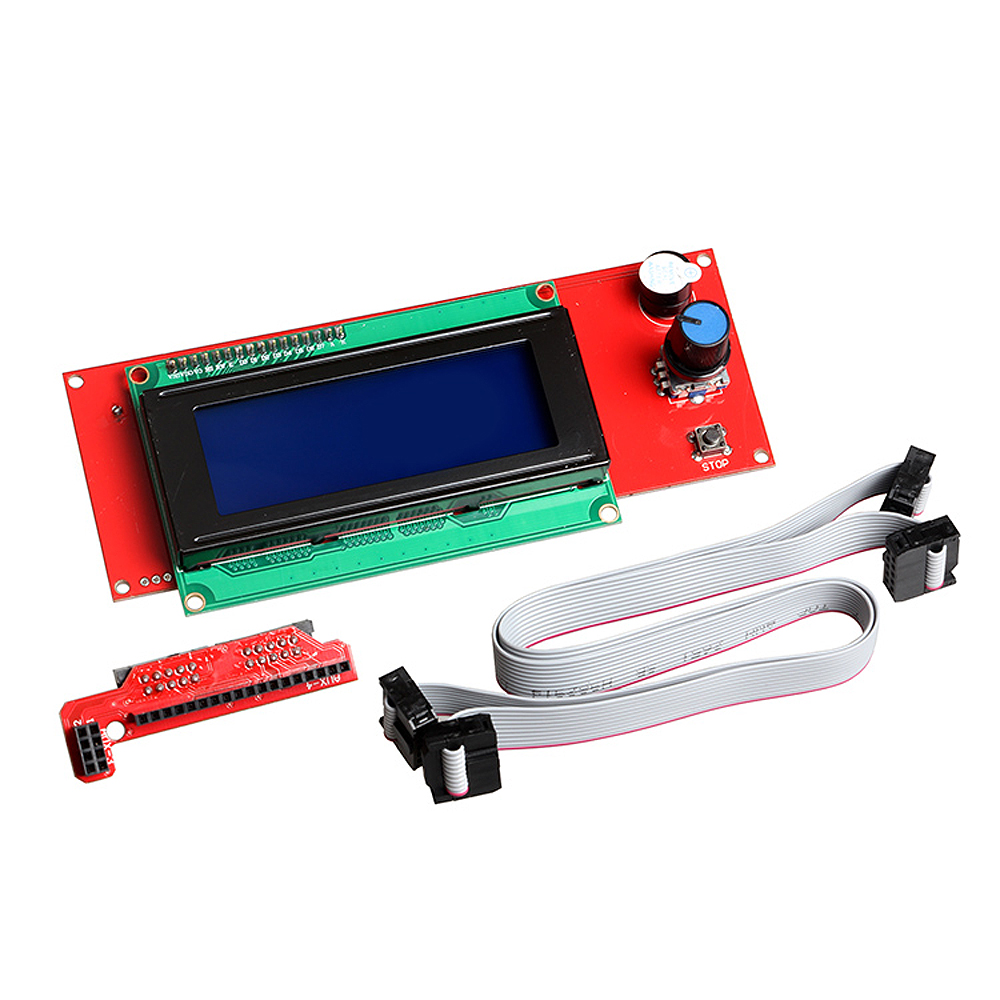
1) Pls check the intalltion and connection graph link for MKS with 12864 or 2004LCD
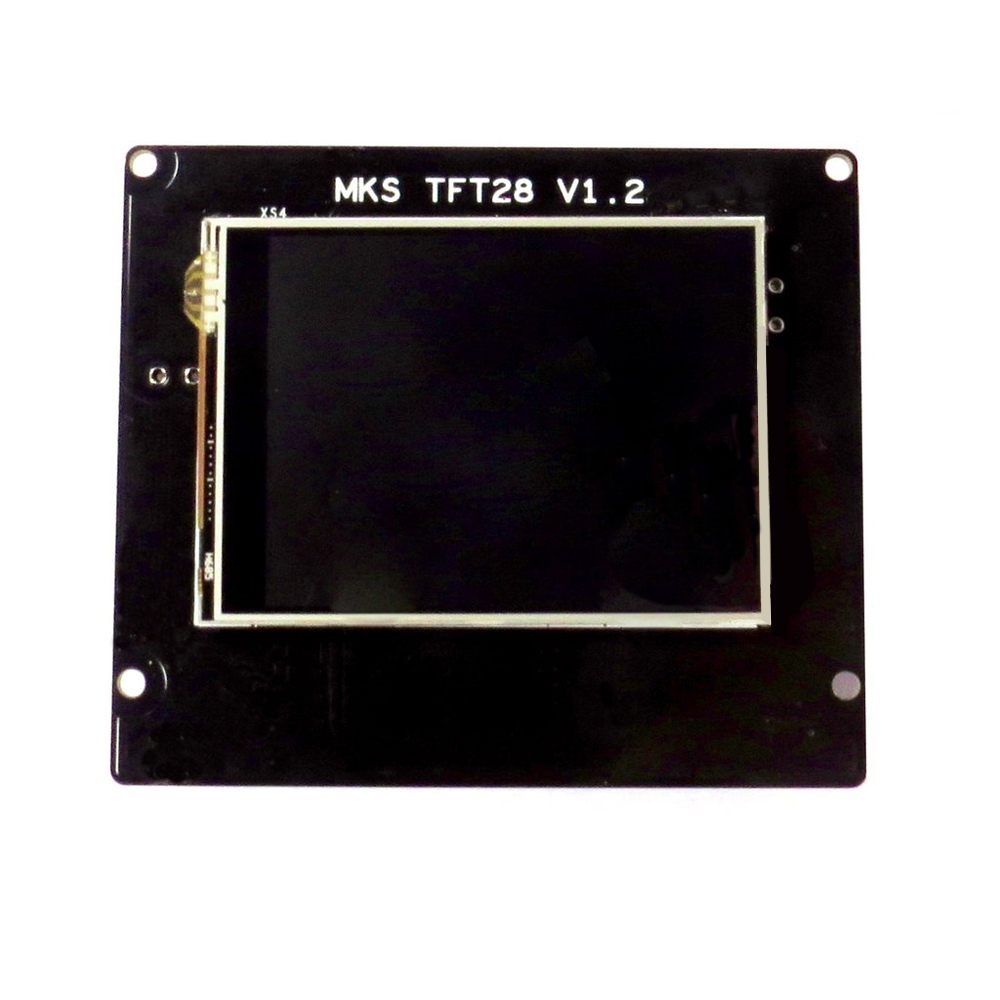
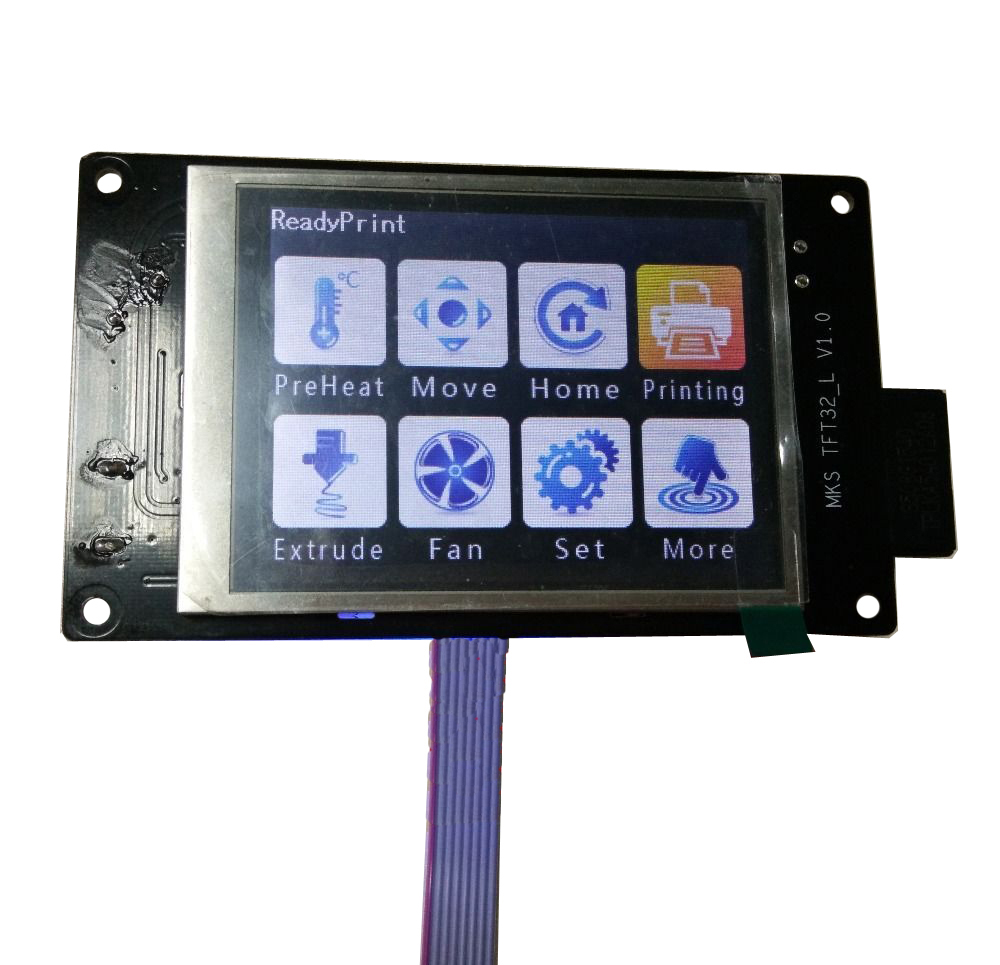
2) Pls check the intalltion and connection graph link for MKS with 2.8″ or 3.2″ TFT Touch LCD
(if you don’t know how to connect the circuit yet, check with your supplier or google the related topic).
Please be noted MKS board Z axis servo controller installation as following:
If you have only one Z axis servo, please connect it to Z_MOT slot, if you have two Z axis servos, another servo should be connected to E1_MOT.
For MKS Gen Board:
If you have only one Z axis servo, please connect it to Z slot, if you have two Z axis servos, another servo should be connected to E1.
Caution: do not plug or unplug and wire or module when power is on, do not even touch the board when power is on or your hand has static charge(you can rmove static charge by touching metal tap) . Always double check power wire is properly installed. If you do not follow above move, you can damage the control board and your 3D printer.
Step 1) Install Arduino and driver (Please download the Arduino IDE version 1.5.X, you’d better download 1.5.4 version IDE).
First, please download Arduino IDE from https://www.arduino.cc/en/Main/OldSoftwareReleases#previous.
Step 2) use USB cable to connect Arduino Mega2560 and your PC. Your pc should detect Arduino Mega2560 and install driver automatically.
If driver can not be installed automatically, you can download the driver from following link:
osoyoo.com/driver/FAT 232 driver.rar
Unzip above file and run the installation program
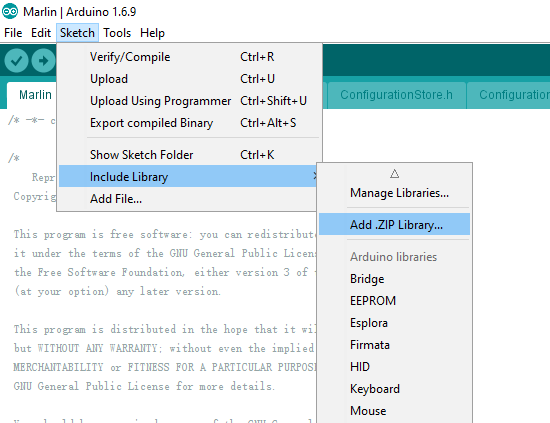
Step 3)Install U8glib library into Arduino IDE. If you have already installed U8glib, please skip this step>
First: Download U8glib library from OSOYOO U8glib library .
Then, in Arduino IDE ->Sketch->Include Library->Add Zip Library , select the zip file you just downloaded and load into IDE. see following picture:

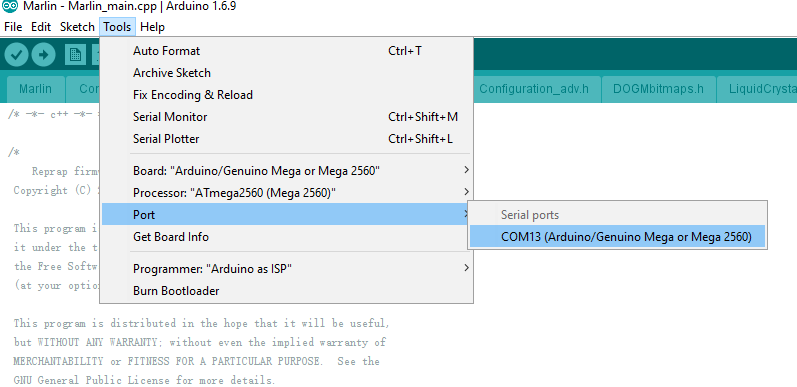
Step 4) In Arduino IDE->Tools->Board select Arduino Mega 2560:
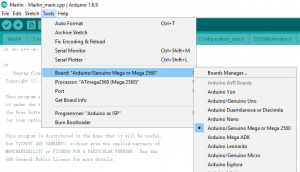
In Tools->Port select the COM port which associated with Arduino Mega2560(see picture below)

Step 5)Download Ramps1.4 board Marlin firmware as per your LCD screen type.
Unzip above file, you will see a folder called “Marlin”
In above Marline folder, there is Configuration.h file which defines some important hardware config setting values. Please read following instruction to change the Configuration.h and configuration_adv.h file according to your hardware situation:
A)If you connect MKS Gen/Base board with two Z axis servo motors, please make following changes,
In configuration.h line 248 to 253:
#define INVERT_X_DIR false // for Mendel set to false, for Orca set to true
#define INVERT_Y_DIR true // for Mendel set to true, for Orca set to false
#define INVERT_Z_DIR false // for Mendel set to false, for Orca set to true
#define INVERT_E0_DIR false // for direct drive extruder v9 set to true, for geared extruder set to false
#define INVERT_E1_DIR false // for direct drive extruder v9 set to true, for geared extruder set to false
#define INVERT_E2_DIR false // for direct drive extruder v9 set to true, for geared extruder set to false
in configuration_adv.h uncomment line 148 #define Z_DUAL_STEPPER_DRIVERS as following:
#define Z_DUAL_STEPPER_DRIVERS // disable this line if you have only one Z motor
B)If you connect MKS Gen/Base board with only One Z axis servo motors, please make following changes,
In configuration.h line 248 to 253:
#define INVERT_X_DIR false // for Mendel set to false, for Orca set to true
#define INVERT_Y_DIR true // for Mendel set to true, for Orca set to false
#define INVERT_Z_DIR false // for Mendel set to false, for Orca set to true
#define INVERT_E0_DIR false // for direct drive extruder v9 set to true, for geared extruder set to false
#define INVERT_E1_DIR false // for direct drive extruder v9 set to true, for geared extruder set to false
#define INVERT_E2_DIR false // for direct drive extruder v9 set to true, for geared extruder set to false
in configuration_adv.h disable line 148 #define Z_DUAL_STEPPER_DRIVERS as following:
//#define Z_DUAL_STEPPER_DRIVERS // disable this line if you have only one Z motor
Step 6)In Arduino IDE->File->Open, find Marlin Folder and open Marlin Arduino File(Marlin.ino)
Your IDE will compile the firmware and load it into Mega2560 board. There might be some warning error message during compiling, just neglect those message.
After the firmware is loaded into Arduino Mega2560, your LCD will show 3D printer menu as per following picture:
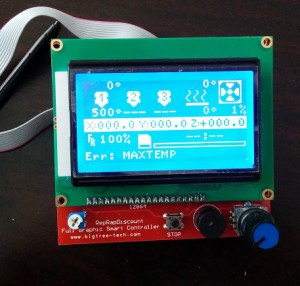
Now you can now control the printer accordingly.


Hello, I’m having a bit of an issue after having installed this. I have a HICTOP i3 Prusa (an older version with standard-threaded Z-axis rods of this: https://smile.amazon.com/dp/B00N7I1ZVU). The stock board fried, so I looked around a bit and found the MKS Base V1.5 as a replacement. I followed all of the instructions here, but I’m having this odd issue where prints are coming out at about half the height they should be. I assume something is set incorrectly in the Configuration.h file, but I’m not sure what.
Also for what it’s worth, in following the guide to a “T” here, The Y- and Z-axes were reversed. I had to set #define INVERT_Y_DIR to false and #define INVERT_Z_DIR to true.
And another small issue that I’m sure is also something to be set in the Configuration.h file: it seems the full print volume isn’t being utilized. The Y- and Z-axes only goes up to about 2/3 of its max, while the X-axis goes to about 3/4 of its max.
Otherwise, this board seems to be doing a bang-up job. Thanks for any help in advance!
1) I don’t know you mean the prints are coming out at about half the height they should be. Are you willing to take a video and send to my email address: [email protected]
2) What’s do you mean “in following the guide to a “T” here ”
3) At line 263-268 in the Configuration.h file, pls confirm the Max is the value in the file:
#define X_MAX_POS 180
#define X_MIN_POS 0
#define Y_MAX_POS 205
#define Y_MIN_POS 0
#define Z_MAX_POS 185
#define Z_MIN_POS 0
I figured it out. I was using only the default values in the Configuration.h file, and the steps were way off. Default is set to 1600 for the Z-azis and my printer needed it to be somewhere around 2560. I ended up finding a tweaked Configuration.h file rom someone else who had the same printer and merged the two files together. My prints are looking quite a bit better now, with no awkward vertical scale. I’m going to be replacing the threaded rods with some trapezoidal ones, so I’m sure I’ll have to change it again. Possibly back to 1600 depending on which rods I get.
As for those min and max positions, they were indeed those defaults. I had to change those as well.
Thanks for the response!
thx
Hey Im using the board to fix up my Hictop Prusa i3 as well. Ive got it homing and moving in the proper direction, but im having an issue where the Z- endstop doesnt seem to want to trigger. Ive checked to make sure that it is NC, I’ve tried triggering it normally. No matter what I do it doesnt seem to want to read anything from there. did you do anything change anything to get the Z end stop working.
Thanks in advance!
which board and LCD do you use?
I got an error when I tried to upload to my 2004 LCD
exit status 1
using typedef-name ‘fpos_t’ after ‘struct’
its not a warning.. so I dont think its uploading
got the same error would love to have this make sense
figured it out make sure you download the Arduino version 1.5.4 anything newer will not compile. hope this help
nice.. no compile issue.. and then I had to switch to COM 5 and
it uploaded. Now my LCD works again.. time to try a print
ksauerwald wondering if your are running two z axis motors and if the changes to the config file for this make any sense to you
You can change all instances of “fpos_t” in sdbasefile.h and sdbasefile.ccp in Arduino to something different like “fpos_t1”. Use CTRL-F to find all instances in both files and replace all. It should compile without issues after that since it is just a naming conflict.
im very new at this could you make sense of the changes you are having me make to the config.h and config_adv.h for a 2 motor z axis because to me the instructions are the same for with no changes?
So I got my LCD showing correct.. but when I try to connect via Pronterface the log on the right shows junk.. any clue what I need to do on that ? am I missing some step ?
found it.. needed to reload and change baud rate.
Hello,
I have the Anet A8 printer which seems to be taking the world by storm. It burnt out and I am replacing it with the MKS base 1.5 board with 3.2 Touchscreen. I have been able to upload the code to the board. I got the directions for x,y,and box z motors correct but when homing, it seems to have issues with the endstops, especially the z. Anyone have any good settings or advice. Also, i can not find anything on net for full documentation on the jumper configurations.
i am also having issues w/ the endstops cant get them recognized at all would you mind sharing your config files?
I have not figured out endstops yet
I to have the anet a8 trying to get this to work can’t seem to get my second z axis motor running one will move the other will click at me. have you run into this problem revmagi?
Make sure your second Z axis is E1-mot.
so i did do that its weird because the motor that is having the issue is pluged into the z-mot on the board. i have swithed the motors to make sure the motor is not bad it will do it to any motor plugged in to z-mot 🙁
I am not front of my computer. I also don’t see where to upload my files.
hey mate are you able to mod the code for me and send it would be a great help
Hello,
I found someone else with A8 that has shed light on our issue. The endstops and their plugs need to be rewired. The guy is going to share his Marlin info as well. I will help you once I have mine figured out.
NC on the endstop goes to the pin S on the board, and COM on the endstop goes to – on the board. I had to resold my connectors on the endstop. That takes care of the hardware portion.
Here is what I have under the last section of “Endstop Settings” in Marlin (config.h)
// Mechanical endstop with COM to ground and NC to Signal uses “false” here (most common setup).
#define X_MIN_ENDSTOP_INVERTING false // set to true to invert the logic of the endstop.
#define Y_MIN_ENDSTOP_INVERTING false // set to true to invert the logic of the endstop.
#define Z_MIN_ENDSTOP_INVERTING false // set to true to invert the logic of the endstop.
#define X_MAX_ENDSTOP_INVERTING false // set to true to invert the logic of the endstop.
#define Y_MAX_ENDSTOP_INVERTING false // set to true to invert the logic of the endstop.
#define Z_MAX_ENDSTOP_INVERTING false // set to true to invert the logic of the endstop.
#define Z_MIN_PROBE_ENDSTOP_INVERTING false // set to true to invert the logic of the endstop.
very cool thank you for the help. Still cant figure out why the motor on my z mot plug does not work but the e1 mot does? could i give you my email? [email protected] to look at the marlin file I am loosing my mind thinking possibly bad board because only the z mot does not work switch motors to another plug like x mot and works fine.
I sent you email. I need to refine my extruder then I should be good. These changes worked for me. Let’s see if we can get your second Z working.
haven’t gotten to try my extruder but that would be great.
thank you 🙂
I have a capacitive sensor for my Z stop.
This is what the leapfrog creatr came with and its not reconizing it.
when the build plate goes up the capacitive sensor lights up but it doesn’t stop.
Is there a pin set for this capacitive sensor and where do I apply in the marlin firmware
It would be nice if Osoyoo added their board to https://www.repetier.com/firmware/v092/ firmware confirguration tool.
would really like to hear from tech support. but supposedly there is some kind of support here.
I am running an Anet a8 using two motors for the z axis. well, I followed your instructions above and it seems that now I can get e1 mot position running fine but the z mot will only chatter at me. at this point I’m thinking the card is bad and will be returning it and getting another board to see unless support can help me with this in some way.
also thanks to users on the message who are and have helped me
you all rock.
Solved another problem. If your 12864 LCD does not work, and is flashing and beeping, your 2 ribbon connectors on the board are turned around backwards. Meaning the tab is facing out instead of in. The numbers are correct. Trim the tabs off the cable plug and turn them around.
Hello, I just got the MKS BASE v1.5 + TFT28 from Amazon and I’m having problem getting them to work, I made sure that all connections are correct and install both the TFT28 driver and TFT28 marlin firmware as instructed on the page, with the Arduino IDE 1.5.4, my problem is that the display and the main board seems not communicating with each other, the temperature on both the bed and extruder always show zero, and moving the axis on the display does nothing, the motors won’t respond, they’re all off, with no turning resistance. Later on I found that the firmware download links for both TFT28 and TFT32 on this page lead to the same file as 12864 LCD, I’m wondering if that’s the cause, can you please check the download link?
had the same problem easy fix. once you load the marlin firmware reload the driver firmware for the card I think it’s in the tutorial for the card on this website then restart the screen and your down 🙂 let me know if it works
Make sure your LCD is attached to the correct port! You might have plugged your screen into the wrong one.
Look at our SCREEN BOARD. Try the other connection point.
I have this package: OSOYOO 2016 Super 3D Printer kit for RepRap Prusa I3 with MKS Base V1.5 Controller Board + 2.8″ TFT LCD Touch Screen
I’ve updated the firmware, matching the 2.8″ TFT touch screen Marlin firmware. I’ve updated the screen.
Still it does not function.
Got it! Make sure the SCREEN BOARD is connected to the right one.
Recommended slicer?
Where should the extruder fan be plugged into? The on that is controlled by the printer to cool the extruded plastic.
I have the exact same question
& how to wiring in a indcutive probe.
Hi i have Mks Gen v1.4 and lcd 12864, after flashing have some screen problems with continuouse beeping signal. The only heply trick was to change wires on conecctors, becouse they come from china in wrong direction. I mean the red wire must come stright from board untill Lcd screen. The right connection you can check as after connection but before flashing the screen must shine without any letter, after flashing as on the picture below…
https://postimg.org/image/f1kxylsn1/
Hello, I have got brand new 3.2″ Colorful LCD TouchScreen + MKS Base V1.5 Controller from eBay, just followed all the steps above and it works, but XYZ motors won’t move manually (- , + ) both directions from the TouchScreen but they move to home as well, (single & all) any advice please!
Pls connect the endstop to X-,Y-,Z-
Thanks for the response! I did connect the endstop to X-,Y-,Z-
and now they are just working fine, Great.
Now please I need to learn how to increase the steps of X, Y , Z at (Configuration.h) file because they only move half way of my bed (220,270,220)
Much appreciate your help,
Do you make sure you connect the motor the the board correctly?
Hello, I have a new MKS Base V1.5. My printer has 2 Z motors. I also have a motor for the extruder. Can you tell me where to plug in the extruder motor? Also, is there anything that I need to set in the Marlin software to tell it about the extruder motor?
Thank you!
If you have two Z axis servos, one connected to Z motor port and another servo should be connected to E1_Motor port.
The extruder motor should be connected to E0_Motor port.
Check the photo here:
http://g02.a.alicdn.com/kf/HTB1vCH0NVXXXXalaXXXq6xXFXXX4/Osoyoo-MKS-Base-V1-5-3D-Printer-Controller-Remix-Board-MEGA2560-and-RAMPS-1-4-Compatible.jpg
Thank You!
I am having painful issues with this MKSv1.4, Problem Z Axis really slow. I changed from Superb Rambo board to this MKSv1.4. I am running Marlin RC, Adruino 1.8, and Matter control. Also tried many versions of Malin including this one. Everything fine after setup except Z axis is way to slow. It crawls along, I have turned up Feedrate in Marlin multiple values 0 to 5 even higher. Tried different step sequences, Even different ramps. I have tried changing 2nd Z axis to E1. Changed to 24v input, I have tried changing values in Matter control EEprom and can to get Z to faster. I even swapped board out and the same issue on both brand new boards. I need a fix for this. X and Y fine but both Z axis move like a slobs.
Does anyone know how to disable max federate for Z axis.Apparently 5 is the highest it can count.
if you have two Z axis servos, another servo should be connected to E1_MOT.
In configuration.h line 248 to 253 of Marlin, pls change the code:
#define INVERT_X_DIR false // for Mendel set to false, for Orca set to true
#define INVERT_Y_DIR true // for Mendel set to true, for Orca set to false
#define INVERT_Z_DIR false // for Mendel set to false, for Orca set to true
#define INVERT_E0_DIR false // for direct drive extruder v9 set to true, for geared extruder set to false
#define INVERT_E1_DIR false // for direct drive extruder v9 set to true, for geared extruder set to false
#define INVERT_E2_DIR false // for direct drive extruder v9 set to true, for geared extruder set to false
in configuration_adv.h uncomment line 148 #define Z_DUAL_STEPPER_DRIVERS as following:
#define Z_DUAL_STEPPER_DRIVERS // disable this line if you have only one Z motor
As I said I have tried changing 2nd Z axis to E1 Already.
I changed the motor directions accordingly no effect.
I have a sneaking suspicion this is inbuilt board regulation to prevent wallys frying the z axis drivers but how can that be possible Marlin controls the PWM step speed to the driver unless they have figured a way to limit divide the PWM on board.
I will have to get oscilloscope on step pin see what is happening.
X axis fast z axis really slow.
Do you mean when you press home, the Z axis is slow. Pls check the configuration.h of marlin.
About Line 286, it shows 50*60,50*60,4*60, you can change the 4 to big number.
I have tested z speed on actual print retraction because that was my main concern and it appears to not effect the print quality. Especially on this new prototype printer.
So for now I am all good many thanks for your help.
I am lucky I purchased two test boards before buying a large shipment.
For anyone else who has the same issue. z axis is much slower than I am used to but it has not effected the print quality in my case when I did an actual print test. Retract speed seems more than enough when doing an actual print.
Do you config the code in configuration.h?
An line 286, it says #define HOMING_FEEDRATE {50*60,50*60,4*60}
You can change the 4*60 to change the Z axis speed
Hello, I have just purchased the MKS Base V1.5 as my RAMPS board cut out. MY printer has worked perfectly and now that I have this board it does not recognize the endstops. I have followed the step by step guide over and over again(and yes the endstops are on X-,Y-, Z-). Does anyone know what could be wrong and what I could do about it. Thank you.
I have fixed the endstops not working but now when I start a print the z axis goes all the way to the top and starts printing, so the filament just falls to the bed, any suggestions?
Pls you need to adjust the distance between the bed and extrude by hand.
Sorry… let me rephrase that, the prints are started at the max build height but when I go home on the printer the printer goes to where it should. So instead of starting the print at 0mm on the z axis it is starting at 170mm and going down. What could be the problem?
1) Pls adjust the endstop of Z axis. Maybe the endstop of Z axis is too high
2) pls insert the Z motor in opposite
Hello, I have an MKS Base V1.5 with a 2.8 touch screen. In my configuration I have 3 endstops and they are connected to X-, Y-, and Z-. If I activate the switches on the endstops manually the LED on the endstop lights. And f I use the touchscreen and select “Home,” it will move everything.
However, if I try the touchscreen to move X, Y, or Z, nothing happens. Can you give me some guidance?
Thanks
pls confirm you connect the thermistors.
Hi
I want to connect a auto bed levelling sensor LJ18A3-8-Z/BX
Is this possible?
Instructions?
I am using 1.5.4 but when I try to compile I keep getting this error:
Arduino: 1.5.4 (Windows 7), Board: “Arduino Mega 2560 or Mega ADK”
In file included from /SdFile.h:27,
from /cardreader.h:6,
from cardreader.cpp:2:
SdBaseFile.h:199: error: ‘fpos_t’ has not been declared
SdBaseFile.h:203: error: ‘fpos_t’ has not been declared
This report would have more information with
“Show verbose output during compilation”
enabled in File > Preferences.
Please advise on what I need to do.
had the same isseu replayed my ide with 1.0.6 much older version.
fixed the problem for me.
Which error do you get?
I am using 2 z steppers and have the second plugged in to e1 when moving the one on e1 turns much faster than the z does. Do you have a fix for that problem?
Do you change the extrude to 2 before you update your marlin?
I changed it but no change with stepper e1 spins way faster than z.
Do you mean the E1 motor is faster than Z?
Hello,
I have a MKS Base v.1.5 with 2 z-motors. I want to hook up a BLTouch. Can you tell me how to make the connection?
Also, is there a description somewhere for jumper pins and other connectors?
Thank you
Thank you! After 3 days in serchts and attemps, only this insruction make me happy. Now my setup workig done!
what type do i put here?
exit status 1
‘SWITCH_ENABLED_X_DUAL_STEPPER_DRIVERS’ does not name a type
This report would have more information with
“Show verbose output during compilation”
option enabled in File -> Preferences.
Do you change the code of Marlin?
If so, pls give me the new code.
My fans are on full blast all the time, how do I program it to control the extruder fan speed like my previous board
Which board do you use? What is your previous board?
Arduino: 1.5.4 (Windows NT (unknown)), Board: “Arduino Mega 2560 or Mega ADK”
In file included from /MarlinConfig.h:32,
from /Marlin.h:36,
from blinkm.cpp:28:
/Configuration_adv.h:253:3: error: invalid preprocessing directive #ENABLED
/Configuration_adv.h:290:2: error: #endif without #if
In file included from /MarlinConfig.h:33,
from /Marlin.h:36,
from blinkm.cpp:28:
/pins.h:178:4: error: #error “Unknown MOTHERBOARD value set in Configuration.h”
In file included from /MarlinConfig.h:39,
from /Marlin.h:36,
from blinkm.cpp:28:
/SanityCheck.h:33:4: error: #error “Marlin requires C++11 support (gcc >= 4.7, Arduino IDE >= 1.6.8). Please upgrade your toolchain.”
/SanityCheck.h:463:8: error: #error “Z_MIN_PROBE_USES_Z_MIN_ENDSTOP_PIN requires the Z_MIN_PIN to be defined.”
/SanityCheck.h:739:4: error: #error “HEATER_0_PIN not defined for this board.”
In file included from /MarlinConfig.h:32,
from /Marlin.h:36,
from blinkm.cpp:28:
Configuration_adv.h:273: error: ‘SWITCH_ENABLED_Z_DUAL_STEPPER_DRIVERS’ does not name a type
In file included from C:\Program Files (x86)\Arduino\hardware\arduino\avr\cores\arduino/Arduino.h:193,
from /MarlinConfig.h:37,
from /Marlin.h:36,
from blinkm.cpp:28:
C:\Program Files (x86)\Arduino\hardware\arduino\avr\cores\arduino/WCharacter.h:26: error: ‘boolean’ does not name a type
C:\Program Files (x86)\Arduino\hardware\arduino\avr\cores\arduino/WCharacter.h:27: error: ‘boolean’ does not name a type
C:\Program Files (x86)\Arduino\hardware\arduino\avr\cores\arduino/WCharacter.h:28: error: ‘boolean’ does not name a type
C:\Program Files (x86)\Arduino\hardware\arduino\avr\cores\arduino/WCharacter.h:29: error: ‘boolean’ does not name a type
C:\Program Files (x86)\Arduino\hardware\arduino\avr\cores\arduino/WCharacter.h:30: error: ‘boolean’ does not name a type
C:\Program Files (x86)\Arduino\hardware\arduino\avr\cores\arduino/WCharacter.h:31: error: ‘boolean’ does not name a type
C:\Program Files (x86)\Arduino\hardware\arduino\avr\cores\arduino/WCharacter.h:32: error: ‘boolean’ does not name a type
C:\Program Files (x86)\Arduino\hardware\arduino\avr\cores\arduino/WCharacter.h:33: error: ‘boolean’ does not name a type
C:\Program Files (x86)\Arduino\hardware\arduino\avr\cores\arduino/WCharacter.h:34: error: ‘boolean’ does not name a type
C:\Program Files (x86)\Arduino\hardware\arduino\avr\cores\arduino/WCharacter.h:35: error: ‘boolean’ does not name a type
C:\Program Files (x86)\Arduino\hardware\arduino\avr\cores\arduino/WCharacter.h:36: error: ‘boolean’ does not name a type
C:\Program Files (x86)\Arduino\hardware\arduino\avr\cores\arduino/WCharacter.h:37: error: ‘boolean’ does not name a type
C:\Program Files (x86)\Arduino\hardware\arduino\avr\cores\arduino/WCharacter.h:38: error: ‘boolean’ does not name a type
C:\Program Files (x86)\Arduino\hardware\arduino\avr\cores\arduino/WCharacter.h:46: error: ‘boolean’ does not name a type
C:\Program Files (x86)\Arduino\hardware\arduino\avr\cores\arduino/WCharacter.h:54: error: ‘boolean’ does not name a type
C:\Program Files (x86)\Arduino\hardware\arduino\avr\cores\arduino/WCharacter.h:62: error: ‘boolean’ does not name a type
C:\Program Files (x86)\Arduino\hardware\arduino\avr\cores\arduino/WCharacter.h:69: error: ‘boolean’ does not name a type
C:\Program Files (x86)\Arduino\hardware\arduino\avr\cores\arduino/WCharacter.h:76: error: ‘boolean’ does not name a type
C:\Program Files (x86)\Arduino\hardware\arduino\avr\cores\arduino/WCharacter.h:83: error: ‘boolean’ does not name a type
C:\Program Files (x86)\Arduino\hardware\arduino\avr\cores\arduino/WCharacter.h:90: error: ‘boolean’ does not name a type
C:\Program Files (x86)\Arduino\hardware\arduino\avr\cores\arduino/WCharacter.h:97: error: ‘boolean’ does not name a type
C:\Program Files (x86)\Arduino\hardware\arduino\avr\cores\arduino/WCharacter.h:104: error: ‘boolean’ does not name a type
C:\Program Files (x86)\Arduino\hardware\arduino\avr\cores\arduino/WCharacter.h:112: error: ‘boolean’ does not name a type
C:\Program Files (x86)\Arduino\hardware\arduino\avr\cores\arduino/WCharacter.h:121: error: ‘boolean’ does not name a type
C:\Program Files (x86)\Arduino\hardware\arduino\avr\cores\arduino/WCharacter.h:128: error: ‘boolean’ does not name a type
C:\Program Files (x86)\Arduino\hardware\arduino\avr\cores\arduino/WCharacter.h:136: error: ‘boolean’ does not name a type
In file included from /MarlinConfig.h:37,
from /Marlin.h:36,
from blinkm.cpp:28:
C:\Program Files (x86)\Arduino\hardware\arduino\avr\cores\arduino/Arduino.h:198: error: ‘uint16_t makeWord’ redeclared as different kind of symbol
C:\Program Files (x86)\Arduino\hardware\arduino\avr\cores\arduino/Arduino.h:197: error: previous declaration of ‘uint16_t makeWord(uint16_t)’
C:\Program Files (x86)\Arduino\hardware\arduino\avr\cores\arduino/Arduino.h:198: error: ‘byte’ was not declared in this scope
C:\Program Files (x86)\Arduino\hardware\arduino\avr\cores\arduino/Arduino.h:198: error: ‘byte’ was not declared in this scope
In file included from blinkm.cpp:28:
/Marlin.h: In function ‘void refresh_cmd_timeout()’:
Marlin.h:249: error: ‘millis’ was not declared in this scope
This report would have more information with
“Show verbose output during compilation”
enabled in File > Preferences.
Arduino: 1.8.0 (Windows 10), Board: “EMoRo 2560”
In file included from sketch\MarlinConfig.h:32:0,
from C:\Users\chris\Downloads\SkynetV2.3.1 (1)\SkynetV2.3.1\SkynetV2.3.1\SkynetV2.3.1.ino:37:
Configuration_adv.h:290: error: #endif without #if
#endif // Z_DUAL_STEPPER_DRIVERS
^
In file included from sketch\MarlinConfig.h:33:0,
from C:\Users\chris\Downloads\SkynetV2.3.1 (1)\SkynetV2.3.1\SkynetV2.3.1\SkynetV2.3.1.ino:37:
pins.h:178: error: #error “Unknown MOTHERBOARD value set in Configuration.h”
#error “Unknown MOTHERBOARD value set in Configuration.h”
^
In file included from sketch\MarlinConfig.h:39:0,
from C:\Users\chris\Downloads\SkynetV2.3.1 (1)\SkynetV2.3.1\SkynetV2.3.1\SkynetV2.3.1.ino:37:
SanityCheck.h:463: error: #error “Z_MIN_PROBE_USES_Z_MIN_ENDSTOP_PIN requires the Z_MIN_PIN to be defined.”
#error “Z_MIN_PROBE_USES_Z_MIN_ENDSTOP_PIN requires the Z_MIN_PIN to be defined.”
^
SanityCheck.h:739: error: #error “HEATER_0_PIN not defined for this board.”
#error “HEATER_0_PIN not defined for this board.”
^
exit status 1
#endif without #if
This report would have more information with
“Show verbose output during compilation”
option enabled in File -> Preferences.
Are you willing to try it on Arduino IDE 1.5.4?
Hello,
I was wondering if someone had the variables to change to get a second extruder (I have dual MK8) setup in a Cartesian setup (Migbot) with this board?
Thank you in advance.
I should say I have the MKS Base V1.5 board.
Do you mean you want to setup the extruder 2 separetedly?
Or you just want to use two extruders?
I cant get my extruder to move. I checked the motor, and the wire to the motor, they are both fine. It seems to be either the port on the control board, or the LCD screen. Can anyone help?
Pls confirm you install the thermistors correctly.
Im having a problem installing the thermistors on the gen 1.4… where the hell do they go? lol
E0 thermistors insert A13
E1 thermistors insert A15
Hotbed thermistors insert A14
Hi zigzach123
I changed from a Melzi board to the MKS GEN V1.4. I experience the same Problem with the new board… Did you manage to find a solution.
I am installing this controller on my Anet A8. I have everything set up correctly. However, I found out that the DEFAULT_AXIS_STEPS_PER_UNIT need to be modified. What’s the value that Anet A8 user should use?
You need to change the value according to your 3D printer.
You can calculate it on the link: http://www.prusaprinters.org/calculator/
Hey All.
I’m wondering if someone can help me at all.
I’ve converted my CTC 3D printer to using an MKS Gen V1.4 and MKS32 TFT screen, all is workign well expect for one area and that is certain printing from SD card.
What happens is that with some files, outputted by S3D I will add, the printer stops printing as if it is waiting for instructions from the TFT/SD. I have left it to see if it carries on but it doesn’t and eventually releases the stepper drives so I can manually mvoe the carriage.
I have scoured the internet and tried to find what could be going on, I have changed multiple settings all to no avail.
Printing directly from USB or Octoprint works fine, as do some files placed on the SD card I will add, it is just the odd one (I am wondering if it is linked to small, fast files?) that does not work.
Any help or ideas will be appreciated.
Ian
I’m having problems too, my printer only use a quarter of the surface 🙁
I tried almost everything, but i’m lost 🙁
Mks Gen 1.4 + tft32 with 5x drv8825 (at 1/16).
I hope you can help me 😀
Do you mean your 3D printer stop printing after 15 miniters working?
Can the printer work again?
Hello.
No mine will stop printing at any time when using the SD card in the TFT to control the MKS board.
It does seem to be linked to when there is perhaps a lot of changes for intrictae prints, as I did three 2.5 hour + prints all ok. But go to a smaller part and it stops printing within a few minutes of starting.
I would say it’s almost as if there is a buffer problem with the data being sent out from the TFT to MKS Gen board and the board cannot deal with the flow of data and so looses steps and stops printing.
I have left it to see if it starts again but it doesn’t and after a few more minutes the steppers are released so the system has shutdown.
Also I notice small pauses in these same prints up until the time it stops printing completely.
Ian
To add, sometimes I cannot then choose the cancel print option and have to rebooth the whole setup by powering off the printer/MKS and back on again to clear it’s memory almost.
Now I can get to print almost the build surface, but if I try to print 200*200mm, the print just print like 160*200mm.
I modified the x_min_pos and the x_max_pos, without success.
Thank you for taking your time with my trouble 😉
I have followed these instructions on installing my new MKS 1.5 onto my Anet A8. I have tried Arduino version 1.4,1.0.6, and 1.8.1. All of them act as though everything is fine, but the LCD never lights up and my OctoPrint isn’t able to control the printer. Can someone please help?
I Too am having the same exact issues. I can upload everything to the board, but nothing shows up on the 12864 LCD and yes the cables are plugged in correctly and the LCD definitely works because Ive been using it on my ramps 1.4.
Do you try to update the marlin with Arduino IDE 1.5.4?
If the LCD don’t show anything, pls turn out a notch on the other side of the EXP1 and EXP2 connector on LCD to make it work, as EXP1 and EXP2 connectors on LCD are soldered wrong
I just notched it out and tried both the EXP1 and the EXP2. The LCD still did nothing.
Can someone please help? My printer has been down almost 2 weeks because of a damaged control board. I purchased this new board so I could get back to printing and so far I can’t do anything.
Pls try to follow the link for Anet A8: https://github.com/melvinchng/AnetA8_MKSBase1.5
Which LCD do you use
12864 LCD. I’ll try that out. Is it possible to add a z axis probe for auto bed leveling?
There doesn’t seem to be any options in the configuration for using a new version of marlin. Unless im missing something?
figured everything out. Clip the LCD cables, and I just installed marlin rc8 using Arduino 1.8.1. Just make sure you define the motherboard with #define MOTHERBOARD BOARD_MKS_13
Do you think you could help me with this process? At this point I am beyond frustrated with this thing. Every time I get great prints something goes wrong. When I get thy fixed, something else comes up.
#define MOTHERBOARD 33
Pls try to follow the link for Anet A8: https://github.com/melvinchng/AnetA8_MKSBase1.5
Ok I have the mks 1.5 with the tft28 touch screen in my monoprice maker select v2. I have the printer heating up and moving but the extruder does not turn it just bounces back and forth. I have the hotend at 210 and can easily push filament through. I swapped motos around and that did not fix the problem. I have double checked the wires and there good. Is there something i am missing In the setup that would fix this? Or any ideas of what to check next?
Do you adjust leveling before printing
I have MKS v1.5. My printer uses E3D V6. Where do I plug the Extruder fan used directly on the hot end (NOT the print cooling fan)? I would like to be able to control this with M code (on SBase 1.4/Smoothie this is M42/43)
I have the same exact question
Elaine,
Could you advise regarding this? Or is it not possible on MKS v1.5?
Do you mean you want to install two fans on extruder?
Most printers will have two fans: 1 for part cooling that is controlled by the slicer, the other is the cooling fan for the hotend (see e3D hot ends like the V6 or Lite 6). On a smoothie board or MKS Sbase board, there is a pinout for this fan and it is controlled by M42/M43. For the MKS Base 1.5, is there a pinout where we can attach the hotend fan and control it via M code? In Marlin this is supported as M42 Pnnn Snnn where Pnnn is the pin number. The MKS Base 1.5 board has two pinouts for fan. What are the pin numbers?
Elaine, do you have any information on this? I would like to control this via firmware rather than powering down my 12v circuit.
i have recently bought a tevo tarantular and my z axis motor makes a grinding noise and if i plug the courd in to other motors same thing but there courds work in any soloutions??
You need to confige the Z axis before printing.
Okay so I have read all (almost) the comments, I am getting worried that these boards are troblemakers. HOWEVER..
Do any of you know sollutions to the following.(Board is BASE v1.5)
– I want to use one z-motor, 2 hotends, heated bed = define motherboard (which do I use)
– When I go in the menu on TFT28 it can’t choose other than E1 and BED.
– if I connect from, say repetier host, it says that the temp on E2 is 100 degrees celcius, and E1 shows up as it should.
– I am running the system on 12v except the heated bed, which will be a 360w 24v heated bed running on a relay, from its own PSU
Any advise would be apreciated.
Do you config the file configuration.h of marlin:
// This defines the number of extruders
#define EXTRUDERS 1
Please change “1” to “2”
I did in fact find that little fault, my bad. But am I right in the auto bed leveling part? Do I need to input the whole section from another configuration.h file that has it?
To ally your fears about these boards being troublesome, I have 6 of these boards and they are rock solid. We will be using them on all of our machines going forward.
Most of the comments I’ve read deal with those who may not be familiar with Marlin. As Elaine mentioned below, you need to be able to edit the Marlin software to configure the various settings. Your temp reading for E2 tells me that you haven’t configured your 2nd hot end and thermistor in Marlin. Either that or your thermistor is defective.
Thanks for the update. I got it to read.. It was in fact both the tft firmware and repetier software that was acting up.
Hi there,
I have a dual extruder e3d chimera im trying to get to work. I am relatively new at this so i am confused. I have the mks base v1.5 board and i try to compile it after i change the firmware to these settings:
#define motherboard 33
#define extruders 2
It keeps coming up when i try to compile with this:
Arduino: 1.8.2 (Windows 10), Board: “Arduino/Genuino Mega or Mega 2560, ATmega2560 (Mega 2560)”
In file included from sketch\MarlinConfig.h:39:0,
from E:\torrent\Marlin-1.1.x\Marlin-1.1.x\Marlin\Marlin.ino:31:
SanityCheck.h:803: error: #error “HEATER_1_PIN not defined for this board.”
#error “HEATER_1_PIN not defined for this board.”
^
exit status 1
#error “HEATER_1_PIN not defined for this board.”
This report would have more information with
“Show verbose output during compilation”
option enabled in File -> Preferences.
I am not sure what i need to do here. Any help would be appreciated. Thanks!
Do you download the marlin from our instruction? As our firmware doesn’t have file “SanityCheck.h”. Are you willing to try our marlin file?
Besides the hot end, you also need to define your thermistor in Marlin.
Figured it out via a bunch of other config.h files. Now i am trying to figure out the bed dimensions. They don’t seen to be right and the extruder crashes the bed etc when doing a g28.
Do you mean when you are printing, the extruder doesn’t work or hotbed doesn’t work?
Is it just me, or does this marlin code not have the auto bed leveling part in the configuration.h file?
No, there is no auto bed leveling part in the configuration.h file
What ??
Can it be put in there?? Or do I need to scrap the board for another version of ramps ??
Also my zmin wont react to a 4.7volt signal from my inductive sensor, if I put a mechanical endstop in there it works???
I’m sorry our engineer don’t write a firmware with auto bed leveling.
Does that mean I cannot use a BLTouch sensor with this board??
You need to confige the firmware, but our engineer don’t know how to use a BLtouch sensor.
This is all wrong. RC8 Marlin DEFINITELY has bed leveling in the firmware. In fact, bed leveling has been in Marlin for some time. I use it with a BLTouch and it works great.
Hey Rick. how did you get Autobed leveling to work on the MKS base 1.5 ?? I have my new machine running kinda okay, but I need to mesh level my bed, its 30 by 30cm, so it has some uneven places. Thanks In ADVANCE!I have not have luck with uploading the newest MARLIN to the board. get some pin error…
web, I will be honest. I had a heck of a time getting this to work, but it does now work and works great. I could not get it to work with the latest version of Marlin. You want to be sure you get v 1.1.x RC8.
That said, I have not tried mesh leveling. The BL Touch uses Bilinear automatic bed leveling. I have not tried the manual mesh bed leveling with this board.
Will The SD-card-reaader only work in baudrate 250000, or does it require 12volt on the tft-board?? I can update from the sd reader just fine, but I cant print from it, no filesystem?? the marlin says “SD init fail”?? I am pretty certain I have had success when I started using this MKS system.?
Hi Webberen, I was following a link from someone I was helping and I read your previous question. I was able to make the MKS base 1.5 board work with my BLTouch. I also received the SD init fail error message previously. I think for the SD init fail error, I just reformatted the card to fat32 with a 2 or 4 gig partition and it started working fine. I don’t mind sending you my config.h file to get you to a starting point.
That would be soooo nice of you..
My email is webberen2502(att)gmail.com
Sent. Hope it helps. Thanks
the baudrate of LCD is coincident with board. Are you willing to take a photo or vedio about the LCD and send to my email address: [email protected]
almost running here..
I cant seem to wrap my head around putting in the offset for the two nozzles.??? Anyone ?? I have found a place in conf.h to do it, but I dont understand what to do there-
Or is it easier to do so in your slicer??
Okay … The slicer is defintely easy to you for this.. I am going in 2 colors.. I STILL haven’t figured out auto bed leveling… AND I am worried my thermistors for the hotends are set incorrectly. My PLA can rund from 165 degrees Celcius.
See it in action: https://www.youtube.com/watch?v=8UKWv_ePZvU
Web, these are more generic questions to Marlin. I’d suggest posting your questions to the reprap.org community.
DOws anyone know what the pinouts are for the two extra fan ports and what current can be drawn from each. Cheers!
I have the same question. I’ve been up all night, every night for over a week trying to figure this out.
WHAT ARE THE PINOUTS FOR THE “12-24V fan”
There is nowhere to configure them in Marlin, and they are not able to power any of my fans.
hid and joe
please see my post above. You can definitely configure this in Marlin.
“…In Marlin this is supported as M42 Pnnn Snnn where Pnnn is the pin number…”
We are all hoping elaine (or someone) can give us the answer for the pin number. Once we have that, Marlin should be able to control the fan.
I have tried 2 of these boards with the same results using Marlin 1.1.4. The issue is the X motor is almost acting like its under powered and will not turn and sounds odd. I can move the x motor wire from x to any other motor and it moves with no issues.
Is there a trick to getting these boards to work?
Do you mean the motor doesn’t move when it is on X axis, but you change the motor to other axis, and it works well.
Which board do you use?
Do you try the marlin which download from our link?
Does the MKS base v1.5 use 1k pullup or 4.7k on the thermistors??
Hello!
Can someone tell me how can I use both Displays? The 20×4 Stock LCD and the TFT32 Display? I cant make them work at the same time. Thank you