Follow these simple steps to build a circuit using the light sensor:
Hardware Required
- OSOYOO basic board for Arduino
- LED
- light sensor
- 10k ohm resistor (for the light sensor)
- 200 ohm resistor (for the LED)
- jumper wires
- breadboard
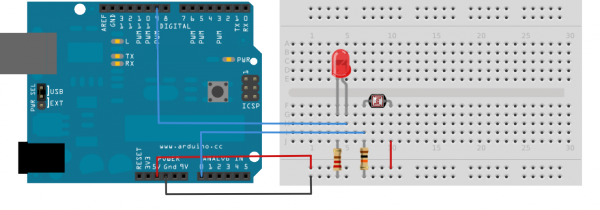
Connection
Connect them as below:
Upload sketch
Upload the following sample sketch to make the LED turn ON and OFF based on input from the light sensor:
const int sensorPin = A0; // pin that the sensor is attached to const int ledPin = 9; // pin that the LED is attached to // variables: int sensorValue = 0; // the sensor value int sensorMin = 1023; // minimum sensor value int sensorMax = 0; // maximum sensor value void setup() { // turn on LED to signal the start of the calibration period: pinMode(13, OUTPUT); digitalWrite(13, HIGH); // calibrate during the first five seconds while (millis() < 5000) { sensorValue = analogRead(sensorPin); // record the maximum sensor value if (sensorValue > sensorMax) { sensorMax = sensorValue; } // record the minimum sensor value if (sensorValue < sensorMin) { sensorMin = sensorValue; } } // signal the end of the calibration period digitalWrite(13, LOW); } void loop() { // read the sensor: sensorValue = analogRead(sensorPin); // apply the calibration to the sensor reading sensorValue = map(sensorValue, sensorMin, sensorMax, 0, 255); // in case the sensor value is outside the range seen during calibration sensorValue = constrain(sensorValue, 0, 255); // fade the LED using the calibrated value: analogWrite(ledPin, sensorValue); }
After down uploading,click the “Serial Monitor” button and chooese the corresponding bautrate(9600 here),and you will see the program running result as below:
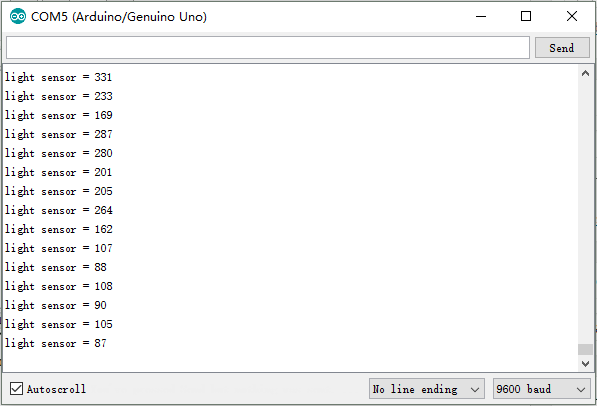
As you can see from the code,when the light value lower than 100,the LED will lights up.
Reference:
You can get more infomation about light sensor:https://osoyoo.com/2017/05/05/light-sensor/
Use NodeMCU to publish light sensor value to internet through MQTT:https://osoyoo.com/2016/12/02/nodemcu-light-sensor-mqtt/


