

Mecanum Wheel Robot Car Full Package (with 18650 batteries)
| Buy from US |
Buy from UK |
Buy from DE |
Buy from IT |
Buy from FR |
Buy from ES |
ここでご購入を! |
 |
 |
 |
 |
 |
 |
 |
Mecanum Wheel Robot Car Kit Metal Chassis
| Buy from US |
Buy from UK |
Buy from DE |
Buy from IT |
Buy from FR |
Buy from ES |
ここでご購入を! |
 |
 |
 |
 |
 |
 |
 |

メカナムホイールとは車輪の表面(円周上)が車軸に対して45°傾けた樽(バレル)によって覆われていて、 モーターの駆動力の伝達により、従来の車輪と同じ動きをすることに加え、円周上の樽がフリーになっている ため前後、左右、回転、45°の方向に移動ができる全方向駆動型車輪です。
本レッスンには Osoyoo メカナムホール付きのロボットカーの組み立て方法、それにアルドゥイーノを使ってロボットカーの制御する方法を紹介いたします。

OSOYOO ロボットカーシャーシ x 1 (2x右ホイール/2x左ホイール、4×モーター)
以下の電子部品はロボットカーシャーシキットには含まれません、ご了承してください。
OSOYOO MEGA2560 ボード(アルドゥイーノと完全に交換でき)
OSOYOO V1.0 WIFI Wifi拡張ボード x 1
OSOYOO Model X モータードライバ x 2
OSOYOO HC02 Bluetooth モジュール×1
OSOYOO 電池ボックス x 1
18650 電池(3.7V) x 2

まず、下図のように、ロボットカーシャーシを取り組んでください。


他の車輪と違って、全方向移動を実現するために、メカナムホイールの車輪の表面(円周上)には45°傾けた樽(バレル)があリます。下図のように、その樽の傾けた方向によって、二種類の車輪(A wheelとB wheel)があります。
下図を参考して、メカナムホイールを取り付けてください。取り組む済んだら、傾けた樽は「×」に見えます。取り付けが間違ったら、ロボットカーは正常に走行できないので、必ず注意してください。


接続方法


Step 1: 最新のアルドゥイーノIDEをインストールしてください。 ( バーショーン1.1.16以降のアルドゥイーノIDE
がインストール済みの場合、直接Step 2 へ)
https://www.arduino.cc/en/Main/Software?setlang=en
をアクセスして、アルドゥイーノIDEがダウンロードできます。
Step 2: https://osoyoo.com/driver/mecanum/mecanum-2560-lesson1.zip,
をアクセスして、ロボットカーを制御できるコードがダウンロードできます。.
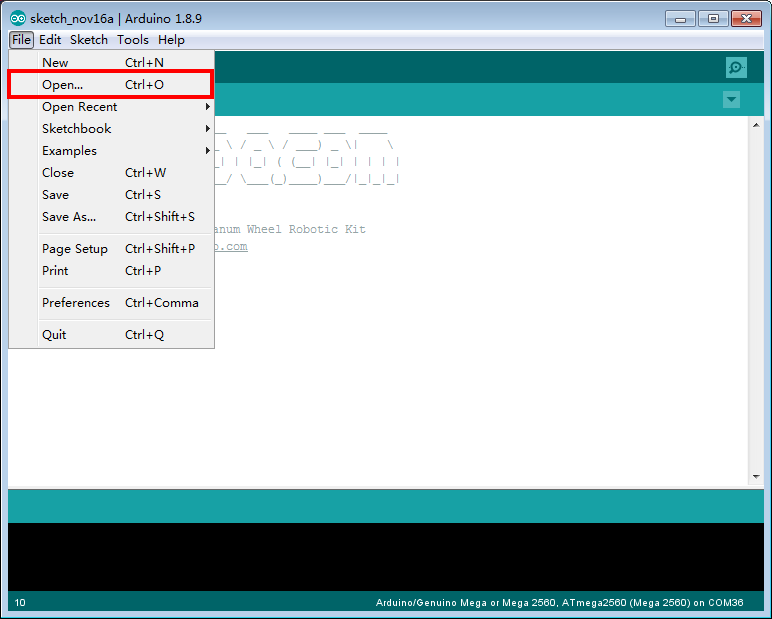
Step 3: Step2でダウンロードしたコードを解凍して、アルドゥイーノIDEに書き込んでください。書き込む手順は下図を参考してください。

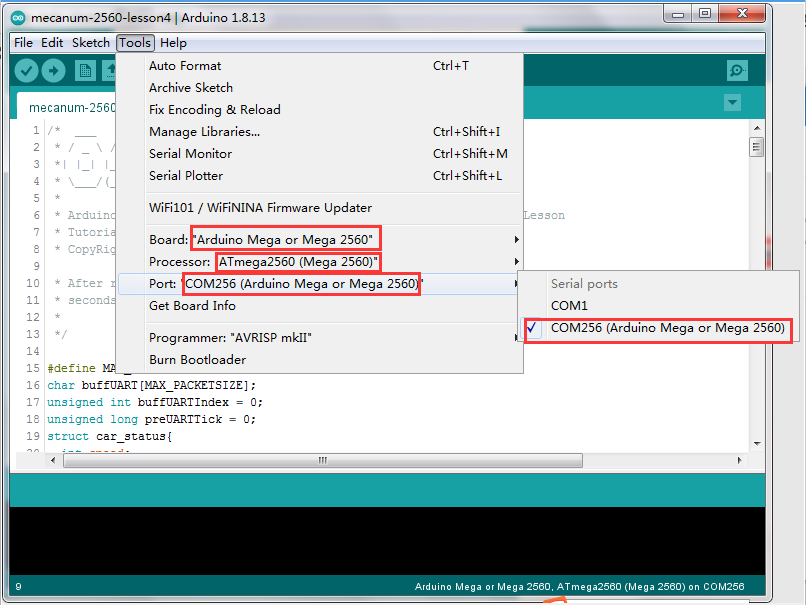
Step 4: ボードとプロセッサを選択した後、プログラムをボードに書き込んでください。


プログラムを運行すると、ロボットカーは「前→後→左回し→右回し→左→右」の順走行します。そうではないなら、もう一度、配線を確認してください。


Noticed during test operation that one wheel (left front) was turning the opposite direction of the others in forward and reverse. Finally figured out that in fact it was the only one turning the right direction. I had to reverse the signal pins on the connections to the driver modules for the other motors to get it to work correctly.
You can do that in code as well by multiplying both the signal and encoder reading by negative one.