Above robot cars are controlled by Arduino. if you have raspberry pi board, actually the robot car can also be controlled by Raspberry Pi. You can visit the following link to learn basic movement with raspberry pi.
link- https://osoyoo.com/?p=31428
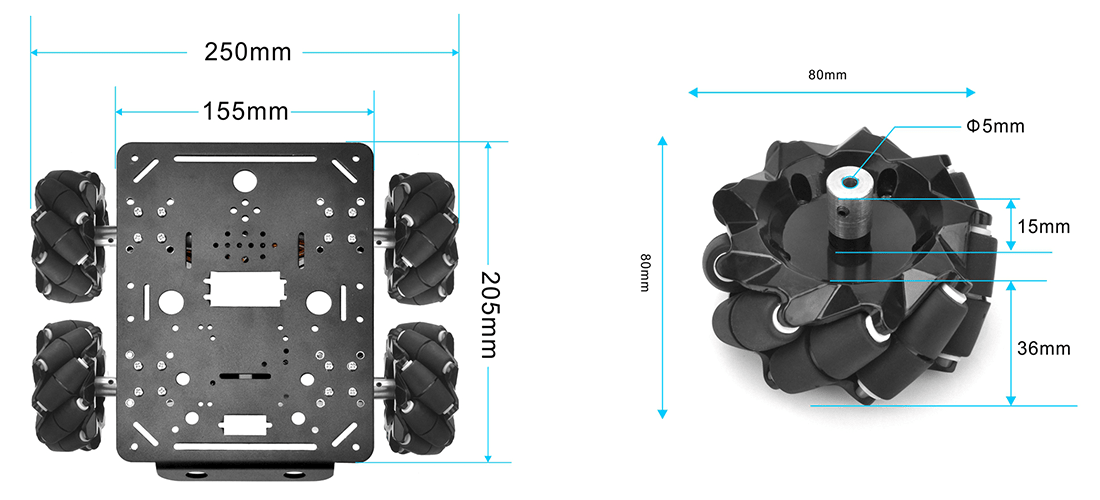
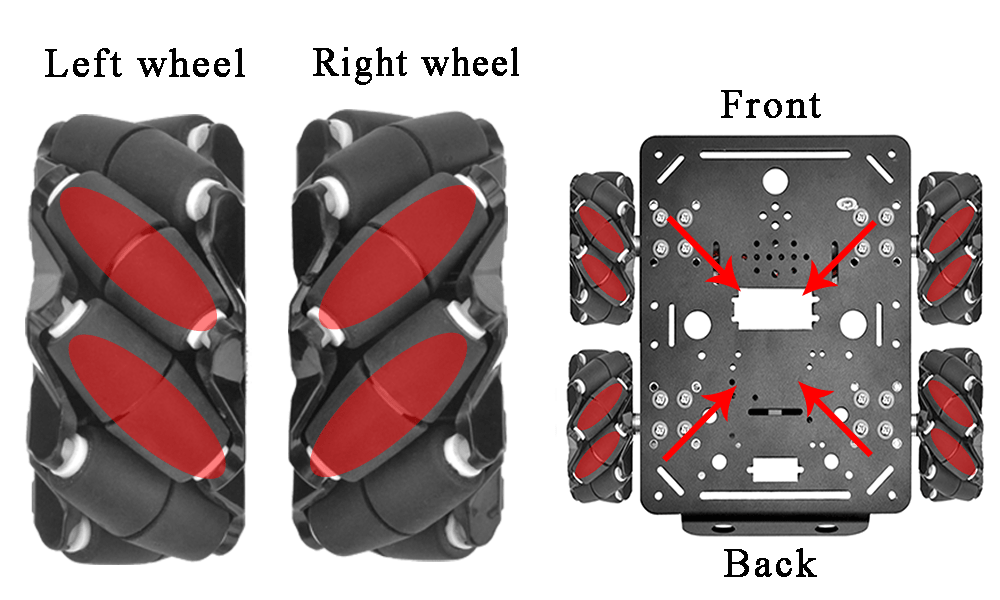
Mecanum Omni wheel is a very powerful wheel technology which allows robot car make omni-directional movement( parallel shift to left and right).
In this project, we will show how to use Arduino to control an Osoyoo Brand Mecanum wheel robot car.
OSOYOO Mecanum Wheels Robotic Car Chassis x 1 (2xleft-wheels/2xright-wheels and Motor x 4)
OSOYOO MEGA2560 board fully compatible with Arduino
OSOYOO V1.3 WIFI Shield x 1
OSOYOO Model X motor driver x 2
OSOYOO HC02 Bluetooth Module
OSOYOO battery box x 1 18650 batteries(3.7V) x 2 (If you buy the kit without the batteries,click it to buy it separately)
Specifications:
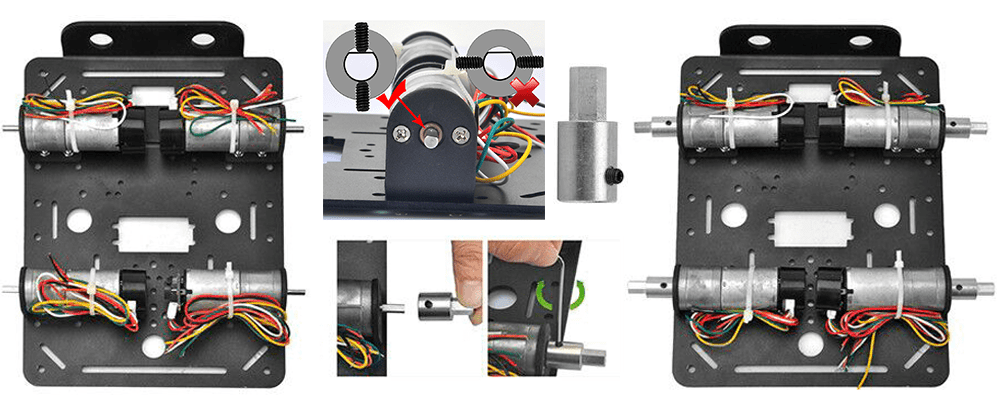
Now the latest version of the motors come without protection caps as the attach picture. The motor protection cap peels off easily,so we remove this cap.
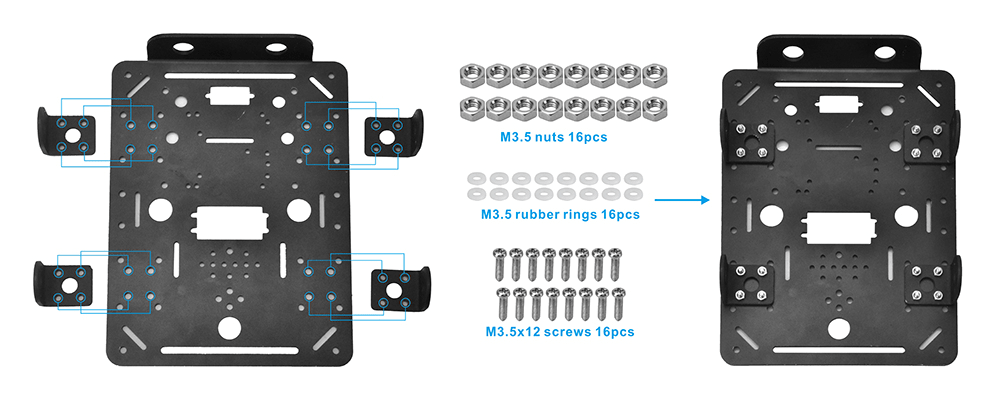
STEP1. Install the metal holder on metal chassis with 16pcs M3.5*12 screws, M3.5 rubber rings and M3.5 nuts.
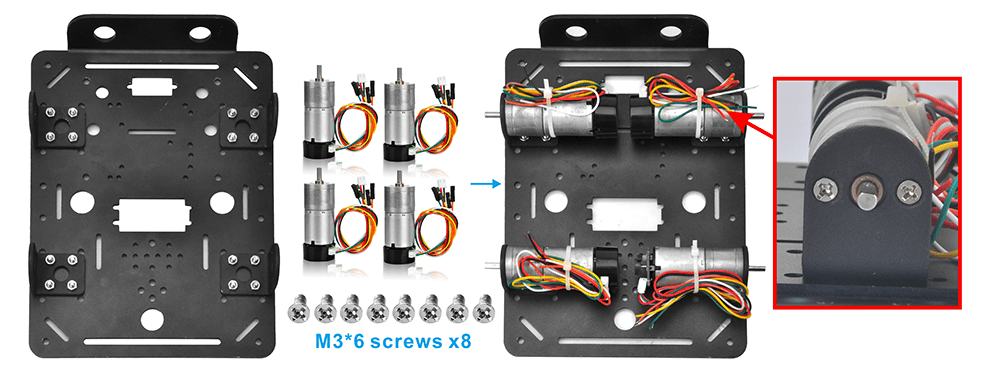
STEP2. Installing 8pcs M3*6 screws as per the following red box.
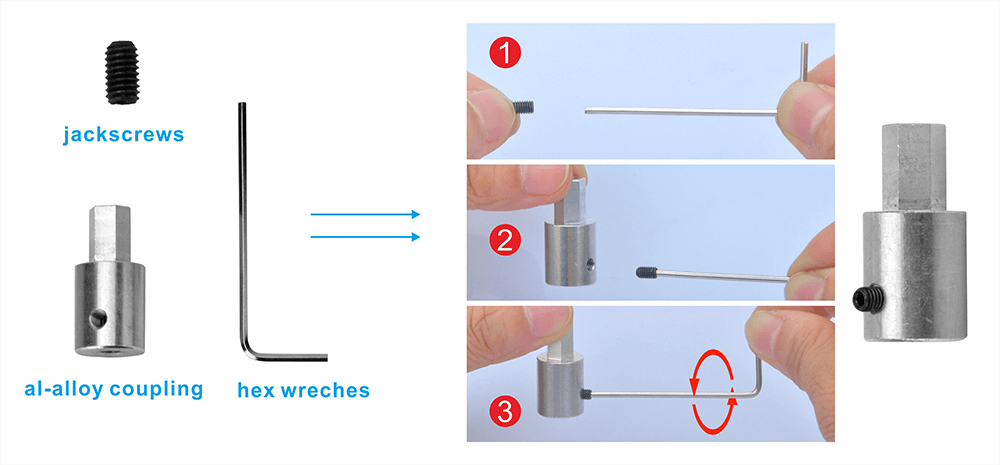
STEP3. Install the jackscrews on al-alloy coupling, please tighten jackscrews to fix the al-alloy coupling on motor.
The shaft from the motor has a flat area on it. Make sure that the jackscrew was positioned on this flat, and tightened both screws on the shaft.
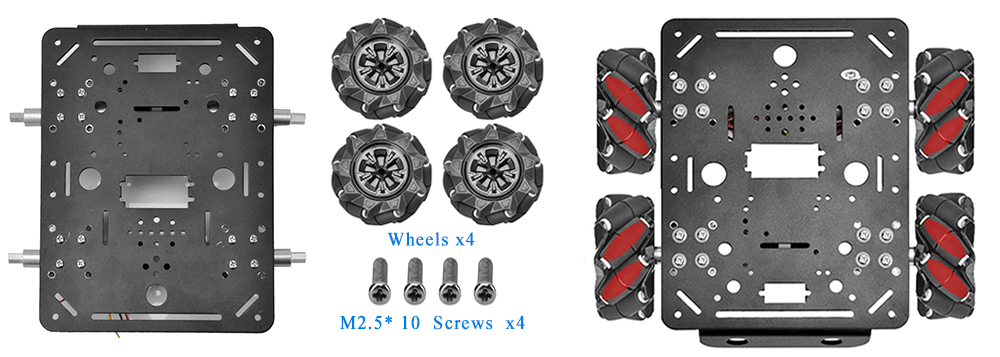
STEP4. Install the 4 mecanum wheels on al-alloy coupling with 4pcs M2.5*10.
There are two types of Mecunum wheels, left and right Mecunum wheel; the difference between them is the orientation of rollers. For A mecunum wheel, as shown below, rollers are orientated from lower right to upper left. Rollers for B wheels are installed in the opposite way.
A correct configuration requires each of four wheels is set in the way as shown below, where the rotation axis of each wheel’s top roller points to the center of the platform. Please notice that all the dynamic analysis and prewritten codes are based on this configuration.
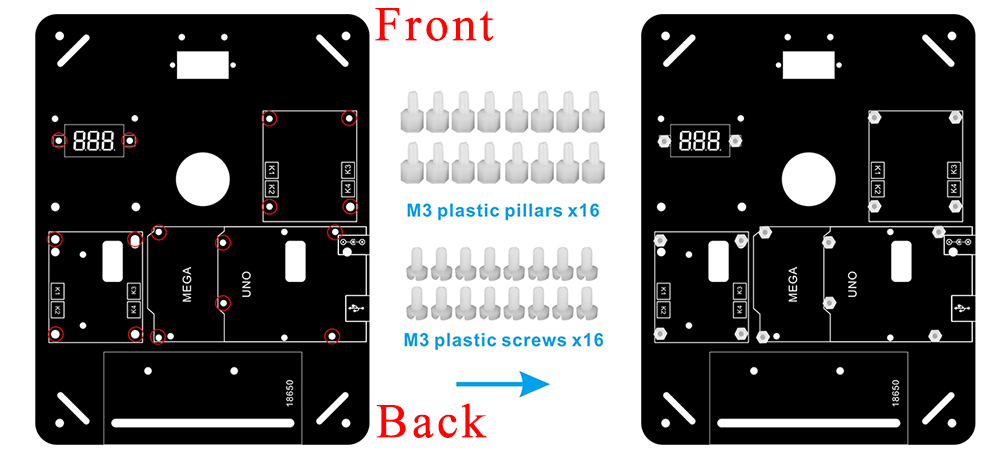
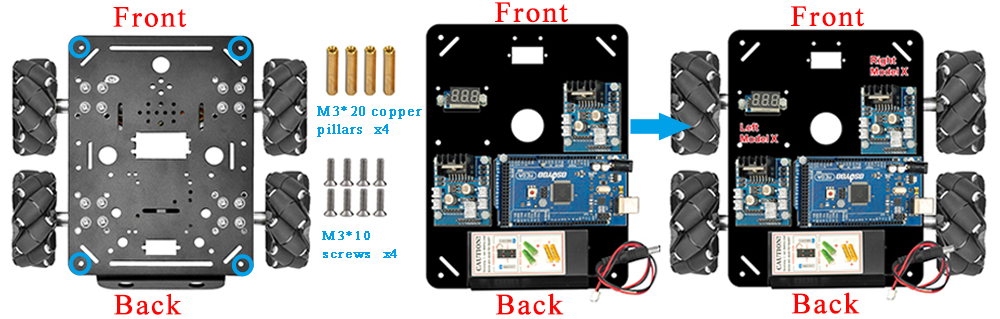
STEP5. Install the 16pcs M3 plastic pillars and screws on acrylic chassis.
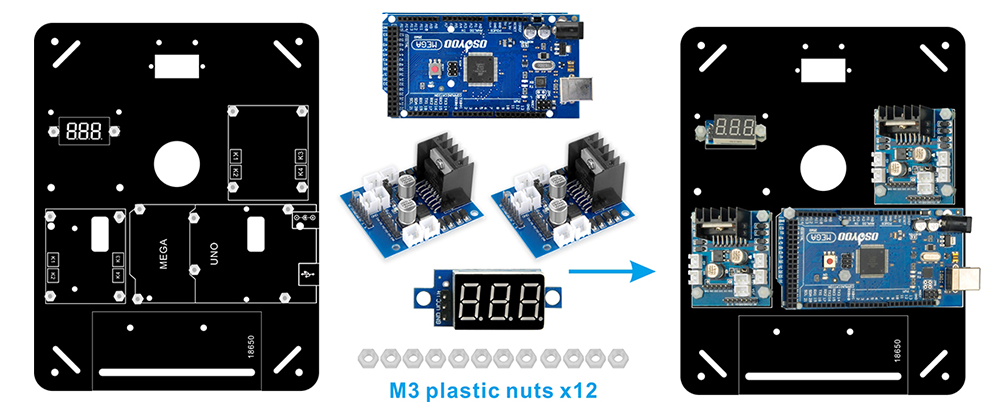
STEP6.Install 1pcs osoyoo Mega2560 board, 2pcs model x motor driver board and 1pcs voltage meter on acrylic chassis with 12pcs M3 plastic nuts.
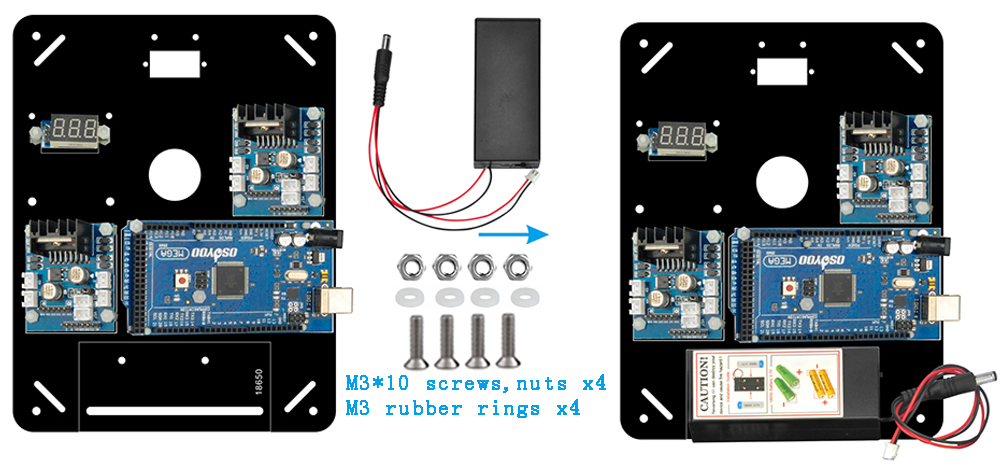
STEP7.Install battery box with 4pcs M3x10 screws and nuts.
STEP8.Install the acrylic chassis on metal chassis.Please note the front and back of acrylic chassis and metal chassis.
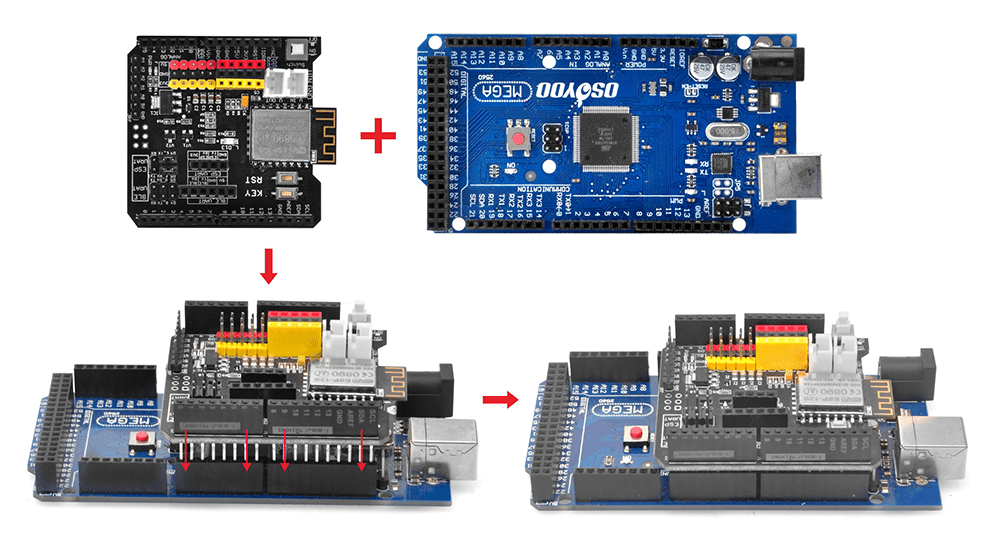
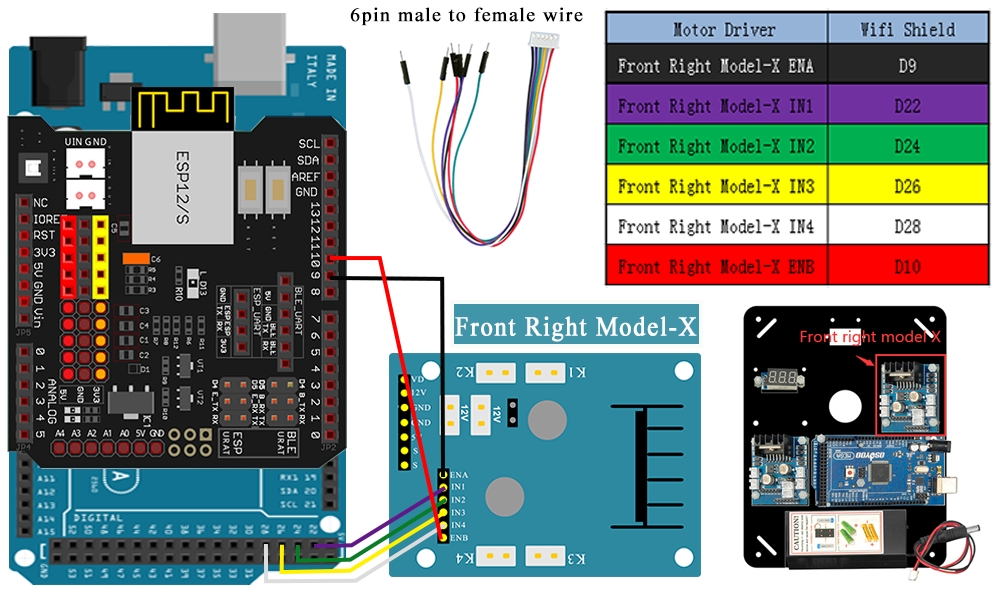
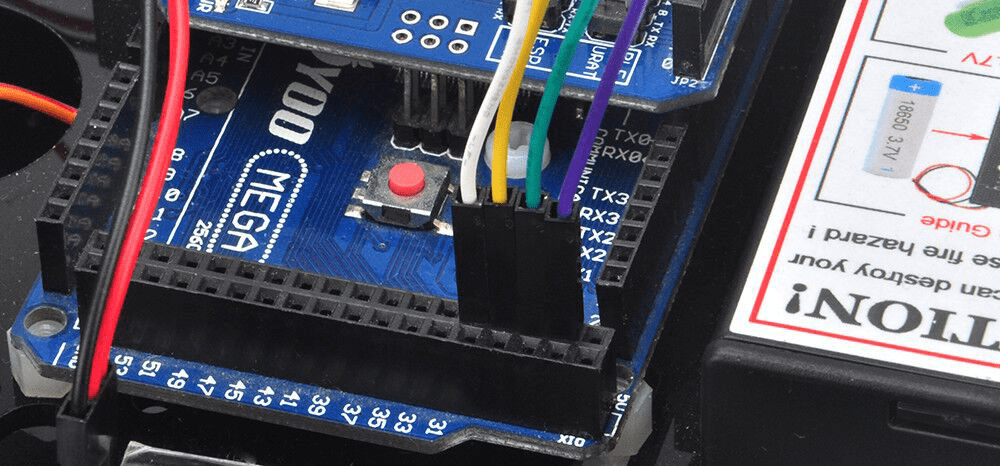
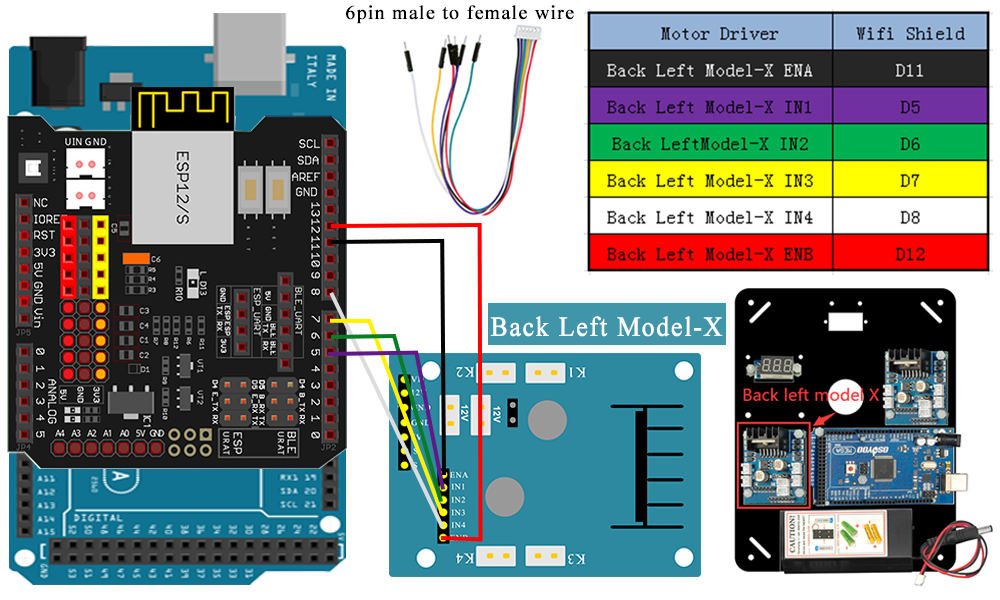
STEP9. Insert OSOYOO wifi shield into Arduino Mega2560 board as following pictures.
Before connect wires, make sure you have inserted OSOYOO WIFI Shield onto MEGA2560 board already.
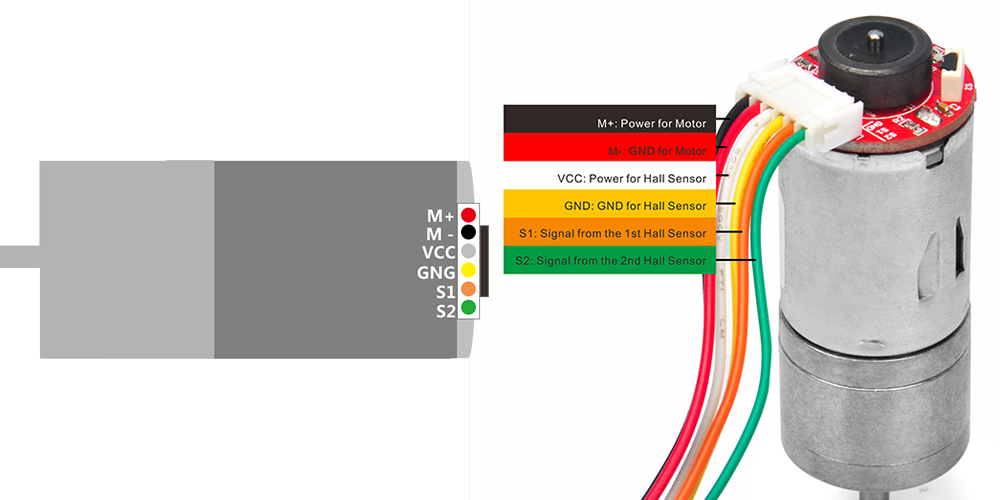
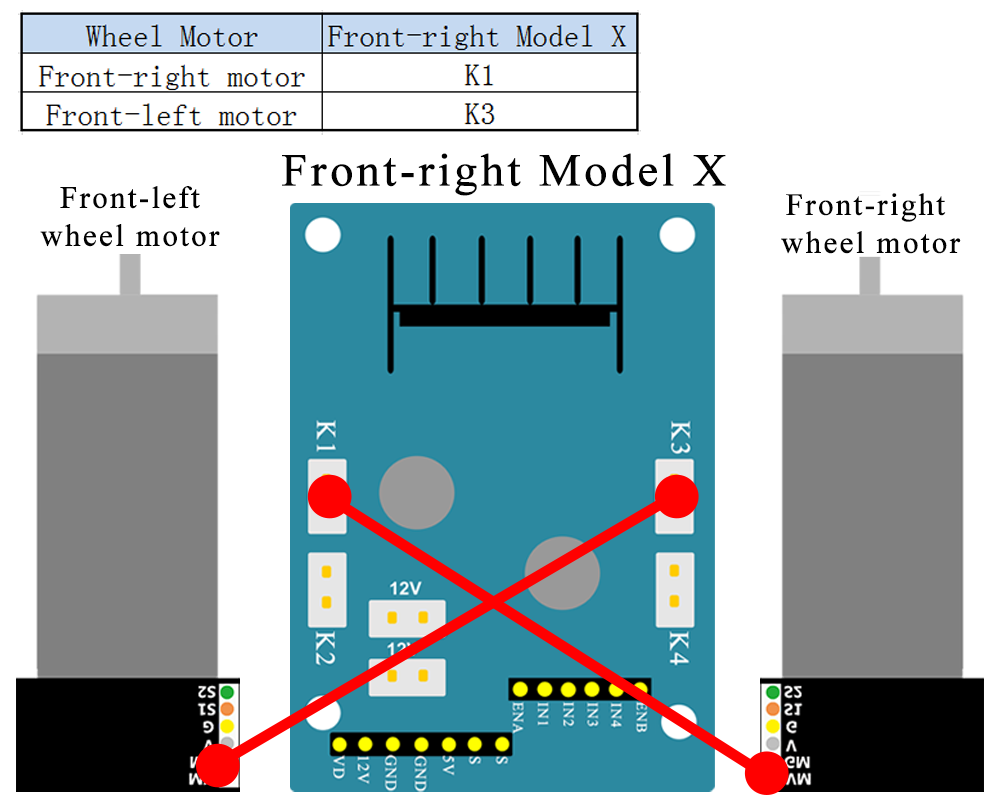
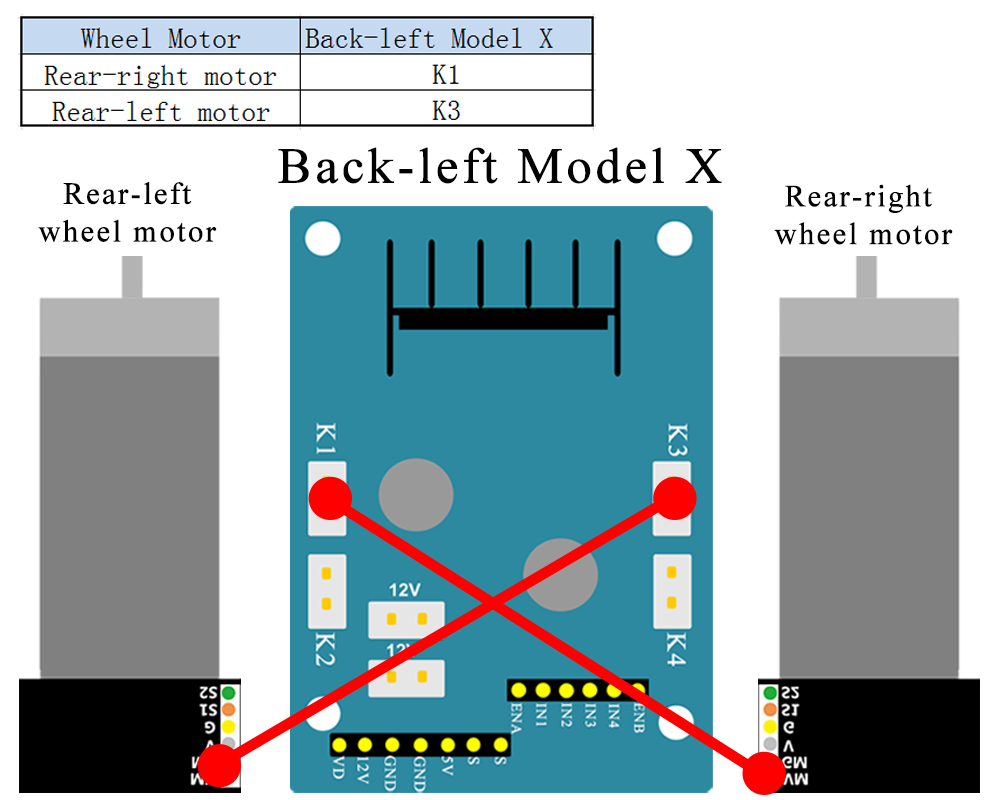
STEP10. connect 4 motors to 2 model X driver board as per the following pictures.
STEP11.Front Model X board IN1,IN2,IN3,IN4 pin connect to D22,D24,D26,D28
Caution:
When insert/remove the 6-pin parallel cable plug into Model X 6-pin male socket, please hold the black plastic pin-holder to do operation. Never drag the wires to pull the plug out of the socket, otherwise it will damage the wires.
STEP12. Left Model X board IN1,IN2,IN3,IN4 pin connect to D5,D6,D7,D8.
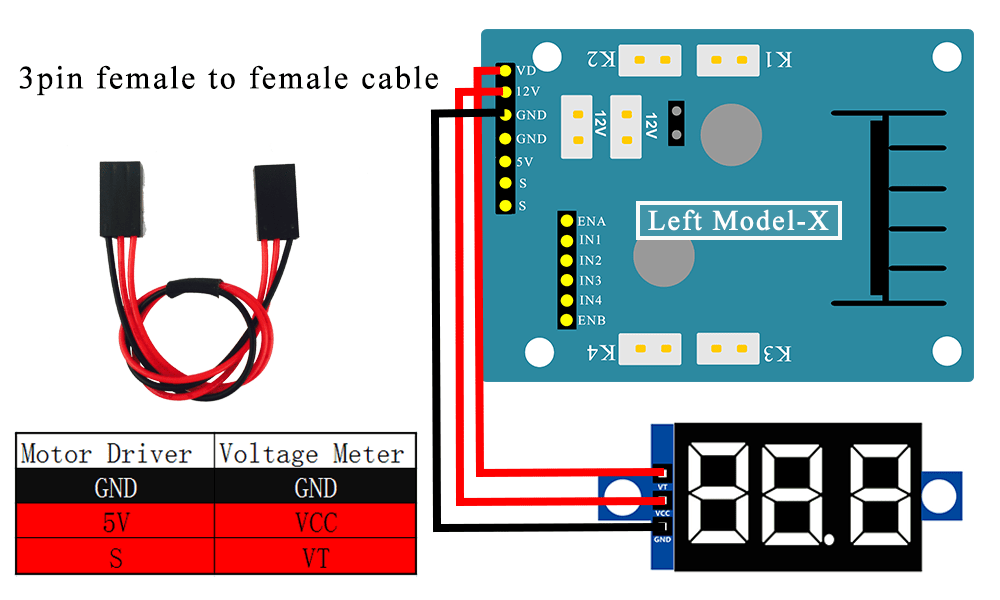
STEP13.connect the voltage meter to left model-x motor driver board with 3pin female to female cable.
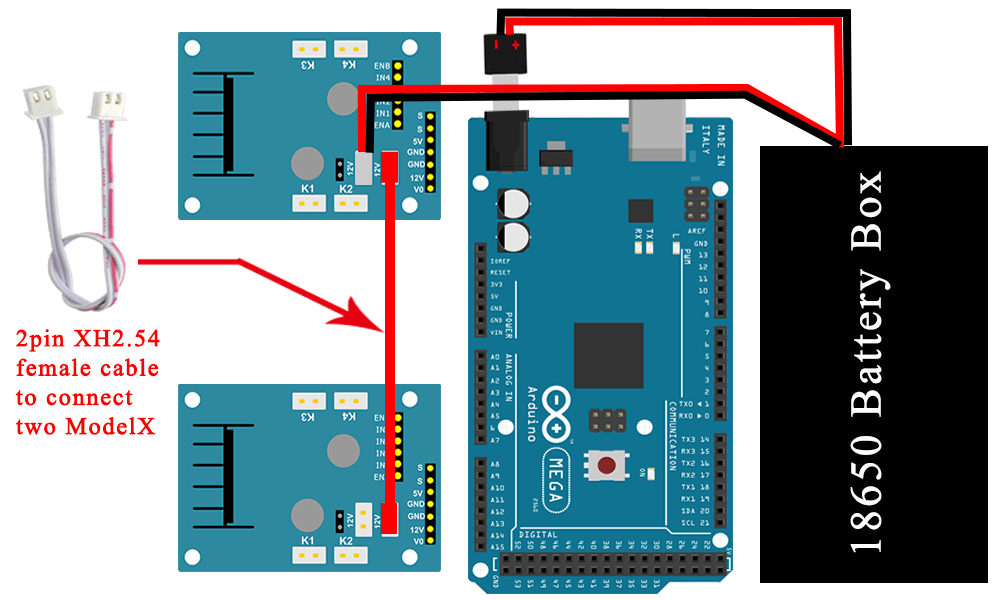
STEP14. Connect two model x motor driver board with 2pin XH2.54 female cable, connect XH2.54 female cable and the DC cable from 18650 battery box to right model x motor driver board.
Step 1: Install latest Arduino IDE (If you have Arduino IDE version after 1.1.16, please skip this step). Download Arduino IDE from https://www.arduino.cc/en/Main/Software?setlang=en , then install the software.
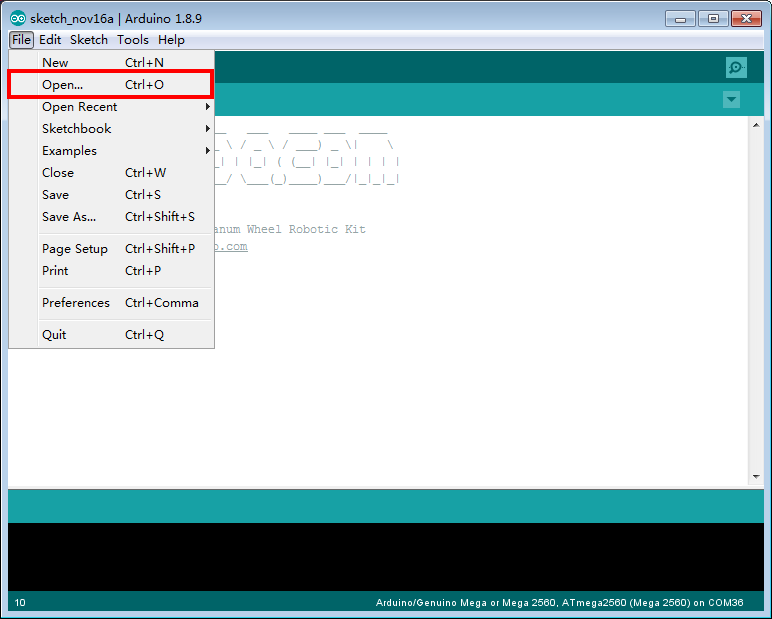
Step 3: Connect Mega2560 board to PC with USB cable, Open Arduino IDE -> click file -> click Open -> choose code “lesson1.ino” in lesson1 folder, load the code into arduino.
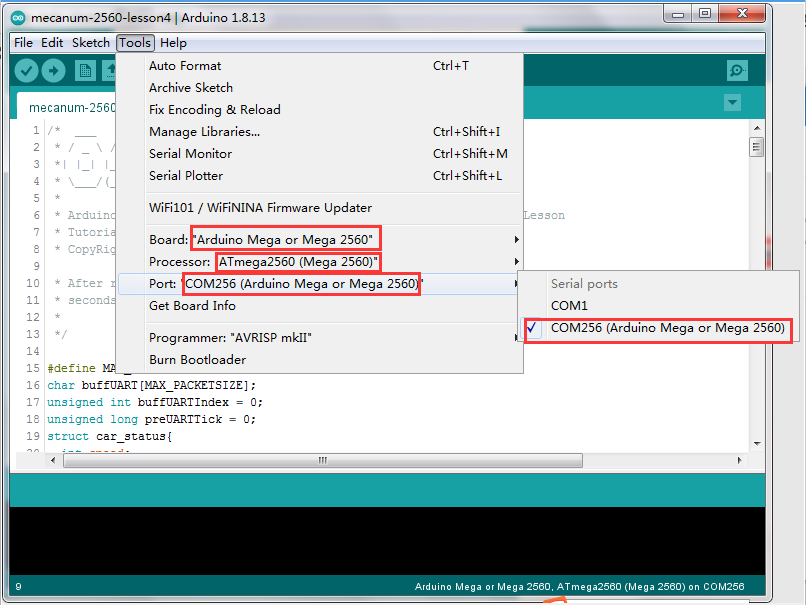
Step 4: Choose corresponding board/port for your project,upload the sketch to the board.
Disconnect Arduino from PC, put battery into battery box. When you put the car on the ground and turn on the switch on OSOYOO Uart WIFI shield V1.3 and the switch on battery box if you install battery box for 18650.
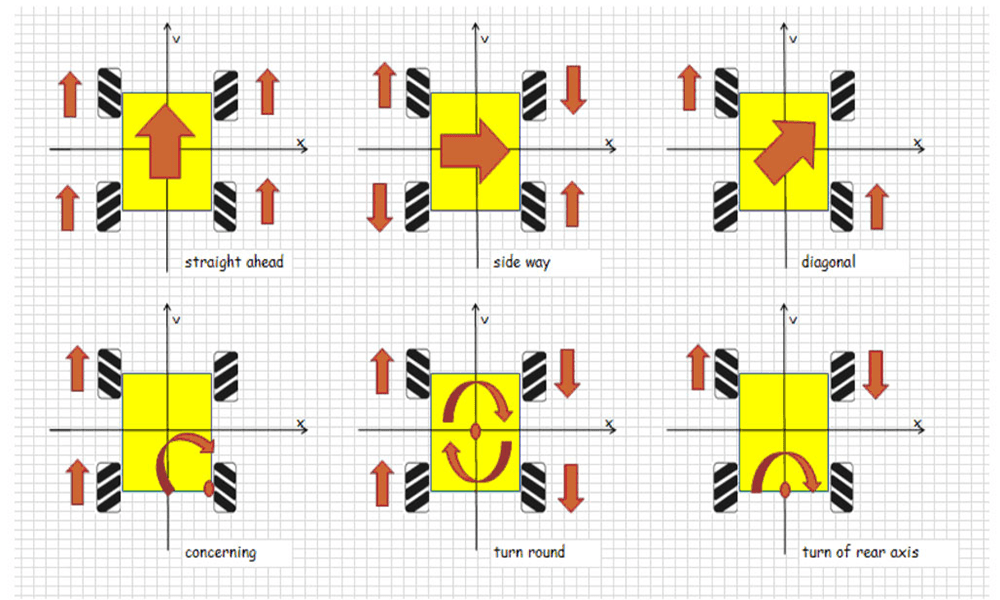
The car should Forward→Backward→Left turn→Right turn→
Right Parallel Shift→Left Parallel Shift→
Down Left Diagonal→ Up Right Diagonal→
Up Left Diagonal → Down Right Diagonal, then stop.
We have two type of motors. Most of our cars are made of Type A motors and a few of them are Type B. Type B motor rotates at reverse direction of Type A motor.
After running Lesson 1 code, the Type A car will move
Forward→Backward→Left turn→Right turn→
Right Parallel Shift→Left Parallel Shift→
Down Left Diagonal→ Up Right Diagonal→
Up Left Diagonal → Down Right Diagonal
If you Mecanum car doesn’t move as per the above sequence, then your motor might be Type B. When type B car is running lesson 1 default sketch, its moving sequence is:
Backward→Forward→Right turn→Left turn→
Left Parallel Shift→Right Parallel Shift→
Up Right Diagonal→Down Left Diagonal→
Down Right Diagonal→Up Left Diagonal
It is important to test whether your car is Type A or Type B. Our default code in all the 5 lessons are designed for Type A motor.
Noticed during test operation that one wheel (left front) was turning the opposite direction of the others in forward and reverse. Finally figured out that in fact it was the only one turning the right direction. I had to reverse the signal pins on the connections to the driver modules for the other motors to get it to work correctly.


Noticed during test operation that one wheel (left front) was turning the opposite direction of the others in forward and reverse. Finally figured out that in fact it was the only one turning the right direction. I had to reverse the signal pins on the connections to the driver modules for the other motors to get it to work correctly.
You can do that in code as well by multiplying both the signal and encoder reading by negative one.