wiringPi简介
wiringPi是管理Raspberry Pi板载GPIO和其他模块的一个库,用户可以调用这个库里面提供的方法操作GPIO,快速实现你的项目,在raspberry pi用wiringPi编程,跟Arduino编程风格如出一辙,如果你有Arduino编程经验,应该能很快上手raspberry pi wiringPi编程。关于更多wiringPi请访问wiringpi官网了解
The GPIO utility
安装wiringPi
首先检查wiringPi是否已经安装,在命令行运行:
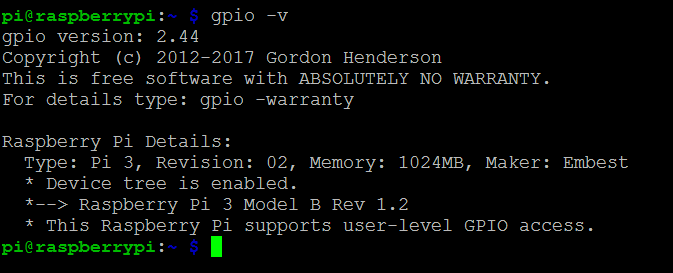
gpio -v
如果你能获取到如图所示的GPIO版本号说明你的pi已经安装了wiringPi

如果你运行上面的命令提示如图示信息说明你的pi尚未安装wiringPi,你需要安装wiringPi

安装wiringPi有两种方式,一种是通过标准包安装,一种是通过源码安装。
A) 通过标准包安装
首先通过git下载wiringPi标准软件包,如果你没有安装git,则先安装git,如果已安装跳过此步
sudo apt-get install git-core
如果在安装过程遇到错误,请确认你的Raspbian是否更新到了最新版本,运行下面命令可以更新Raspbian到最新版本
sudo apt-get update
sudo apt-get upgrade
用git获取wiringPi软件包
 cd
 git clone git://git.drogon.net/wiringPi
下载完成后,运行如下命令
cd ~/wiringPi
git pull origin
运行下面命令安装wiringPi
 cd ~/wiringPi
 ./build
牛刀小试
安装了wiringPi,先体验一下用wiringPi编程,接下来就在Raspberry Pi上用wiringPi写一个程序,让LED灯闪烁。
1 )工作原理
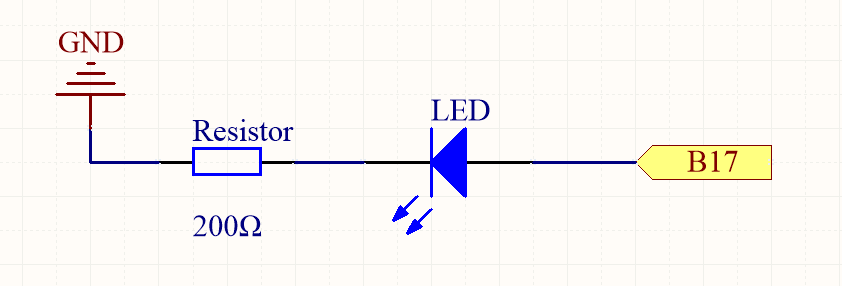
将LED灯接到Raspberry Pi的一个GPIO口,程序向GPIO口写高低电平控制LED灯闪烁

2 )电路连接图
暂无
3 ) 在命令行运行下列命令,新建一个.c源文件
cd ~
sudo  nano  testwiringpi.c
先testwiringpi.c写入下面代码
#include
#include

#define LEDPIN  0

int main(){
    //when initialize wiring failed,print message to screen
    if(wiringPiSetup()== -1){
        printf("Setup wiringPi Failed!");
        return -1;
    }

    pinMode(LEDPIN,OUTPUT);
    printf("\n");
    printf("\n");
    printf("********************************|\n");
    printf("|       LED Blink               |\n");
    printf("|  -----------------------      |\n");
    printf("|                               |\n");
    printf("|   LED connect to GPIO 0       |\n");
    printf("|                               |\n");
    printf("|   LED will blink at 500ms     |\n");
    printf("|                         OSOYOO|\n");
    printf("********************************|\n");

    while(1){
        digitalWrite(LEDPIN,LOW);
        printf("...LED OFF\n");
        printf("\n");
        delay(500);
        digitalWrite(LEDPIN,HIGH);
        printf("LED ON...\n");
        printf("\n");
        delay(500);
    }
    return 0;
}
这段代码显示添加wiringPi和stdio两个库文件,接着定义LED所接的GPIO端口为GPIO 0.Raspberry Pi的一般GPIO有BCM编码和wPi编码,程序中使用的是wPi编码方式。在命令行运行
gpio readall
可以查看相应编码方式。在main函数中先是先屏幕打印相关提示信息,接着讲LEDPIN引脚设置成输出模式;在while循环中,不断低将LEDPIN脚电平切换,让LED闪烁,同时向屏幕打印信息。
可以在命令行运行下面命令下载完整源代码
sudo wget http://osoyoo.com/dirver/pi3_start_learning_kit_lesson_3/testwiringpi.c
运行下面命令编译程序
gcc -Wall -o app testwiringpi.c -lwiringpi
C语言属于高级语言,在运行之前需要编译成可执行文件。其中gcc是编译C语言编译器;-o参数用于指定编译后的可执行文件名,这个文件名可以随意命名。
sudo ./app
运行上面命令执行程序,会看到LED不停闪烁,同时屏幕上打印出LED状态。


Hi,
I have tried this “testwiringpi.c” program. The Program works fine, however the LED does not light up. Any ideas how I can troubleshoot it?
Hi, Check if you did connect the LED in the correct polarity. If it isn’t working try to change the connecting legs.