概述
在前面两课中知道了如何用软件控制LED,在这一课中,我们将学习如何用按键控制LED亮灭。
所需物料
1 * Raspberry Pi
1 * Breadboard
1 * LED
1 * Button
1 * Resistor (200Ω)
Jumper wires
1 * T-Extension Board
1 * 40-Pin Cable
工作原理
按键是一种常用的电子元器件,一般把按键当做开关使用,用来导通或断开电路。在这一课中所用按键有4个引脚(1、2、3、4),如图
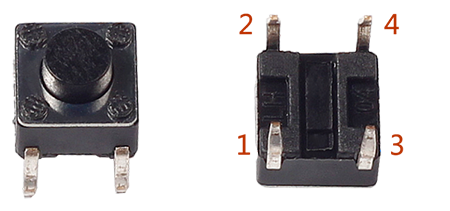
长沙最好自己拍照片,打上logo,这个从网上找的
其中,1、2脚是导通的;3、4脚也是导通的,当按键按下,1、3导通,2、4也导通。其原理可以用下图形象地表示
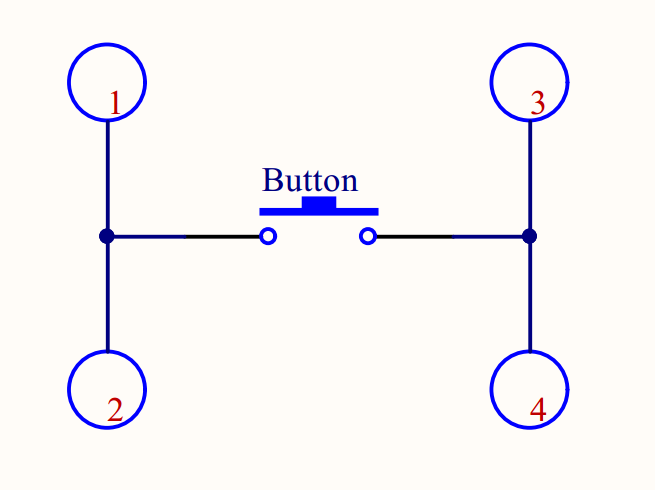
没有按下
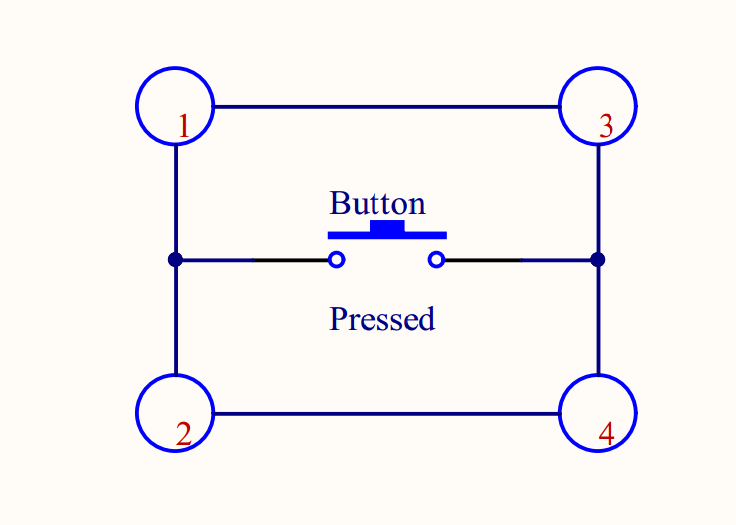
按键按下
在这一课中,我们将按键接到raspberry Pi的一个GPIO0(BCM_GPIO17)口上,将LED接到Raspberry Pi的GPIO1(BCM_GPIO18)口上,如图所示
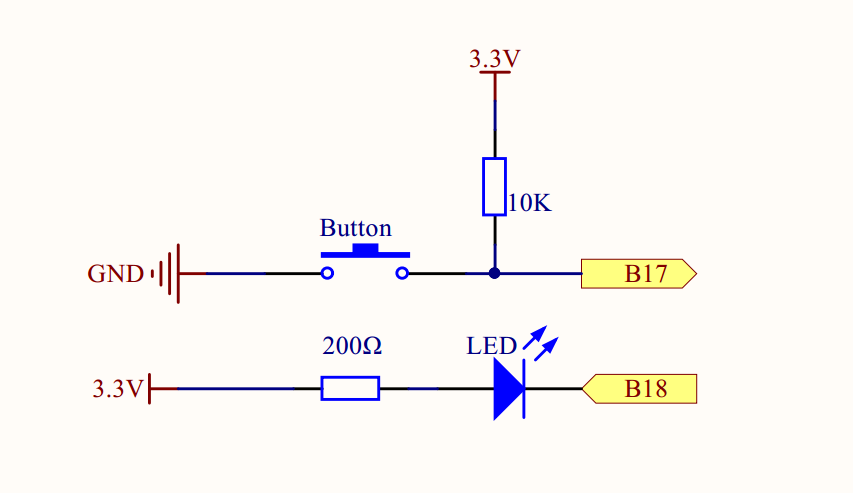
按键没有按下GPIO0(BCM_GPIO17)检测到一个高电平;当按键按下后,Pi的GPIO0(BCM_GPIO17)会读取到一个低电平,当Pi的GPIO0(BCM_GPIO17)检测低电平的时候,通过软件让LED状态改变。
实物连接图
还没有画(o(╯□╰)o)
软件
对于C语言用户
1 ) 在/home/pi下新建一个.c源文件,文件名随意
cd ~
sudo nano button_led.c
2)向新建的源文件中写入代码
#include <wiringPi.h>
#include <stdio.h>
#include <stdlib.h>

//setup GPIO0(BCM_GPIO17) as button pin
#define  ButtonPin   0
//setup GPIO1(BCM_GPIO18) as led pin
#define  LedPin      1
跟前面的课程一样首先包含程序需要的库文件,然后定义LED和按键所接到的GPIO管脚。
int main(void){
    // When initialize wiring failed, print messageto screen
    if(wiringPiSetup() == -1){
        printf("setup wiringPi failed!");
        exit(1);
    }

    pinMode(LedPin, OUTPUT);
    pinMode(ButtonPin, INPUT);

    // Pull up to 3.3V,make GPIO1 a stable level
    pullUpDnControl(ButtonPin, PUD_UP);

    printf("\n");
    printf("|**************************************|\n");
    printf("|          Button control LED          |\n");
    printf("|    ------------------------------    |\n");
    printf("|         LED connect to GPIO1         |\n");
    printf("|        Button connect to GPIO0       |\n");
    printf("|                                      |\n");
    printf("|     Press button to turn on LED.     |\n");
    printf("|                                      |\n");
    printf("|                                OSOYOO|\n");
    printf("|**************************************|\n");
    printf("\n");

    digitalWrite(LedPin, HIGH);
    printf("|****************|\n");
    printf("|   LED off...   |\n");
    printf("|****************|\n");

    for(;;){
        // Indicate that button has pressed down
        if(digitalRead(ButtonPin) == 0){
            // Led on
            digitalWrite(LedPin, LOW);
            printf("|****************|\n");
            printf("|   ...LED on    |\n");
            printf("|****************|\n");
            delay(400);
        }
        else{
            // Led off
            digitalWrite(LedPin, HIGH);
            printf("|****************|\n");
            printf("|   LED off...   |\n");
            printf("|****************|\n");
            delay(400);
        }
    }
    return 0;
}
基本上跟前面课程中的代码一样,将LedPin和ButtonPin分别设置为输出模式和上拉输入模式,pinMode(ButtonPin, INPUT)和pullUpDnControl(ButtonPin, PUD_UP)将ButtonPin设置成上拉输入。在循环中不断检测ButtonPin引脚的电平,如果检测到低电平,表示按键按下,则向LedPin引脚写低电平(0V),点亮LED;反之,则向LedPin脚写高电平(3.3V),熄灭LED。
完整的源代码可以在命令行运行下面的命令获取
sudo wget http://osoyoo.com/driver/pi3_start_learning_kit_lesson_7/button_led.c
3) 编译程序
sudo -Wall -o button_led button_led.c -lwiringPi
4) 执行程序
sudo ./button_led
5) 最终结果
程序运行起来后会先屏幕打印电路连接情况,接着打印LED关闭状态,如按下按键LED亮起,屏幕上LED状态变为…LED on状态;松开按键,LED熄灭,屏上LED状态变为LED off…
对于python用户(以远程登录为例)
1) 在/home/pi新建一个.py的python脚本文件,文件名随意,你开心就好(^_^)
cd ~
sudo nano button_led.py
2) 编码
import RPi.GPIO as GPIO
import time

#set BCM_GPIO 17(GPIO0) as button pin
ButtonPin = 17
#set BCM_GPIO 18(GPIO1) as LED pin
LedPin = 18

#set led status to True(OFF)
led_status = True
跟之前一样先导入程序中使用到的软件模块,再分别定义LED和按键接到那个GPIO口上,同时将LED初始状态设置成True(3.3V).
def setup():
    GPIO.setwarnings(False)
    #set the gpio modes to BCM numbering
    GPIO.setmode(GPIO.BCM)
    #set all LedPin's mode to output,and initial level to HIGH(3.3V)
    GPIO.setup(LedPin,GPIO.OUT,initial=GPIO.HIGH)
    #set ButtonPin's mode to input,and pull up to high(3.3v)
    GPIO.setup(ButtonPin,GPIO.IN,pull_up_down = GPIO.PUD_UP)
    #set up a falling detect on ButtonPin,and callback function to ButtonLed
    GPIO.add_event_detect(ButtonPin,GPIO.FALLING,callback = ButtonLed)
    pass
在setup函数中将LedPin设置为输出模式,按键设置为上拉输入模式,并且采用下降沿触发中断的方式检测ButtonPin引脚电平。当Pi检测到ButtonPin引脚产生了下降沿中断时候,程序会跳到回调函数(callback function)ButtonLed中执行中断程序。
def ButtonLed(ev=None):
    global led_status
    # Switch led status(on-->off; off-->on)
    led_status = not led_status
    GPIO.output(LedPin, led_status)
    if led_status:
        print('|*************|')
        print('|  LED OFF... |')
        print('|*************|')
        print('\n')
    else:
        print('|*************|%2


