About RGB LED
How do RGB LEDs work?
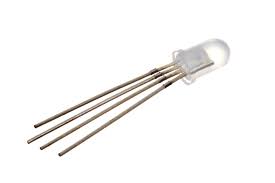
At first glance, RGB (Red, Green, Blue) LEDs look just like regular LEDs, however, inside the usual LED package, there are actually three LEDs, one red, one green and yes, one blue. By controlling the brightness of each of the individual LEDs you can mix pretty much any color you want.
Two types of RGB LEDs
There are common anode RGB LEDs and common cathode RGB LEDs. See figure below:
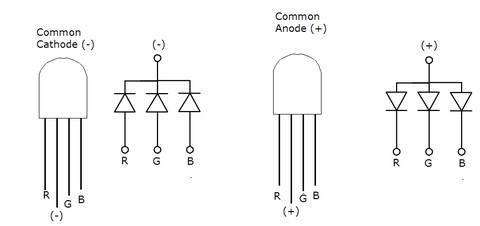
As you can see, the 3 LEDs can share the cathode or the anode. This results in an RGB LED that has 4 pins, one for each LED, and one common cathode or one common anode.
The 4 pins which can be distinguished by their length. The longest one is the ground (-) or voltage (+) depending if it is a common cathode or common anode LED, respectively.
Note: If you are using a common ANODE LED instead of common CATHODE, connect the long pin to +5V instead of ground
How to create different colors?
The reason that you can mix any color you like by varying the quantities of red, green and blue light is that your eye has three types of light receptor in it (red, green and blue). Your eye and brain process the amounts of red, green and blue and convert it into a color of the spectrum.
In a way, by using the three LEDs we are playing a trick on the eye. This same idea is used in TVs, where the LCD has red, green and blue color dots next to each other making up each pixel.

You can create one of those three colors – red, green or blue – by activating just one LED.
For example, if you want to produce blue, you activate the blue LED and turn off the other two.
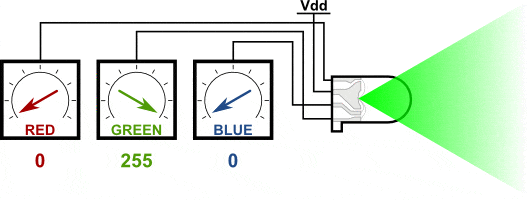
If we set the brightness of all three LEDs to be the same, then the overall color of the light will be white. If we turn off the blue LED, so that just the red and green LEDs are the same brightness, then the light will appear yellow.
We can control the brightness of each of the red, green and blue parts of the LED separately, making it possible to mix any color we like.
Black is not so much a color as an absense of light. So the closest we can come to black with our LED is to turn off all three colors.
Pulse-width Modulation(PWM)
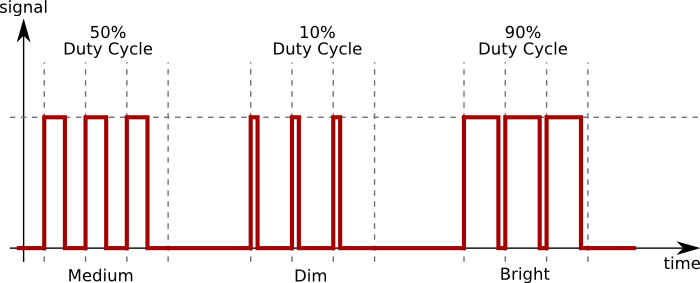
The brightness of an LED is proportional to the current going through it, but it would be rather difficult to use a microcontroller to accurately control the current flowing through an LED. Fortunately, human vision has a nice phenomenon called persistence of vision. Persistence of vision is the phenomenon where an image that is seen for only a fraction of a second will continue to be “seen” by your brain even after the original image has vanished or moved. This this the same principle behind film and television, where a rapidly changing image tricks your brain into seeing continuous motion. By turning our LED on and off rapidly, we can trick the brain into seeing an “average” value of brightness based on the duty cycle of the driving PWM signal.
Pulse-width modulation (PWM) is the practice of modulating the duty cycle of a signal, used in this application to control the average power sent to each LED. In the following figure, we show three different duty cycles, first with 50% duty cycle, then 10% and 90% duty cycle. During the 10% duty cycle, the signal is at the logic high level for only a brief time each cycle, but with 90% duty cycle, most of the signal’s period is spent at logic high level. If the frequency of the signal is fast enough, then there will be no visible flicker, and the LED’s brightness will be proportional to the signal’s duty cycle.
LEARNING GOALS
When you download the program, you can see a smile on the car’s dot matrix, and the seven color lights are on, and the children can modify the program to try other colors.
Preparation
Hardware:
● 1 X USB cable
● 1 X micro:bit robot
Then the micro:bit is connected to the computer through USB, and the computer will pop up a U disk and click the URL in the U disk to enter the programming interface. Input this URL https://github.com/osoyoo/OSOYOO-MICRO-BIT-CAR to get the package.
Test Code
Expansion Code
If you want the color of your robot headlight to keep changing, you can try uploading the code below to your micro bit. Of course, you can also adjust the color sequence and delay time according to your own ideas.


