In the previous course, we have introduced what is infrared remote control, and use simple experiments to tell you how to use infrared receiver and infrared remote control with micro:bit.
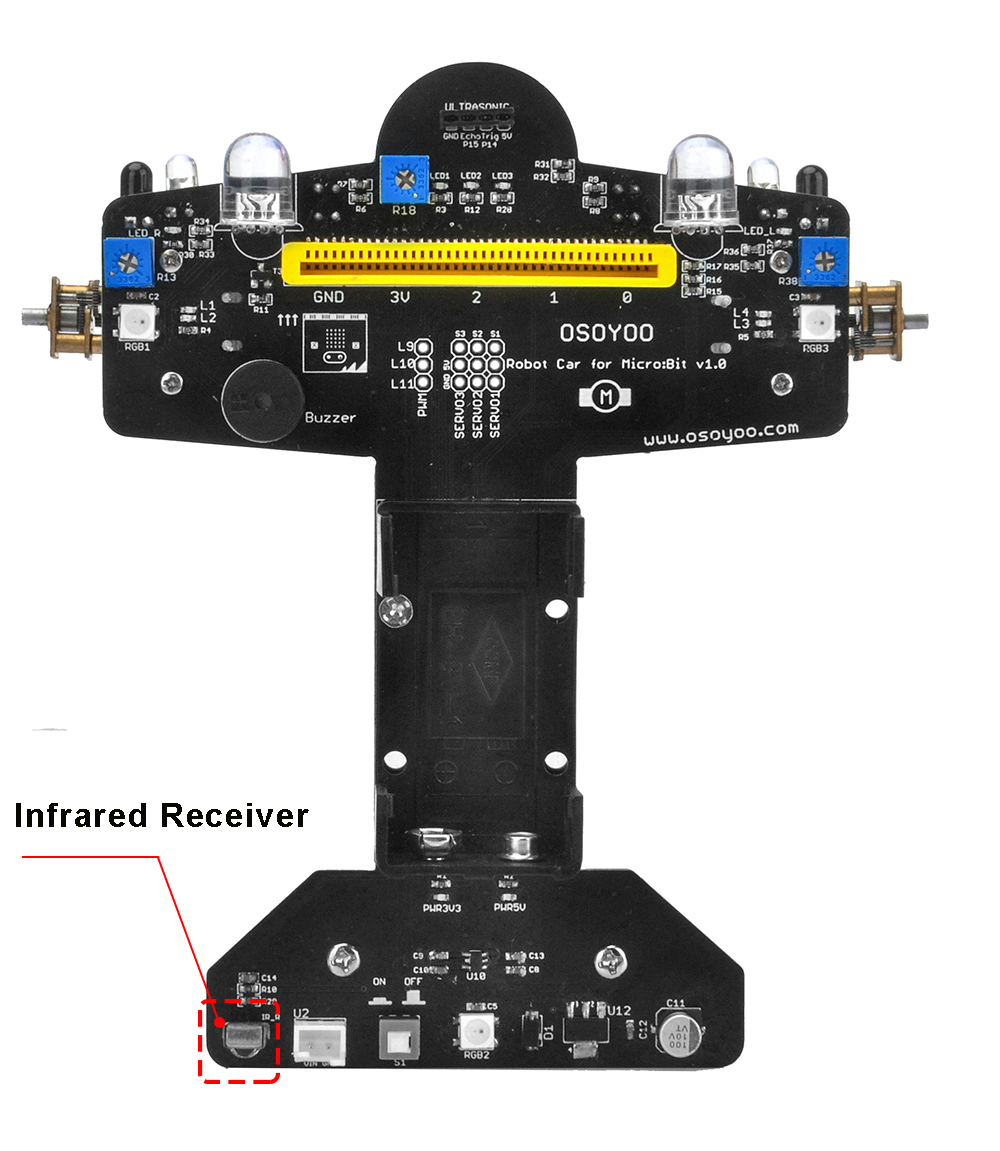
In this lesson, we will use the BBC micro:bit V1.x, OSOYOO Robot onboard infrared receiver module and demonstrate how to change the driving direction and status of the car through the infrared remote control, control the car RGB lights, control the micro bit led matrix, etc.
● 1 X USB cable
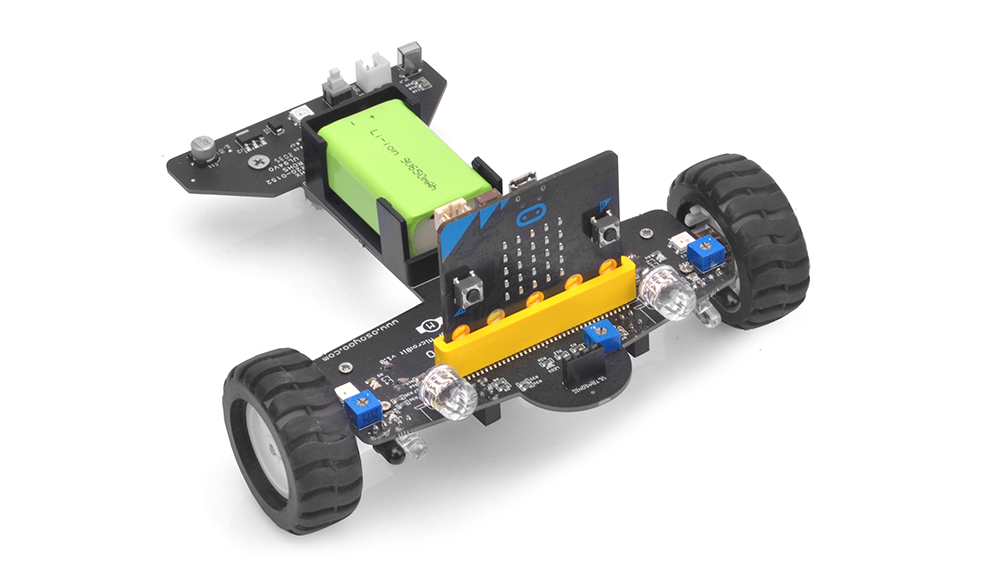
● 1 X micro:bit robot V1.x
● 1 x OSOYOO Robot for Micro bit
● 1 x 9V battery
● 1 X Infrared controller
IR, or infrared, communication is a common, inexpensive, and easy to use wireless communication technology. IR light is very similar to visible light, except that it has a slightlty longer wavelength. This means IR is undetectable to the human eye – perfect for wireless communication. For example, when you hit a button on your TV remote, an IR LED repeatedly turns on and off, 38,000 time a second, to transmit information (like volume or channel control) to an IR photo sensor on your TV.
If you want more information about IR ,you can see tutorial link :https://osoyoo.com/?p=19435
Block
Analyse
Examples
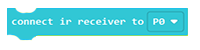
connect ir receiver to block;
When dragged into this block, the program will connect the ir receiver
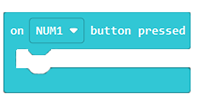
button press block ;
When dragged into the block ,the car according your button to run
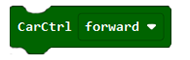
CarCtrl block;
When dragged into the block, the car will always according setting direction to run
Show color block;
show the color by yourself
RGB Car Program ;
When dragged into the block, the RGB will always according setting to show color
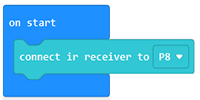
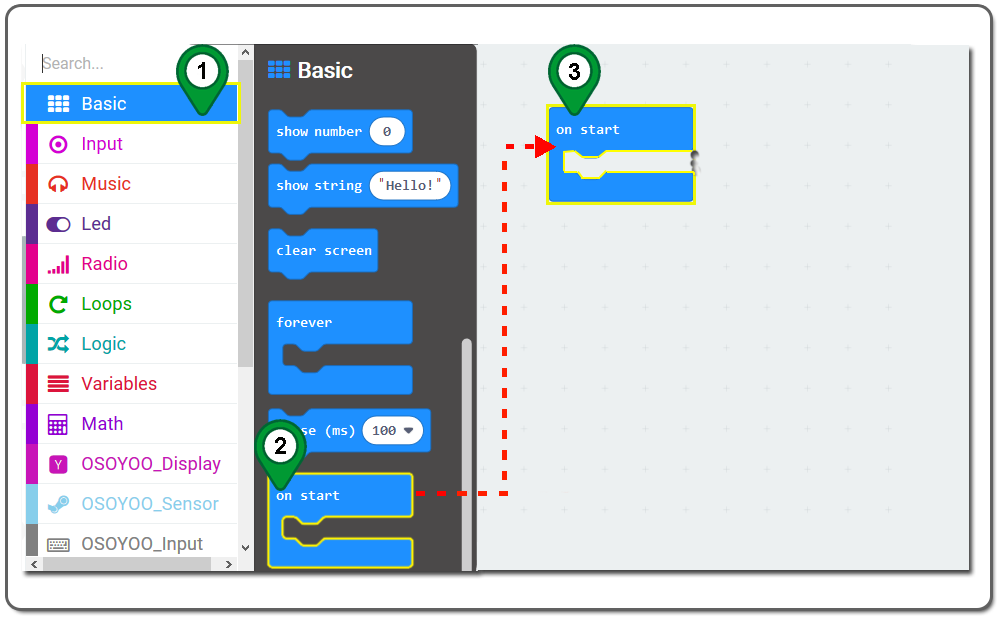
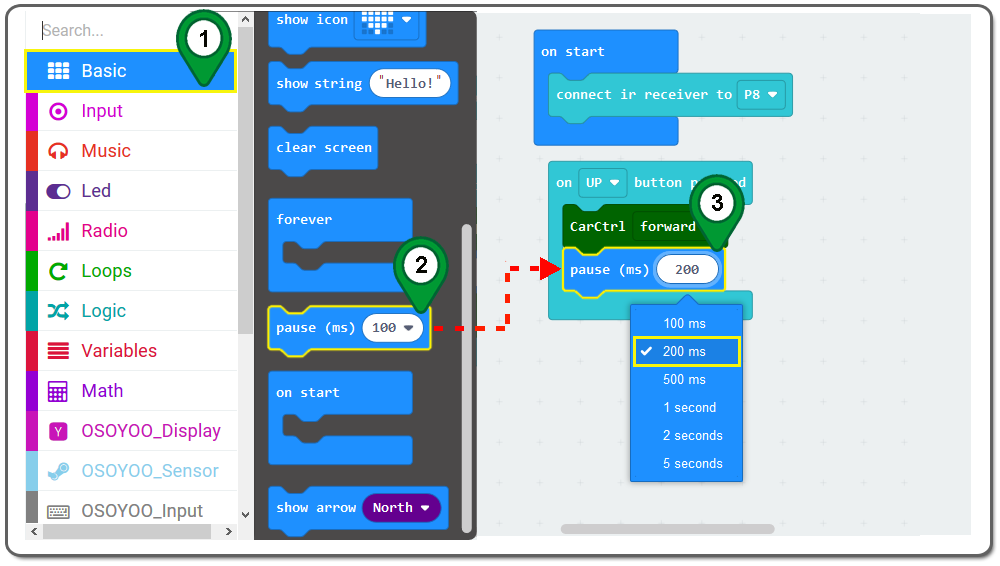
Step 1.In the Toolbox, click on the Basic category and then click the on start block , and then Drag as following figure:
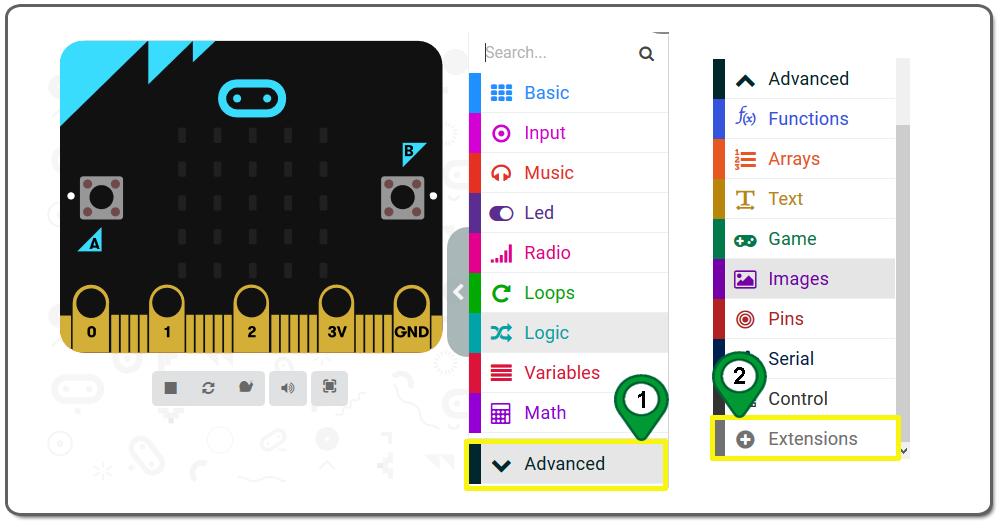
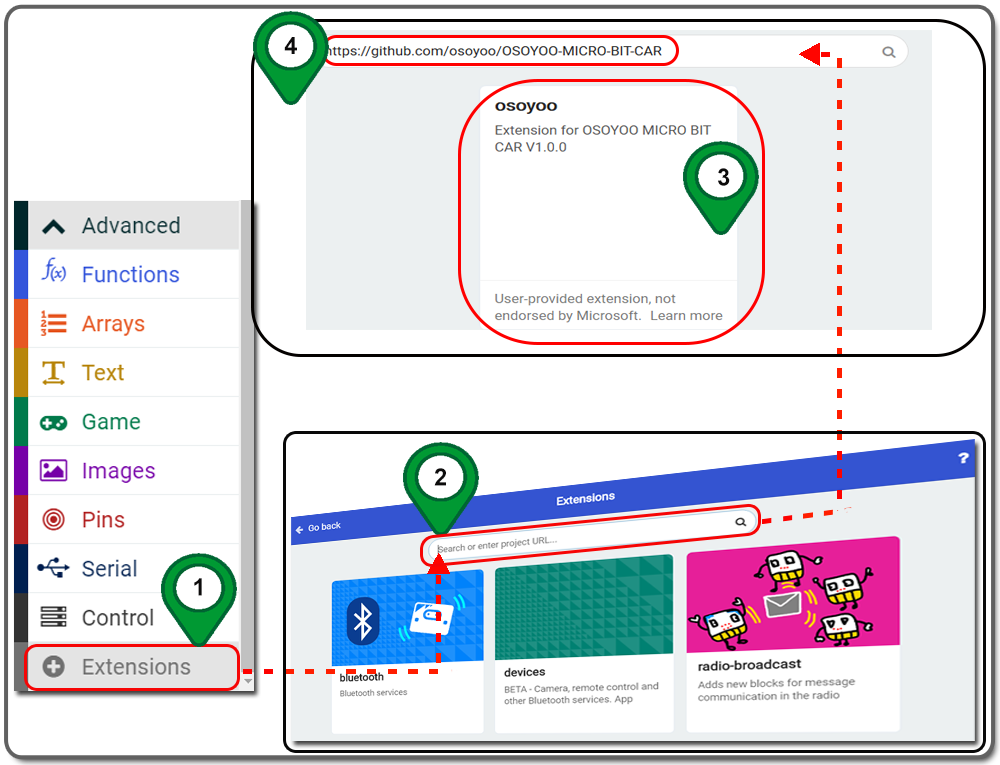
Step 2.In the Editor controls, click on the Advanced button and then Extensions as following figure.
Step 3. In the Extensions page , enter project URL “https://github.com/osoyoo/OSOYOO-MICRO-BIT-CAR” and “https://github.com/osoyoo/OSOYOO_IR_BLACK_V1.5” in the Search textbox and click on the Search button. The page will show you all the matching extensions based on your search string. Now, click on OSOYOO to add it into your project .
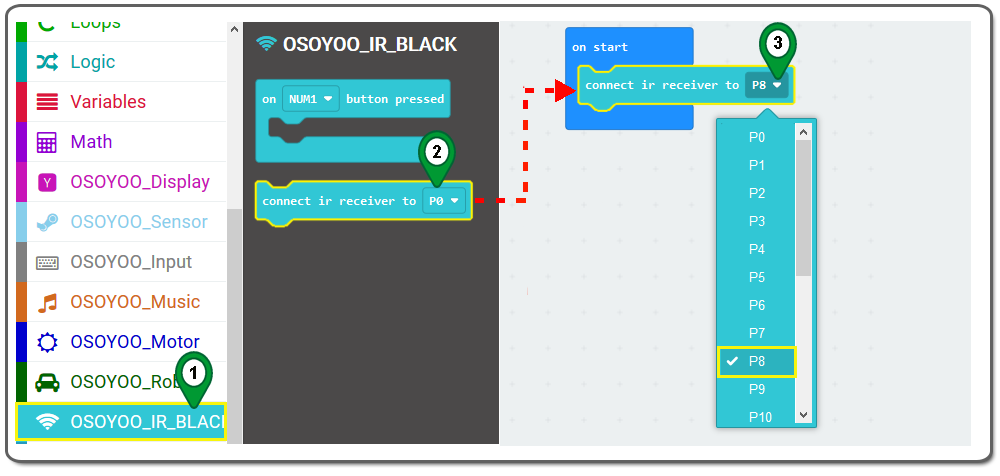
Step 4.Click on the OSOYOO_IR_Black category. Drag connect ir receiver to block and place it inside the on start block as following figure.
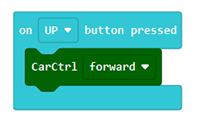
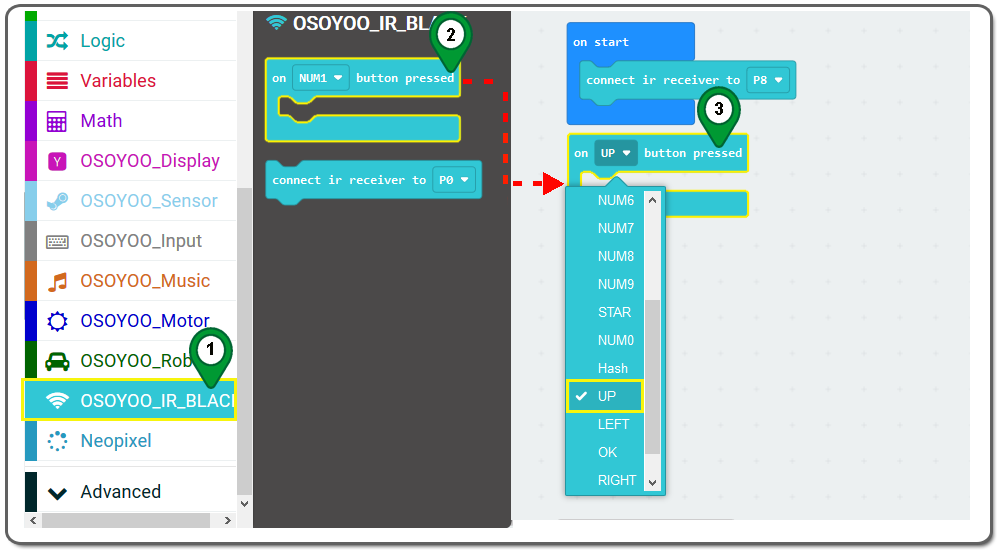
Step 5.Click on the OSOYOO_IR_Black category again. Drag on button pressed block then choose UP as following figure.
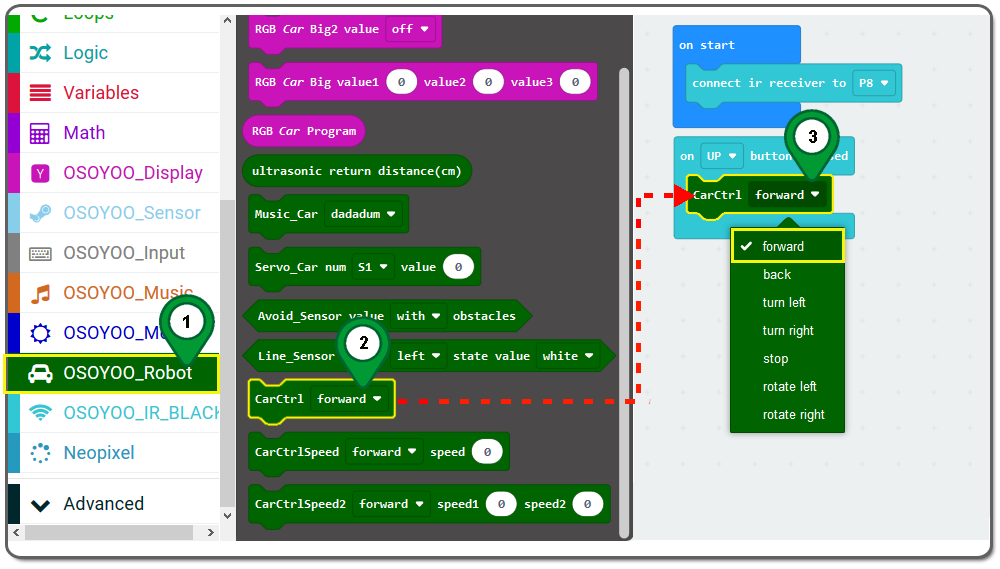
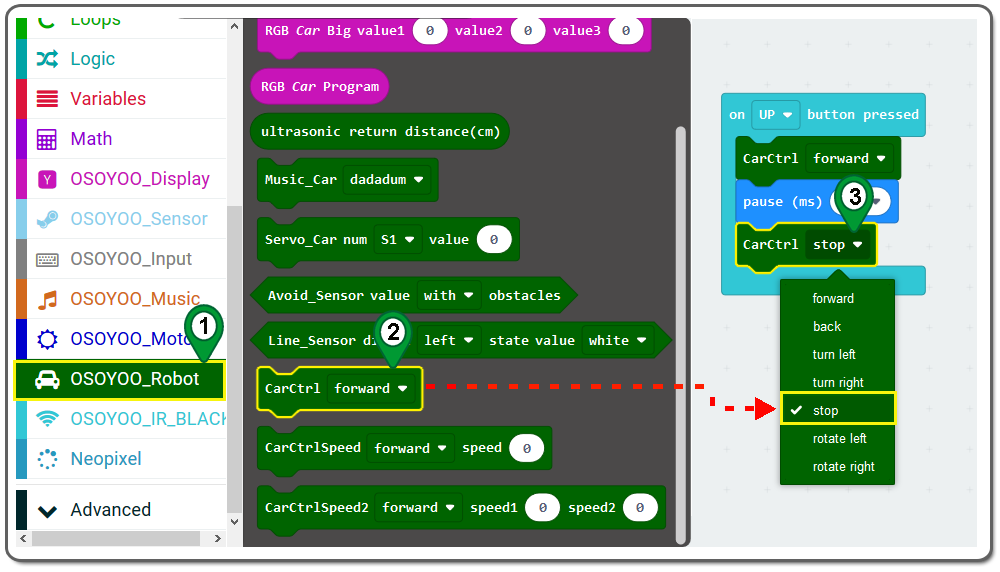
Step 6.Click on the OSOYOO_Robot category. Drag carCtrl block and place it inside the on up button pressed block,set forward from drop-down menu.
Step 7. Click on the Basic category and then click the pause(ms) button, Drag and choose 200ms as following figure:
Step 8.Click on the OSOYOO_Robot category. Drag carCtrl block and place it below previous PAUSE 200ms block ,set stop from drop-down menu.
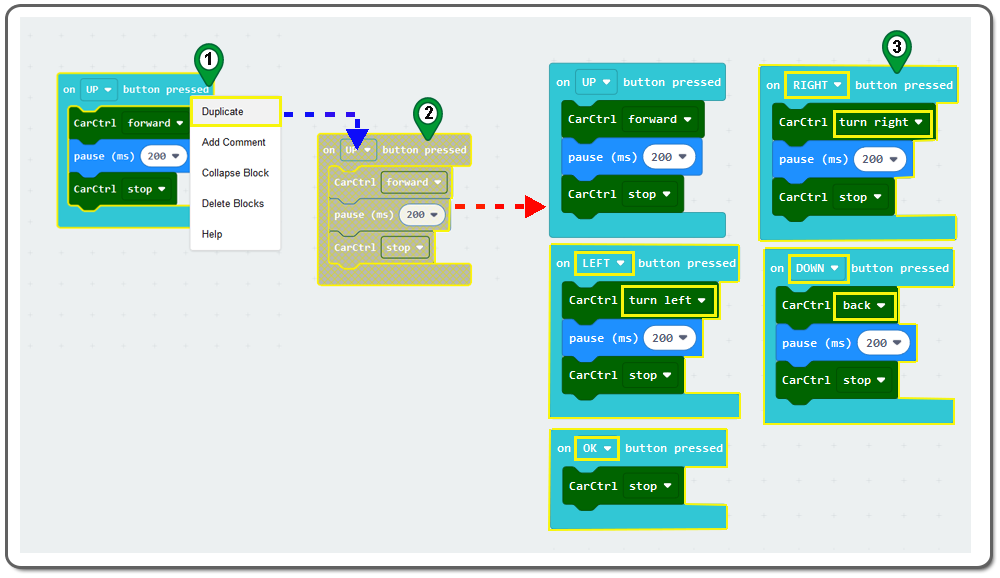
Step 9.Right click on button presses block and use Duplicate method four times. Then set the new direction as following figure.
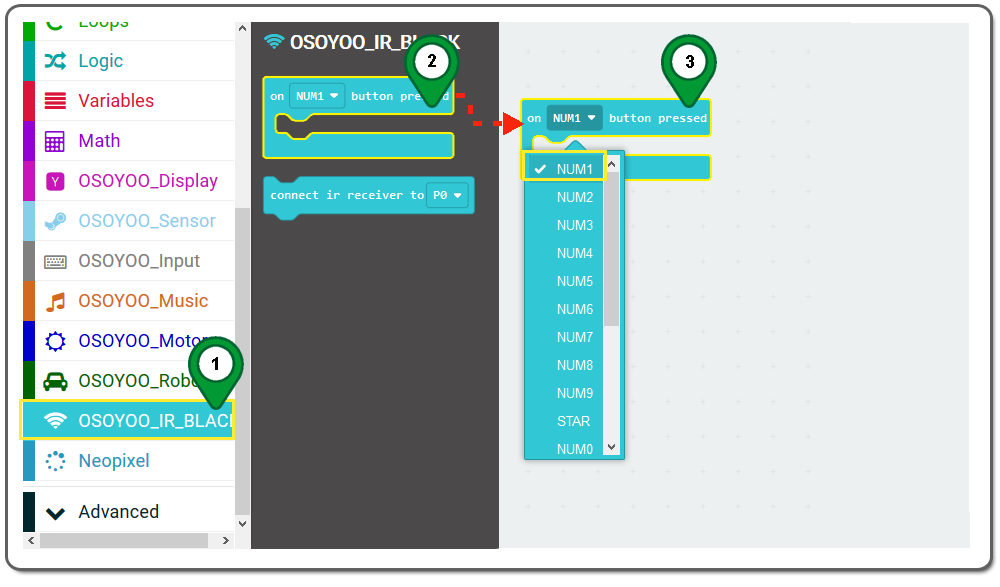
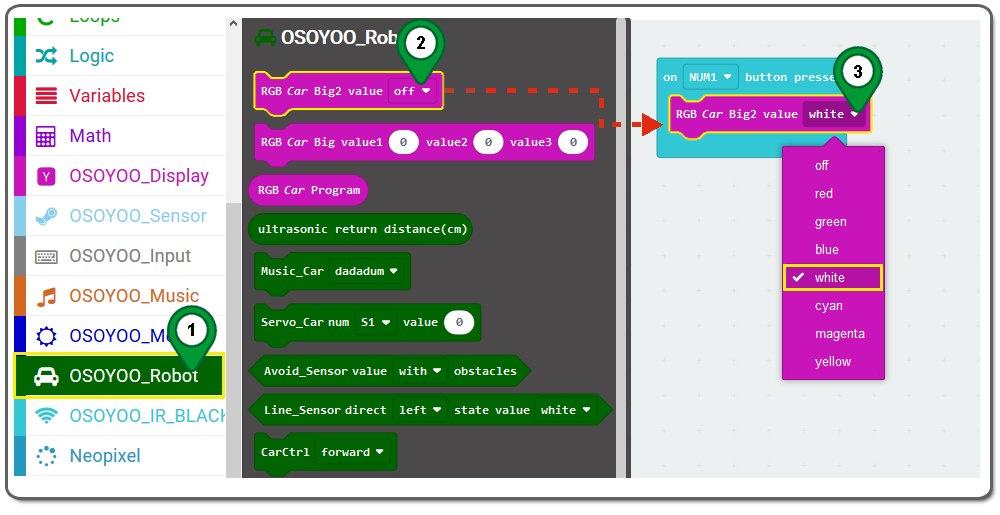
Step 10.Click on the OSOYOO_IR_Black category again. Drag on button pressed block then choose NUM1 as following figure.
Step 11.Click on the OSOYOO_Robot category again. Drag RGB Car Big2 value block and place it in on button pressed block ,set white from drop-down menu.
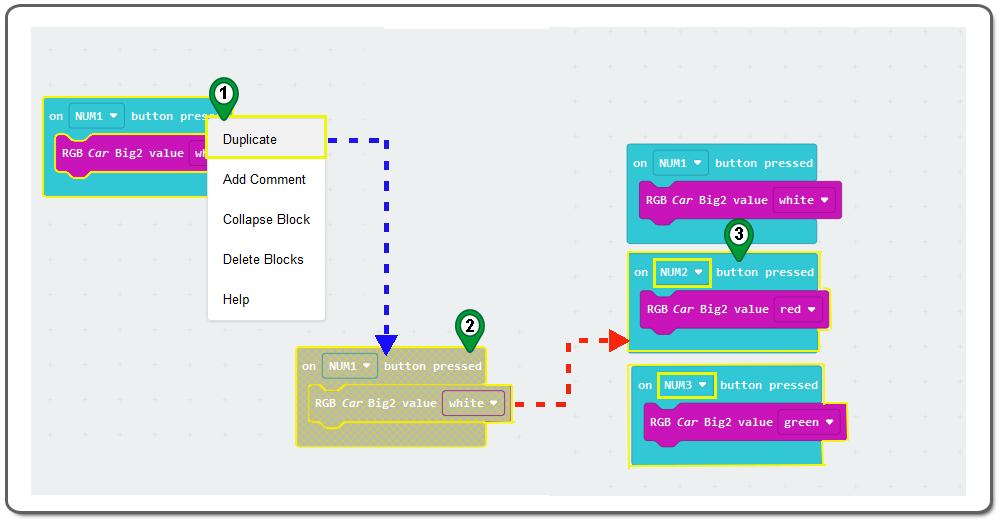
Step 12.Right click on button presses block and use Duplicate method two times. Then set the NUM and color as following figure.
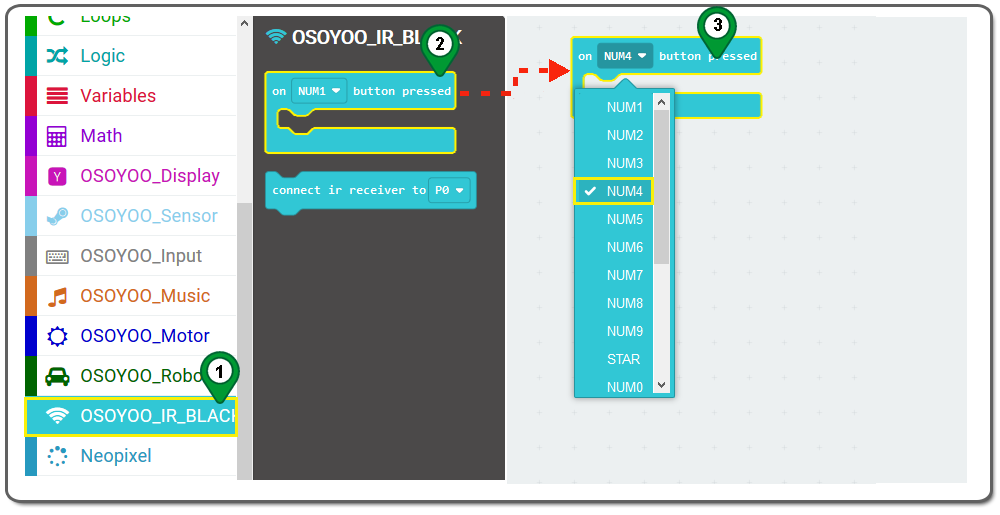
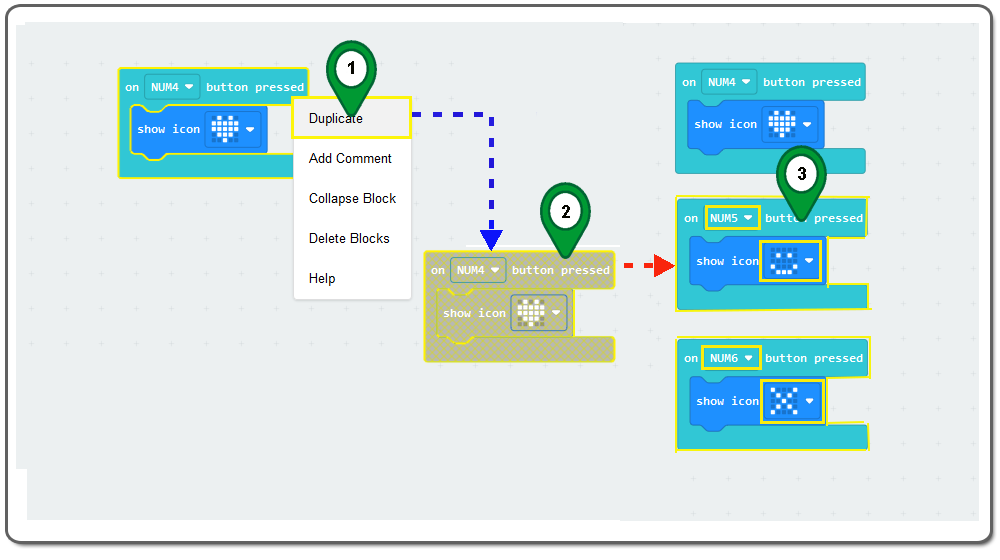
Step 13.Click on the OSOYOO_IR_Black category again. Drag on button pressed block then Set the NUM4 as per following figure.
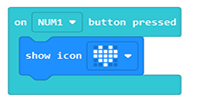
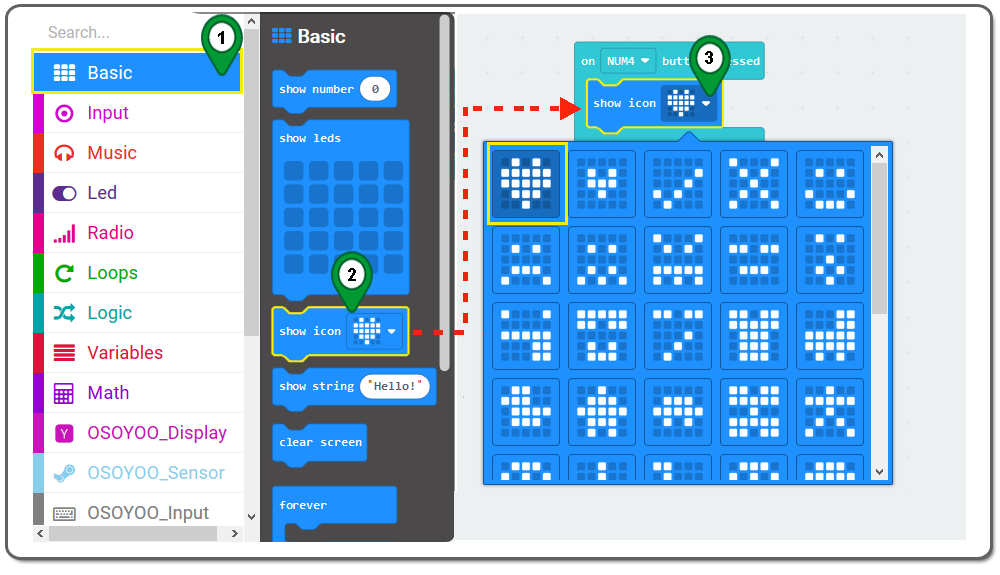
Step 14. Click on the Basic category again.And then click the show icon button, Drag and choose heart as following figure:
Step 15.Right click on button presses block and use Duplicate method two times. Then set the NUM and icon as following figure.
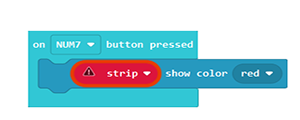
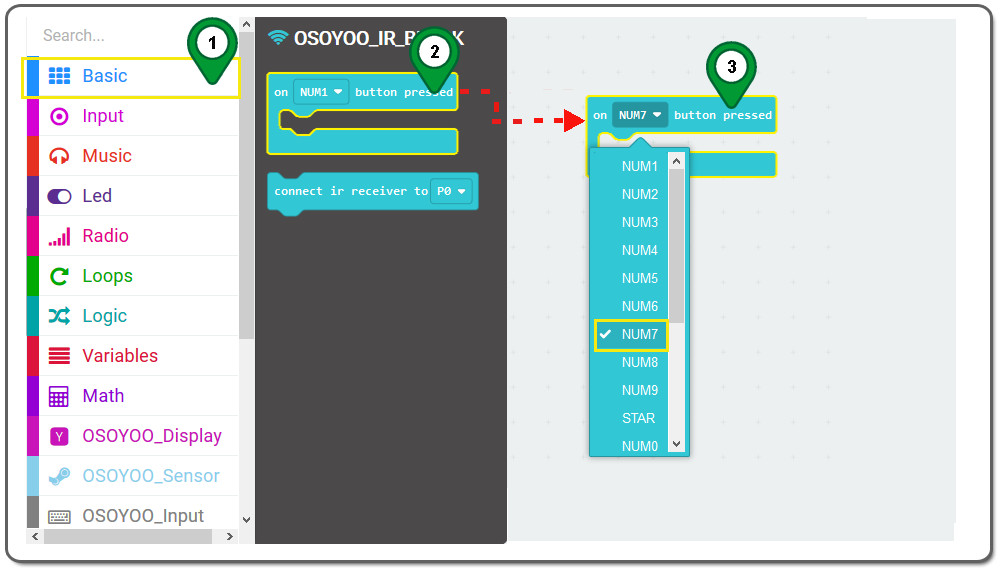
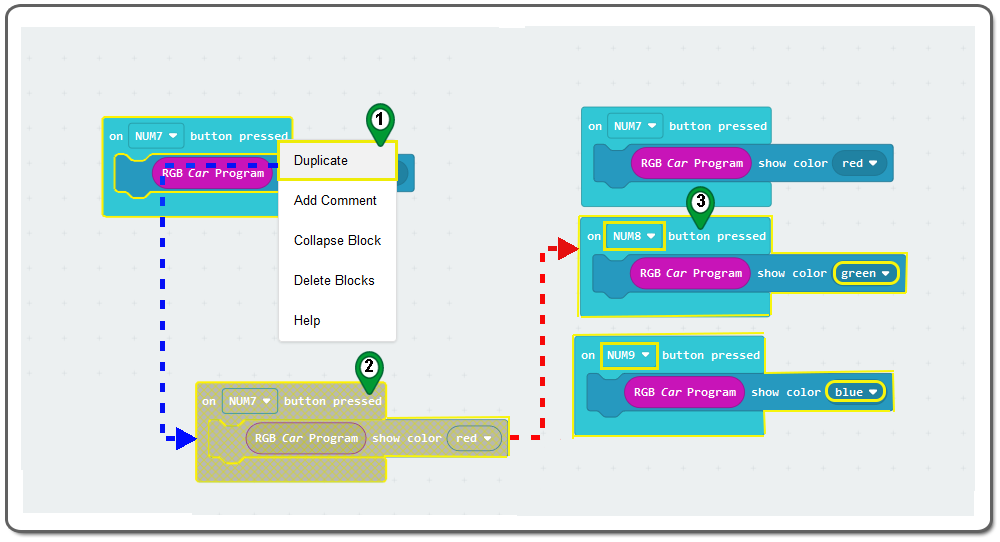
Step 16.Click on the OSOYOO_IR_Black category again. Drag on button pressed block then Set the NUM7 as per following figure.
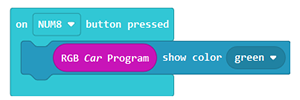
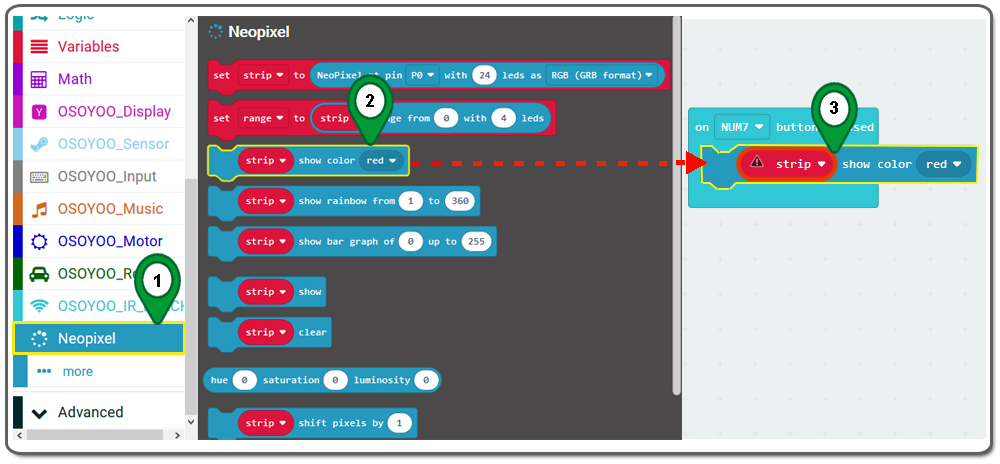
Step 17.Click on the Neopixel category . Drag strip show color block and place it in on NUM7 button pressed block as per following figure.
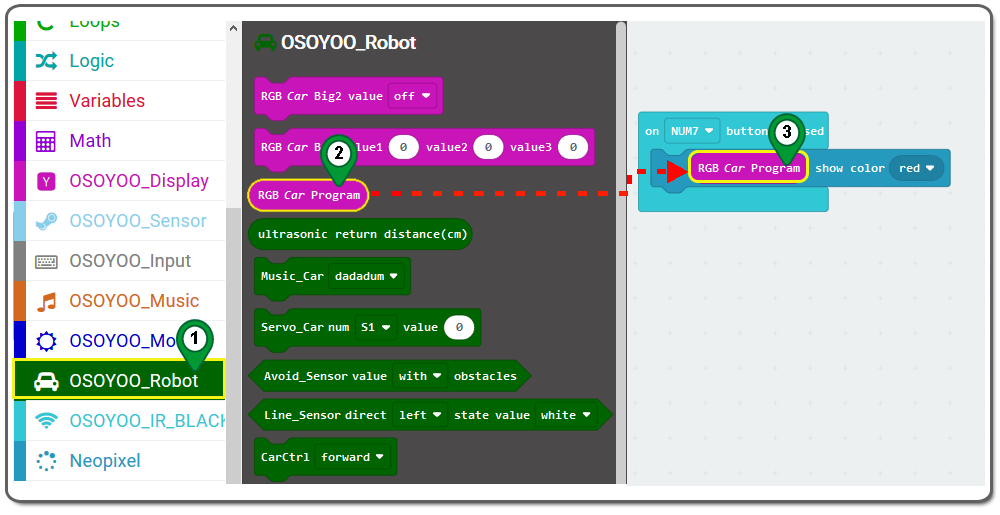
Step 18.Click on the OSOYOO_Robot category again. Drag RGB Car Program block and place it in show color red block as per following figure.
Step 19 .Right click on button presses block again ,and use Duplicate method two times. Then set the NUM and color as following figure.
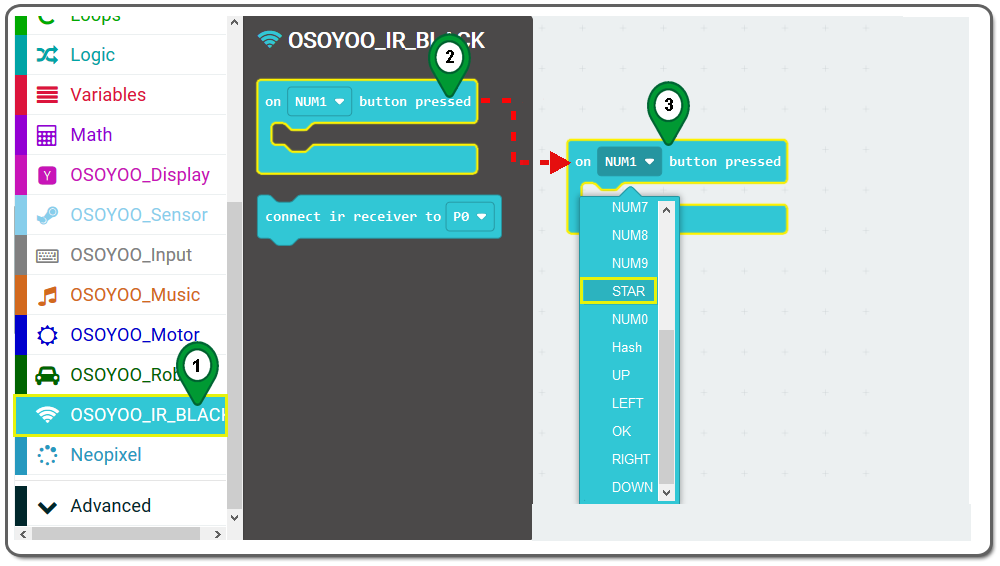
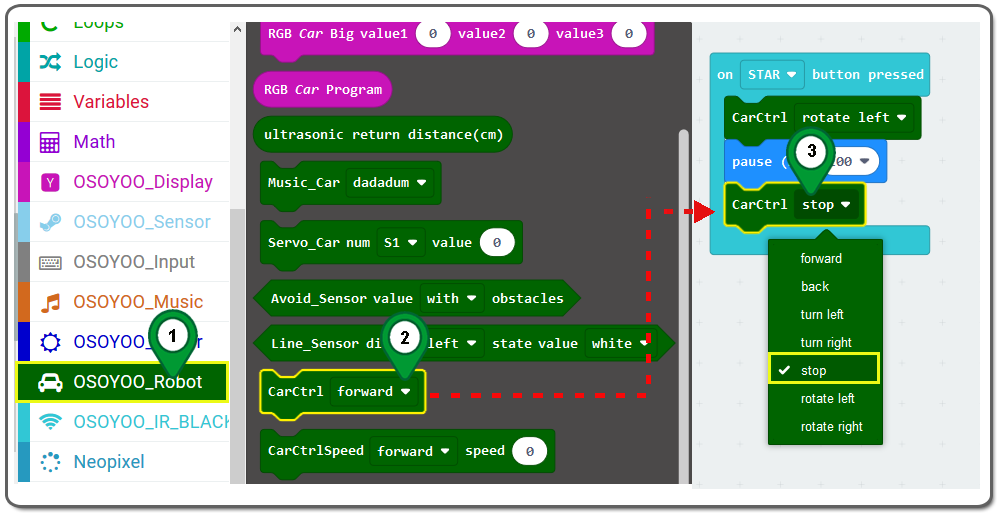
Step 20.Click on the OSOYOO_IR_Black category again. Drag on button pressed block then set the STAR as per following figure.
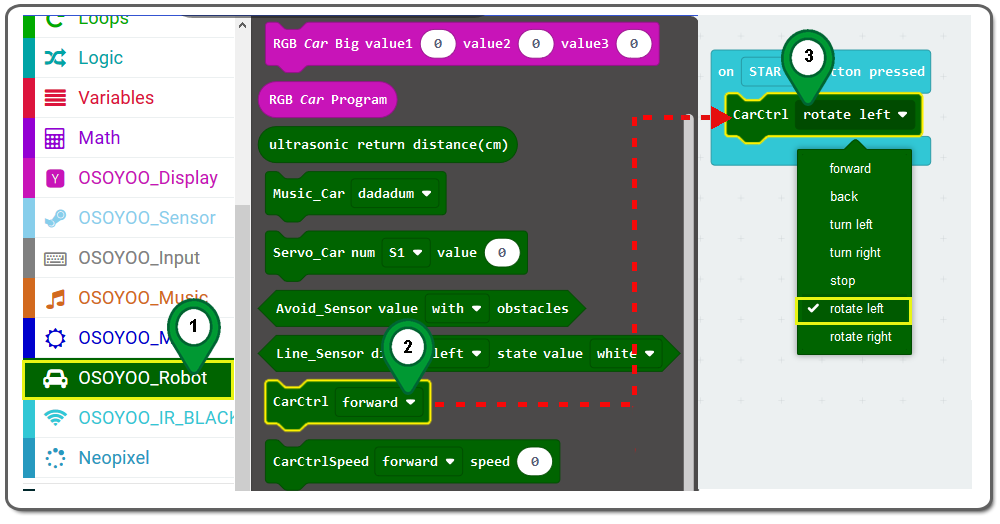
Step 21.Click on the OSOYOO_Robot category again. Drag carCtrl block and place it inside the on STAR button pressed block,set rotate left from drop-down menu.
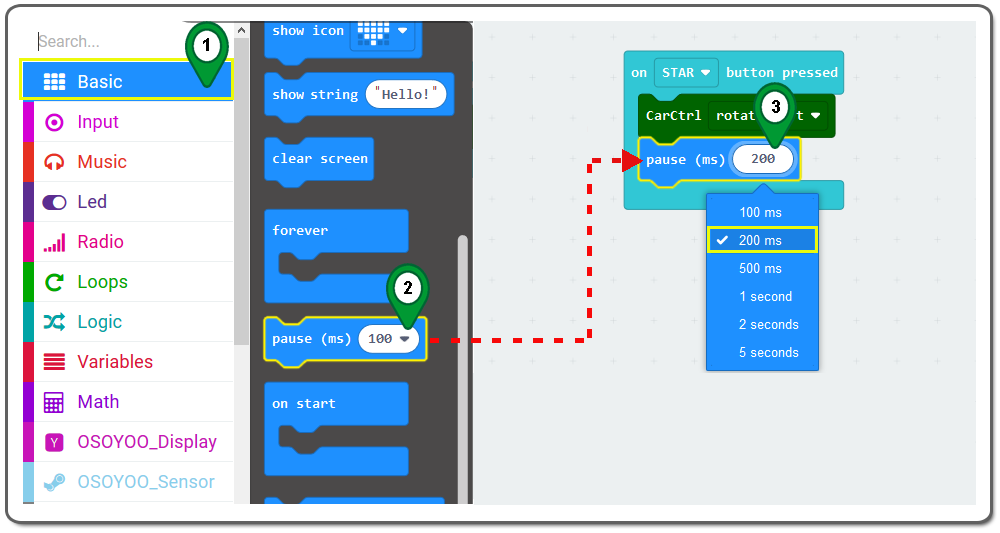
Step 22. Back to Click on the Basic category . And then click the pause (ms) button, Drag and choose 200ms from drop-down menu.
Step 23.Click on the OSOYOO_Robot category . Drag carCtrl block and place it behind the pause 200ms block,set stop from drop-down menu.
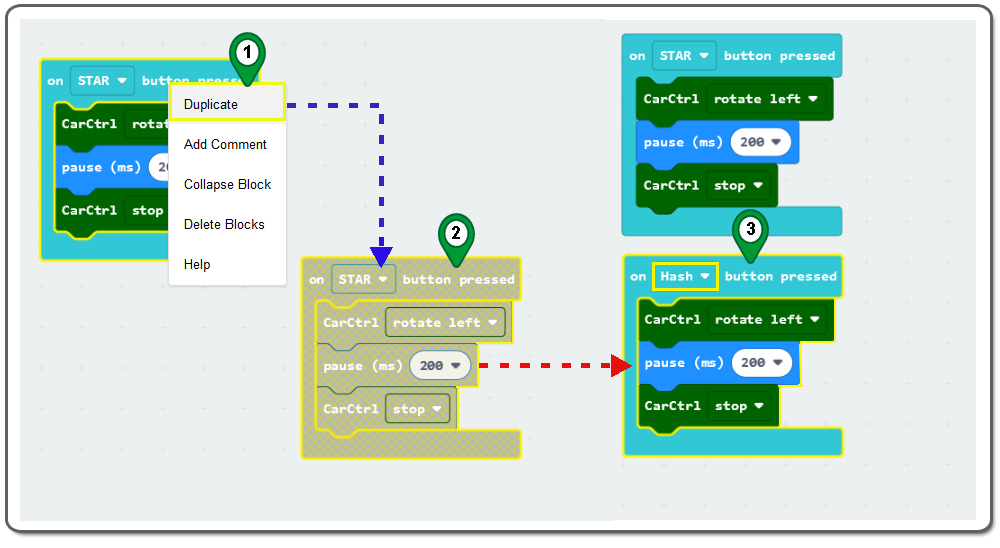
Step 24 .Right click on STAR button presses block again ,and use Duplicate method . Then set the Button as following figure.
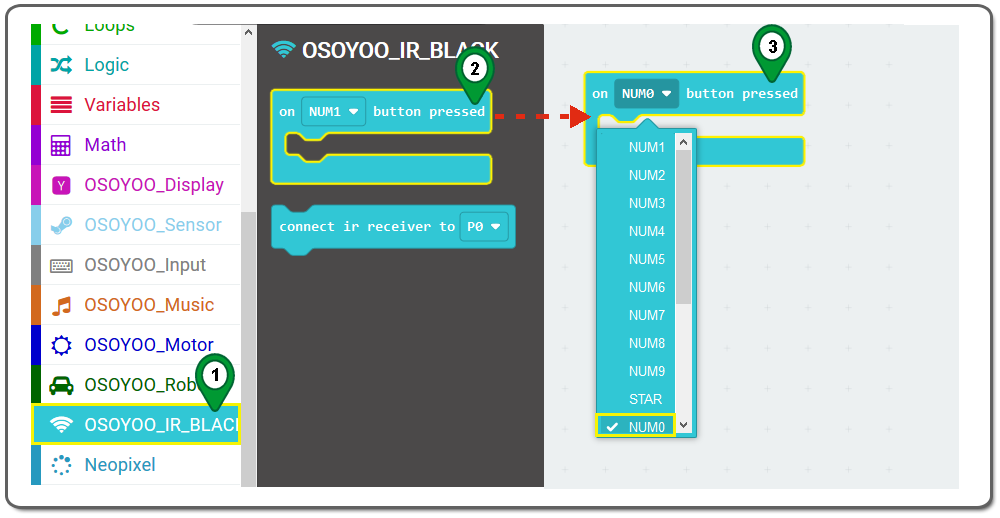
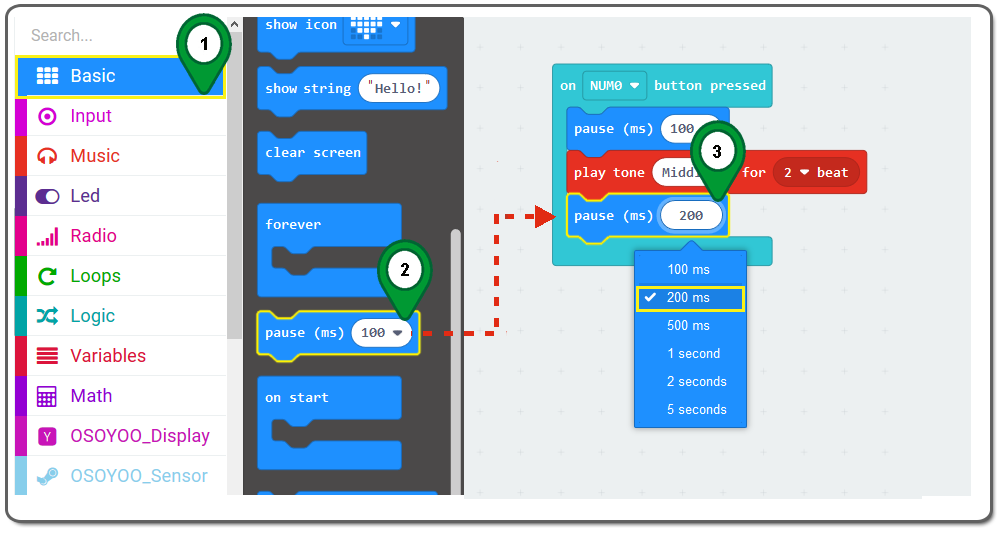
Step 25.Click on the OSOYOO_IR_Black category again. Drag on button pressed block then set the NUM0 as per following figure.
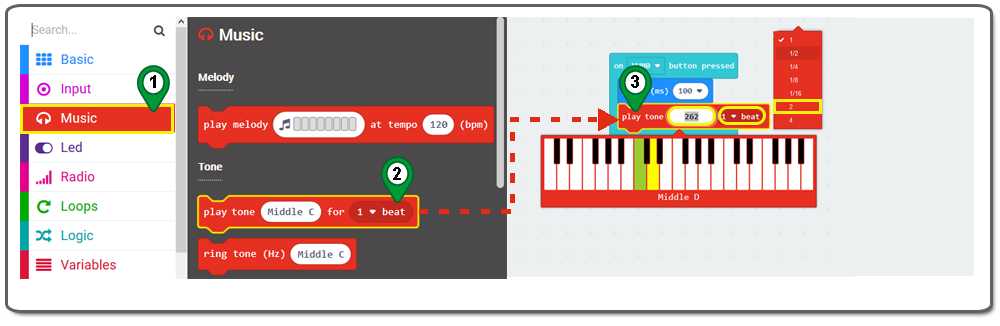
Step 26. Back to Click on the Basic category again . And then click the pause (ms) button, Drag and choose 100ms from drop-down menu.
Step 27.Click music category . And then click the play tone middle for beat bolck, Drag and choose tone and beat from drop-down menu as per following figure.
Step 28.Repeat Step 26 again, Set the 200ms as per following figure.
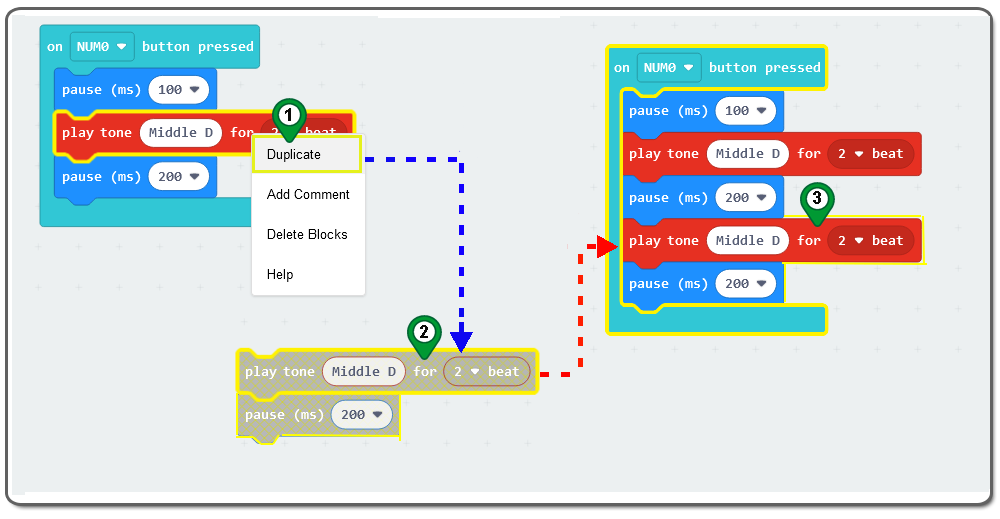
Step 29.Right click play tone button ,and use Duplicate method . Then place it behind the pause 200ms block as following figure.
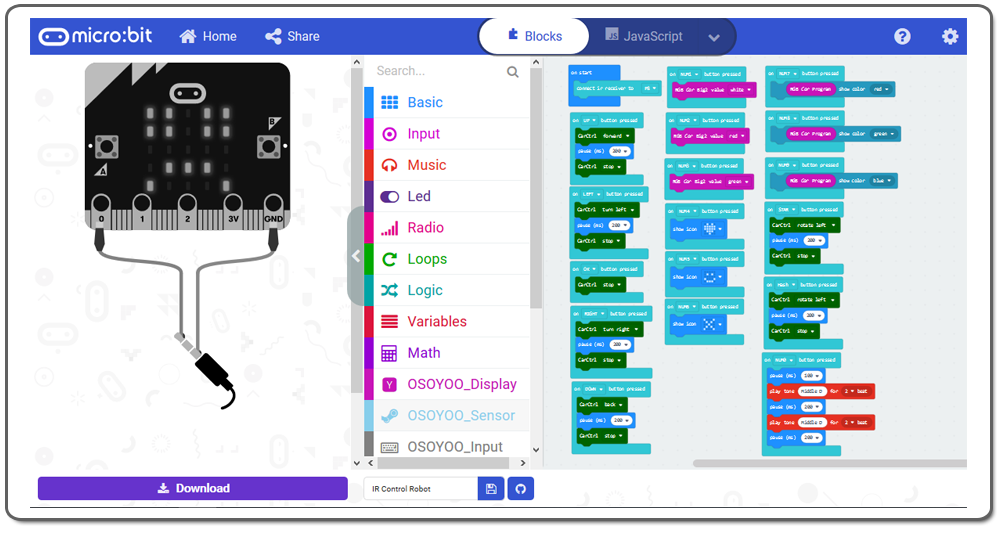
All of the operation is complete, you will see as per following figure.
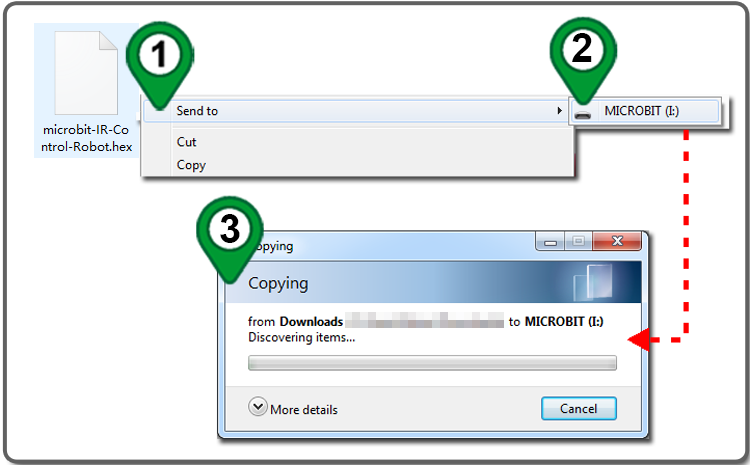
Step 32. Download this “.hex” file and save it to your MICROBIT disk Driver as following figure.
Note: You can ignore the “Cannot read property ‘onPressEvent’ of undefined” compilation problem in the code. You should still be able to upload the code to your microbit without any problem.
Step B)Connect the micro:bit with the computer through USB cable, and the computer will pop up a U disk and send the download file(.hex)to your micro:bit.
Step C)Insert the micro:bit main board into the robot, and connect a 9v battery into the battery box.
Step D)Turn the POWER switch ON.
After you download the program, you can control the car by remote control.
Press the buttons “1”to”3″ can control the head light.
Press the buttons “4” “5” “6” to display different patterns on the dot matrix.
Press the buttons “7”to”8″ can control the on-board RGB LED.
Press the button “0” you can control the passive buzzer BEEP.
Press the button “Start” to control the robot rotate left.Press the button “Hash” to control the robot rotate left.
Press the button “Up” “Down” “Left” “Right” “OK” to control the robot go ahead, go backward, turn left, turn right, stop.
Note:
1.Before using, the plastic gasket at the rear of the infrared remote controller needs to be removed
2.This experiment must be carried out indoors to reduce interference from sunlight to infrared receiver.