Resistive Touch LCD Screen, 3.5 inch, 480×320@60fps, HDMI interface, designed for Raspberry Pi.
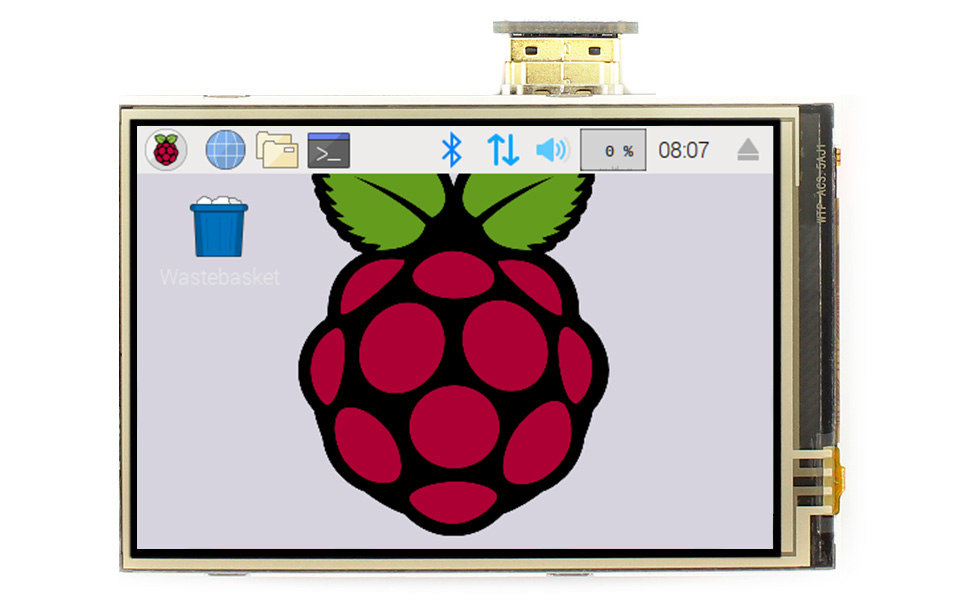
The OSOYOO 3.5-inch resistive touchscreen HAT is a versatile, high-quality display solution for STEM projects, industry and hobbyists. Suitable for the Raspberry Pi platform, the resistive touchscreen provides an easy way to display and interact with the information displayed on your Raspberry Pi.
The 3.5-inch touchscreen HAT for Raspberry Pi is specifically designed to fit easily onto the GPIO pins of the Raspberry Pi. It connects seamlessly and directly to the GPIO array, eliminating the need to deal with additional cables or complex configurations. However, for applications that do not require a GPIO interface, a display can also be easily connected via the HDMI port for flexible integration and use of touchscreen functionality.
Specification
Video
- Physical LCD resolution 3.5inch 480×320 (ILI9488)
- Configurable software resolution max 1920×1080, above 60~75fps
- Default resolution 720×480 (3:2 ratio)
- Auto fill screen area
- None IPS LCD, View angle 12 O’Clock
Touch: XPT2046 Resistive touch with pen
Button: 2 push buttons (Power switch, Brightness adjust)
LED for power status indication: Off: Display is in active status, On: Display is in suspend mode
HDMI-A connector
HDMI-A to HDMI-A, HDMI-A to HDMI mini PCB adapter
USB Type-C port for only power supply
RaspberryPI GPIO compatible 26pin female connector:
- 5V supply from RaspberryPi connector
- SPI bus for touch function
DDC/CI support
Compatible with Win7/10/11, Linux (Debian, Ubuntu, RaspberryOS…)
Power consumption:
- Normal mode: 5V, 200~230mA (max brightness)
- Standby mode: 5V, 70~90mA (no signal, standby)
- Suspend mode: 5V, 20mA (power switch off)
Mechanical size: Board 85mm x 56mm, LCD view area 73.4mm x 49mm
Hardware Description
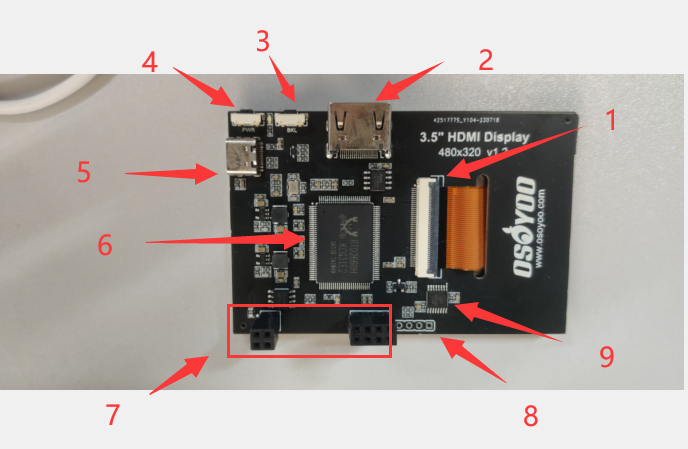
①Backlight button: backlight brightness adjustment button, short press backlight changes by 10%, long press 3 seconds to close backlight
②HDMI interface: HDMI signal input interface
③Amplifier interface: HDMI audio output interface
④USB power supply interface: provide power for ordinary display (5V 1A)
⑤Transaction raspberry pie 26PIN base: gets power and return touch from this area when used as a raspberry pie monitor
Interface
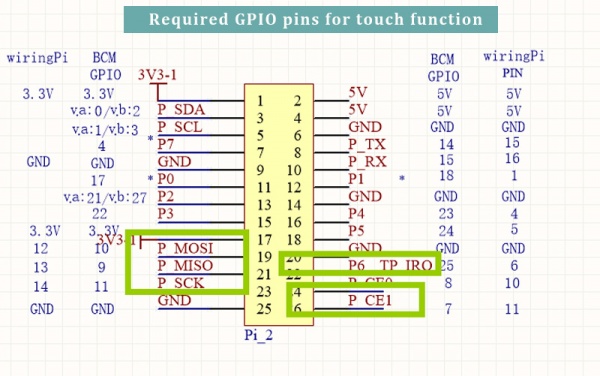
The pin marked as “NC” below indicates that the LCD is not occupied by the pin, and the user can use it for other applications.
| Pin Number |
Identification |
Description |
| 1 |
3.3V |
Power (3.3V input) |
| 2 |
5V |
Power (5V input) |
| 3 |
NC |
NC |
| 4 |
5V |
Power (5V input) |
| 5 |
NC |
NC |
| 6 |
GND |
Ground |
| 7 |
NC |
NC |
| 8 |
NC |
NC |
| 9 |
GND |
Ground |
| 10 |
NC |
NC |
| 11 |
NC |
NC |
| 12 |
NC |
NC |
| 13 |
NC |
NC |
| 14 |
GND |
Ground |
| 15 |
NC |
NC |
| 16 |
NC |
NC |
| 17 |
3.3V |
Power (3.3V input) |
| 18 |
NC |
NC |
| 19 |
TP_SI |
SPI data input of touch panel |
| 20 |
GND |
Ground |
| 21 |
TP_SO |
SPI data output of touch panel |
| 22 |
TP_IRQ |
The touch panel is interrupted, and the low level is detected when the touch panel is pressed. |
| 23 |
TP_SCK |
SPI clock signal of touch panel |
| 24 |
NC |
NC |
| 25 |
GND |
Ground |
| 26 |
TP_CS |
Touch panel chip select signal, low level selects touch panel |
Features
HDMI35 is designed for RaspberryPi 3/4 display, and can be used as a general purpose HDMI display. Touch function is unavailable when using with pc/laptop through HDMI cable.
– Power supply
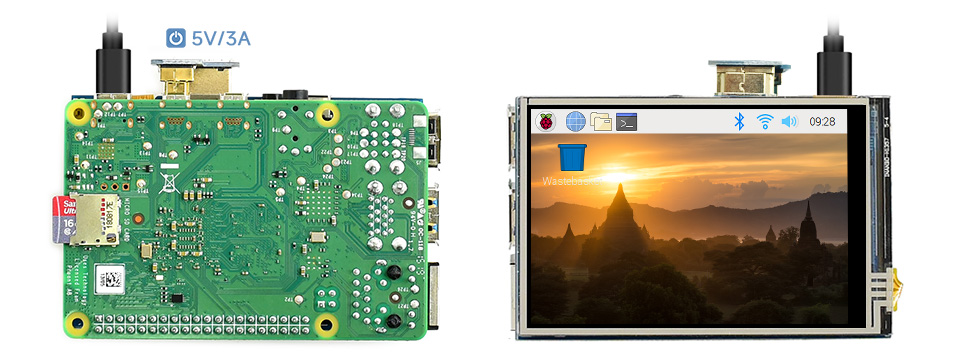
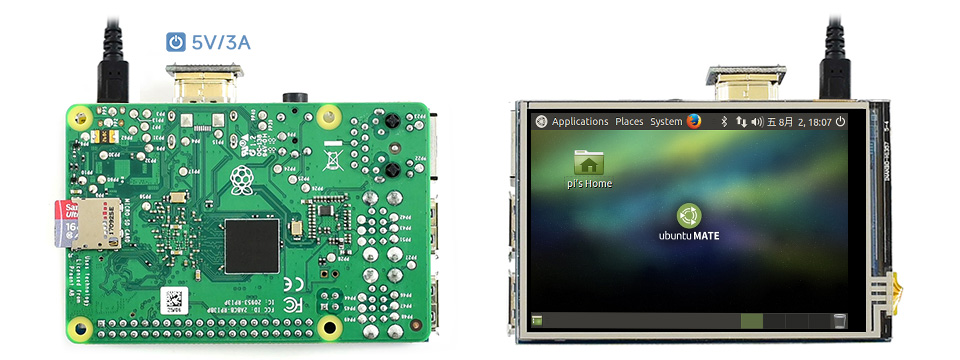
The display can be powered from RaspberryPi GPIO +5V pin, or from external power adapter. 5V/1A external power adapter is enough for power supplying to the display.
If the display is plugged to the RaspberryPi GPIO connector, and powered from external power adapter through USB type-C cable, the RaspberryPi also can be powered from the GPIO +5V pin, and don’t need extra power supply.
In this case, the external power adapter should be at least 5V/3A capable.
The RaspberryPi and HDMI35 display do not support USB PD, and the input voltage is always 5V.
– Button
The power switch is toggle push button, toggles power on (normal mode) and power off (suspend mode) status. The power indicator led lights on when the display is suspended. DDC/CI function is always ready even it is in suspend mode, and the display can wakeup programmatically by DDC/CI commands.
The brightness button adjusts the lcd brightnees by 10% step in 10~100% range.
The brightness value is stored to the non-volatile memory, and updated in every button click or DDC/CI brightness command.
The display supports 0, 180º rotation of the lcd view area, without changing settings at the RaspberryPi or PC. Its useful for simple customization of the display usage, but after rotation the touch needs to be re-calibrated.
Press brightness button, holding, then press power button, rotates the display 180 º, the rotation status is also saved to non-volatile memory
– DDC/CI
The display’s brightness, contrast, colors can be updated by DDC/CI commands from HDMI port DDC channel (I2C port).
It also can enable or disable splash logo, hdmi symbol on the screen, standby feature. If the standby feature is disabled (disabled by default), the display always shows message if there is no input signal.
– Filling screen area
The display supports automatic video scaling (RTD2660), and can show any kind of resolution (up to 1920×1080) video to the physical 480×320 view area.
When using on Win10/11 PC, the display sometimes does not fill the entire view area of the LCD, and could be shrinked due ratio mismatching.
In this case, It can be fixed by adjusting [Settings]-[Display]-[Advanced Display Settings]-[Refresh Rate] value.
Note
Only the touch function requires GPIO, display don’t use the GPIO.
Device & System Support
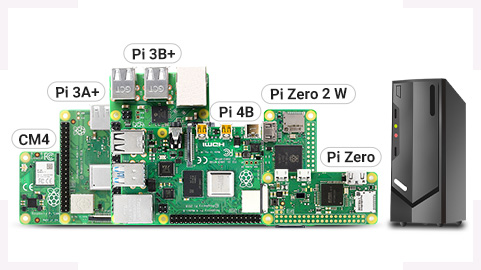
Raspberry Pi
Supports Raspbian / Ubuntu / Kali / Retropie, driver provided
Supports all versions of Raspberry Pi
PC
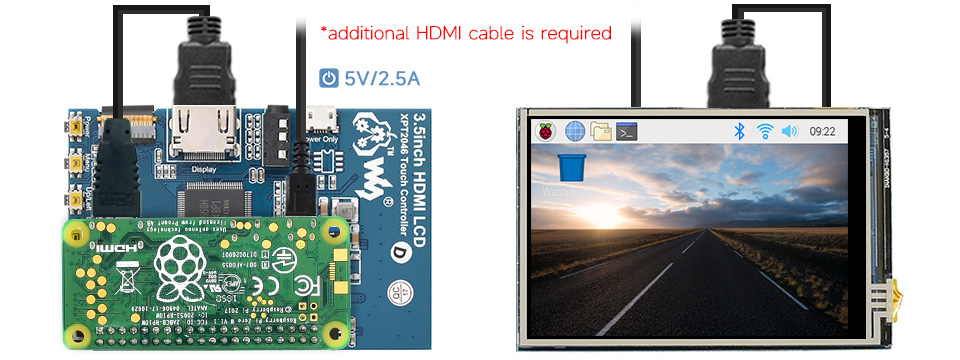
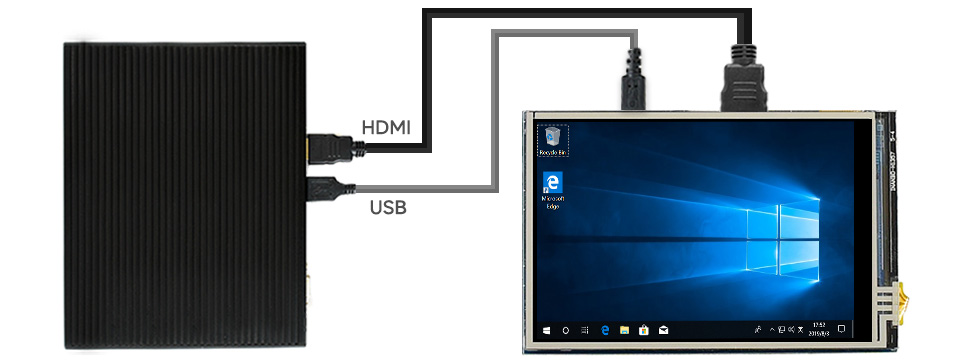
Supports Windows 11 / 10 / 8.1 / 8 / 7, no touch (additional HDMI cable required)
Connection Examples
Working With Raspberry Pi 4
Working With Raspberry Pi 3B+
Working With Raspberry Pi Zero W
Working With Mini PC
Applications
- Robotics; User interfaces, Control panels, Telepresence robots
- STEM Projects
- Media devices
Getting Started
Hardware Connection
1. Connect the GPIO interface
Raspberry Pi leads out 40 GPIO pins, while the screen leads out 12 pins. When connecting, pay attention to the corresponding pins and Raspberry Pi pins.
2. Connect the HDMI connector to the HDMI port of the screen and the Pi.
3. Turn the Backlight on the back of the LCD to “ON”.
Note: Raspberry Pi Zero / Zero 2 W needs an additional HDMI cable for connection.
The hardware connection is as shown below (Pi 4 and Pi 3B+):


Software Setting
This LCD can support Raspberry Pi OS / Ubuntu / Kali / Retropie systems.
Firstly, Download IMG system in your computer from the raspberry pi official website: https://www.raspberrypi.org/downloads/

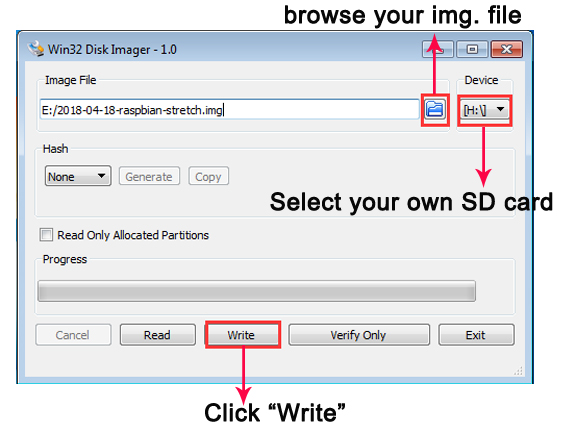
Secondly, Unzip the IMG system, and open your imager writer (recommend win32diskimager from: https://sourceforge.net/projects/win32diskimager/);
Thirdly, Insert the SD card into the card reader, and connect with computer, and select the image system and the device, and then click “write”, as below:
Online installation
You can install the touch driver for 3.5″ HDMI touch screen based on the existing system, but it just supports Raspberry Pi OS.
1) Burn OS system (Raspberry Pi OS) in a TF card/micro SD card, and insert this card in your raspberry Pi
Note:
- The Raspberry Pi must be connected to the network, or else the program won’t be successfully installed.
- You can remotely control Raspberry Pi via ssh, vnc or remote desktop tools, or directly control Raspberry Pi with other HDMI monitor with keyboard and mouse
- All following steps are tested on OS: 2021-05-07-raspios-buster-armhf, there may be some differences with other OS
2) Run the following commands in terminal to switch user permission as administrator
sudo passwd root
sudo passwd –unlock root
su root
3) Run the following command in terminal to download the driver:
git clone https://github.com/osoyoo/HDMI-show.git
4) Run the following command in terminal to change the executable permissions of file:
sudo chmod -R 777 LCD_driver
5) Run the following command in terminal to enter the file
cd LCD_driver
Step 4: Run the following command (Please don’t turn off Raspberry Pi, and it will reboot in 2 minites):
sudo ./LCD35_hdmi
Wait for about 2 minutes, the driver would be installed and reset automatically, insert the 3.5″ HDMI screen and turn on.
Now you have completed to install the touch driver for 3.5″ HDMI touch screen.
Offline installation
You can install the touch driver for 3.5″ HDMI touch screen based on the existing system, but it just supports raspbian system.
1) Burn OS system (Raspberry Pi OS) in a TF card/micro SD card, and insert this card in your raspberry Pi
2) Connect the raspberry pi with 3.5″ HDMI touch screen and make sure that the network is available for raspberry pi
3) Download Driver to your PC — 3.5″ HDMI touch screen driver
4) Copy the driver into a NEW USB flash, and insert to Rapberry Pi.
5) Copy the driver and paste it to the folder of raspberry pi, Raspbian Direction: Pi,
6) Enter the following command in terminal to change the executable permissions of file:
sudo chmod 777 LCD_show_35hdmi.tar.gz
7) Enter the following command in terminal to unzip the file
tar -xzvf LCD_show_35hdmi.tar.gz
8) Enter the following command in terminal to enter the files after Unzip
cd LCD_show_35hdmi
9)choose one command to install suitable resolution driver:
Resolution 720*480(recommend): sudo ./LCD35_720*480
Resolution 480*320: sudo ./LCD35_480*320
Resolution 810*540: sudo ./LCD35_810*540
Wait for about 5 minutes, the driver would be installed and reset automatically, insert the 3.5″ HDMI screen and turn on.
Now you have completed to install the touch driver for 3.5″ HDMI touch screen.
How to use as PC monitor
- Connect the computer HDMI output signal to the LCD HDMI interface by using the HDMI cable
- Connect the LCD’s USB Power interface to the USB port of the device
- If there are several monitors, please unplug other monitor connectors first, and use LCD as the only monitor for testing.
- Note: touch function can only be used for raspberry pi.
How to rotate the display direction
This method only applies to the Raspberry Pi series of display screens, other display screens do not apply.
- Method 1,If the driver is not installed, execute the following command (Raspberry Pi needs to connected to the Internet):
sudo rm -rf LCD-show
git clone git clone https://github.com/osoyoo/HDMI-show.git
chmod -R 755 LCD-show
cd LCD-show/
sudo ./XXX-show 90
After execution, the driver will be installed. The system will automatically restart, and the display screen will rotate 90 degrees to display and touch normally.
( ‘ XXX-show ‘ can be changed to the corresponding driver, and ‘ 90 ‘ can be changed to 0, 90, 180 and 270, respectively representing rotation angles of 0 degrees, 90 degrees, 180 degrees, 270 degrees)
- Method 2,If the driver is already installed, execute the following command:
cd LCD-show/
sudo ./rotate.sh 90
After execution, the system will automatically restart, and the display screen will rotate 90 degrees to display and touch normally.
( ‘ 90 ‘ can be changed to 0, 90, 180 and 270, respectively representing rotation angles of 0 degrees, 90 degrees, 180 degrees, 270 degrees)
If the rotate.sh prompt cannot be found, use Method 1 to install the latest drivers


Greetings, friends:
I recently purchased an OSOYOO 3.5 Inch HDMI Screen v2.0 through Amazon.
I would appreciate it if you could send me the information on the screen’s GPIO ports to take advantage of the touch screen function.
Thanks!
It is using the GPIO Physical Pin# 17,18,19,20,21,22 which provide SPI I port in Pi.