Introduction
In this lesson, we will show how to use the DS18B20 Temperature Sensor with an Osoyoo UNO, we will monitor the output of the DS18B20 Temperature Sensor. With this sensor you can get the temperature in your room, car, whatever.

Preparations
HARDWARE
- Osoyoo UNO Board (Fully compatible with Arduino UNO rev.3) x 1
- Breadboard x 1
- DS18B20 Temperature Sensor x 1
- Jumpers
- USB Cable x 1
- PC x 1
SOFTWARE
Arduino IDE (version 1.6.4+)
Arduino library: OneWire.h
Arduino library: DallasTemperature.h
About DS18B20 Temperature Sensor
The DS18B20 comes in different forms and shapes, so you have plenty of choice when deciding which one works best for you. There are 3 variations available: 8-Pin SO (150 mils), 8-Pin µSOP, and 3-Pin TO-92. If you look at online shop, some friends have packaged the TO-92 version in a waterproof housing so you can use it directly in your fish-tank, water boiler, outside your house or even your freezer, without having to worry about water/moisture shortcutting your electronics (these have 3 wires: Black (GND), Red (Vdd) and white or yellow (Data)).
DS18b20 – Available Packages


DS18B20 in a waterproof casing
The DS18B20 is quite versatile. It can be powered through the data line (so called “parasite” mode, which requires only 2 wires versus 3 in normal mode), it operates in a 3.0V to 5.5V range, measures Temperatures from -55°C to +125°C (-67°F to +257°F) with and ±0.5°C Accuracy (from -10°C to +85°C). It converts a temperature in 750ms or less to a up to 12 bits value.
Another cool feature is that you can connect up to 127 of these sensors in parallel, and read each individual temperature. Not sure what I’d do with that, but the ability to combine one or two, for example for the temperature of your fridge and freezer, is a nice option, specially when other pins of your Arduino are being used for other things …
The three pins of the Temperature Sensor are:
- Ground : This will be connected to the ground of Arduino
- VCC : This will be connected to the 5v of Arduino
- Signal : This will be connected to any digital pin of Arduino.
Description:
This is DS18B20 digital temperature sensor for Arduino -55°C~125°C
Digital signal output
Detect ambient air temperature
Compatible with Arduino DIY project and other DIY projects
NOTES
- The DS18B20 and ordinary transistors look similiar, so be careful not to regard it as a generalPass transistor to avoid damage.
- in order to prevent damage to the DS18B20 ensure that the powerLine and ground are not reversed.
- the relevant technical data on the bus did not mention a single number that can be linked to how much DS18B20, But in practical applications are not as many, and we should pay attention to.
- There is a bus length limitation that should be taken in consideration when long-distance communications, consider bus distributed capacitance and resistance.
- Identify DS18B20 Temperature Sensor Module power line, ground, and data Line, power line and ground points connect to the Arduino test board +5 V, GND, Data bus connect to the digital port.
Specification:
Resolution adjustment range :9-12
With mounting holes for easy installation, Aperture: 2.5
Temperature measuring range: -55 ~ +125 ℃
Temperature measurement accuracy: 0.5 ℃
Working voltage: DC 5V/DC 3.3V
Example
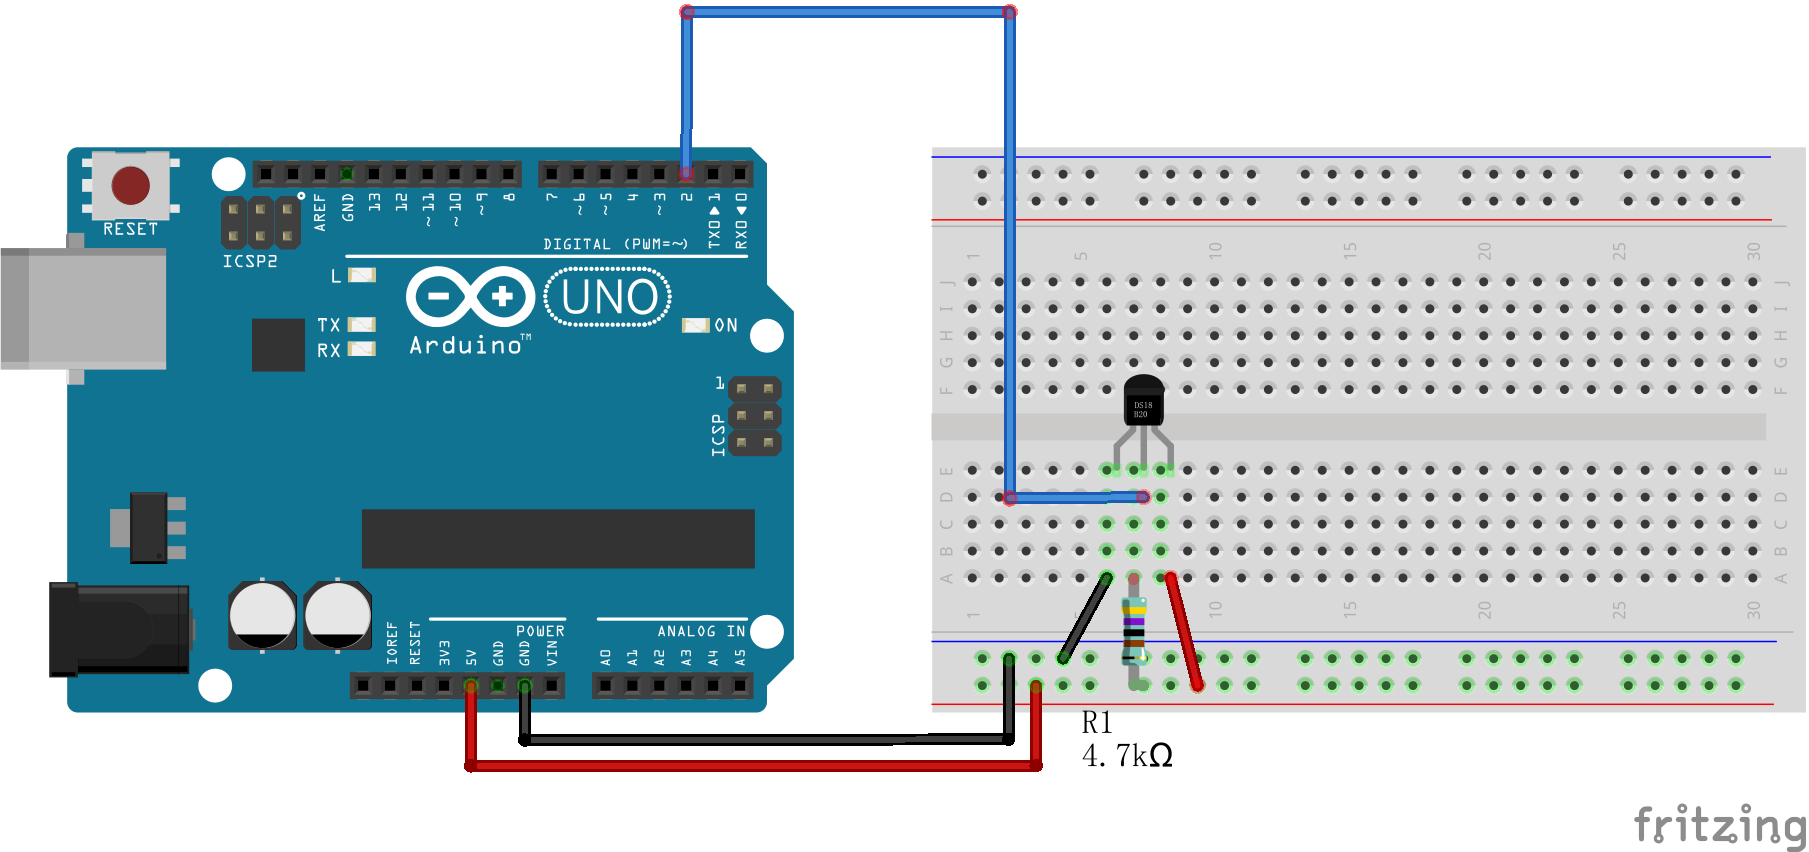
Connection of DS18B20 Temperature Module with arduino
The connection scheme is very easier. We have only three pins to connect. Connect the temperature module to the Arduino as shown in the figure.
CODE
You’ll need to install the OneWire Library and DallasTemperature Library.
Installing the OneWire Library
- Click here to download the OneWire library. You should have a .zip folder in your Downloads
- Unzip the .zip folder and you should get OneWire-master folder
- Rename your folder from
OneWire-master to OneWire
- Move the OneWire folder to your Arduino IDE installation libraries folder
- Finally, re-open your Arduino IDE
Installing the DallasTemperature Library
- Click here to download the DallasTemperature library. You should have a .zip folder in your Downloads
- Unzip the .zip folder and you should get Arduino-Temperature-Control-Library-master folder
- Rename your folder from
Arduino-Temperature-Control-Library-master to DallasTemperature
- Move the DallasTemperature folder to your Arduino IDE installation libraries folder
- Finally, re-open your Arduino IDE
After installing the needed libraries, upload the following code to your Arduino board.
#include "OneWire.h"
#include "DallasTemperature.h"
#define ONE_WIRE_BUS 3 // ds18b20 S pin to D3
OneWire oneWire(ONE_WIRE_BUS);
DallasTemperature sensors(&oneWire);
void setup(void)
{   Serial.begin(9600);
    sensors.begin();
}
void loop(void){
  // Call sensors.requestTemperatures() to issue a global temperature and Requests to all devices on the bus
  sensors.requestTemperatures();
  Serial.print("Celsius temperature: ");
  // Why "byIndex"? You can have more than one IC on the same bus. 0 refers to the first IC on the wire
  Serial.print(sensors.getTempCByIndex(0));
  Serial.print(" - Fahrenheit temperature: ");
  Serial.println(sensors.getTempFByIndex(0));
  delay(1000);
}
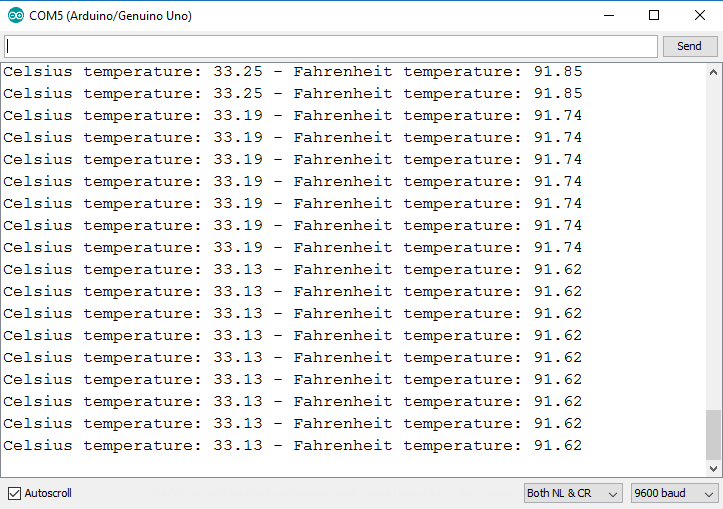
RUNNING RESULT
Finally, you should open the Arduino IDE serial monitor at a 9600 baud rate and you’ll see the temperature displayed in both Celsius and Fahrenheit: