RPi4/5 + Osoyoo 3.5″ SPI Screen – Bookworm/Trixie Setup Guide(Version: 2025-10-01 and later)
Hardware: Raspberry Pi 4B / 5
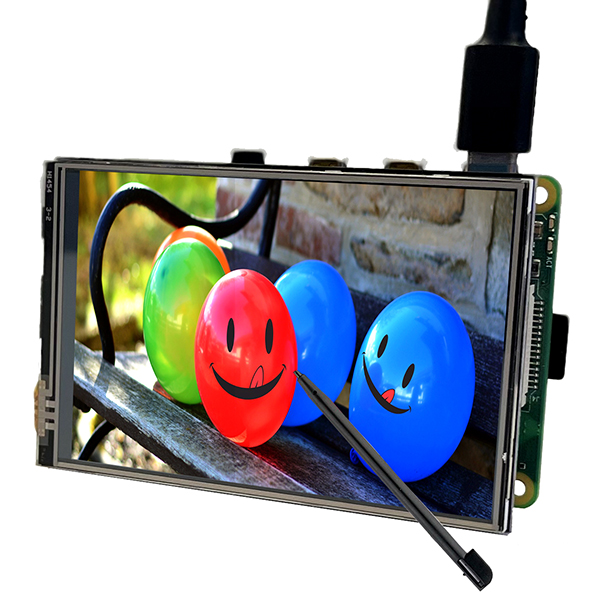
Screen: Osoyoo 3.5″ SPI Touchscreen 480×320 (Model No.: 2022013800)
System: Raspberry Pi OS Bookworm / Trixie (Version: 2025-10-01 and later)
Note: This guide is for Raspberry Pi 4 and 5. For Raspberry Pi 3, additional configuration steps are required (see RPi3-specific tutorial).
1Burn OS Image
Burn the Raspberry Pi OS (Bookworm or Trixie) with desktop to a TF card/micro SD card, and insert this card in your Raspberry Pi.
Download OS from: Raspberry Pi Official Website
Important: Please confirm that the SD card has enough space for the touch driver (at least 16GB recommended).
Tip: Use Raspberry Pi Imager to burn the image. You can pre-configure WiFi, username, and SSH during the imaging process.
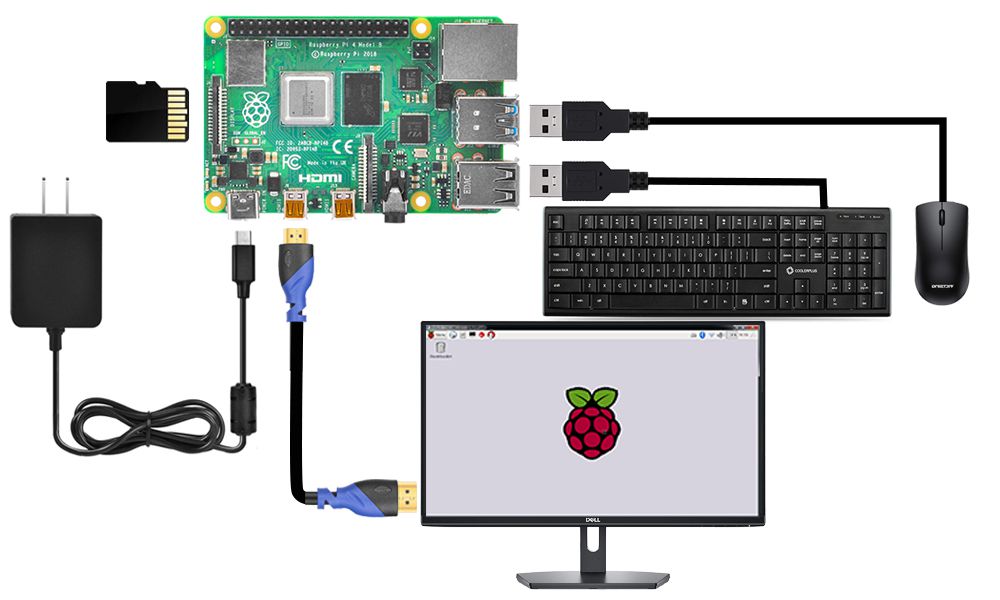
2Connect HDMI Monitor
Connect Raspberry Pi to your HDMI monitor or TV. Plug a keyboard and mouse into Raspberry Pi USB ports.
Warning: Do NOT install the 3.5″ SPI screen now! It will only show a white screen until the driver is configured.
3Connect to Internet
Get the Raspberry Pi connected to the Internet via WiFi or Ethernet.
For WiFi setup guide, visit: Raspberry Pi Basic Tutorial
4Enable SSH
Use a mouse to navigate:
Raspberry Pi Icon → Preferences → Control Centre → Interfaces → Enable SSH
Then close the window.
5Get IP Address
Open terminal and enter the following command to get the Raspberry Pi’s IP address:
hostname -I
Note: Write down this IP address. You will need it to connect via SSH in Step 8.
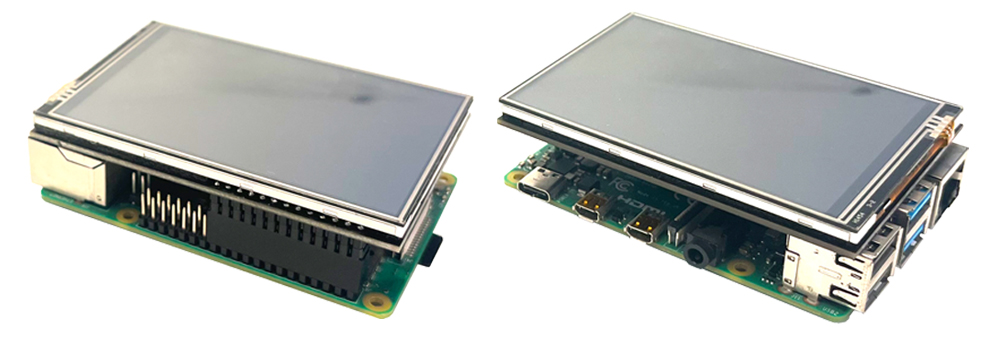
6Install SPI Screen Hardware
Shut down the Raspberry Pi, remove the HDMI/TV monitor, keyboard and mouse. Then install the 3.5″ SPI screen.
Pin Alignment: There are 40 pins on Raspberry Pi, but only 26 pins on the LCD connector. Make sure to align the pins correctly starting from Pin 1!
7Power On
Power on the Raspberry Pi with the SPI screen installed.
Expected Behavior: The screen will show white initially. This is normal. The green LED on the Pi board should blink, indicating the system is booting.
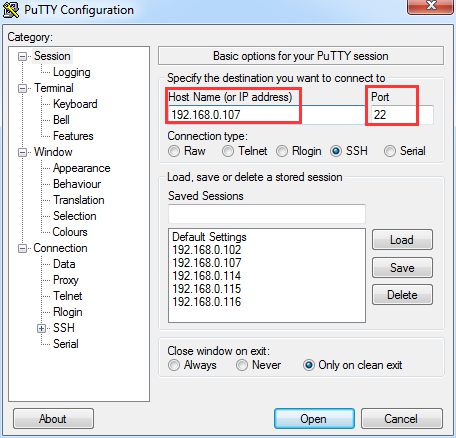
8SSH Remote Access
Use an SSH tool to control Raspberry Pi remotely. We recommend PuTTY on Windows. For PuTTY setup guide: click here
- Enter the IP address from Step 5 under “Host Name”
- Enter 22 under “Port” (default SSH port)
- Click “Open”
- Login with your username and password
9Configure the Driver
Open the Raspberry Pi terminal via SSH and execute the following commands:
sudo apt-get update
sudo apt-get install unzip cmake -y
cd ~
sudo wget https://osoyoo.com/driver/osoyoo35b.zip
sudo unzip ./osoyoo35b.zip
sudo cp osoyoo35b.dtbo /boot/overlays/
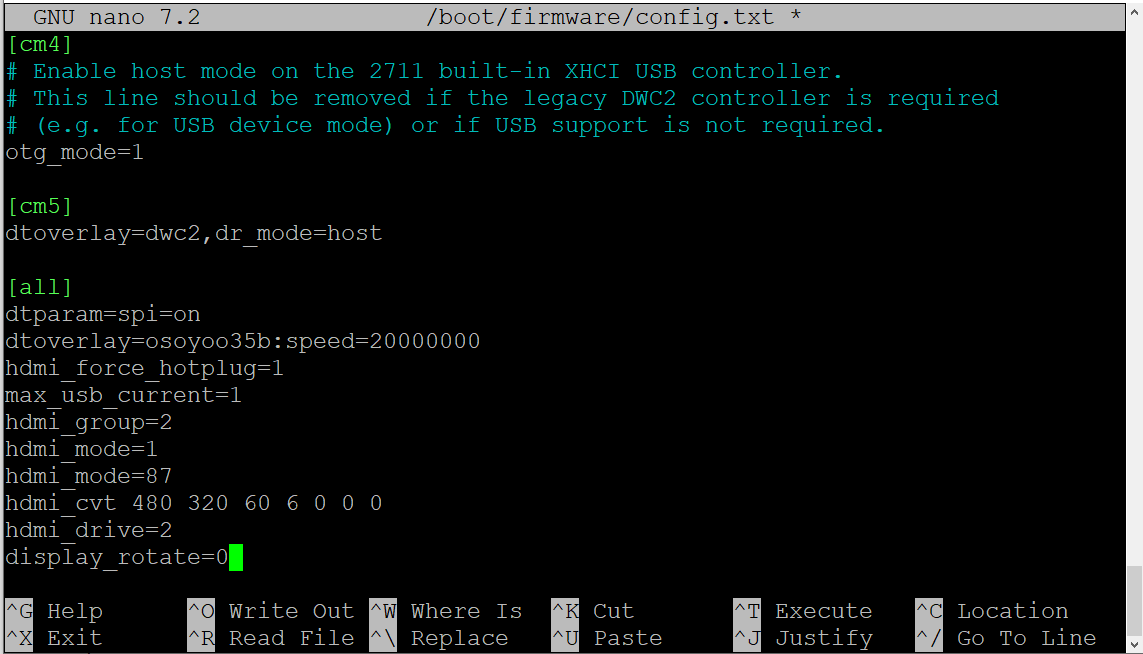
10Edit config.txt
sudo nano /boot/firmware/config.txt
10a. Comment out this line (add # at beginning):
CRITICAL: Find and comment out the following line. This disables KMS which is required for SPI screen to work.
#dtoverlay=vc4-kms-v3d
10b. Add the following at the END of the file:
# ========== SPI Screen Configuration ==========
dtparam=spi=on
dtoverlay=osoyoo35b:speed=20000000
hdmi_force_hotplug=1
max_usb_current=1
hdmi_group=2
hdmi_mode=1
hdmi_mode=87
hdmi_cvt 480 320 60 6 0 0 0
hdmi_drive=2
display_rotate=2
Save and exit: Press Ctrl+X, then Y, then Enter.
11Auto-start Settings
11a. Configure .bash_profile
Open or create the .bash_profile file:
sudo nano ~/.bash_profile
Add the following code:
export FRAMEBUFFER=/dev/fb1
startx 2> /tmp/xorg_errors
11b. Configure 99-fbturbo.conf (if it exists)
Check if the file exists and verify the content:
sudo nano /usr/share/X11/xorg.conf.d/99-fbturbo.conf
If it exists, ensure fbdev is set to /dev/fb0:
Section "Device"
        Identifier      "Allwinner A10/A13 FBDEV"
        Driver          "fbturbo"
        Option          "fbdev" "/dev/fb0"
        Option          "SwapbuffersWait" "true"
EndSection
Note: If the file doesn’t exist, you can skip this step.
12Set CLI Auto-login
sudo raspi-config nonint do_boot_behaviour B2
sudo raspi-config nonint do_wayland W1
sudo reboot
CRITICAL: do_wayland W1 switches from Wayland to X11. Bookworm/Trixie defaults to Wayland, but SPI screens do NOT support Wayland. This is the most important step!
After Reboot: The SPI screen should display the desktop. If the screen still shows white, try power cycling (unplug and replug the power).
13Configure Touch
After the desktop is working, connect via SSH and install the calibration software:
sudo apt-get install xserver-xorg-input-evdev xinput-calibrator -y
sudo cp -rf /usr/share/X11/xorg.conf.d/10-evdev.conf /usr/share/X11/xorg.conf.d/45-evdev.conf
Create the calibration configuration file:
sudo nano /usr/share/X11/xorg.conf.d/99-calibration.conf
Add the following content:
Section "InputClass"
    Identifier "calibration"
    MatchProduct "ADS7846 Touchscreen"
    Option "Calibration" "241 3854 3885 240"
    Option "SwapAxes" "1"
EndSection
Reboot to apply touch settings:
sudo reboot
Troubleshooting
Diagnostic Commands
If screen is stuck at boot page or showing white screen, run these commands via SSH:
# Check X Server errors
cat /tmp/xorg_errors

# Check X log
cat ~/.local/share/xorg/Xorg.0.log

# Check framebuffer devices
ls -l /dev/fb*

# Check if SPI overlay loaded
dmesg | grep -i osoyoo

# Verify config.txt changes
cat /boot/firmware/config.txt | grep -E "(kms|spi|osoyoo)"

# Verify Wayland is disabled (should show X11)
echo $XDG_SESSION_TYPE
Common Errors and Solutions
Error: White screen after reboot
Solution: Try power cycling (unplug and replug power). If still white, check config.txt:
cat /boot/firmware/config.txt | grep -E "(kms|spi|osoyoo)"
Error: no screens found in X log
Solution: Ensure KMS is disabled and Wayland is switched to X11:
sudo raspi-config nonint do_wayland W1
sudo reboot
Error: Touch not working or inverted
Solution: Recalibrate touch screen:
DISPLAY=:0 xinput_calibrator
Then update /usr/share/X11/xorg.conf.d/99-calibration.conf with new values.
Error: Screen shows desktop but windows overflow
Solution: This is normal at 480×320 for some apps (like Control Centre). Use Alt+F4 to close windows, Alt+drag to move windows. For a workaround, see the 640×480 virtual resolution tutorial.
One-Click Setup Script
Save the following as setup-spi.sh and run with:
chmod +x setup-spi.sh && ./setup-spi.sh
#!/bin/bash
echo "=== RPi4/5 + Osoyoo 3.5 SPI Screen Setup ==="

# Update system
sudo apt-get update

# Step 9: Install driver
sudo apt-get install -y unzip cmake
cd ~
sudo wget -q https://osoyoo.com/driver/osoyoo35b.zip
sudo unzip -o -q ./osoyoo35b.zip
sudo cp osoyoo35b.dtbo /boot/overlays/

# Step 10: Edit config.txt
sudo sed -i 's/^dtoverlay=vc4-kms-v3d/#dtoverlay=vc4-kms-v3d/' /boot/firmware/config.txt
sudo sed -i 's/^dtoverlay=vc4-fkms-v3d/#dtoverlay=vc4-fkms-v3d/' /boot/firmware/config.txt

if ! grep -q "osoyoo35b" /boot/firmware/config.txt; then
    sudo tee -a /boot/firmware/config.txt > /dev/null << 'CONF' # ========== SPI Screen Configuration ========== dtparam=spi=on dtoverlay=osoyoo35b:speed=20000000 hdmi_force_hotplug=1 max_usb_current=1 hdmi_group=2 hdmi_mode=1 hdmi_mode=87 hdmi_cvt 480 320 60 6 0 0 0 hdmi_drive=2 display_rotate=2 CONF fi # Step 11: Configure .bash_profile cat > ~/.bash_profile << 'EOF' export FRAMEBUFFER=/dev/fb1 startx 2> /tmp/xorg_errors
EOF

# Step 12: Set boot behaviour and switch to X11
sudo raspi-config nonint do_boot_behaviour B2
sudo raspi-config nonint do_wayland W1

# Step 13: Install touch support
sudo apt-get install -y xserver-xorg-input-evdev xinput-calibrator
sudo cp -rf /usr/share/X11/xorg.conf.d/10-evdev.conf \
            /usr/share/X11/xorg.conf.d/45-evdev.conf

sudo tee /usr/share/X11/xorg.conf.d/99-calibration.conf > /dev/null << 'EOF'
Section "InputClass"
    Identifier "calibration"
    MatchProduct "ADS7846 Touchscreen"
    Option "Calibration" "241 3854 3885 240"
    Option "SwapAxes" "1"
EndSection
EOF

echo "=== Setup complete. Rebooting... ==="
sleep 3
sudo reboot
Known Limitations
- Screen resolution is fixed at 480x320 (hardware limitation)
- Some applications have minimum window sizes larger than 480x320
- 16-bit color depth may cause some GTK themes to render differently
- SPI screens require X11; Wayland-only applications won't work
Reference Tutorials
Choose the tutorial that matches your Raspberry Pi model and OS version:
Bookworm / Trixie RPi 4/5
Advanced • Trixie/Bookworm • 2025-10-01 and later
Advanced • Trixie/Bookworm • 2025-10-01 and later
Not sure which to choose?
• Check your Pi model: cat /proc/device-tree/model
• Check your OS version: cat /etc/os-release
Tech Support
Need help or have feedback? Submit a ticket and our team will get back to you within 1-2 working
days. We appreciate your patience!
Working Time: 9 AM – 6 PM GMT+8 (Monday – Friday)
Contact Us: [email protected]
© 2026 Osoyoo | osoyoo.com
Last updated: 2026-02-10