Introduction:
Blynk Legacy is a very powerful Internet of Things(IoT ) software solution which allows you to design your own IoT APP without Android and iOS APP programming knowledge.
Following tutorial will guide to install Blynk legacy server in your local Windows, Mac computer or Linux like Raspberry Pi.
Picture 1.1 shows how Blynk systems works:
Picture 1.1
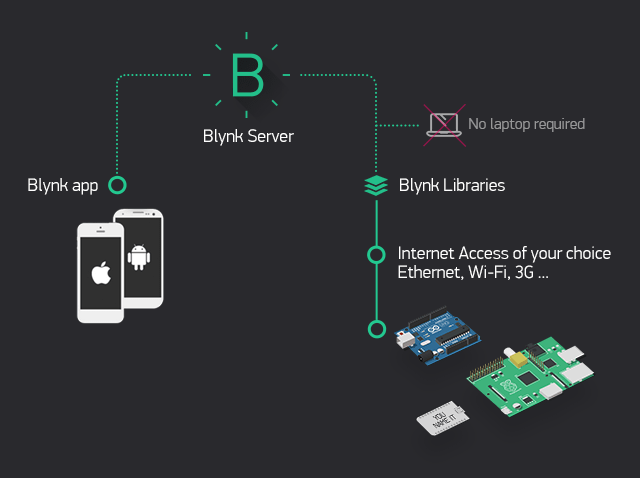
From Above picture, you can see Blynk software consists three parts:
- Blynk Legacy APP which is installed in your Cell phone or tablet
- Blynk Legacy Server
- Blynk Library which is installed in IoT terminal device such as Arduino, Raspberry Pi etc.
In this Lesson, we will teach students how to install Blynk Legacy local Server and setup APP and Arduino sketch code to make them working in Blynk Local Server.
Install Server on local PC
You can install local Blynk server on any computer which has Java 11 (or higher version). Java environment is a basic module which comes with those popular OS such as Windows, MacOS and Linux. So if your computer is not too old, you no need install any Java software to run Blynk server.
In this tutorial, we will teach how to install local Blynk server on Windows, MacOS and Raspbian(Raspberry Pi OS). If you use other OS, the installation is similar, just make sure you have Java 11 and JDK 8+ installed in your OS.
Install Blynk local server on Windows
1)Download Blynk local server from https://osoyoo.com/driver/blynk/blynk-server.jar
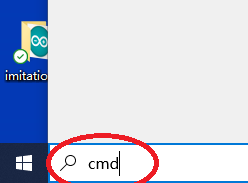
2)In Windows search bar , type cmd to open command windows
3)After open the command window, go to the fold where blynk-server.jar file is saved. Test your java environment by typing following command in cmd terminal:
java -version
You should see something as following
java version "1.8.0_202"
If you can’t see java version, it means your haven’t installed Java properly, please read this article to install Java
4)Go to your download folder, replace the bold font path with your folder path
cd C:\Users\Admin\your download folder
Then run following command to start the local Blynk server:
java -jar ./blynk-server.jar -dataFolder ./Blynk
you will see following result:

Now your local Blynk server has been successfully installed and running in your Windows.
Install Blynk local server on Apple Macbook Computer
1)Download Blynk local server from https://osoyoo.com/driver/blynk/blynk-server.jar
2)Open MacBook terminal window,
Go to your download folder, Run following command to start the local Blynk server:
java -jar ./blynk-server.jar -dataFolder ./Blynk
you will see following result:

Install Blynk local server on Raspberry Pi or similar Linux computer
1)Open your Pi shell terminal or use SSH to connect Raspberry Pi remote terminal
2)Download Blynk local server by following command
wget http://osoyoo.com/driver/blynk/blynk-server.jar
2)Go to your download folder, Run following command to start the local Blynk server:
java -jar ./blynk-server.jar -dataFolder ./Blynk
The java server will start in one or two minutes, then you will see following result:

If you want the Raspberry Pi to start Blynk Server automatically when starting your Pi, you can run following command:
crontab -e
Then you can add following in the bottom crontab file
@reboot java -jar /home/pi/blynk-server.jar -dataFolder /home/pi/Blynk
After that, use Ctrl-X to save and exit the file and reboot your computer. Your Blynk server will automatically start every time.
You can visit the admin page of Blynk Server url:
https://your_RaspberryPi_ip_address:9443/admin
Cell Phone APP download and configure:
Prerequisite:
You have successfully installed Blynk server in your local computer. Next step is to install Blynk Legacy APP in your cell phone.
Before install and setup your Blynk APP, you need to know your local server’s LAN IP address first, if you don’t know how to do it, read following article:
How to know my computer’s local IP address
Now let’s start to install and setup Blynk Legacy APP
1)Google Play and Apple Store do not support Blynk Legacy APP downloading anymore. But Android Mobile Device can still download the apk file from following link:
https://osoyoo.com/driver/blynk/blynk_legacy.apk
2) Open Blynk App, click Login , you will see following UI:
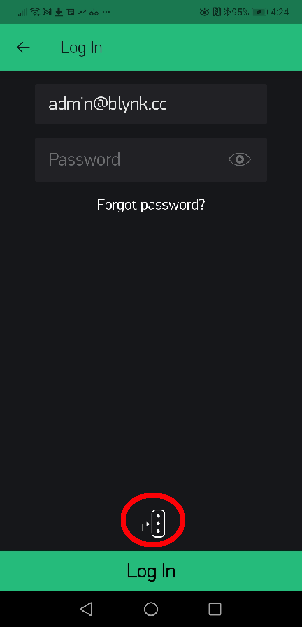
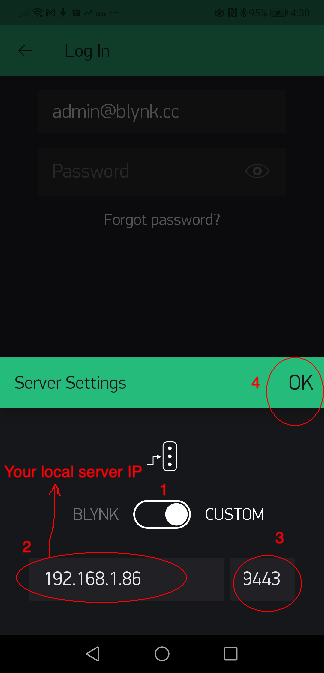
3)Click the three dot icon in above UI to set local server IP and port.
Do following settings:
- Switch server from BLYNK to CUSTOMS
- Set your local blynk server IP
- Set port to 9443
- click OK
See following picture:
After you have set up the local server IP and port, you can use following steps to connect APP to local Blynk server:
If your Local Blynk is not running properly or IP address setting is wrong, APP will show Can’t connect to Server, Try later…If server running and IP setting are all ok, you will a New Project UI as following:
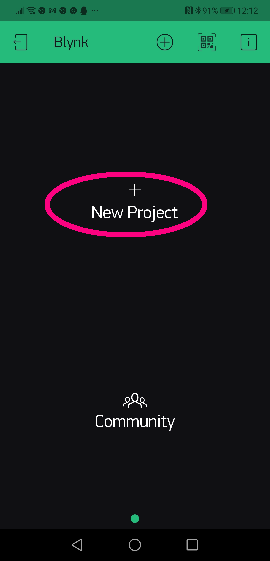
Congratulations! You have successfully installed local Blynk Server and connected your APP to the server.
Suppose you are using Arduino as terminal device, you click +New Project to add an Arduino project:
You can name your Project Lesson1 and select Arduino UNO (or Arduino MEGA if you are using MEGA2560),
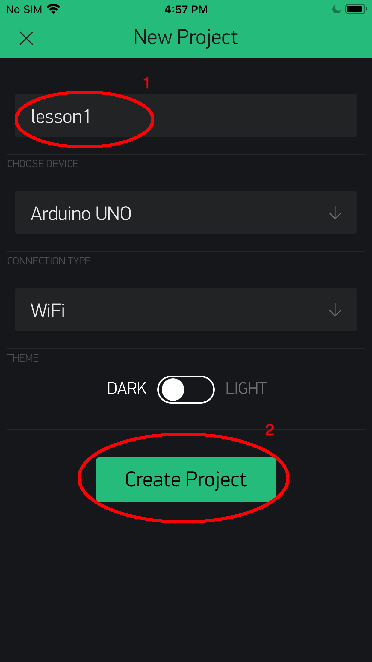
In above UI, Click Create Project, you will see a blank project named lesson1 as following picture, In future, you can click (+) sign to add control Widget to create your APP UI

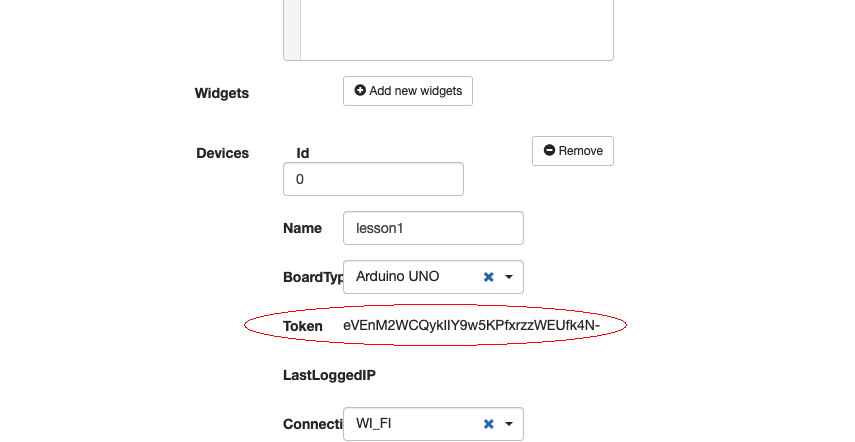
Get Auth Token
Blynk Auth token is the password to let your Arduino board to exchange project data with local Blynk server. You need to set this token in your Arduino code file in future. Token is associated with a project, so you must create a project in APP before getting a Token.
You have two methods to get Blynk Token:
Method 1) In your folder where you download and save blynk-server.jar file, you will see a sub-folder called blynk, enter that folder, you will find a file [email protected] , please use a text editor to open this file:

After open the the file, you will see following content:
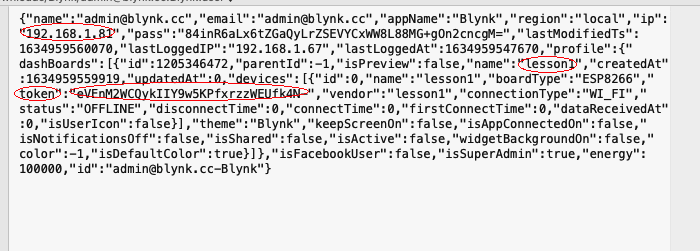
In above picture, you can see that, on the right of the word “token“, there is a long string
This is the token of the lesson 1 project , copy this token to a file , and you will use it in your Arduino or Raspberry Pi client software code.
Method 2) Get token from local blynk control panel:
Please open your browser and visit following url:
https://your_server_ip:9443/admin
your_server_ip is the IP address of your local Blynk server.
Above https:// url default certificate is self-signed. It will therefore be considered unreliable. You will have to accept the alert message displayed by your internet browser. If you are using Google Chrome browser, You will see following alert:
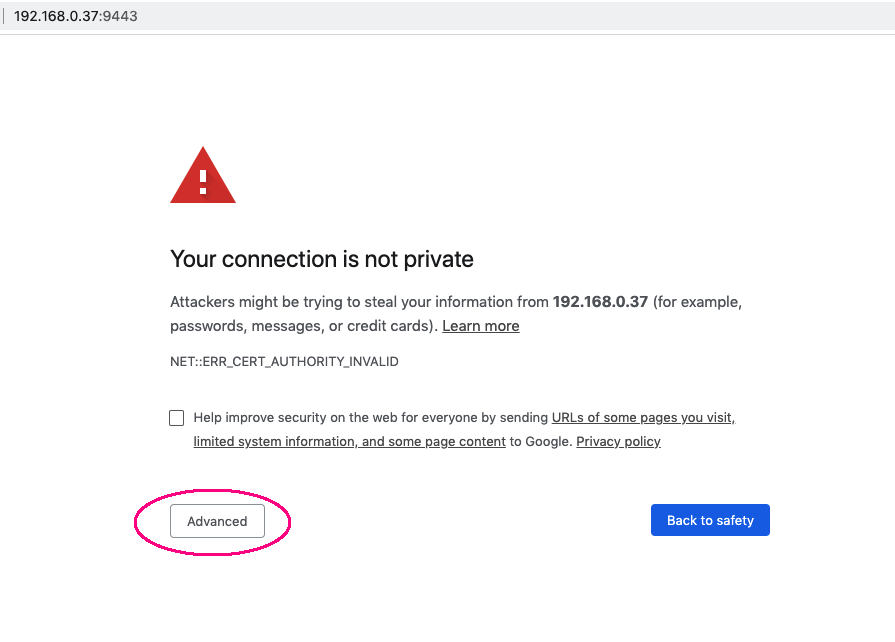
Click Advanced, then select proceed to the unsafe IP as following:

You will go to Server login page, please use user name [email protected] and password admin to login to control panel.
then please click Users->[email protected]:
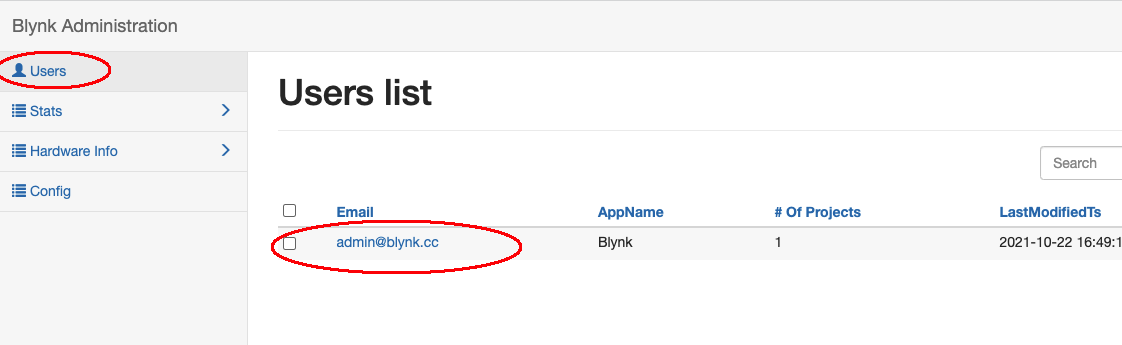
Click [email protected], then you will find the Token which was just assigned for your project: