OVERVIEW
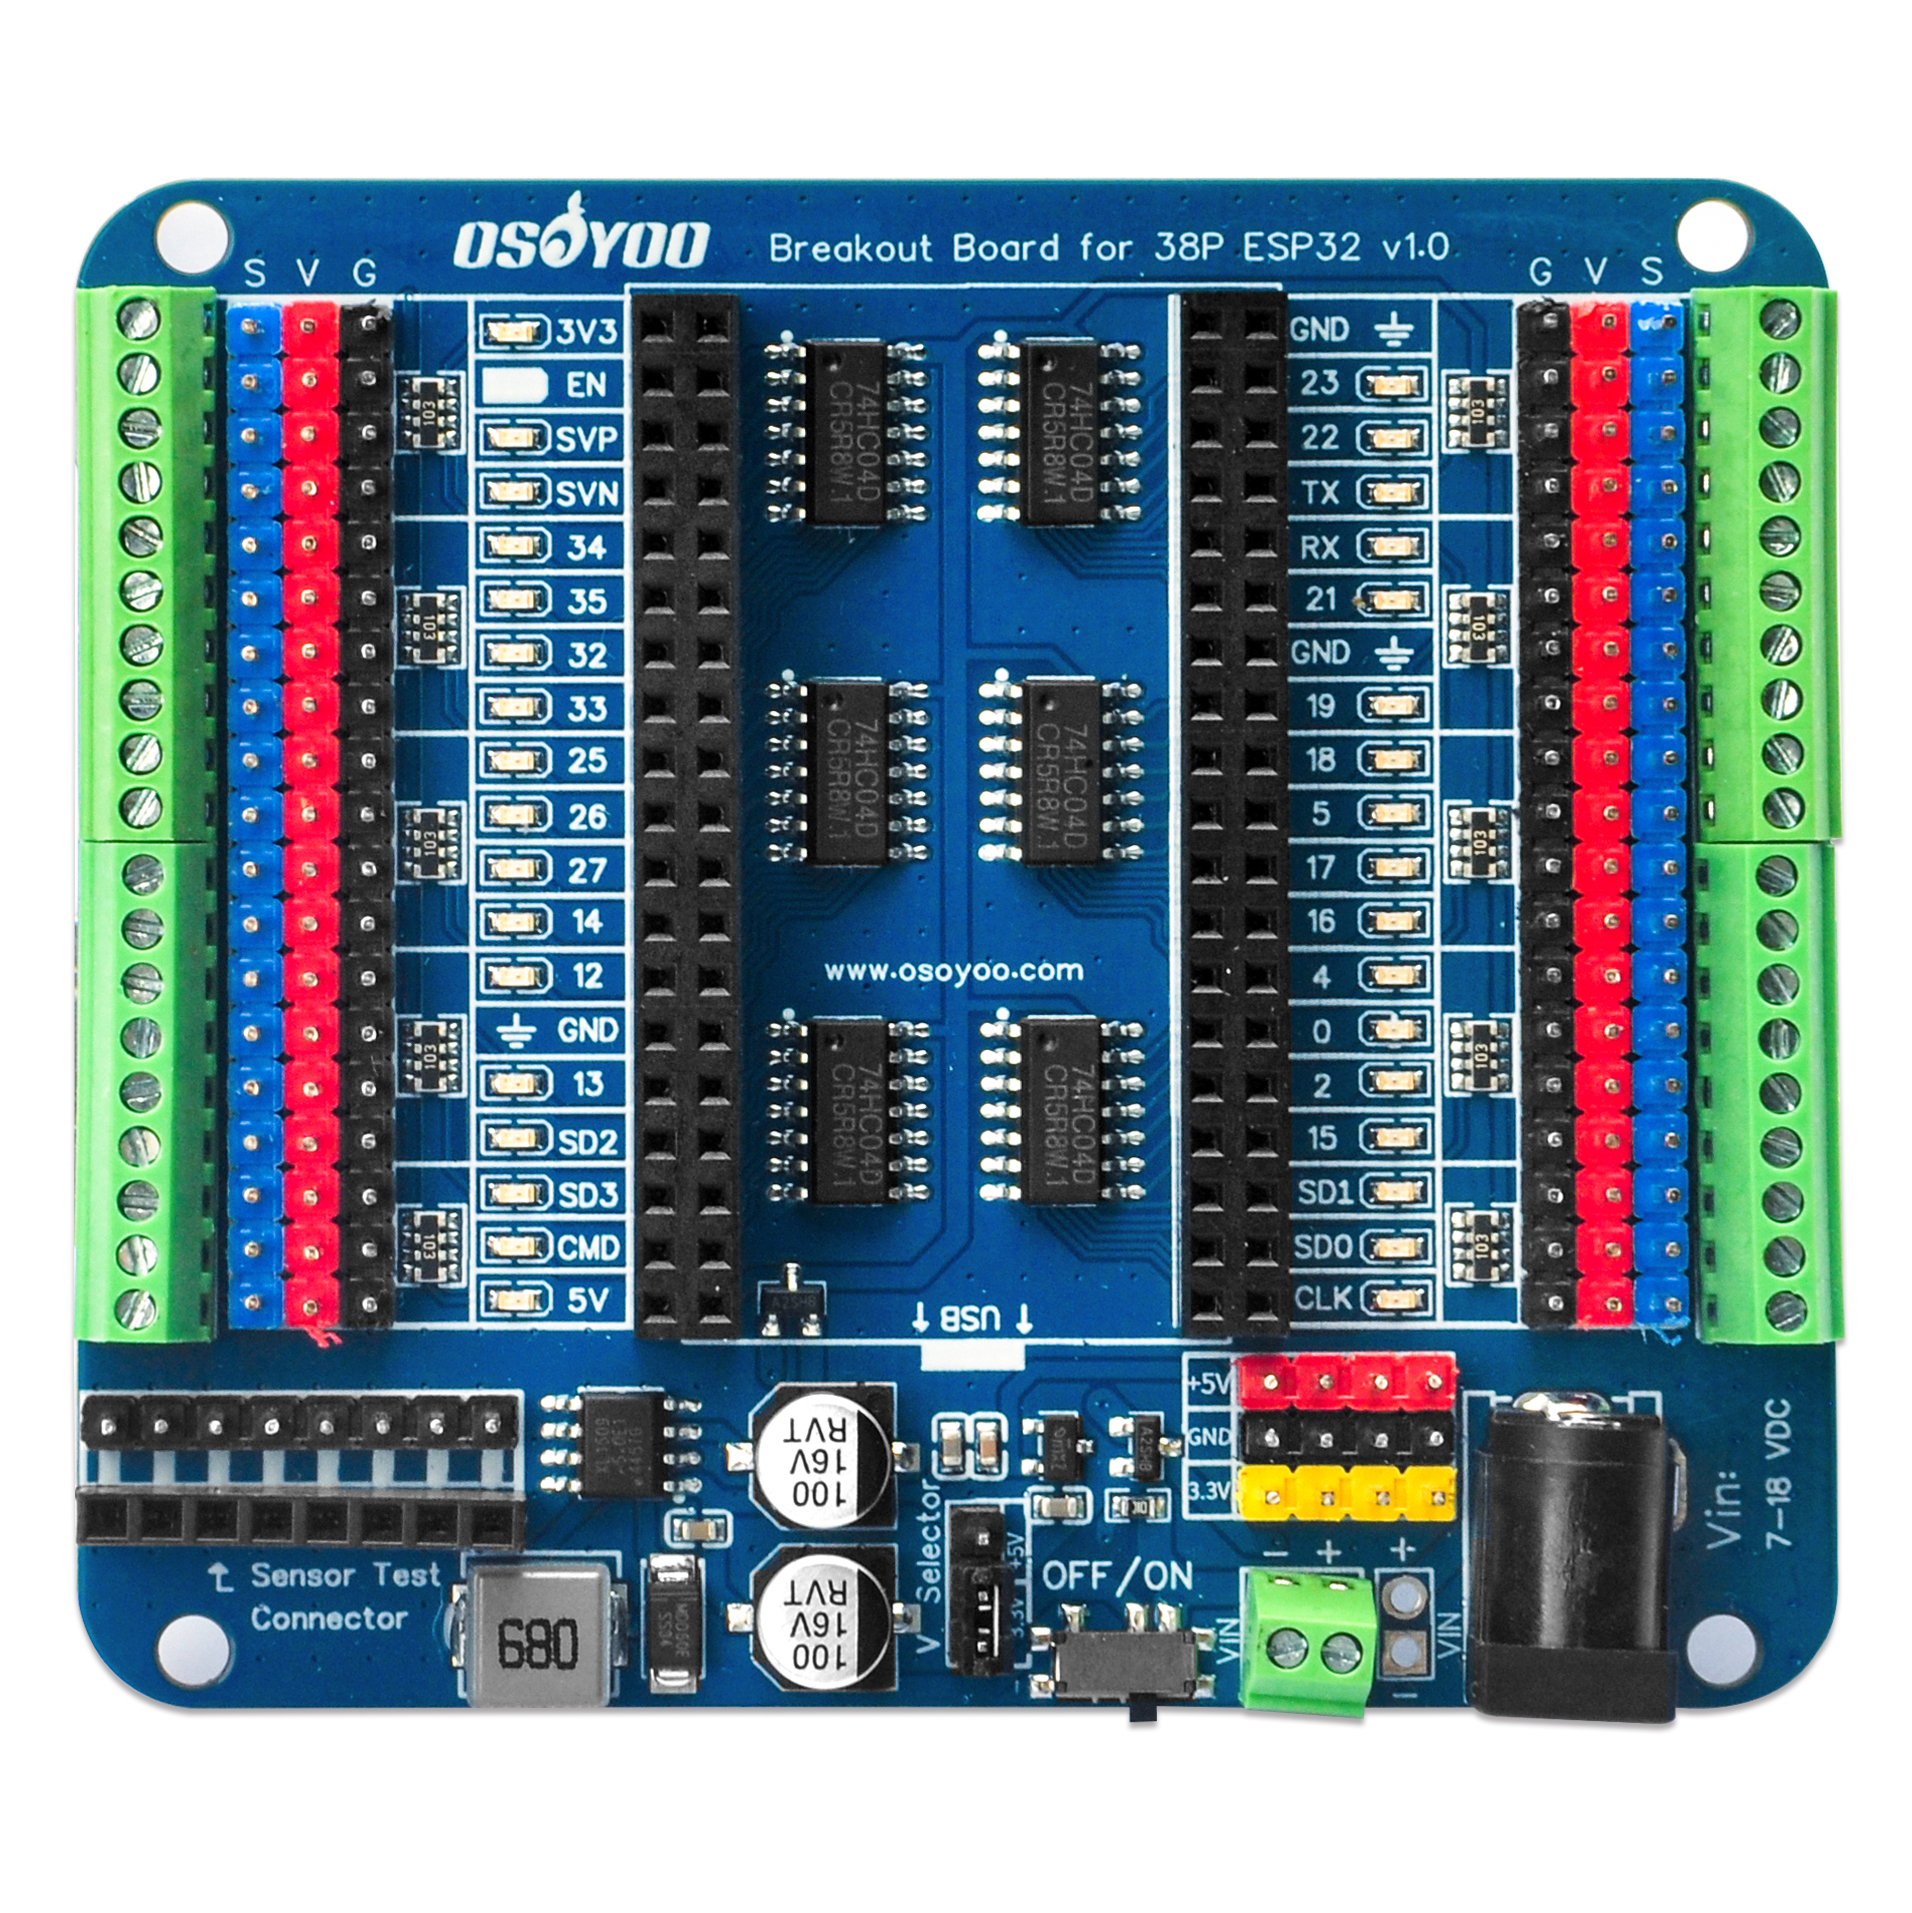
The OSOYOO 38-Pin ESP32 Expansion Board is an ideal tool for ESP32 developers, offering powerful features, wide compatibility, and a beginner-friendly design. Whether you are learning, developing, or prototyping, it provides reliable support to help you bring your ideas to life.
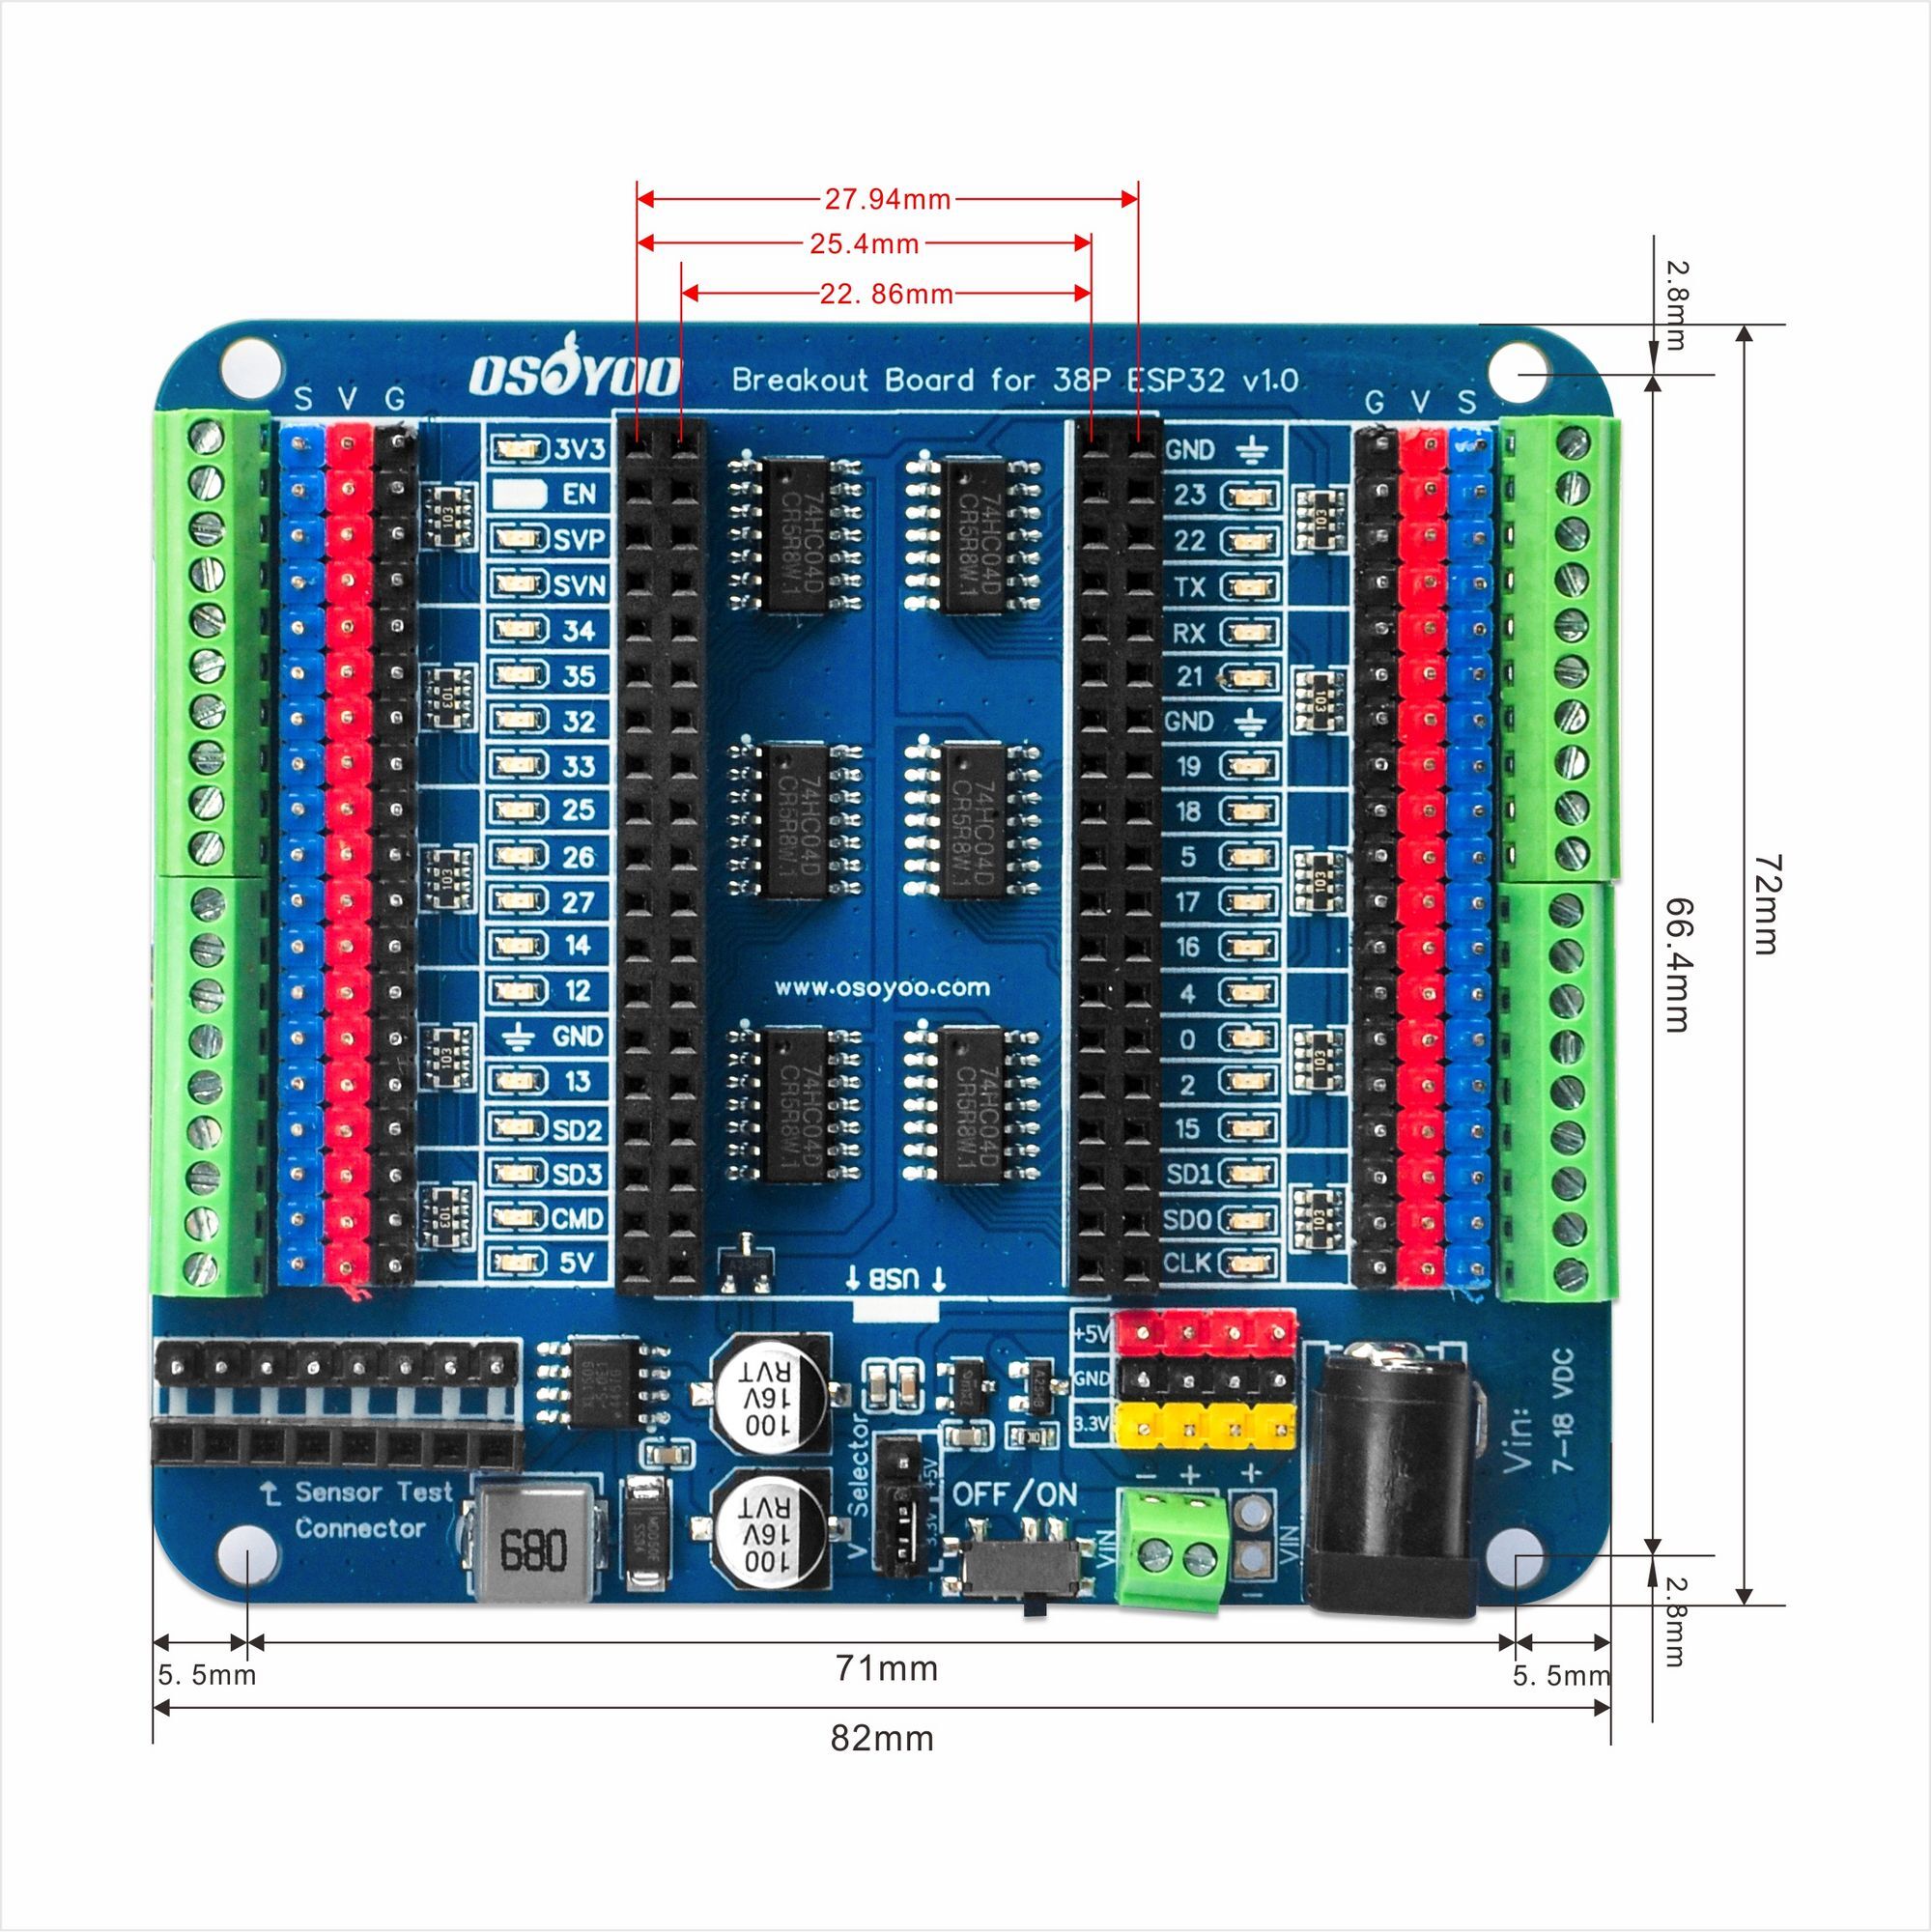
Since different 38-pin ESP32 modules on the market have varying pin widths, this board includes two sets of 2×19-pin female row headers, supporting 0.9/1.0/1.1 inch (22.86/25.4/27.94 mm) pin spacings for maximum compatibility. If you need a 30-pin ESP32/ESP8266 breakout board, click this link.
It adds LED indicators for each GPIO port, so you can use the indicators to check pin status and easily verify your prototype code without any additional wiring.
COMPATIBLE LIST
Most 38-pin ESP32 modules support pin widths of 0.9/1.0/1.1 inch (22.86/25.4/27.94 mm).
Features
- Compatibility:
- Supports most 38-pin ESP32 modules.
- Includes two sets of 2×19-pin headers for compatibility with various modules with pin widths of 0.9/1.0/1.1 inches (22.86/25.4/27.94 mm).
- LED Indicators:
- Each GPIO port has an LED indicator to display the status (high/low) of the pins, making it easier to debug and verify code without additional wiring.
- Independent LED: the status LED is driven by the chip rather than the GPIO, so the GPIO output is not affected.
- Power Protection:
- Features a reverse power protection circuit to prevent damage if the power is connected incorrectly.
- On-board power switch for convenient control.
- Power Options:
- Dual power supply: 5V/2A and 3.3V/500mA, providing ample power for servos and sensors.
- Automatic power switching between USB and external power sources.
- External power input via screw terminals or DC jack (7–12V recommended).
- Voltage Selection:
- The V_Selector jumper lets you choose between 3.3V and 5V for the V pin. By default, the V pin is set to 3.3V. Select the correct voltage to avoid damaging the board or connected devices.
- Easy Connectivity:
- 2.54mm pitch pin headers and screw terminals for easy connection to sensors, servos, and other peripherals.
- On-board 3-pin interfaces with V and GND pins for quick sensor or servo connections.
TECH SPECS
| Name |
OSOYOO_IO_Breakout_Board_for_38P_ESP32_v.1.0 |
| Operating Voltage |
5V |
| VIN Input Voltage (recommended) |
7–12V |
| VIN Input Voltage (limit) |
7–18V |
| ADC Channels |
18 |
| PWM Digital I/O Pins |
16 |
| Pinhead number |
38 |
| Power Switch |
Yes |
| External Power Output |
5V/2A 3.3V/500mA |
| Options for power input |
USB / DC005-2.1 / Screw terminal / Male pin headers |
| On-Board LED Indicators |
34 |
| Length |
82 mm |
| Width |
72 mm |
| Weight |
52 g |
DIAGRAM
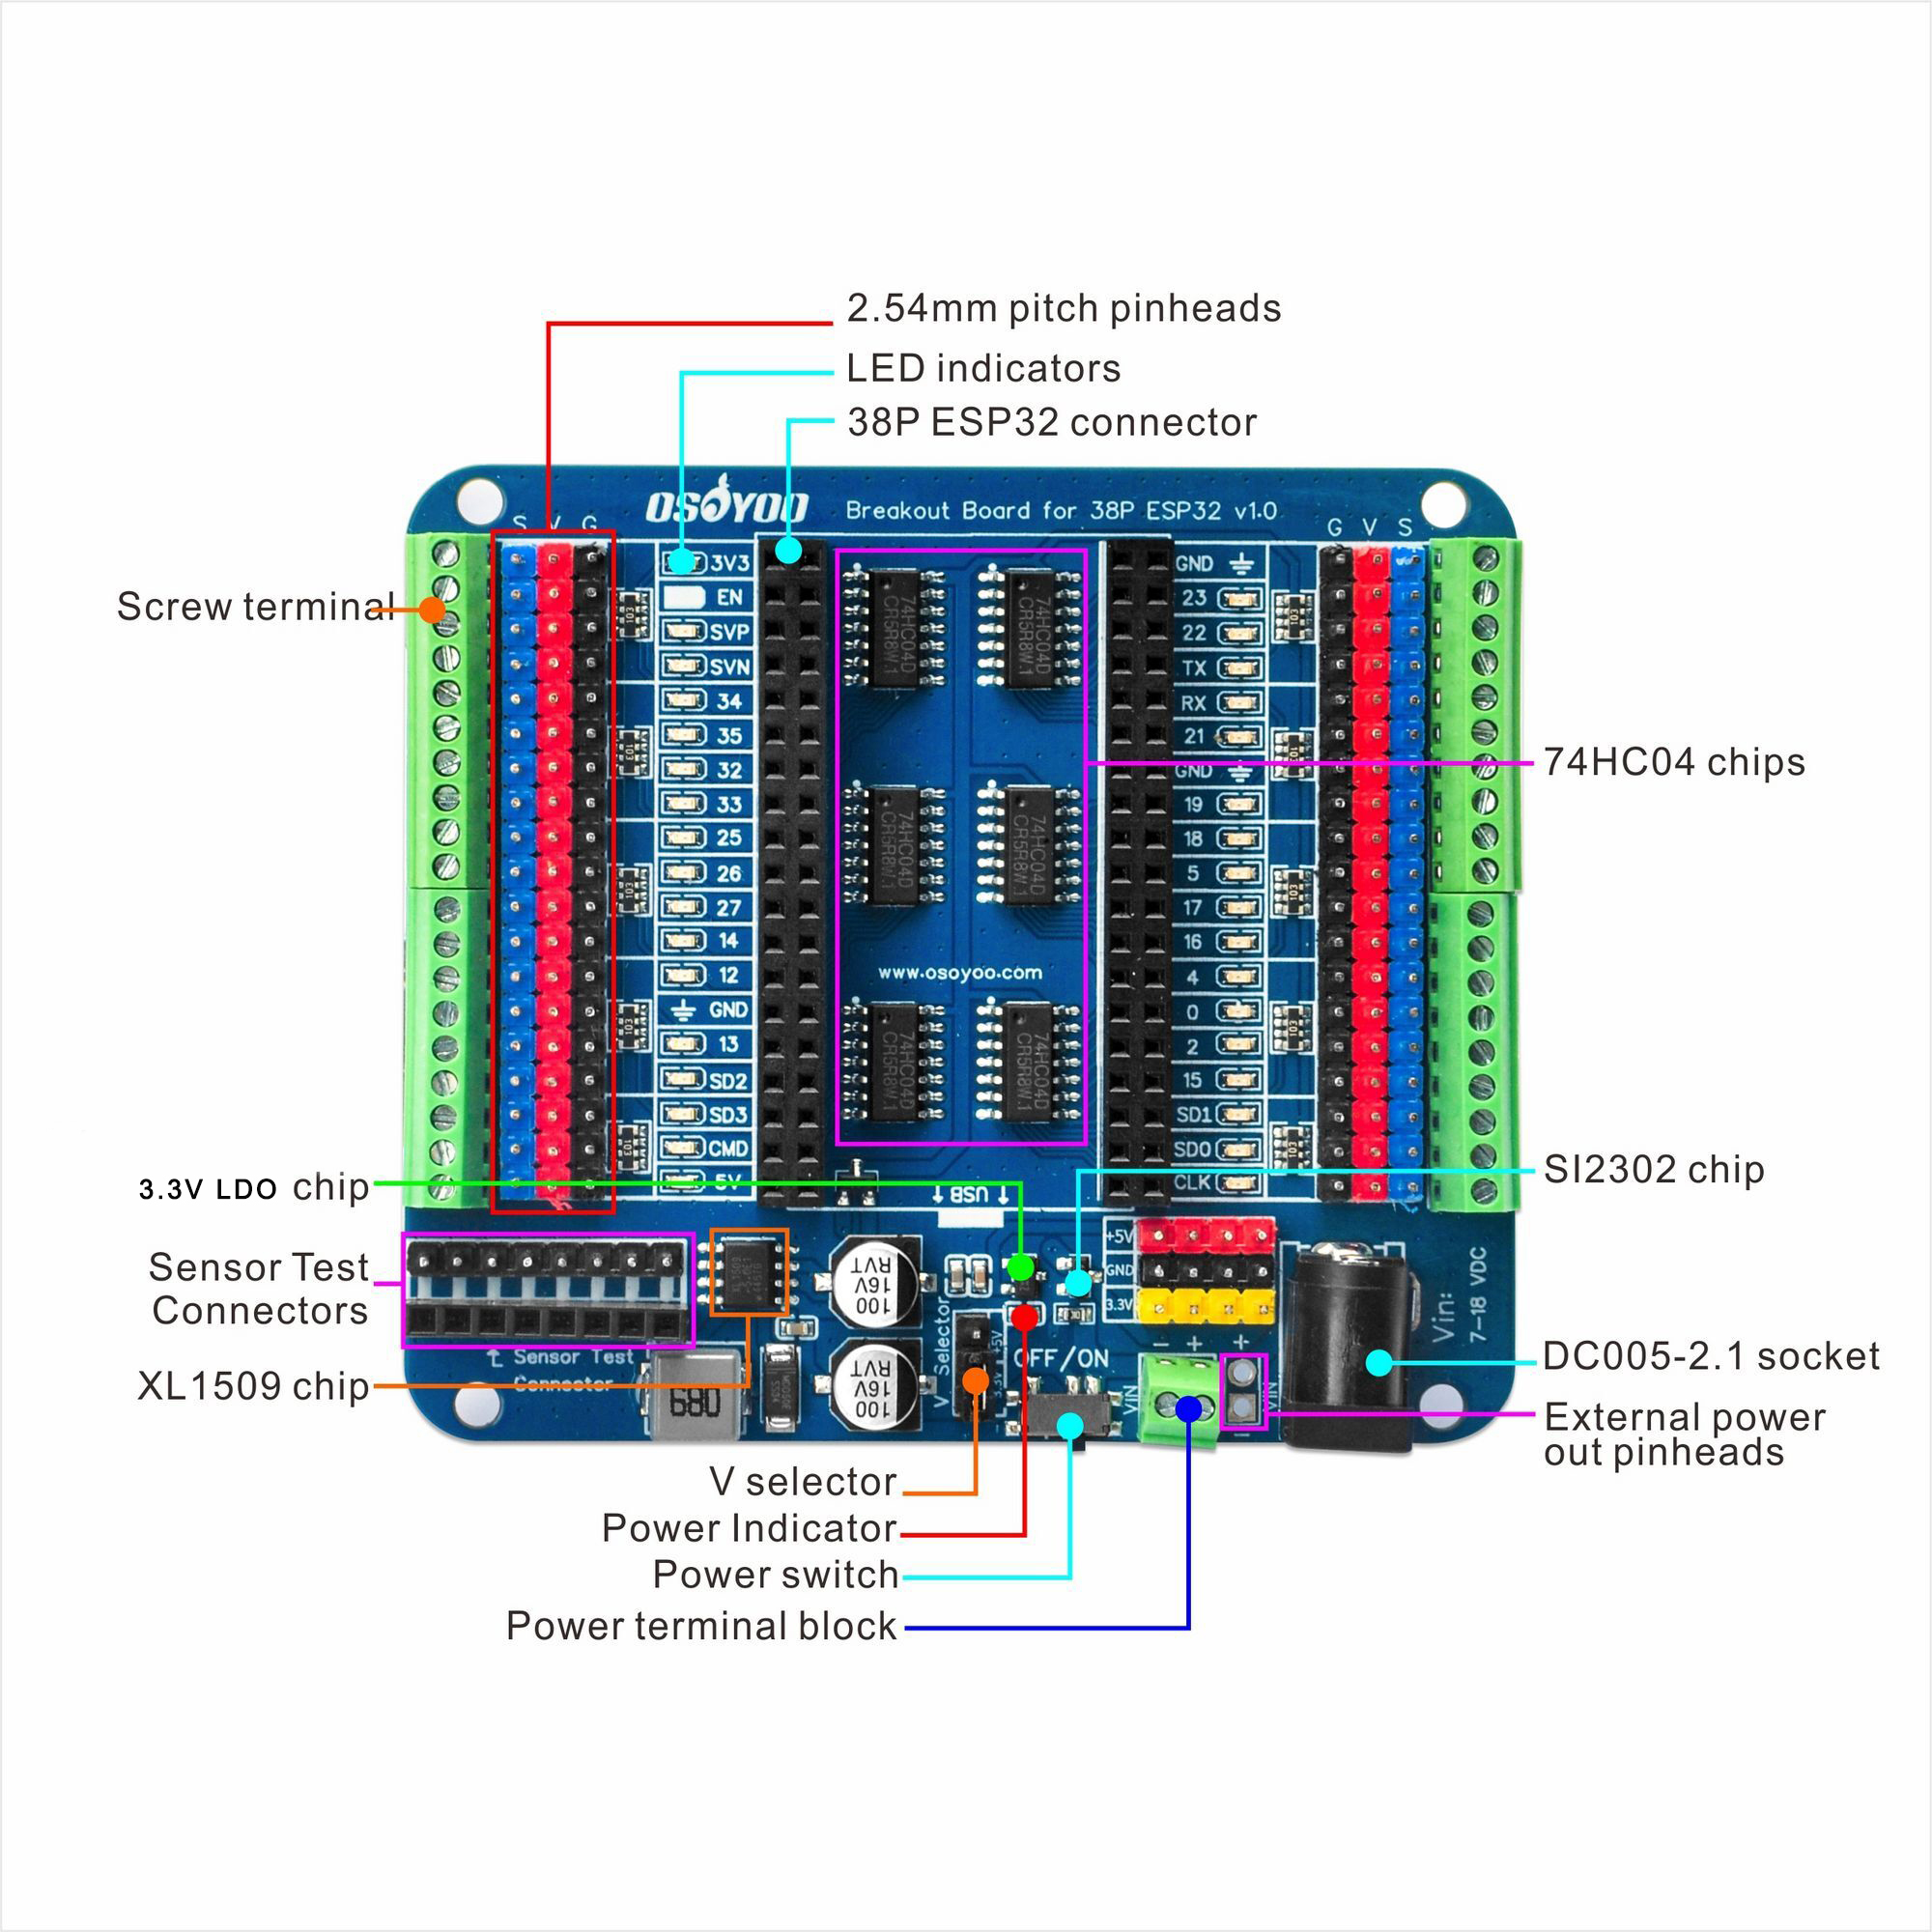
- 38P ESP32 connector: Two sets of 2×19-pin row headers for compatibility with various module pin spacings. Ensure correct orientation when inserting the module to avoid damage.
- LED indicators: LEDs light up when GPIO pins are high and turn off when low.
- 2.54mm pitch pin headers: The S terminal connects directly to the ESP32, with V and GND pins for easy connection to sensors or servos.
- Screw terminal: Connects to all GPIO headers with 2.54mm pitch.
- XL1509 chip: DC/DC converter supporting 5V/2A output.
- LDO chip: LDO regulator for 3.3V/500mA output.
- V selector: Jumper cap to select between 3.3V and 5V for the V pin.
- Power switch: On-board switch for easy power control.
- Power terminal block: We recommend using a 7–12V DC power supply.
- DC005-2.1 socket: We recommend using a 7–12V DC power supply.
- External power out pin headers: Can be used with an external DC power supply or to power other devices.
- SI2302 chip: N-Channel MOSFET used in the power supply screw terminal reverse-protection circuit.
- 74HC04 chips: Hex inverter used to connect each I/O port to control the corresponding LED indicator.
- Sensor test connectors: 8-pin male and female connectors for easy testing of sensor modules.
Important Notes
- Voltage Selection:
- By default, the V pin is set to 3.3V. Do not connect 5V devices to the GPIO pins when using this setting.
- If using an external power supply, ensure the jumper cap on the V_Selector is correctly placed for the desired voltage (3.3V or 5V).
- Power Supply:
- Do not use both the DC jack and screw terminal simultaneously to avoid damaging the board.
- If powering via USB, the V pin will not output voltage unless the jumper cap is removed from the V_Selector and connected to the S-3V3 pin.
- Assembly:
- Ensure the ESP32 module is correctly aligned before powering the board to prevent damage.
ASSEMBLY
When inserting the module, pay attention to the board’s orientation. Ensure the ESP32 is correctly seated before powering on to avoid damage from misalignment.
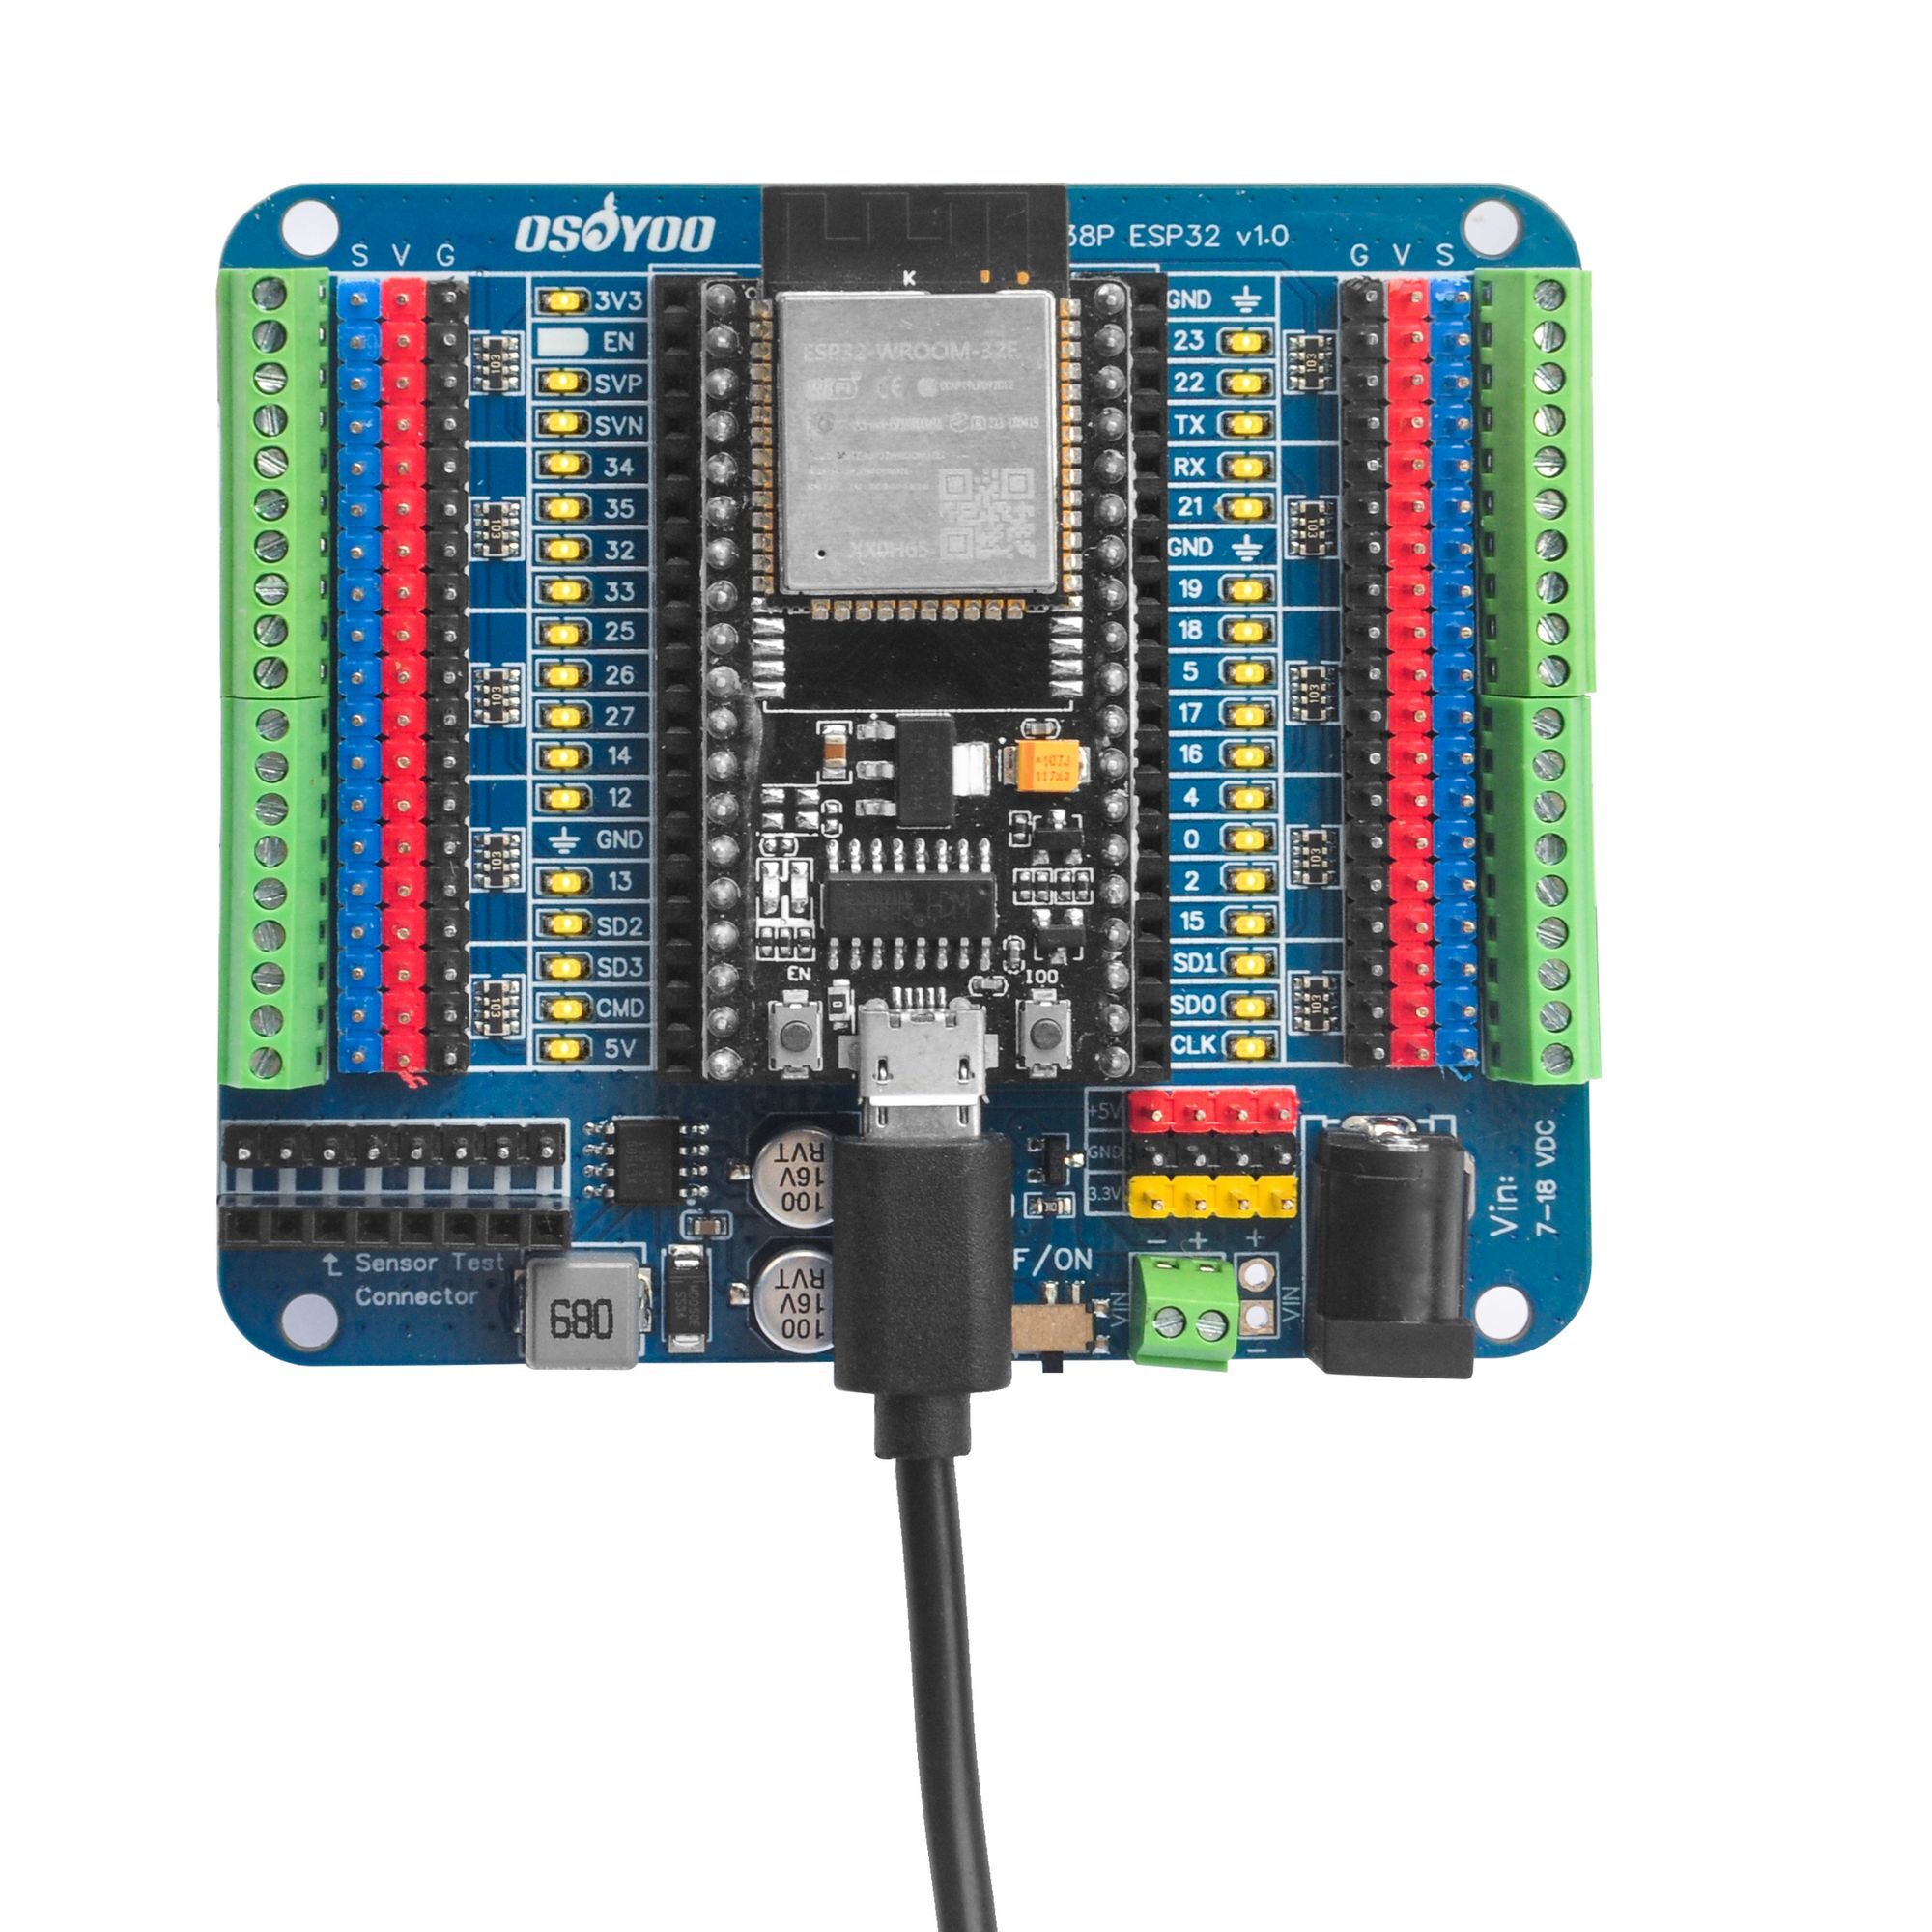
(The ESP32 module is not included with this product. You will need to provide your own or purchase one separately.)
DIMENSIONS
Resources