Overview
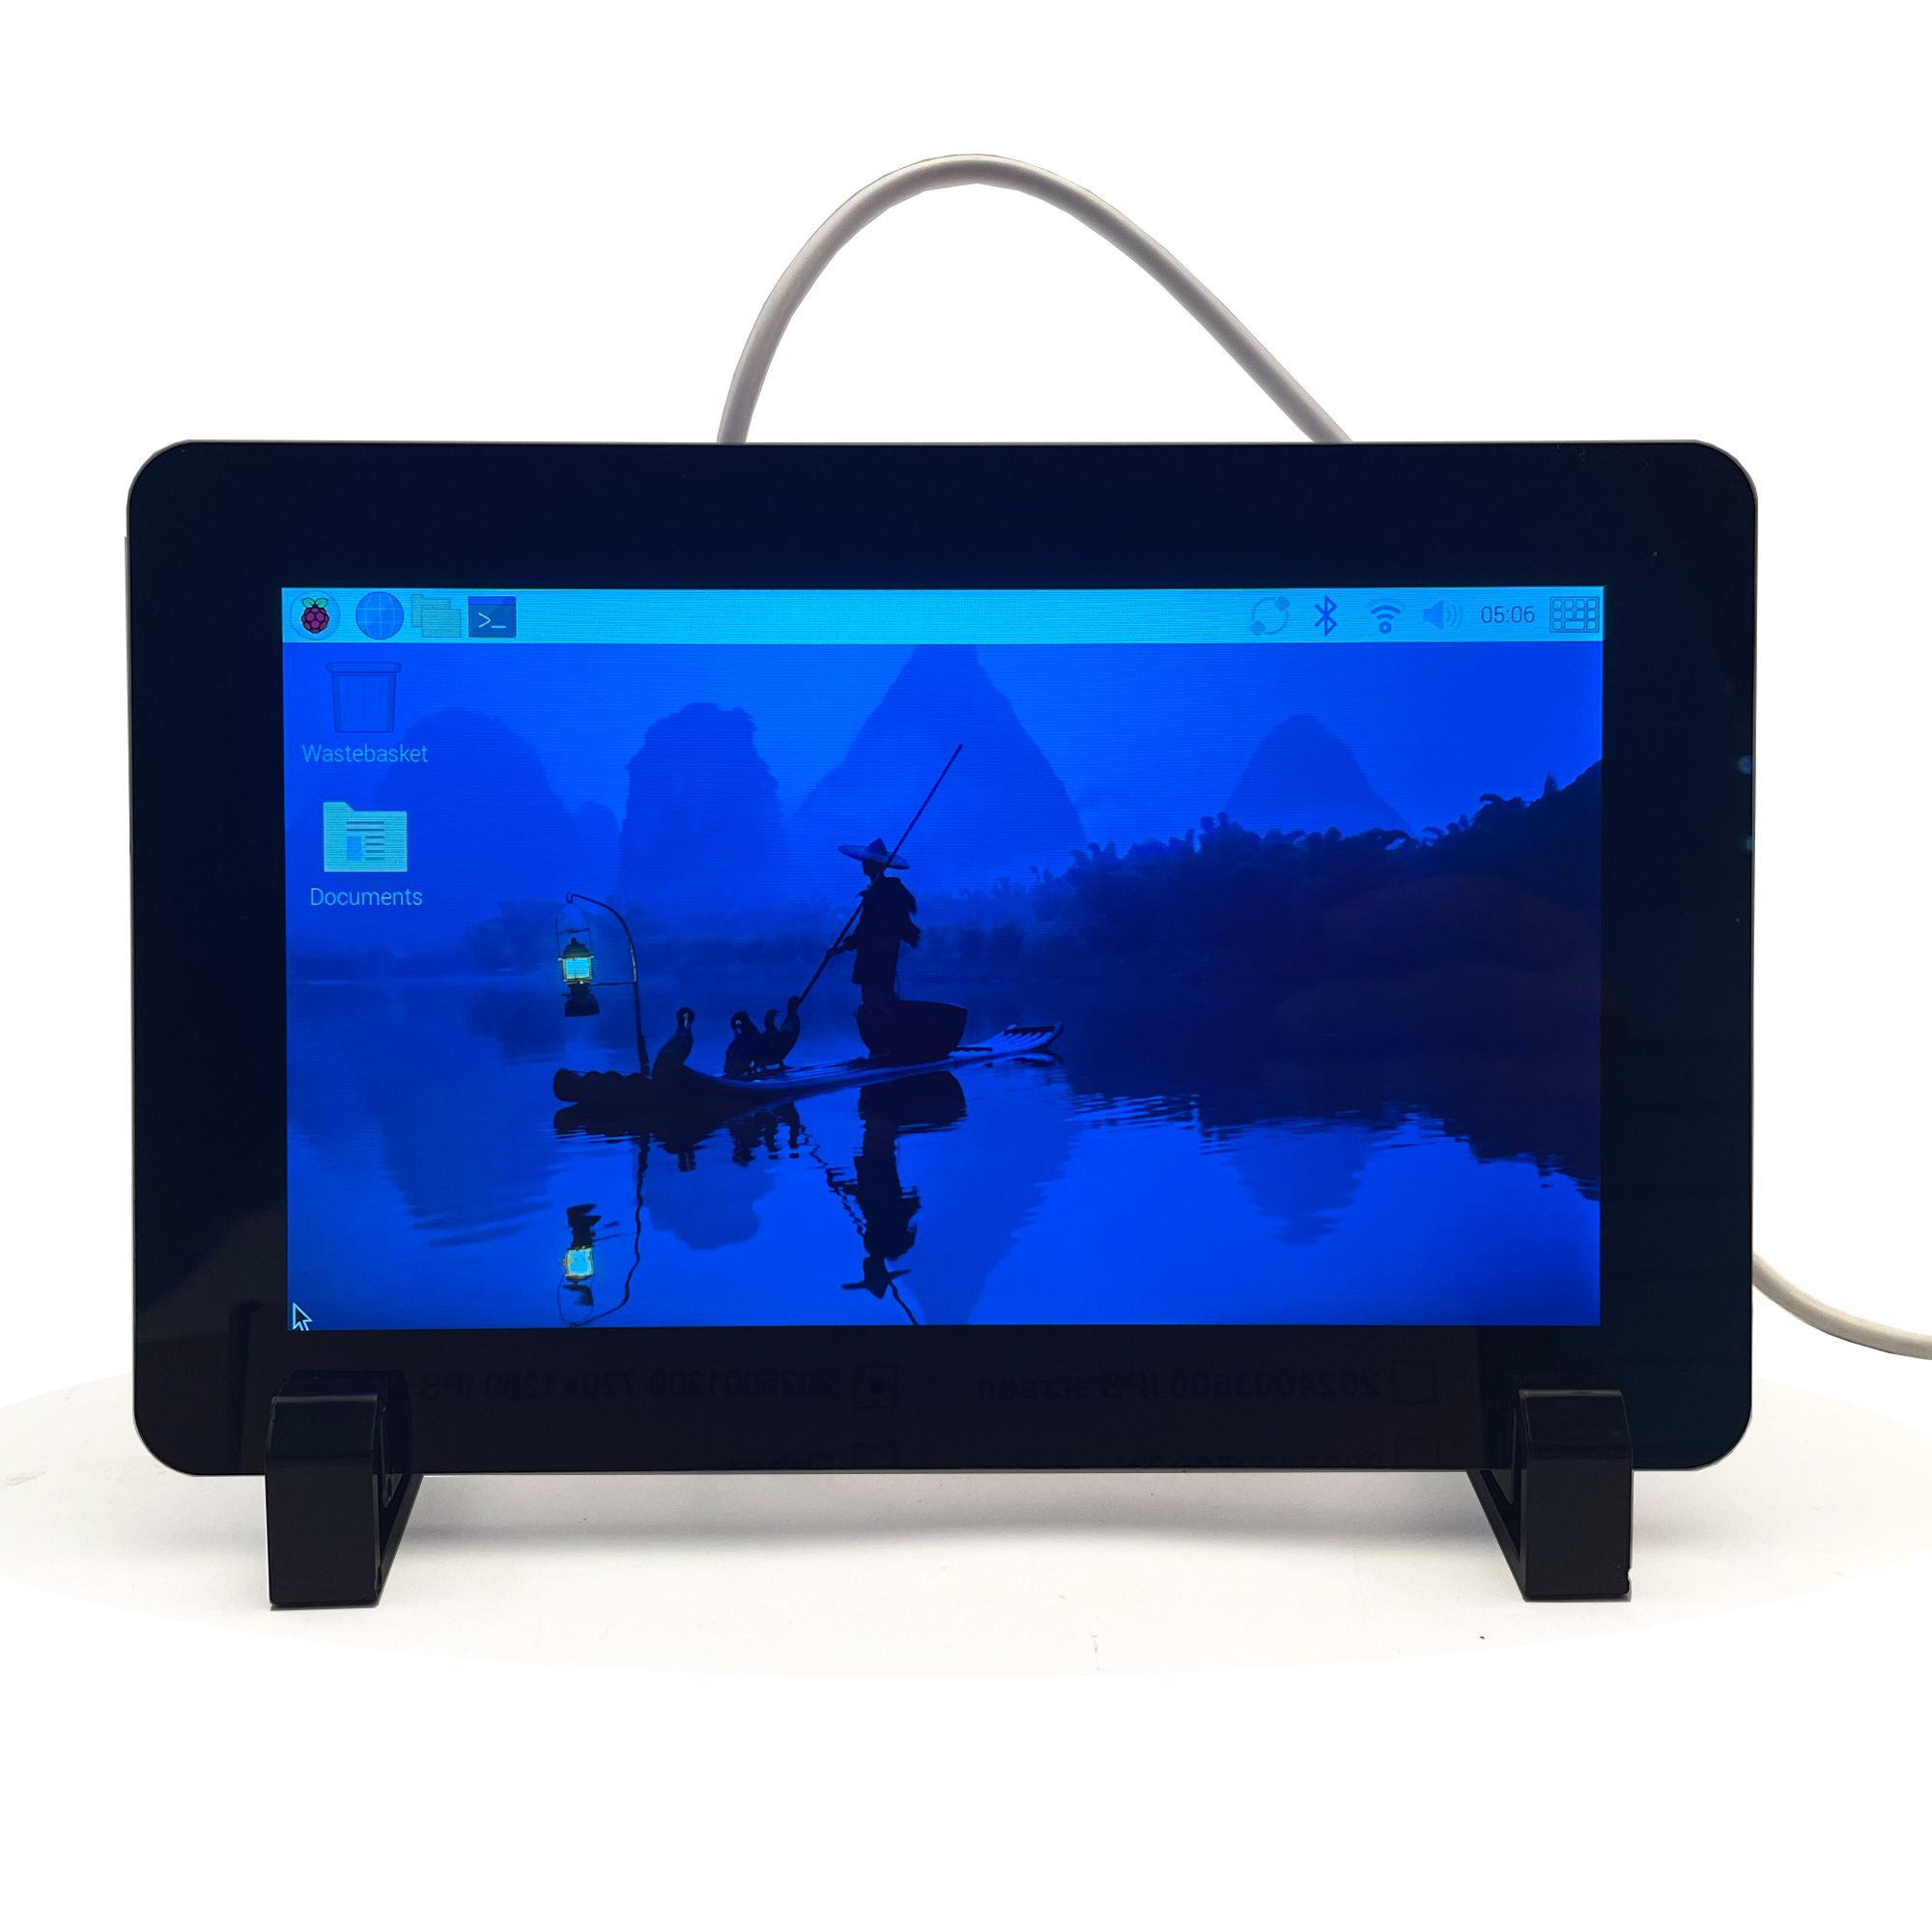
The OSOYOO 720×1280 DSI Dispaly is a portrait orientation touchscreen LCD display designed for interactive projects like tablets, entertainment systems, and information dashboards.
The OSOYOO 720×1280 DSI Dispaly
The OSOYOO 720×1280 DSI Dispaly connects to a Raspberry Pi using a DSI connector and Power connector. Raspberry Pi OS provides touchscreen drivers with support for five-finger multitouch and an on-screen keyboard, providing full functionality without the need to connect a keyboard or mouse.
Features
- 7inch DSI touch screen, five-point capacitive touch control
- IPS display panel with hardware resolution of 720×1280
- Toughened glass capacitive touch panel, hardness up to 6H
- Support drives the LCD directly via the DSI interface of the Raspberry Pi, and the refresh rate is up to 60Hz.
- Easy driver installation, supports the latest Bookworm system (Kernel 6.12 and later versions)
- Supports all Raspberry Pi computers with DSI interfaces (except for the Raspberry Pi Zero series)
- Supports software control of backlight brightness
Specifications
| Parameters |
Value |
Unit |
| Input voltage |
5.00 |
V |
| Input current |
0.5 |
A |
| Dot arrangement |
720×3(RGB)×1280 |
dots |
| Display mode |
IPS/Normally Black |
— |
| Viewing Direction |
80/80/80/80 (All) |
° |
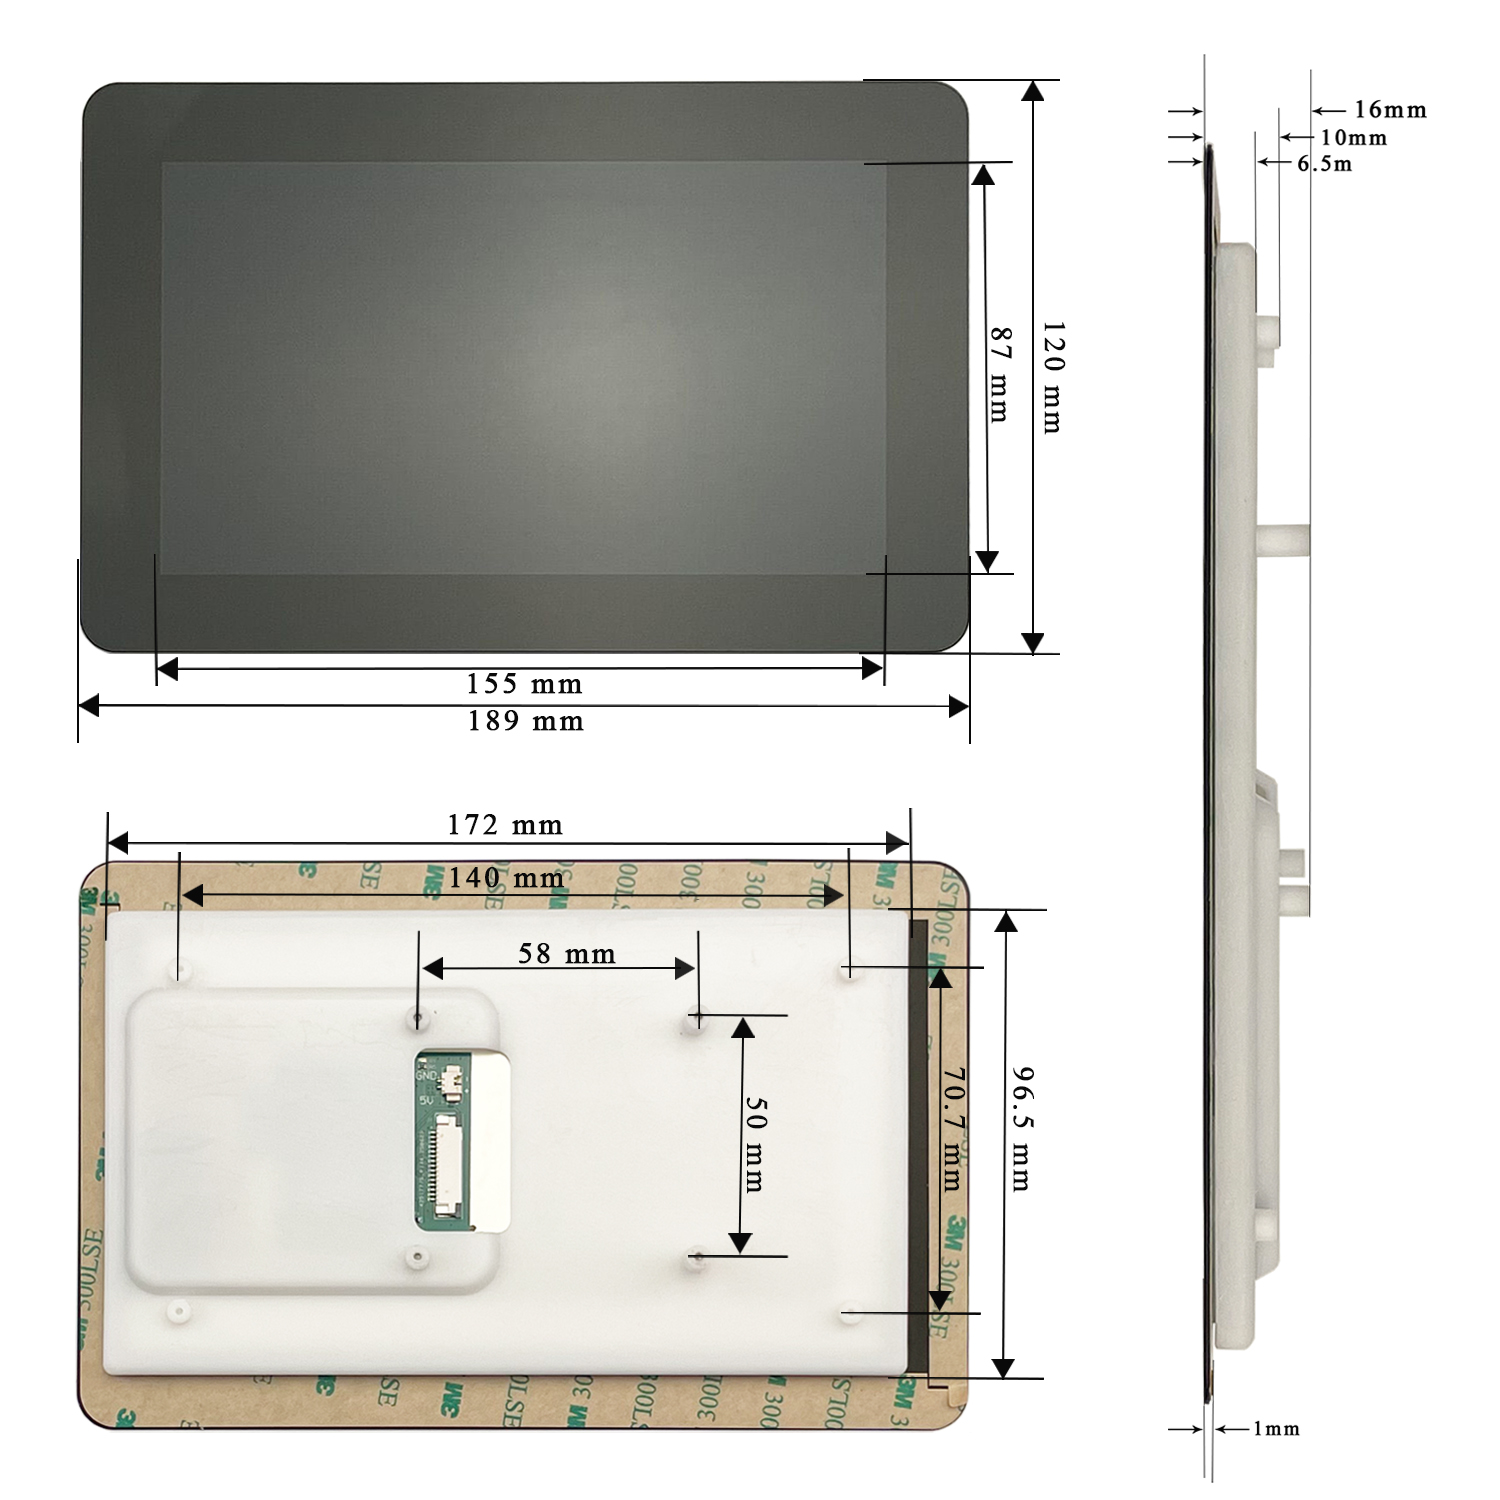
| Module size |
120.24(W) × 189.32(H) × 4.24(T) |
mm |
| Active area |
86.84*154.37 |
mm |
| Interface |
2 Lanes MIPI DSI Interface |
— |
| Surface Hardness |
6H |
— |
| Weight |
TBD |
g |
| Backlight brightness |
300nits(Min)350nits(Typ.) |
nits |
| LCD type |
TFT |
— |
| Panel type |
G+G |
— |
| Operating temperature |
0~50 |
℃ |
| Storage temperature |
-10~70 |
℃ |
Note: Unmarked tolerance: ±0.20
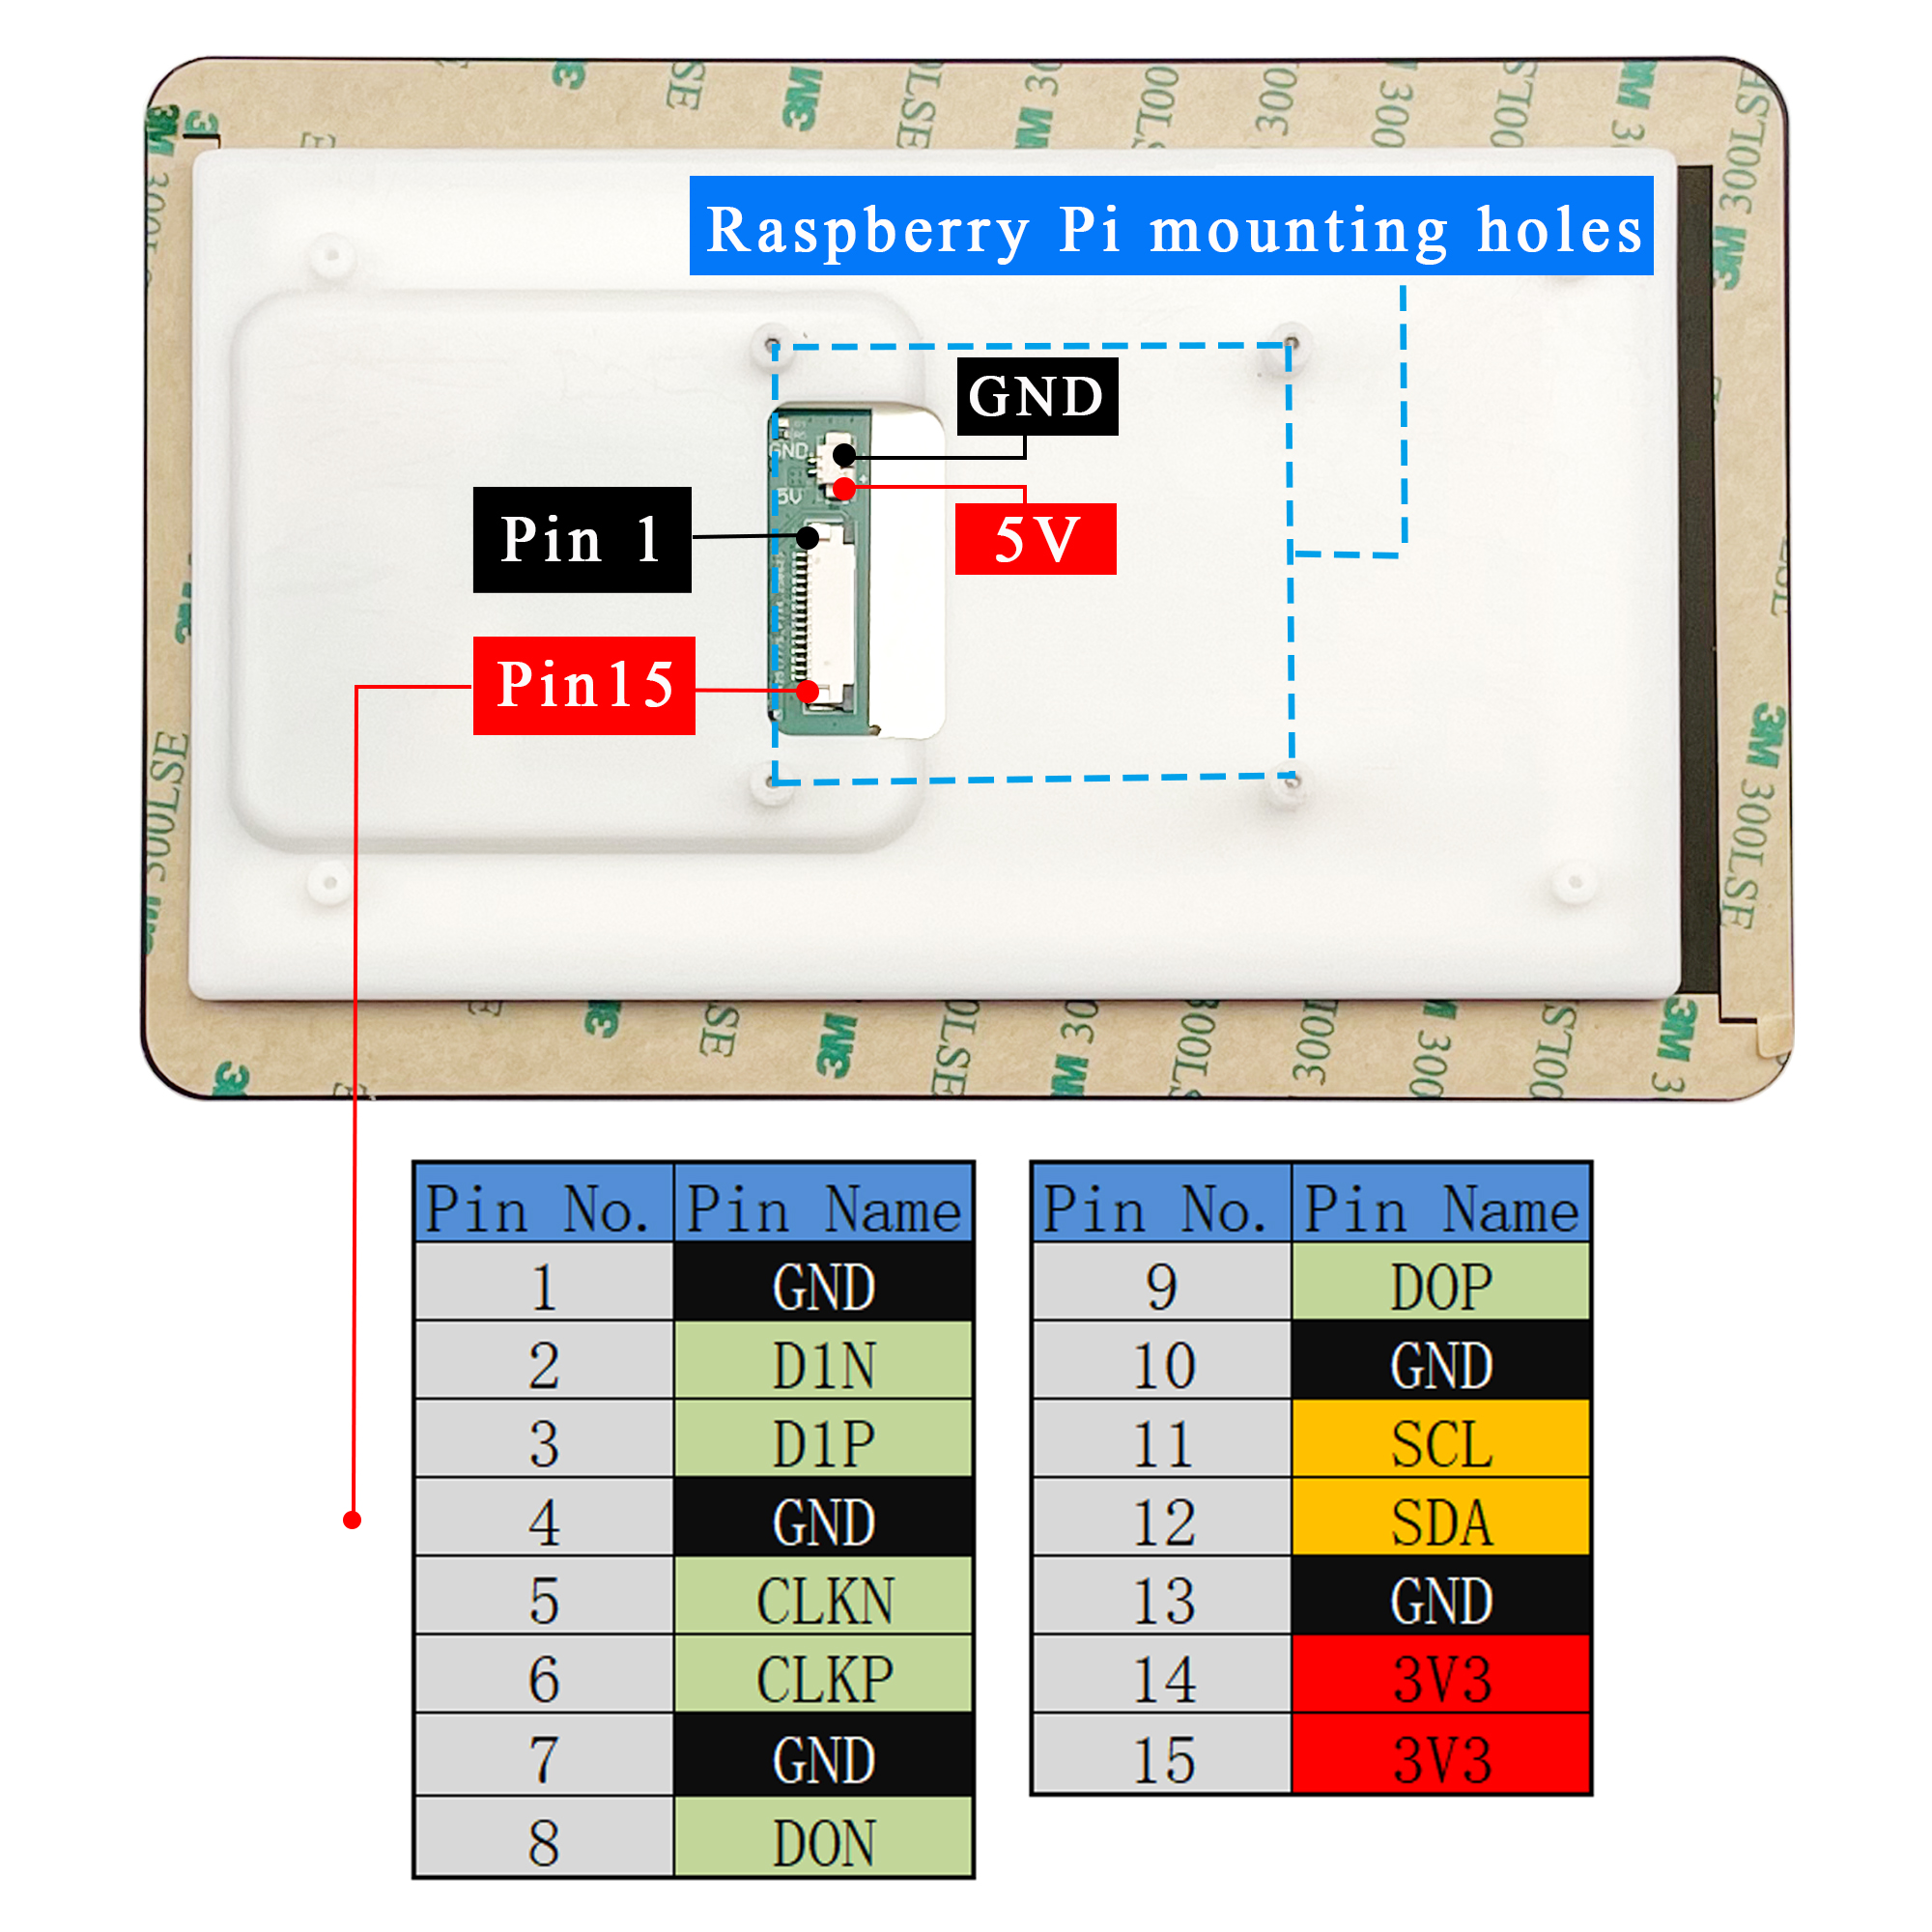
Interfaces
Install
Pi5/CM5/CM4/CM3+/CM3 Hardware Connection
1. Use the “15P to 22P 200mm FPC cable” to connect the DSI port of the display to the 22PIN DSI port of the Raspberry Pi motherboard.
2. Use the “Power cable” to connect the power connector of the display to the 5V GND pin header of the Raspberry Pi motherboard.

3. Secure the Raspberry Pi to the display with M2.0 screws.
The installation effect is as follows:
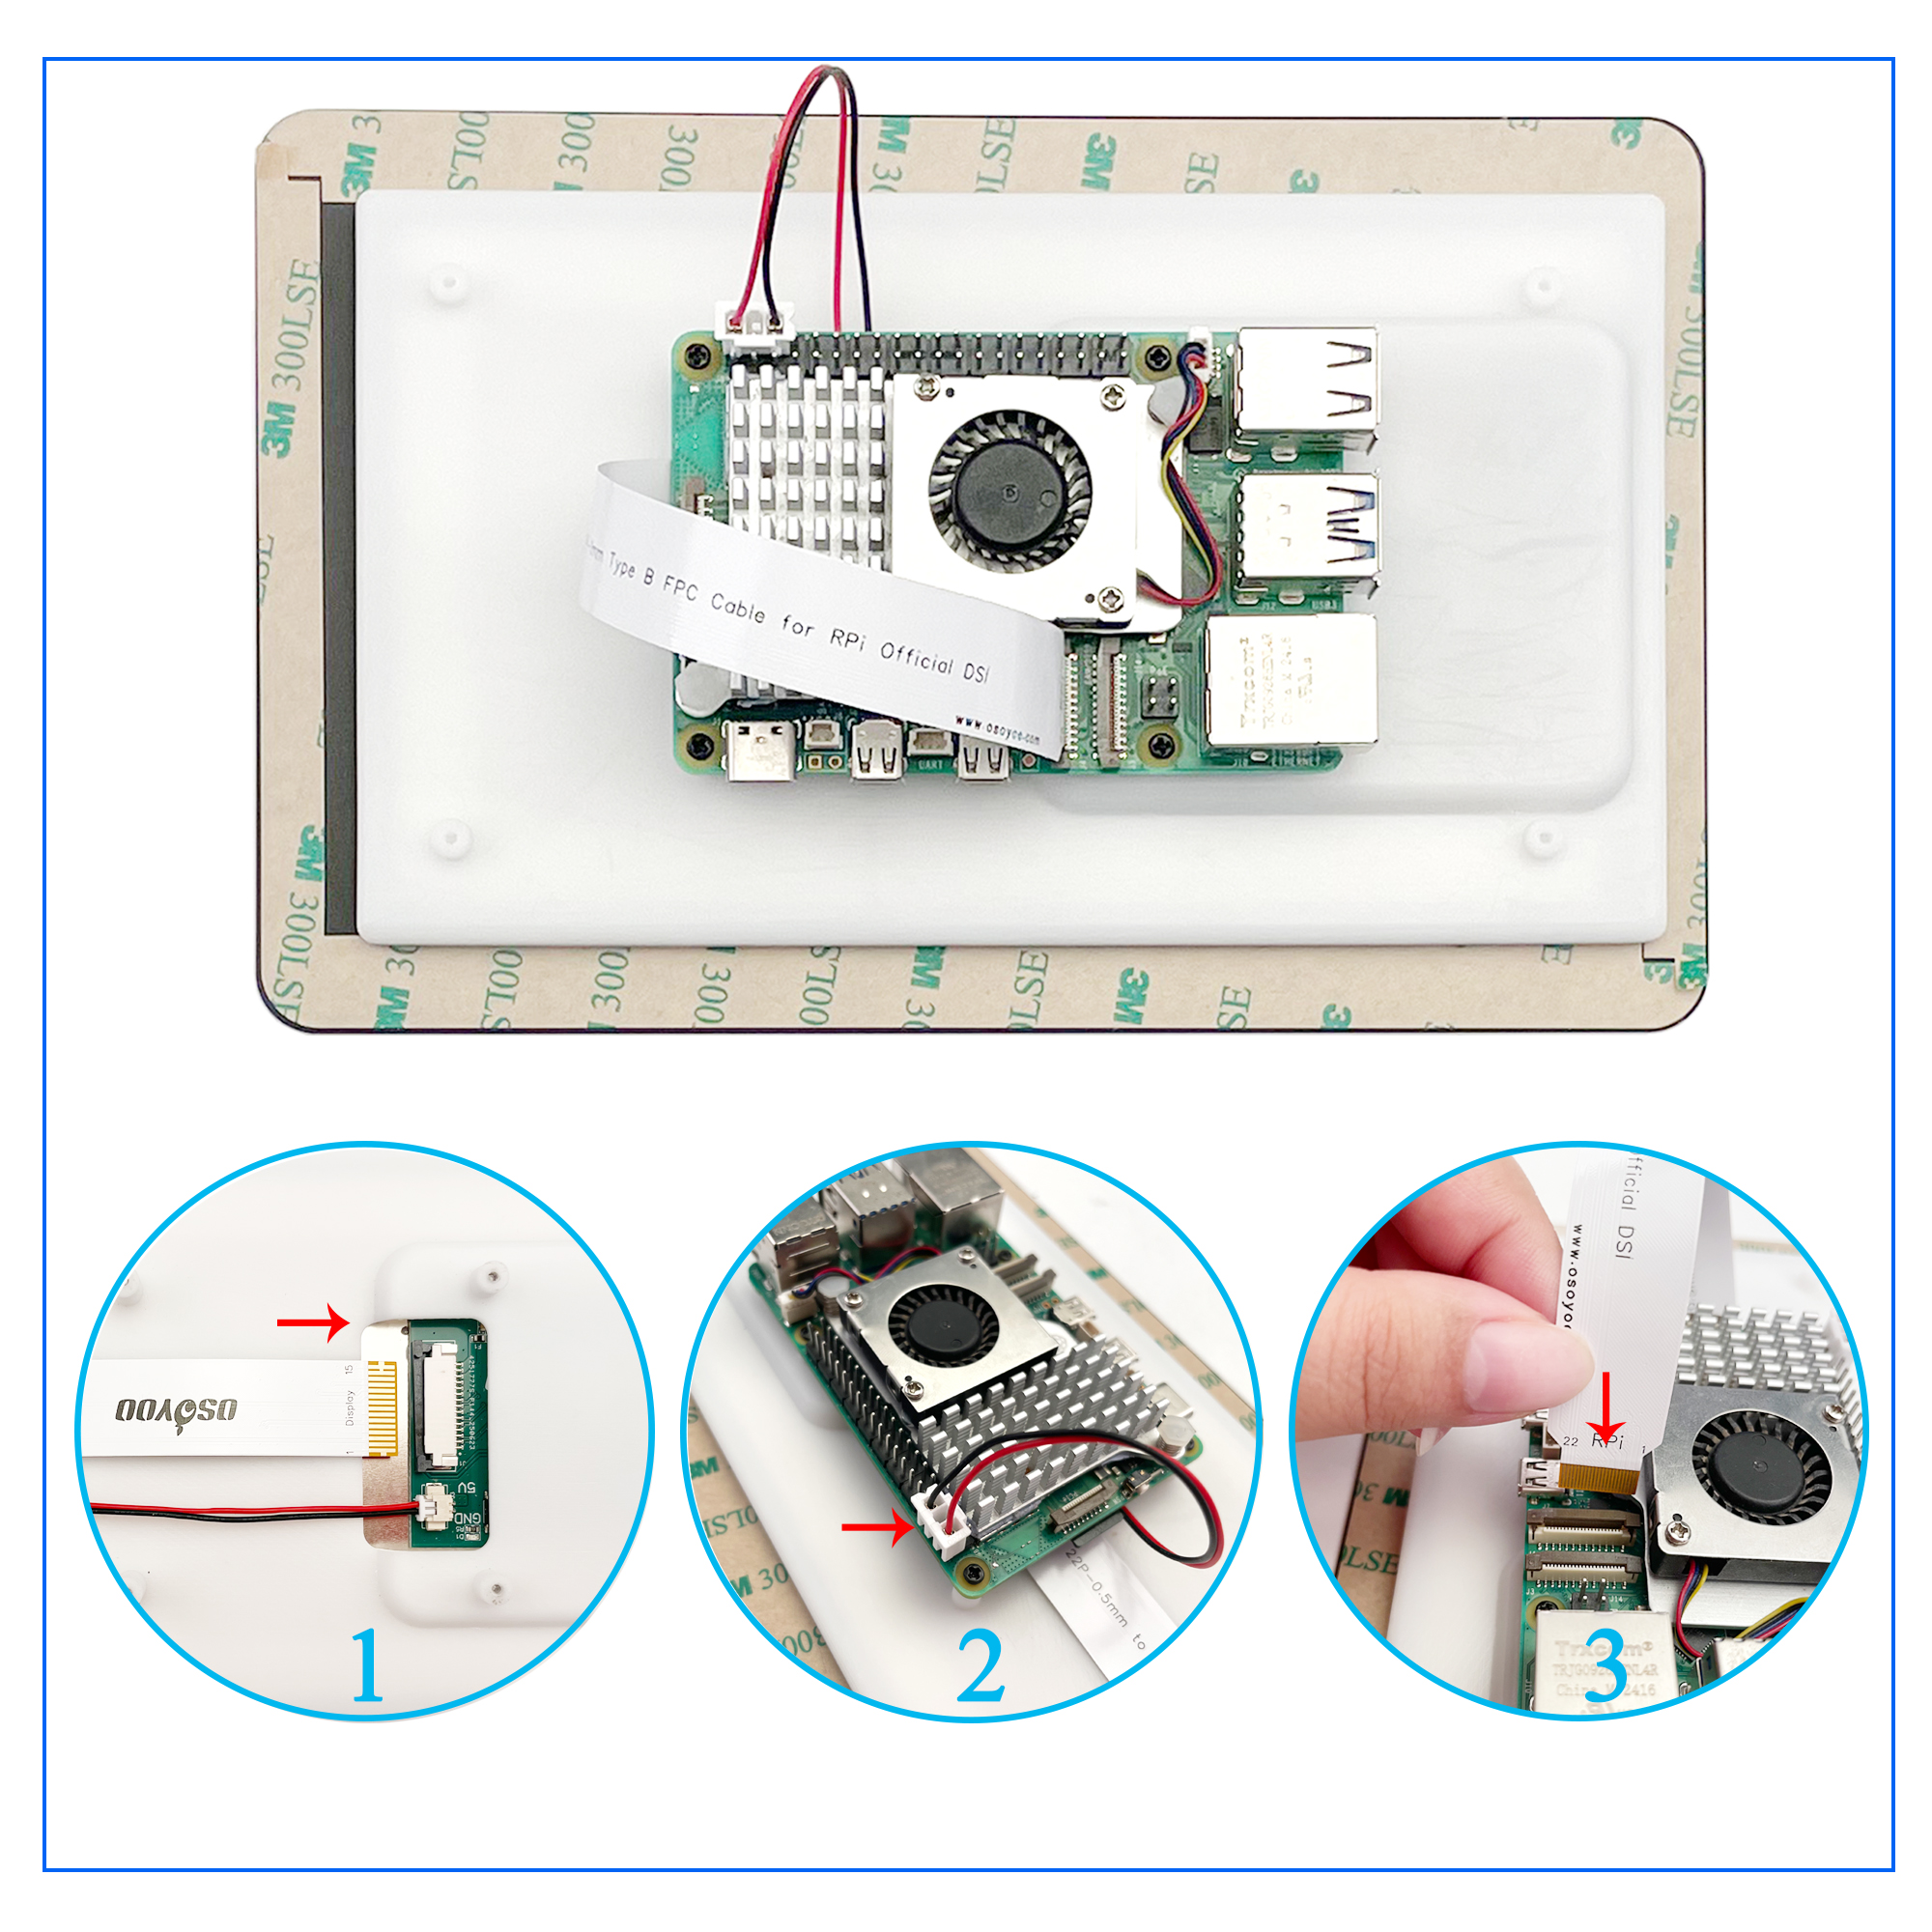
Note: Make sure that the DSI cable is connected in correct direction and 5V power is supplied through the GPIO pins.
Pi4B/3B+/3B/3A+ Hardware Connection
1. Use the “FFC Cable 15PIN 20cm (opposite direction)”cable to connect the DSI port of the display to the 15PIN DSI port of the Raspberry Pi motherboard.
2. Use the “Power cable” to connect the power connector of the display to the 5V GND pin header of the Raspberry Pi motherboard.

3. Secure the Raspberry Pi to the display with M2.0 screws.
The installation effect is as follows:
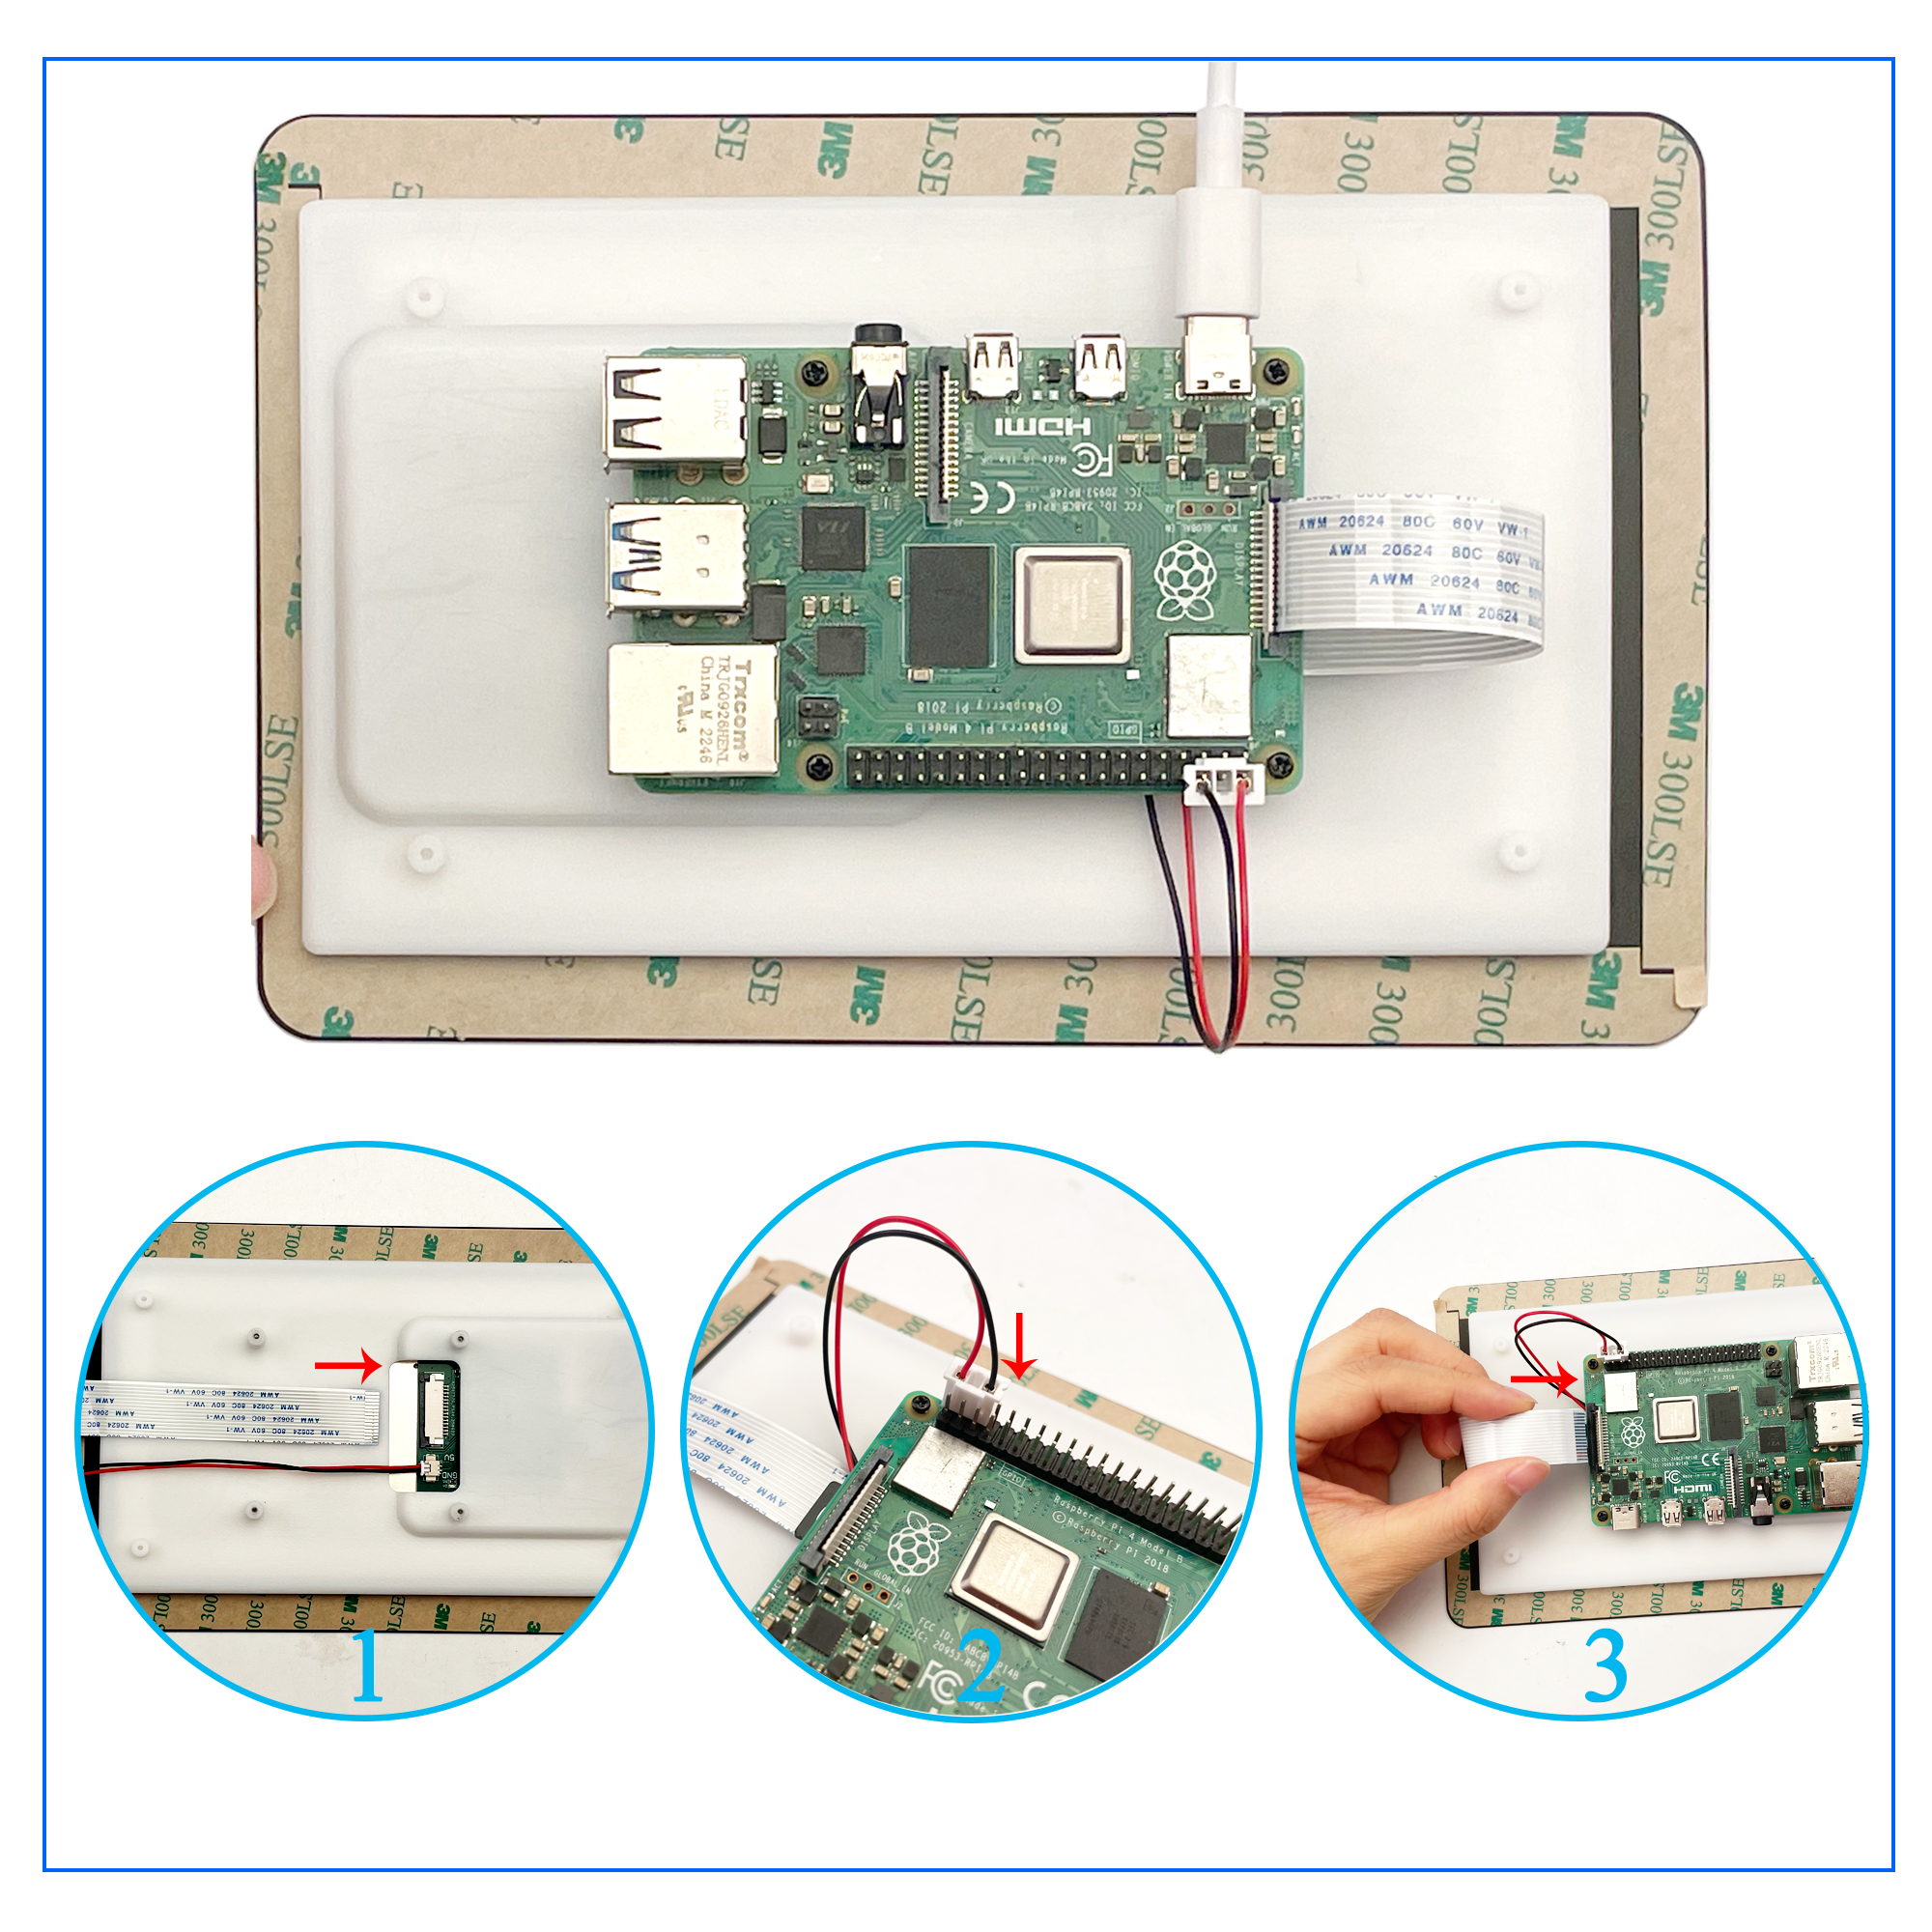
Note: Make sure that the DSI cable is connected in correct direction and 5V power is supplied through the GPIO pins.
Software Settings
Method 1: Flash the Pre-installed Image (recommended)
1. Select pre-installed image, download and unzip it as .img file
OSOYOO 720×1280 7 inch DSI Display pre-installed image
Note:The default user name is “pi”, the default password is “raspberry”.
2. After the image flashing is completed, connect the TF card to the Raspberry Pi, start the Raspberry Pi, and wait for about 30 seconds for it to be displayed and touched normally.
Method 2: Flash Latest Bookworm System & Install the Driver Manually
1. Connect the TF card to the PC, download and use Raspberry Pi Imager to flash the last bookworm system image.

2. After the burning is completed, connect the TF card to the Raspberry Pi, start the Raspberry Pi, and log in to the terminal of the Raspberry Pi (you can connect the Raspberry Pi to the HDMI display or use ssh to log in remotely).
3. Run the following command on the terminal to install the driver
First download the driver using the following command:
wget https://osoyoo.com/driver/osoyoo_dsi.zip
Then type the following command:
 unzip osoyoo_dsi.zip
 cd osoyoo_dsi
 sudo su
When using the DSI1 interface or a device with only one DSI interface:
sudo bash ./install7.sh
When using the DSI0 interface:
sudo bash ./install7.sh dsi0
It will automatically detect the hardware model, kernel version, and install the appropriate driver files, and reboot.
Note
Since Pi5/CM5/CM4/CM3+/CM3 has two mipi DSI interfaces, please note that the correct DSI interfaces and commands are used, DSI1 is recommended by default.
Adjusting Backlight Brightness
- 1. Open the “Screen Configuration” application;

- 2. Go to “Screen” -> “DSI-2” -> “Brightness”, check the backlight brightness you need to set, and finally click “Apply” to complete the backlight setting.

OSOYOO also provides a corresponding demo (the demo is only used for Bookworm and Bullseye systems), users can download, install and use in the following way:
wget https://osoyoo.com/driver/Brightness.zip
unzip Brightness.zip
cd Brightness
sudo chmod +x install.sh
./install.sh
After the installation is completed, you can open the demo in the Start Menu -> Accessories -> Brightness, as shown below:

In addition, you can also control the brightness of the backlight by entering the following command on the terminal:
echo X | sudo tee /sys/class/backlight/*/brightness
Where X represents any number from 0 to 255. 0 means the darkest backlight, and 255 means the brightest backlight. For example:
echo 100 | sudo tee /sys/class/backlight/*/brightness
echo 0 | sudo tee /sys/class/backlight/*/brightness
echo 255 | sudo tee /sys/class/backlight/*/brightness
Bookworm Touch Screen Rotation
- 1. Open the “Screen Configuration” application;

- 2. Go to Screen – > DSI-1 – > Touchscreen and check 10-0014 Goodix Capacitive TouchScreen;

- 3.Click Apply, then close the current window, and reboot according to the pop-up prompts to complete the specified touch screen;


- 4.Go to Screen -> DSI-1 -> Orientation, check the direction you need to rotate, and finally click Apply to complete the display and touch synchronous rotation.

Outline dimensions
Standard version and the protective case
SAFETY INSTRUCTIONS
To avoid malfunction or damage to this product, please observe the following:
• Before connecting the device, shut down your Raspberry Pi computer and disconnect it from external power.
• Input voltages exceeding the maximum or improper operation may cause permanent damage to the device.
• The input current needs to be ≥ 0.5A, otherwise it will cause the startup failure or display abnormality, and staying in an abnormal state for a long time may cause permanent damage to the device.
• If the cable becomes detached, pull the locking mechanism forward on the connector, insert the ribbon cable with the metal contacts facing towards you, then push the locking mechanism back into place.
• This device should be operated in a dry environment at 0–50°C.
• Do not expose it to water or moisture, or place on a conductive surface whilst in operation.
• Do not expose it to excessive heat from any source.
• Care should be taken not to fold or strain the ribbon cable.
• Care should be taken when screwing in parts. A cross-thread can cause irreparable damage and void the warranty.
• Take care whilst handling to avoid mechanical or electrical damage to the printed circuit board and connectors.
• Store in a cool, dry location.
• Avoid rapid changes of temperature, which can cause moisture to build up in the device.
• The display surface is fragile and has the potential to shatter
