Introduction
In this project, we will show what is MQ-5 Sensor and how to use it with the Arduino board.
Preparations
HARDWARE
- Osoyoo UNO Board (Fully compatible with Arduino UNO rev.3) x 1
- MQ-7 Sensor x 1
- Jumpers
- USB Cable x 1
- PC x 1
SOFTWARE
- Arduino IDE (version 1.6.4+)
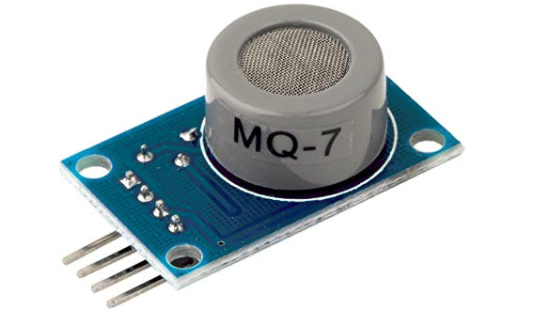
About MQ-7 Gas Sensor
Description
MQ-7 Semiconductor Sensor for Combustible Gas
Sensitive material of MQ-7 gas sensor is SnO2, which with lower conductivity in clean air. It make detection by method of cycle high and low temperature, and detect CO when low temperature (heated by 1.5V). The sensors conductivity is more higher along with the gas concentration rising. When high temperature (heated by 5.0V), it cleans the other gases adsorbed under low temperature. Please use simple electrocircuit, Convert change of conductivity to correspond output signal of gas concentration.
MQ-7 gas sensor has high sensitity to Carbon Monoxide. The sensor could be used to detect different gases contains CO, it is with low cost and suitable for different application.
Character
- High sensitivity to Combustible gas in wide range
- High sensitivity to Natural gas
- Fast response
- Wide detection range
- Stable performance, long life, low cost
- Simple drive circuit
Technical Data
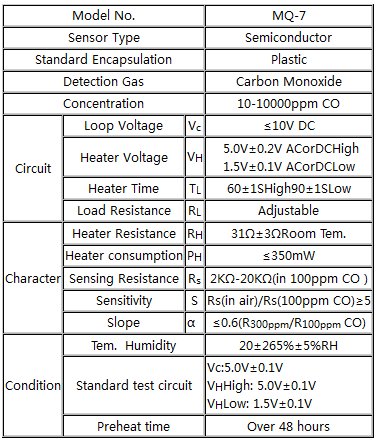
Introduction to MQ-7 Carbon Monoxide Sensor
According to its datasheet, the MQ-7 carbon monoxide sensor detects 20 to 2000 ppm of CO in air. Here is its sensitivity characteristic curve:
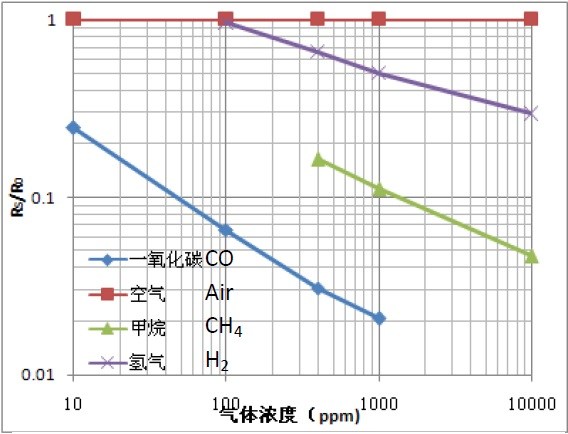
This is a graph of Rs/R0 vs. gas concentration in ppm. Rs is the resistance of the sensor in target gas while R0 is the resistance in clean air. We will use this graph later when we create our code.
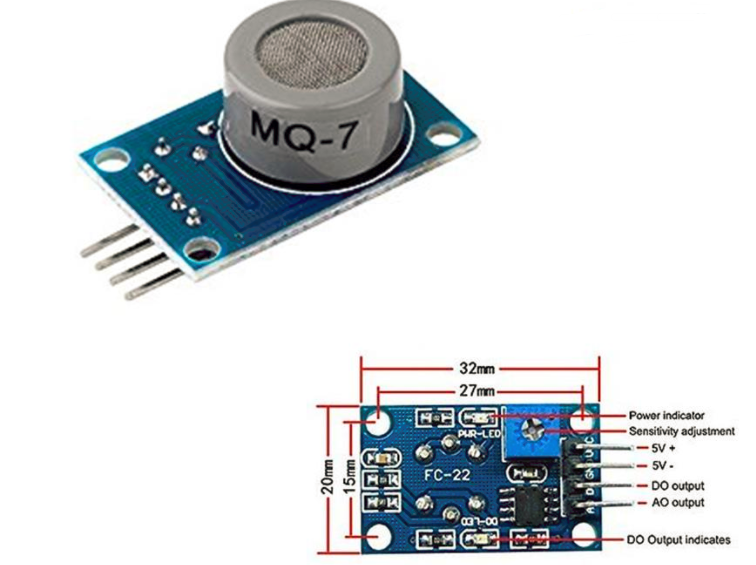
This breakout board is more convenient as it converts resistance variations to voltage variations. Here is its schematic diagram:
There are two ways to read the output from the MQ-7. One is through the DOUT pin which gives a high when the concentration threshold is reached and low otherwise. The threshold can be varied by adjusting the trimmer on the breakout board which is Rp in the schematic.
Meanwhile, the AOUT pin gives varying voltage representing the CO concentration. We can convert the voltage reading to ppm if we look at the characteristic curve above. The relationship between concentration in ppm and RS/R0 is:

Example
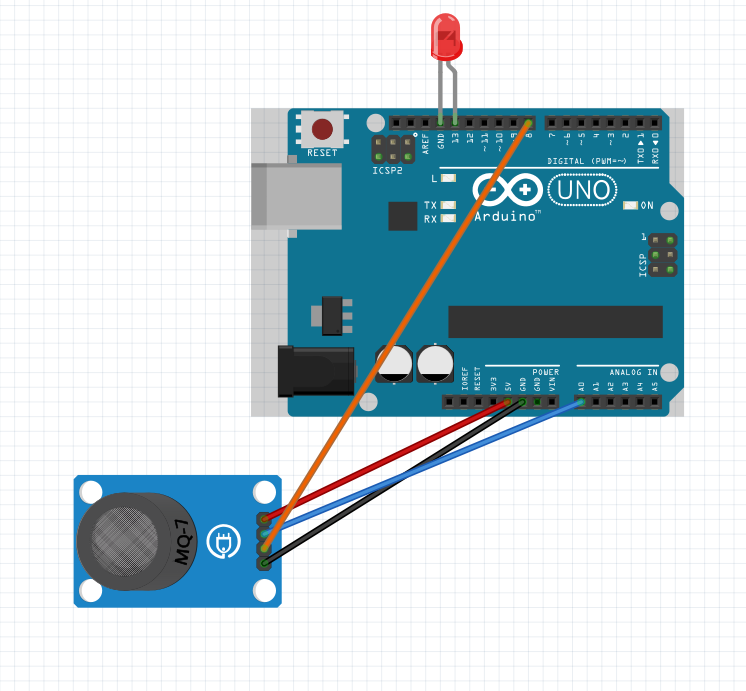
Connection
Connect the MQ 7 Sensro and the Arduino Board as below digram:
Arduino Sketch for MQ-7
const int AOUTpin=0;//the AOUT pin of the hydrogen sensor goes into analog pin A0 of the arduino
const int DOUTpin=8;//the DOUT pin of the hydrogen sensor goes into digital pin D8 of the arduino
const int ledPin=13;//the anode of the LED connects to digital pin D13 of the arduino

int limit;
int value;

void setup() {
Serial.begin(115200);//sets the baud rate
pinMode(DOUTpin, INPUT);//sets the pin as an input to the arduino
pinMode(ledPin, OUTPUT);//sets the pin as an output of the arduino
}

void loop()
{
value= analogRead(AOUTpin);//reads the analaog value from the hydrogen sensor's AOUT pin
limit= digitalRead(DOUTpin);//reads the digital value from the hydrogen sensor's DOUT pin
Serial.print("Hydrogen value: ");
Serial.println(value);//prints the hydrogen value
Serial.print("Limit: ");
Serial.print(limit);//prints the limit reached as either LOW or HIGH
delay(100);
if (limit == HIGH){
digitalWrite(ledPin, HIGH);//if limit has been reached, LED turns on as status indicator
}
else{
digitalWrite(ledPin, LOW);//if threshold not reached, LED remains off
}
}
The first block of code defines all the pin connections of the sensor and the LED. Since the AOUTpin connects to analog pin A0, it is initialized to 0. Since the DOUTpin connects to digital pin D8, it is initialized to 8. Since the LED connects to digital pin D13, it is initialized to 13. 2 variables, limit and value, are also declared. These will be used to store the value of the analog pin AOUT and digital pin DOUT.
The next block of code sets the baud rate and declares the DOUTpin as input and the ledPin as output. This is because the sensor is an input to the Arduino for the Arduino to read and process the sensor value. And the LED is an output will serves an indicator if the sensor has detected alcohol.
The next block of code reads the sensor pin AOUT and stores the value in the integer value. It also reads the sensor pin DOUT and stores the value in the integer limit. We then print the alcohol value, which will be a numeric value ranging from either 0 (no alcohol detected) to 1023 (maximum level of carbon monoxide that can be read). We will aslo print the limit which will either be HIGH or LOW. If the CO detected is under the threshold level, the value of limit returned will be low. If the CO detected is above the threshold, the value of limit returned will be HIGH.
If the value is HIGH, the LED will turn on. If the value is low, the LED will remain off.


