INTRODUCTION
场景图
Is the brighter the lamp, the better? No, we need to adjust the lamp according to the brightness of the environment in order to better protect our eyesight. Now let’s start learning how to make such a healthy household appliance.
In this circuit you will work with a potentiometer. You will learn how to use a potentiometer to control the brightness of an LED by reading a sensor and storing its 0–1023 value as a variable, then using it as a brightness level for the LED.
Parts Needed
器件组合图
You will need the following parts:
- 1x micro:bit
- 1x Micro B USB Cable
- 1x micro:bit Breakout
- Jumper Wires
- 1x Potentiometer
- 1x LED Module
Hardware Hookup
Ready to start hooking everything up? Check out the wiring diagram and hookup table below to see how everything is connected.
Wiring Diagram for the Experiment
接线实物图/接线表格
led模块接到P0
电位器模块接到P2
Running Your Script
Either copy and paste, or re-create the following code into your own MakeCode editor by clicking the open icon in the upper right-hand corner of the editor. You can also just download this example by clicking the download button in the lower right-hand corner of the code window.
Note: You may need to disable your ad/pop-up blocker to interact with the MakeCode programming environment and simulated circuit!
Code to Note
Let’s take a look at the code blocks in this experiment.
If you are having a hard time viewing this code, click on the image above to get a better look!
A “variable” is a placeholder for values that may change in your code. You can create a variable using th Make Variableoption underneath the Variables group. You can then name it, which then creates a block for your given variable.
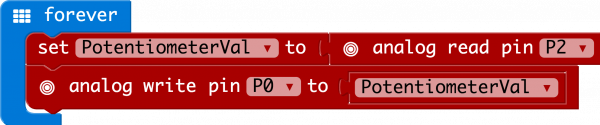
Set To
To store a value inside of your newly created variable you use the set to block. The set to block allows you to select from a list of the variables that exist in your program and then add a value that you want to store or set that variables to.
Analog Read
In this program you are reading the voltage from the potentiometer which is 0 to 3.3 volts. The micro:bit reads that value as a 10 bit number which is a value range from 0 to 1023 using the analog read block. The analog read block is a value based block, meaning that you have to insert it into a block with a matching shape. We insert it into the set toblock to store its value as a variable.
Analog Write
Just like the analog write block the analog write block deals with a range of values, but instead of reading a pin as an input the analog write block outputs an analog value to a pin. We see this as a brightness range with this led, but it could be a tone from a buzzer, a motor speed, etc. We set our analog output to the variable we stored the potentiometer value in.
What You Should See
You should twist the potentiometer. You will notice that the LED will get brighter or dimmer based on the position of the potentiometer. If you turn the potentiometer all the way one direction it will be fully on and the other end will be fully off.
When you complete the above steps, a simple eye lamp is made. Remember to protect your eyesight while reading.


