Here, we will show how to use OSOYOO Smart Home IoT Kit with OSOYOO IoT APP to control some electronic devices, such as LEDs, active buzzers, fan modules, relay modules, etc.
In this lesson, we will learn how to use OSOYOO IoT APP to remotely turn on or turn off the LED and control the brightness of the LED. . . Using the same principle, you can also control other electronic devices
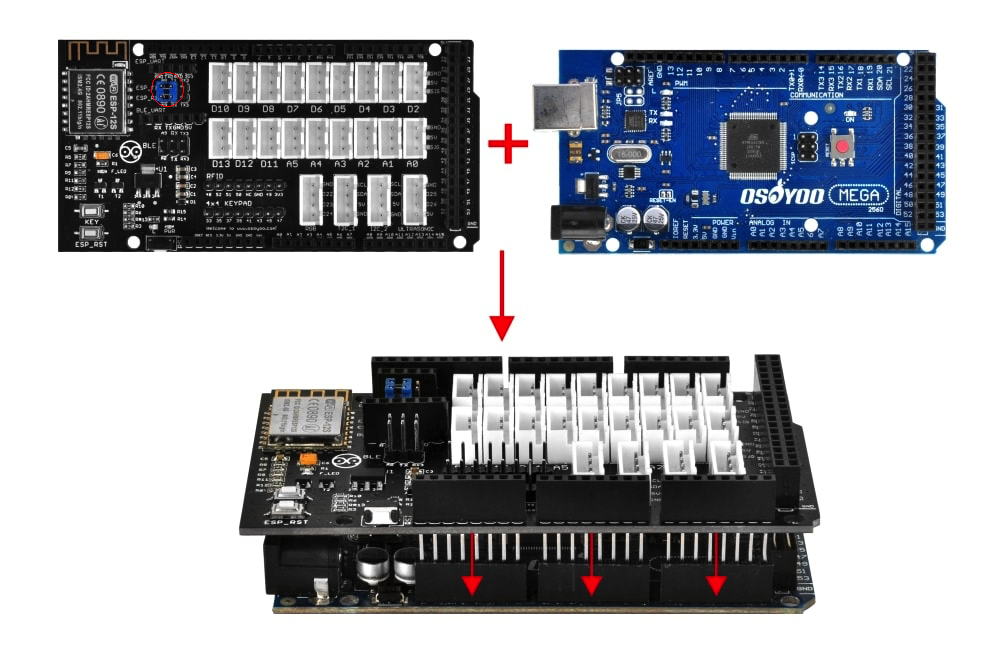
First, please plug OSOYOO MEGA-IoT Extension Board into MEGA2560 board:
Make sure that jumper caps in the following red circle are installed. These two jumper caps connect A9 to ESP_TX and A8 to ESP_RX.
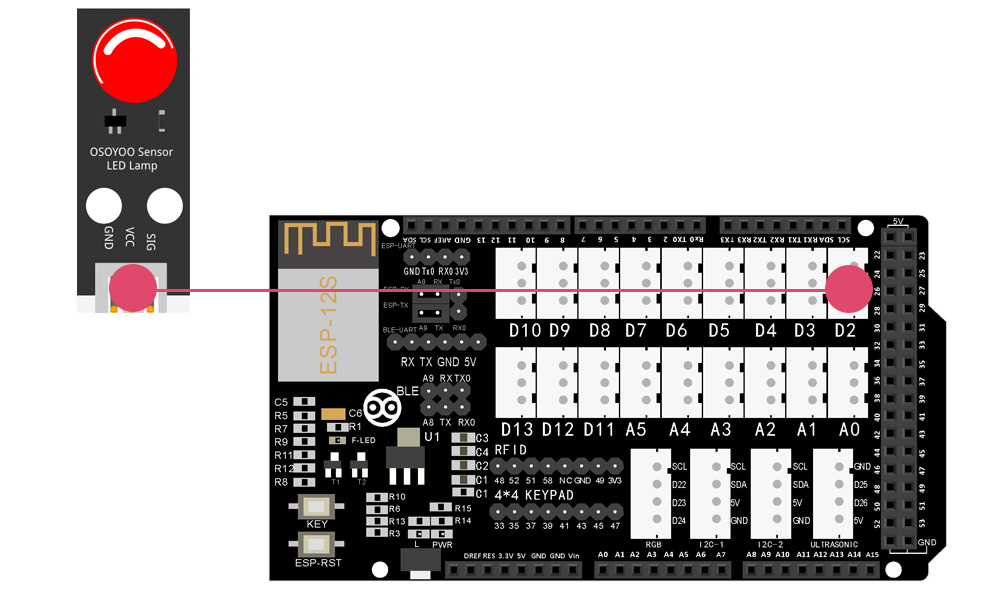
Connect the LED Module to the D2 port as below:
Prerequisite:
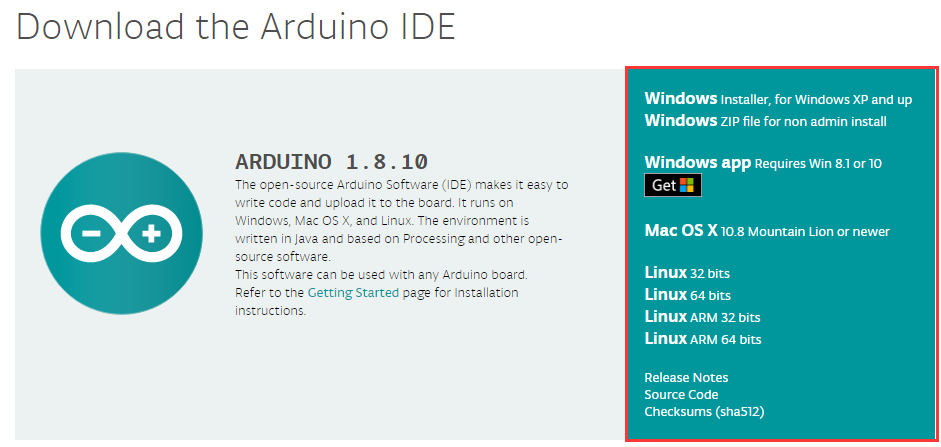
If you haven’t installed latest Arduino IDE (If you have Arduino IDE version after 1.1.16, please skip this step)Download Arduino IDE from https://www.arduino.cc/en/software, then install the software.
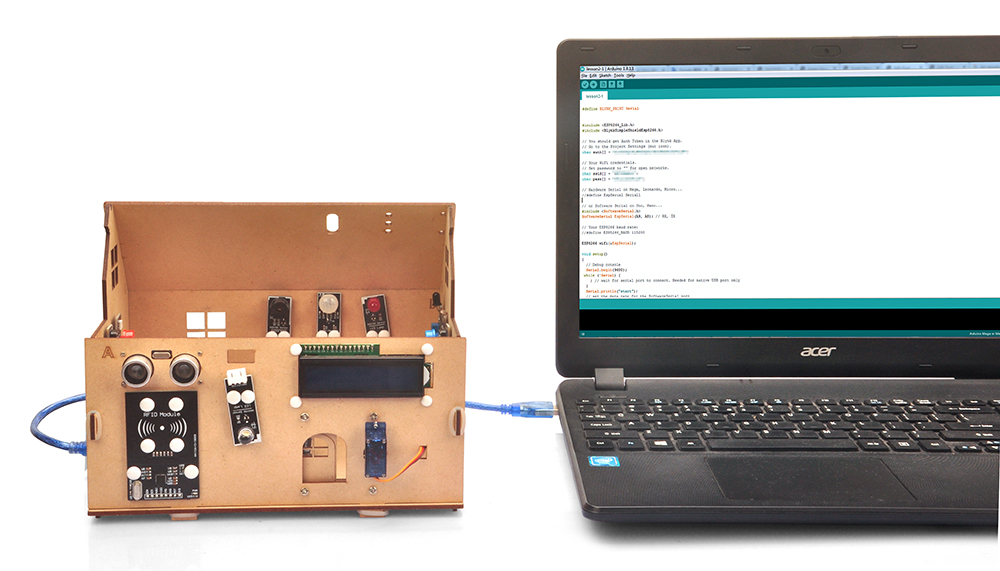
Step 2) After above operations are completed, connect OSOYOO MEGA2560 Board to PC with USB cable.
Notice: Shut off your battery or unplug your power adapter when upload sketch code to Arduino.
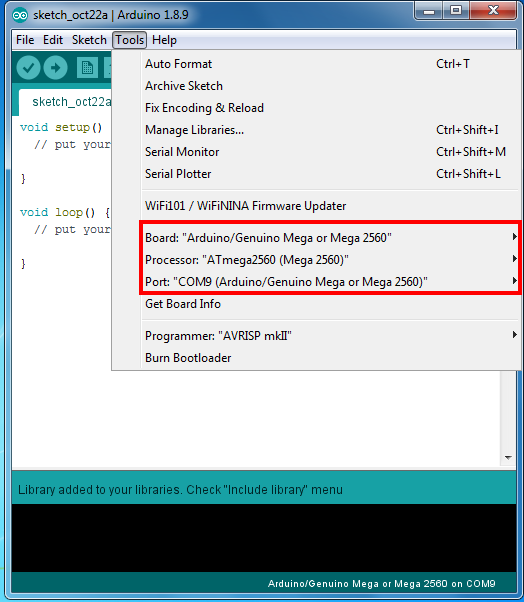
Step 3 Open Arduino IDE: Choose corresponding board type and port type for your project.
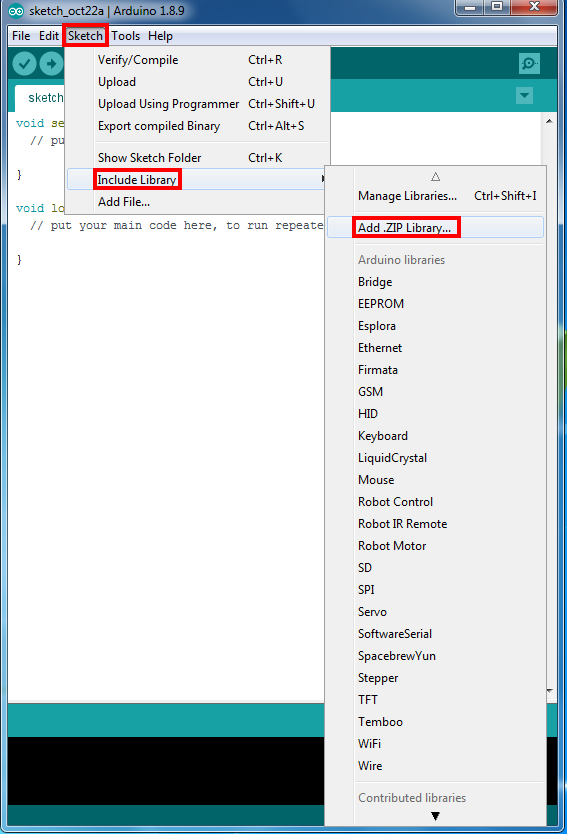
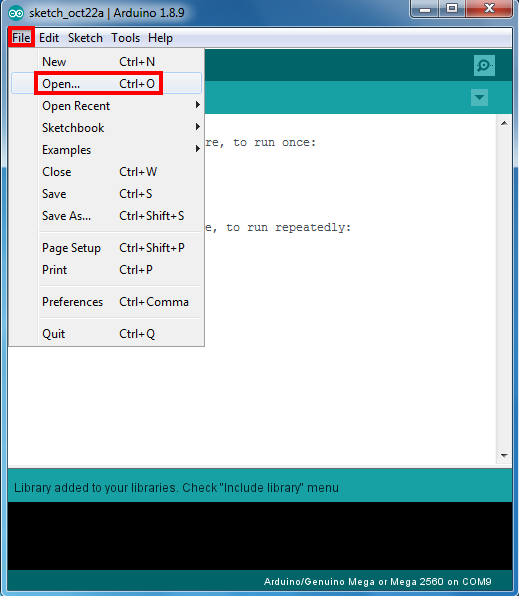
Step 4 Arduino IDE: Click file – Open, then choose code in the folder, load up the sketch onto your Arduino.
Note: In the sketch, find lines 17 to 18 and replace your Wi-Fi ssid/password
char ssid[] = "***”;//replace this line with your Wi-Fi ssid
char pass[] = "***”; //replace this line with your Wi-Fi password

Upload the sketch to the board. Wait until you see something like this:
Done uploading
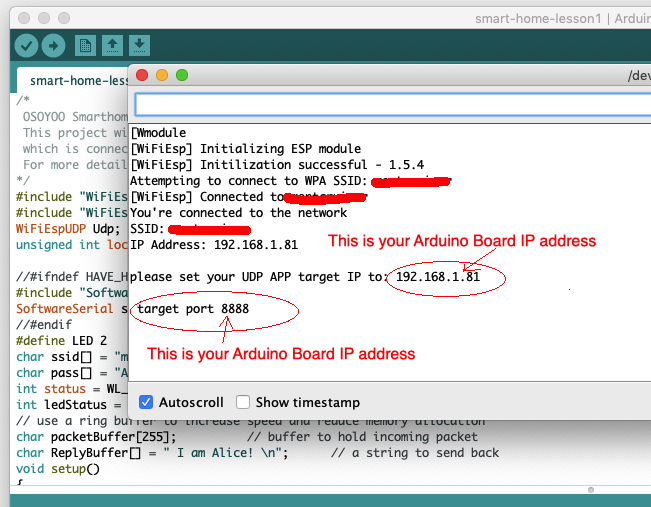
Step 5: Now open Serial monitor in the upper right corner, you should see your Arduino IP address and Port number as following:
Congratulations! You have installed Arduino Sketch successfully! Next step is to install an OSOYOO IoT APP in your mobile device:
Step 6 Download OSOYOO IoT APP by searching OSOYOO IoT UDP robot car app from Apple Store(iPhone/iPad) or Google Play Store (Android device)
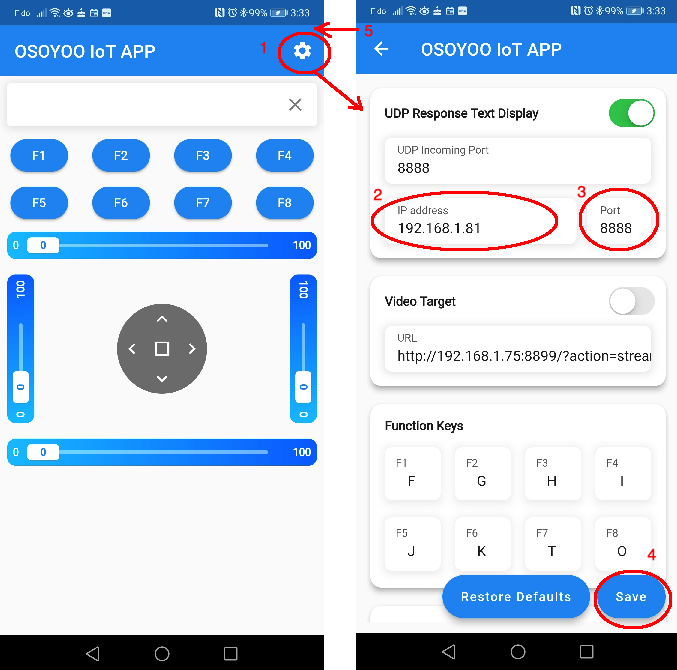
1)Open APP, click Setting button in upper right corner
2)Use the Arduino IP address you get in Step 8 to replace default IP 192.168.1.255
3)keep default port number 8888 without changing
4)Click Save button to save the changes you just made
5)Click Back Arrow to go back to APP front UI
What if I don’ have Wifi Router
Sometimes, you don’t have a proper wifi router and you also want exchange data between APP and your Arduino. It this case, you can make the Arduino board work as a WIFI router itself. This is called AP mode.
Unzip above file and run smarthome-lesson1B.ino file, no need to set SSID password. Open your Serial Monitor, you will see the ESP8266 Arduino shield actually is providing a Wifi SSID called “OSOYOO-SmartHome” with IP address 192.168.4.1
Use your mobile phone to connect this Wifi SSID OSOYOO-SmartHome, then open the Red APP, Set the IP address to 192.168.4.1, then press F1 key in the APP, the LED will turn on, press F2 key, the LED will be off.
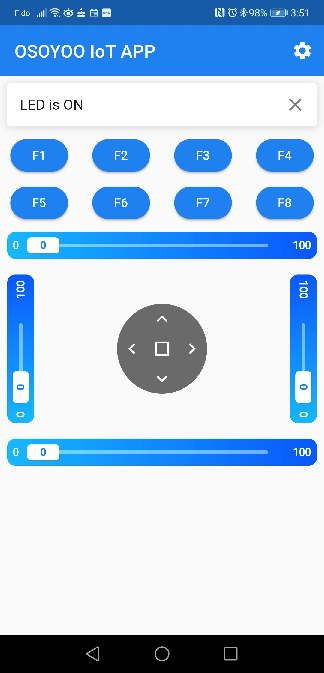
Press the F1 Button on the APP, then the remote LED (which is connected to D2 port of Wi-Fi board) will be turned on.
Once the Arduino board turns on LED, it will send a message “LED is ON” to APP, you will see this message in APP response display area as following:
Press the F2 Button on the APP, then the remote LED will be turned off.
Once the Arduino board turns on LED, it will send a message “LED is OFF” to APP, you will see this message in APP response display area too.
Following tutorial is only for advance users who want to get more deep understanding about the APP and the Sample Code.
Brief Introduction about OSOYOO IoT UDP APP and How to use Arduino Software to receive send/receive UDP message:
When you press a button key in Arduino IDE, the APP actually send a brief message through UDP protocol to remote device whose IP and port are defined in setting page in Step 10.
In the lower part of the setting page, you will see the fields which defines the default messages which are sent by each button:
In the above picture, you can see F2 is associated to ‘G’, this means when you press F2, you will send a single letter message ‘G’ to remote device by UDP protocol.
If you click the letter G, you can actually change F2’s message. For example, if you change ‘G’ to ‘Hello’, then the message ‘Hello’ will be sent after F2 is pressed.
You can download a UDP protocol receiving Arduino code from the following link: https://osoyoo.com/driver/smart-home-v2-udp/lesson1/UdpReceive.zip
Open above sketch code, change its SSID and Password in line 19 and 20, then run it. You can open a serial monitor to check message you received from each button from your APP.
UDP is a useful internet communication protocol used in IoT applications and email transfer. We hope you can get some hand-on UDP programming experience through this project.
I have a problem with thie error “cannot initialize ESP” TIME OUT, No tag found, WIFI shield no present
Could you help me, please? I don’t know what to do.
Trouble Shooting
Sometimes when running lesson1 project, ESP8266 might have initialization problem with MEGA2560 A8,A9 pins and this cause WifiESP initializing error showing in Serial monitor as following:
[WiFiEsp] Initializing ESP module
[WiFiEsp] >>> TIMEOUT >>>
[WiFiEsp] >>> TIMEOUT >>>
[WiFiEsp] >>> TIMEOUT >>>
[WiFiEsp] >>> TIMEOUT >>>
[WiFiEsp] >>> TIMEOUT >>>
[WiFiEsp] Cannot initialize ESP module
To solve the problem, we need use Stable pin D10,D11 to initialize ESP8266 and then switch back to A8,A9.
To do this, please do as per following steps:
Step 1)remove the jumper caps on A8/ESP_RX and A9/ESP_TX, then use two Female-To-Male jumper wires connect ESP_RX to D11 and ESP_TX to D10,
see following picture:
Above circuit change will use D10, D11 instead of A8, A9 to connect ESP8266 serial port because MEGA2560 A8,A9 is not as stable as D10,D11.
Step 2) Now we need slightly change some code of Lesson 3 sketch file line 15:
Original line 15 is :
SoftwareSerial softserial(A9, A8); // RX, TXPlease change above line to:
SoftwareSerial softserial(10, 11); // RX, TX
Step 3) Load the sketch to IDE and the Initializing normally will pass through and show
[WiFiEsp] Initilization successful – 1.5.4 SSI
This means your ESP8266 chip has connected to your MEGA2560. Then your OSOYOO Advanced Board for MEGA2560 Board will keep connecting your wifi SSID and Serial Monitor will tell you the IP address.
Once above procedure has been done. You can actually roll back the ESP8266 connection to A8,A9 same as original status, and change line 15 to : SoftwareSerial softserial(A9, A8); // RX, TX
Now load the original Lesson 3 sketch, it will work .