| Buy from OSOYOO |
Buy from US |
Buy from UK |
Buy from DE |
Buy from IT |
Buy from FR |
Buy from ES |
Buy from JP |
 |
 |
 |
 |
 |
 |
 |
 |
Overview

Introduction
The OSOYOO 3.5-inch HDMI capacitive touchscreen is a 480 × 320 LCD display with adjustable brightness. It supports popular mini PCs such as Raspberry Pi, Banana Pi, and Jetson Nano, and it also works as a general-purpose HDMI display for computers, TV boxes, and more.

Features
- 3.5-inch HDMI capacitive touchscreen with a 480 × 320 hardware resolution.
- Supports up to 5-point capacitive touch.
- Supports Raspberry Pi OS, Ubuntu, and Kali when used with a Raspberry Pi.
- Supports Ubuntu when used with a Jetson Nano.
- Supports Windows 11 / 10 / 8.1 / 8 / 7 when used as a computer monitor.
- Supports power control and backlight control for greater power savings.
- Rotate the screen with a button.
- Supports DDC/CI
Interface Introduction
- Micro HDMI port — the HDMI signal input.
- Brightness button — adjusts the LCD brightness in 10% steps over a 10–100% range. The brightness value is saved to non-volatile memory and updated on every button press or DDC/CI brightness command.
- Power switch — a toggle push button that switches between power on (normal mode) and power off (suspend mode). The power indicator LED lights up when the display is suspended. The DDC/CI function stays available even in suspend mode, so the display can be woken programmatically with DDC/CI commands.
- Type-C power and touch port — used for touch communication and to supply power to the display.
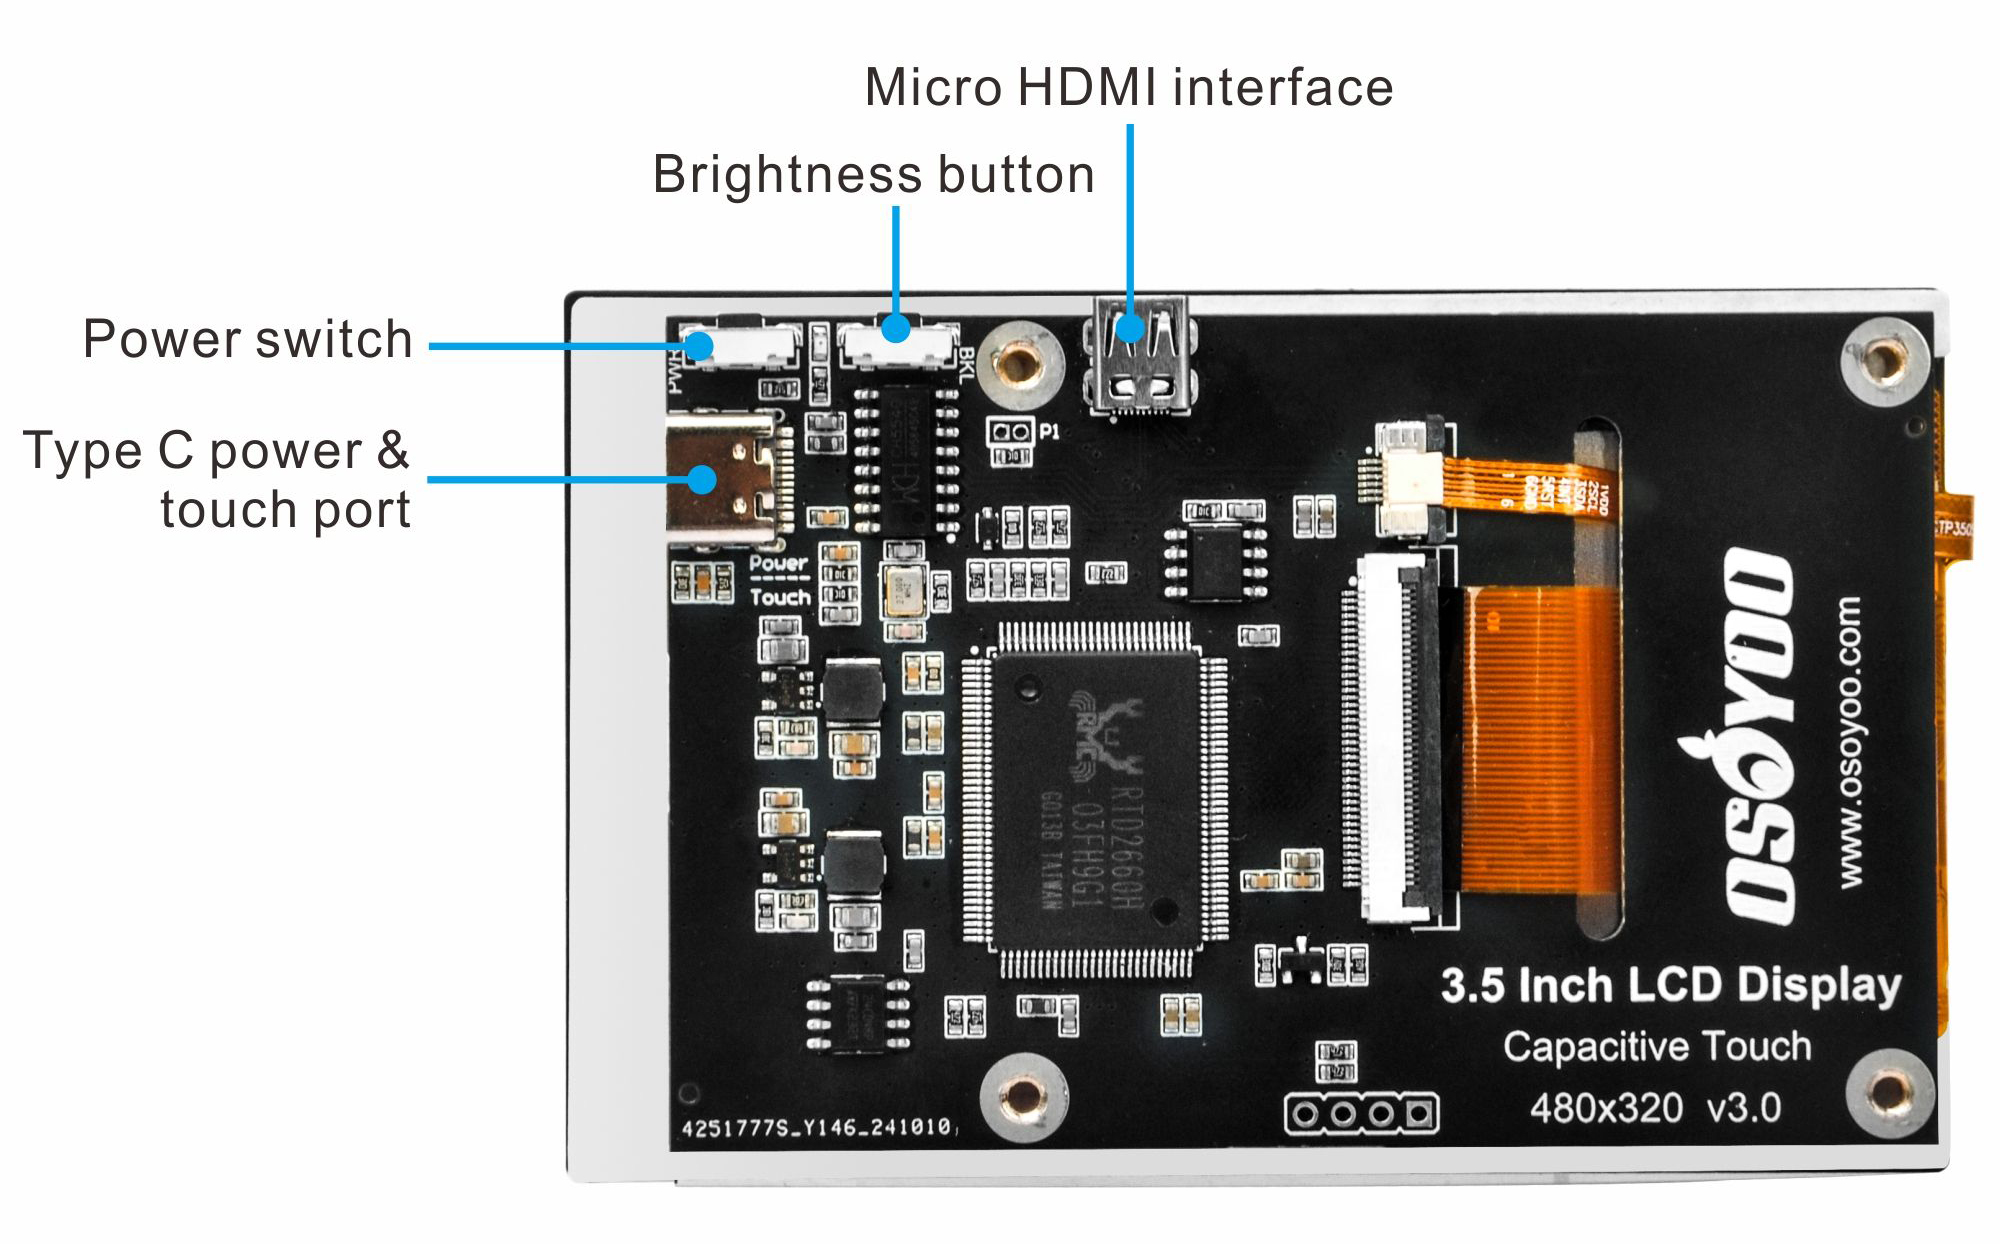
The display supports 0° and 180° rotation of the LCD viewing area without changing any settings on the Raspberry Pi or PC. This is handy for simple customization, but after rotating, the touch needs to be recalibrated. Press and hold the brightness button, then press the power button to rotate the display 180°; the rotation state is also saved to non-volatile memory via DDC/CI. The display’s brightness, contrast, and colors can be updated with DDC/CI commands sent through the HDMI port’s DDC channel (I2C port). You can also enable or disable the splash logo, the HDMI symbol on the screen, and the standby feature. If the standby feature is disabled (the default), the display always shows a message when there is no input signal.
Parameters
Download the datasheet for the OSOYOO 3.5-inch HDMI capacitive touchscreen here: https://osoyoo.com/picture/3.5hdmi_screen/2024009100/datasheet.pdf
| Item |
Description |
Unit |
| Model |
2024009100 |
/ |
| Touch Panel |
Capacitive Touch |
/ |
| Size |
3.5 |
Inch |
| Viewing Angle |
130 |
Deg |
| Resolution |
480 × 320 |
Pixels |
| Dimensions |
93.44 × 60.00 x 7.00 |
mm |
| Display Area |
73.44 × 48.96 |
mm |
| Color Gamut |
80% |
NTSC |
| Maximum Brightness |
300 |
cd/m² |
| Contrast |
500:1 |
/ |
| Backlight Adjustment |
Button Dimming |
/ |
| Refresh Rate |
60 |
Hz |
| Display Port |
Standard Micro HDMI Port |
/ |
| Touch Port |
5V USB Touch(Type-C) |
/ |
| Power Consumption |
Normal mode: 5V, 200~230mA (max brightness)
Standby mode: 5V, 70~90mA (no signal, standby)
Suspend mode: 5V, 20mA (power switch off) |
/ |
| Operating Temp |
-20~ +70 |
°C |
| Storage Temp |
-30~ +80 |
°C |
| Mounting thread size |
M2.5 |
/ |
| Package Size |
130*90*40 |
mm |
| Weight |
55 |
g |

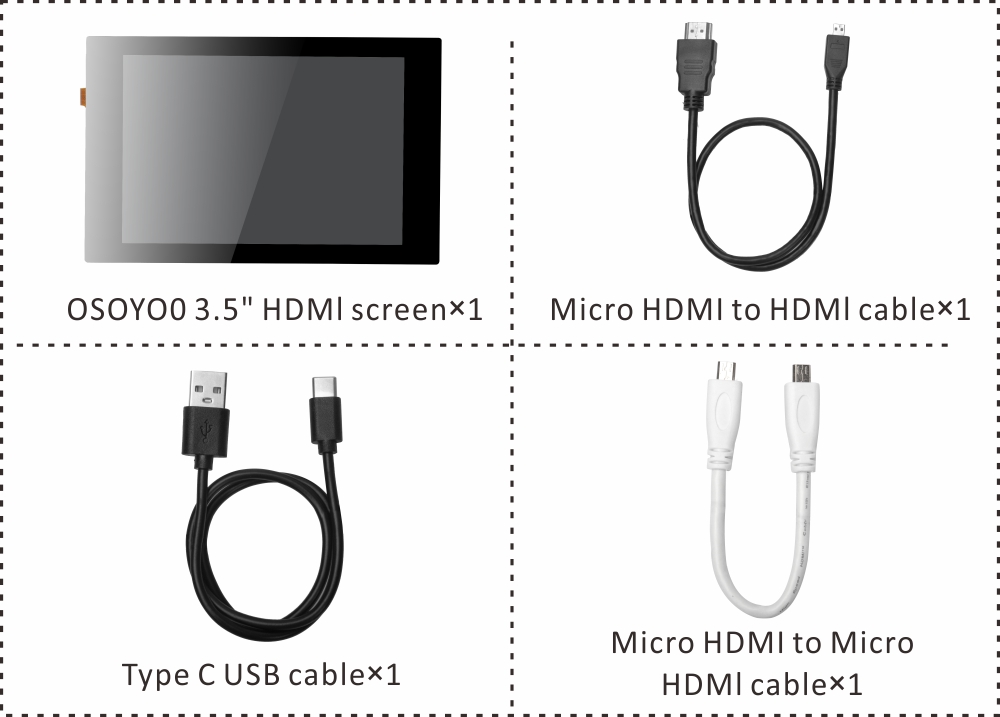
Package List
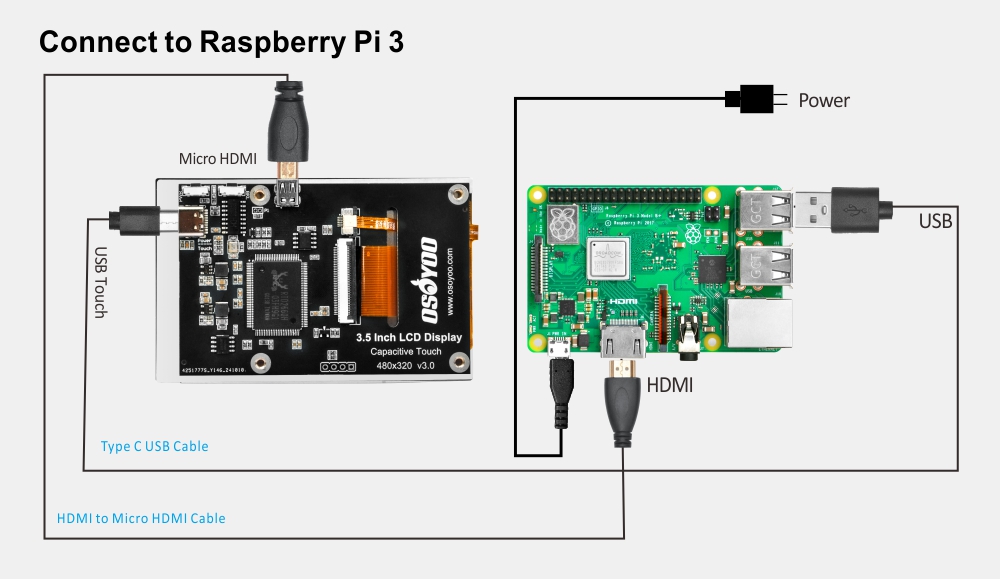
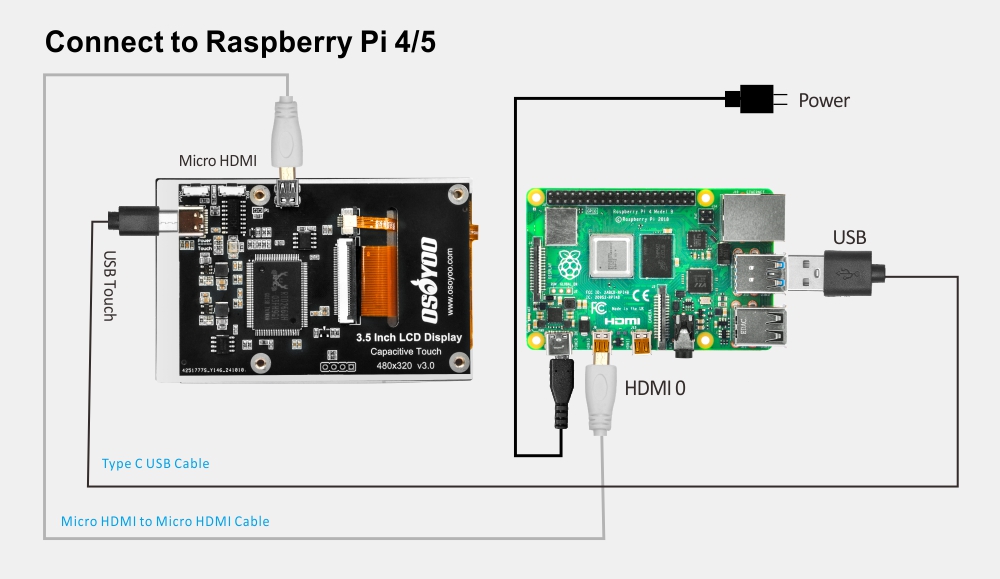
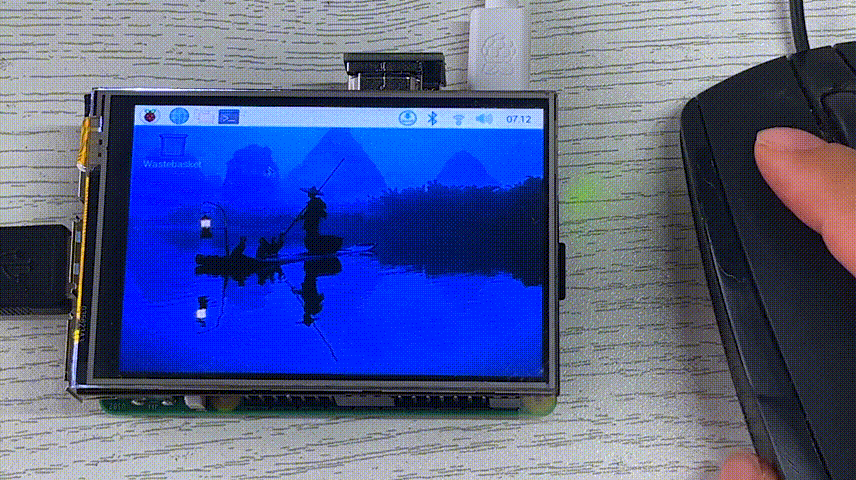
Working with Raspberry Pi
How to Connect
1. Connect the touch port to a USB port on the Raspberry Pi.
2. Connect the HDMI port to the Raspberry Pi’s HDMI port.
3. Burn an OS onto your SD card.
Note:
1. This screen supports Raspberry Pi OS, Ubuntu, Kali, and RetroPie. When the LCD is used with a system such as Raspberry Pi OS, you must set the resolution manually. Otherwise, the display resolution will be wrong and affect your experience.
2. To learn more about how to burn an OS image, please visit: https://osoyoo.com/?p=56660/#1
4. Insert the SD card with an OS that is compatible with your Raspberry Pi board into the Raspberry Pi.
5. Power on your Raspberry Pi board with a suitable power adapter.
Recommended adapter:
- For Raspberry Pi 5: 5V-5A
- For Raspberry Pi 4: 5V-3A
- For Raspberry Pi 3: 5V-2.5A
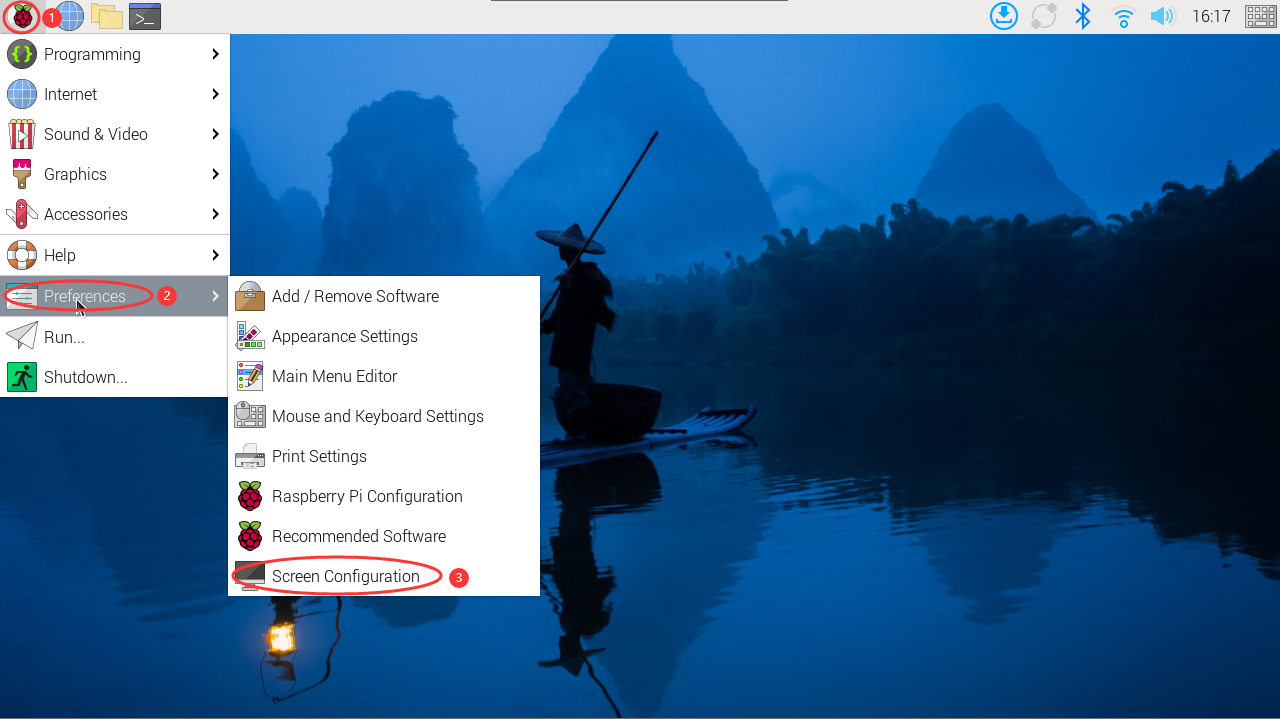
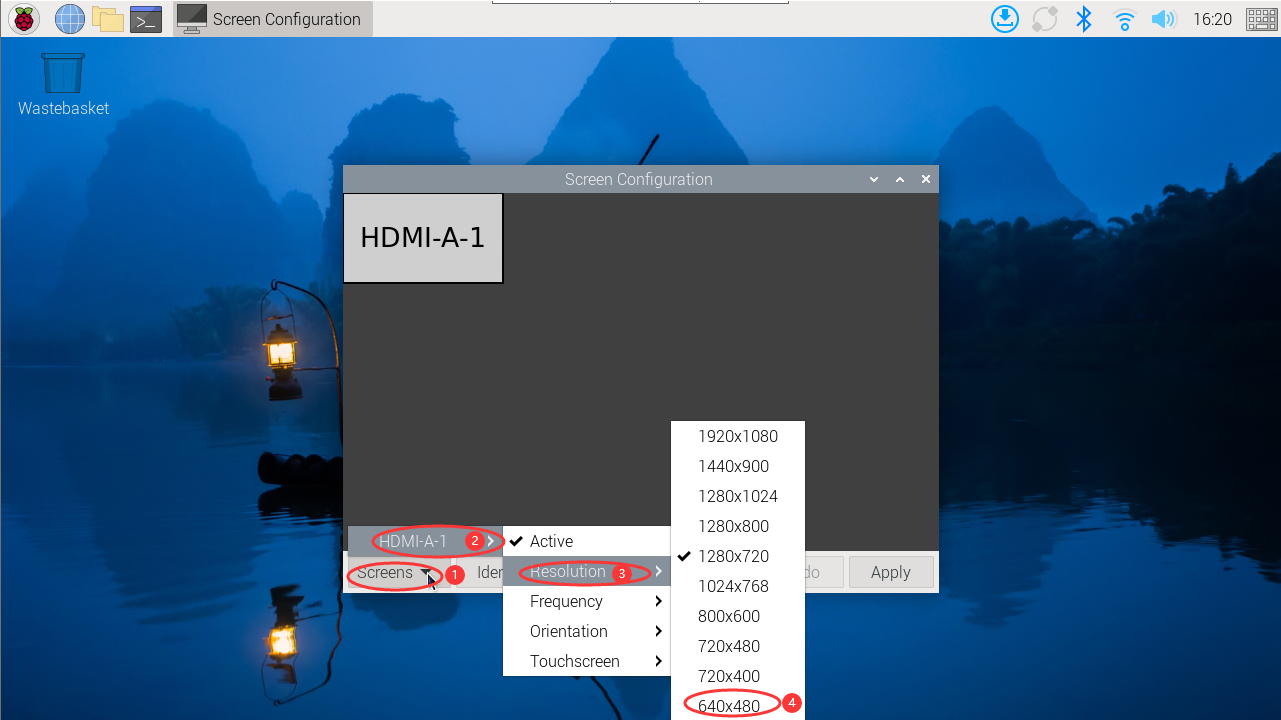
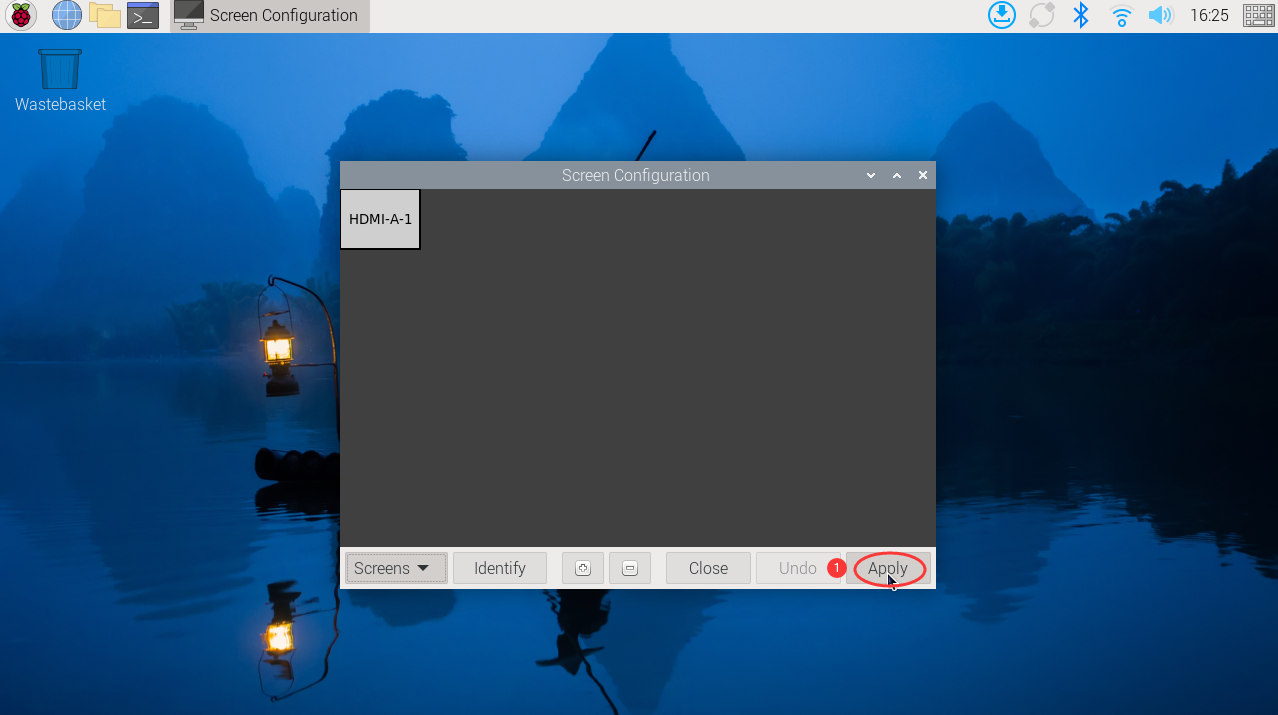
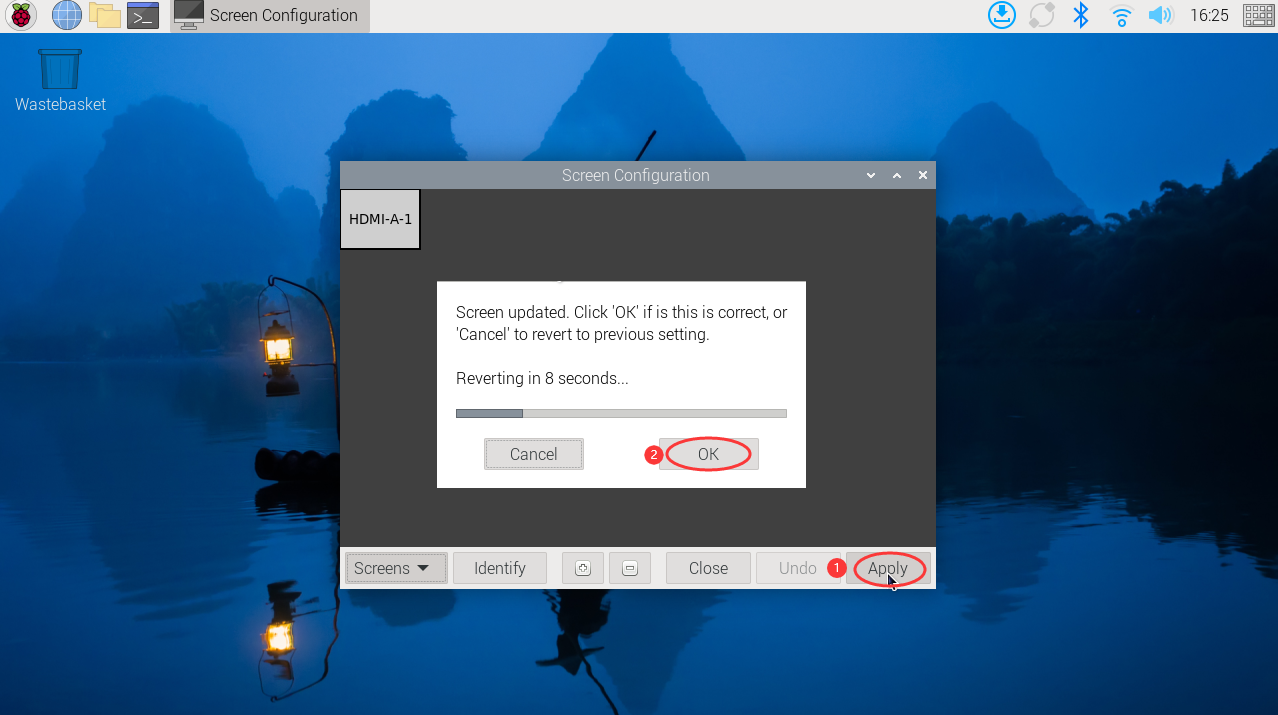
6. Set a suitable resolution before use. Here we use “2024-11-19-raspios-bookworm-arm64-full” as an example. Click the “main menu” icon, go to “Preferences”, then to the “Screen Configuration” submenu. In the window that opens, click “Screens”, select “HDMI-A-1” (choose the correct HDMI screen), then under “Resolution” pick a suitable value (we recommend 640×480). Click “Apply”, then click “OK” within 10 seconds to confirm your resolution.
Your 3.5″ HDMI touch screen is now ready to use.
How to Rotate the Display in Raspberry Pi OS
The easiest way to rotate the display on a Raspberry Pi is through the operating system. Raspberry Pi OS has a dedicated menu command in the desktop environment. Make the right selection here and you can rotate the display clockwise, counterclockwise, or flip it entirely.
1. Rotate the display:
- Open Menu > Preferences
- Select Screen Configuration
- In the new window, right-click the display
- Select Orientation and choose one of the four options
- Click the green check mark to confirm and apply the new orientation
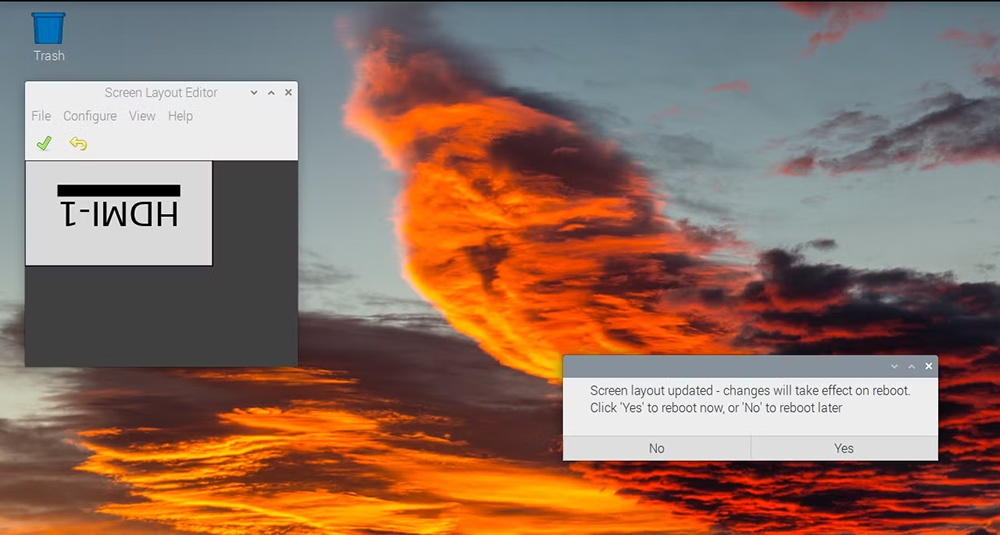
When you apply the change, you’ll be asked to reboot. The screen will have its new orientation after the Pi reboots.
2. Touch calibration
After rotating the display, the touch position is wrong because the touch input doesn’t rotate with the display. So you need to recalibrate the touch.
1. Install libinput.
sudo apt-get install xserver-xorg-input-libinput
Note: If you are using an Ubuntu system or a Jetson Nano, the installation command is:
sudo apt install xserver-xorg-input-synaptics
Use the mouse to control your screen, then click [Preferences] – [Calibrate Touchscreen] from the main menu (or enter DISPLAY=:0.0 xinput_calibrator in the terminal). Tap the four crosshair points in the corners to complete the calibration.
Working with a PC
How to Connect
Supports Windows 11 / 10 / 8.1 / 8 / 7.
1. Connect the touch port of the LCD to a USB port on the PC, and Windows will automatically detect the touch function.
2. Connect the HDMI port of the LCD to the HDMI port of the PC, and Windows will automatically detect the display.
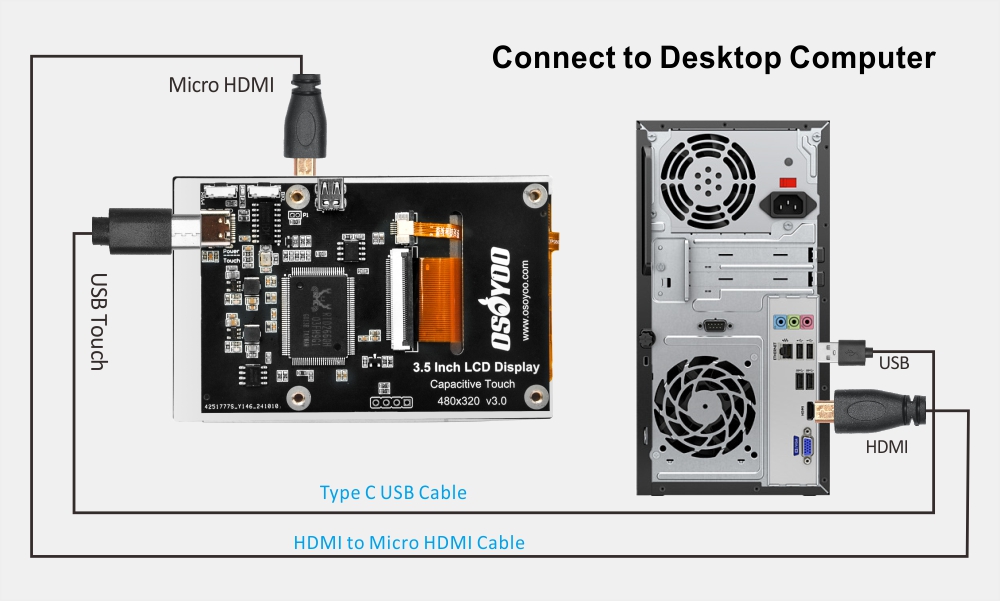
Note:
- Some PCs do not support plug-and-play HDMI devices; they will work normally after you restart the system.
- If the USB port doesn’t supply enough power, the LCD will flicker. We recommend using the host’s USB 3.0 port.
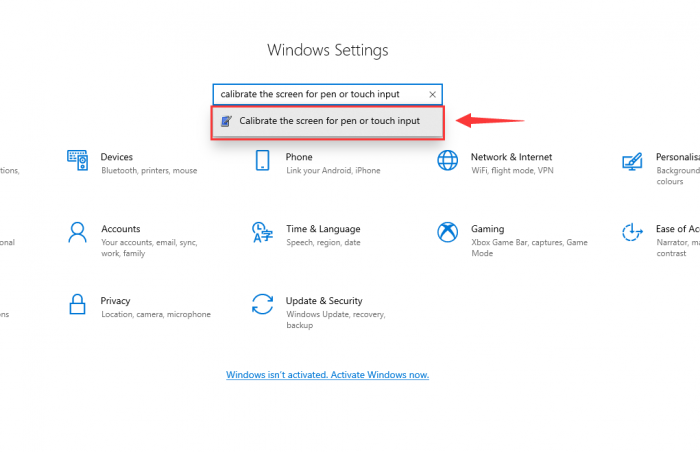
How to Calibrate Touch
Take Windows 10 as an example:
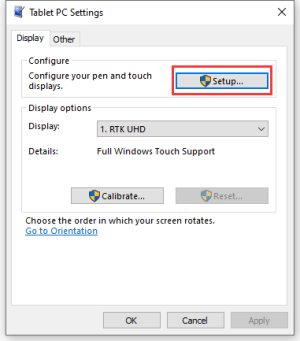
- 1. Open the Windows system settings, type in the search bar, and click “Calibrate the screen for pen or touch input” (as shown in the picture below):
- 2. Click “Setup” in the “Tablet PC Settings” window that pops up:
- 3. The following text prompt will appear on the screen. Tap the touch screen with your finger, and the computer will recognize it as a touch screen.
【Note】If the touch screen is blank, press the “Enter” key and the text prompt will switch to the touch screen. (The screen that displays the text prompt will be used as the touch screen!)


