| Buy from OSOYOO |
Buy from US |
Buy from UK |
Buy from DE |
Buy from IT |
Buy from FR |
Buy from ES |
Buy from JP |
 |
 |
 |
 |
 |
 |
 |
 |
Overview
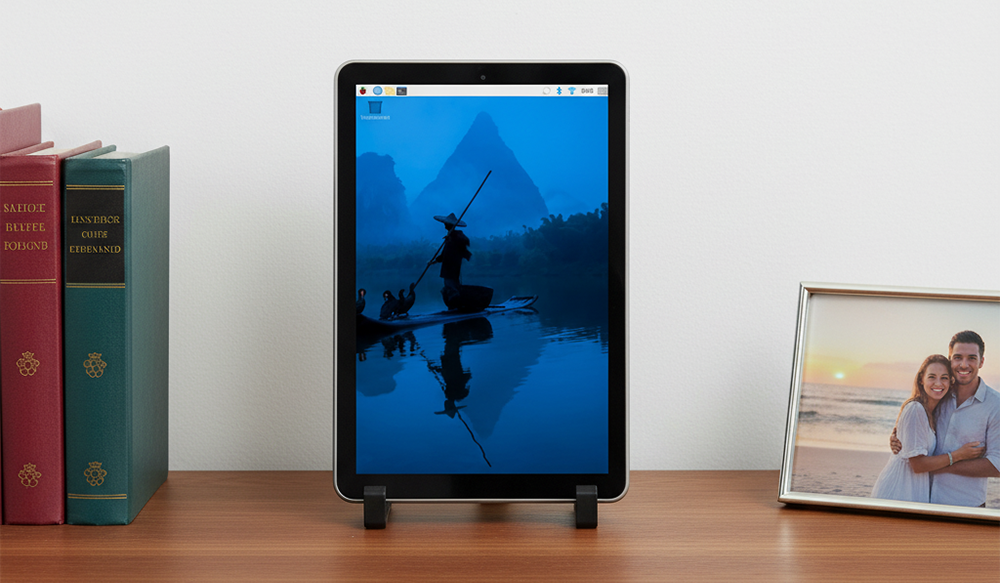
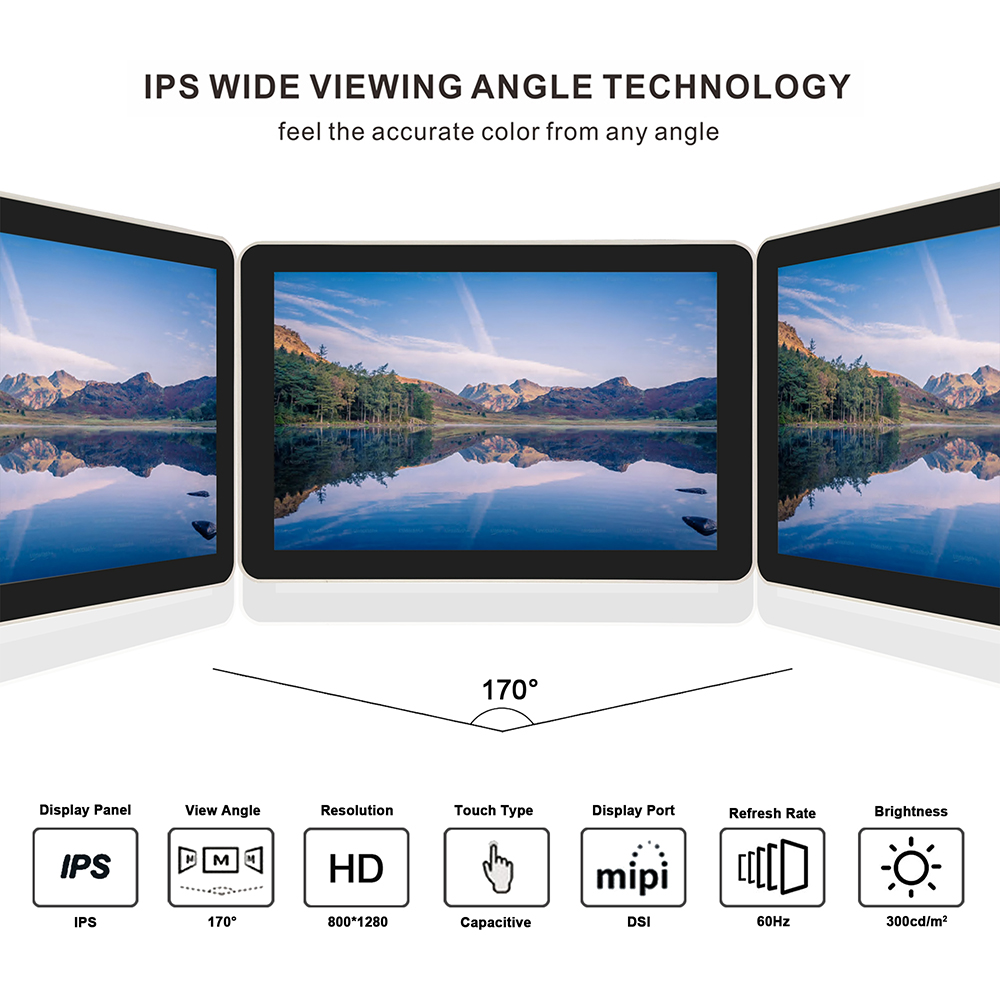
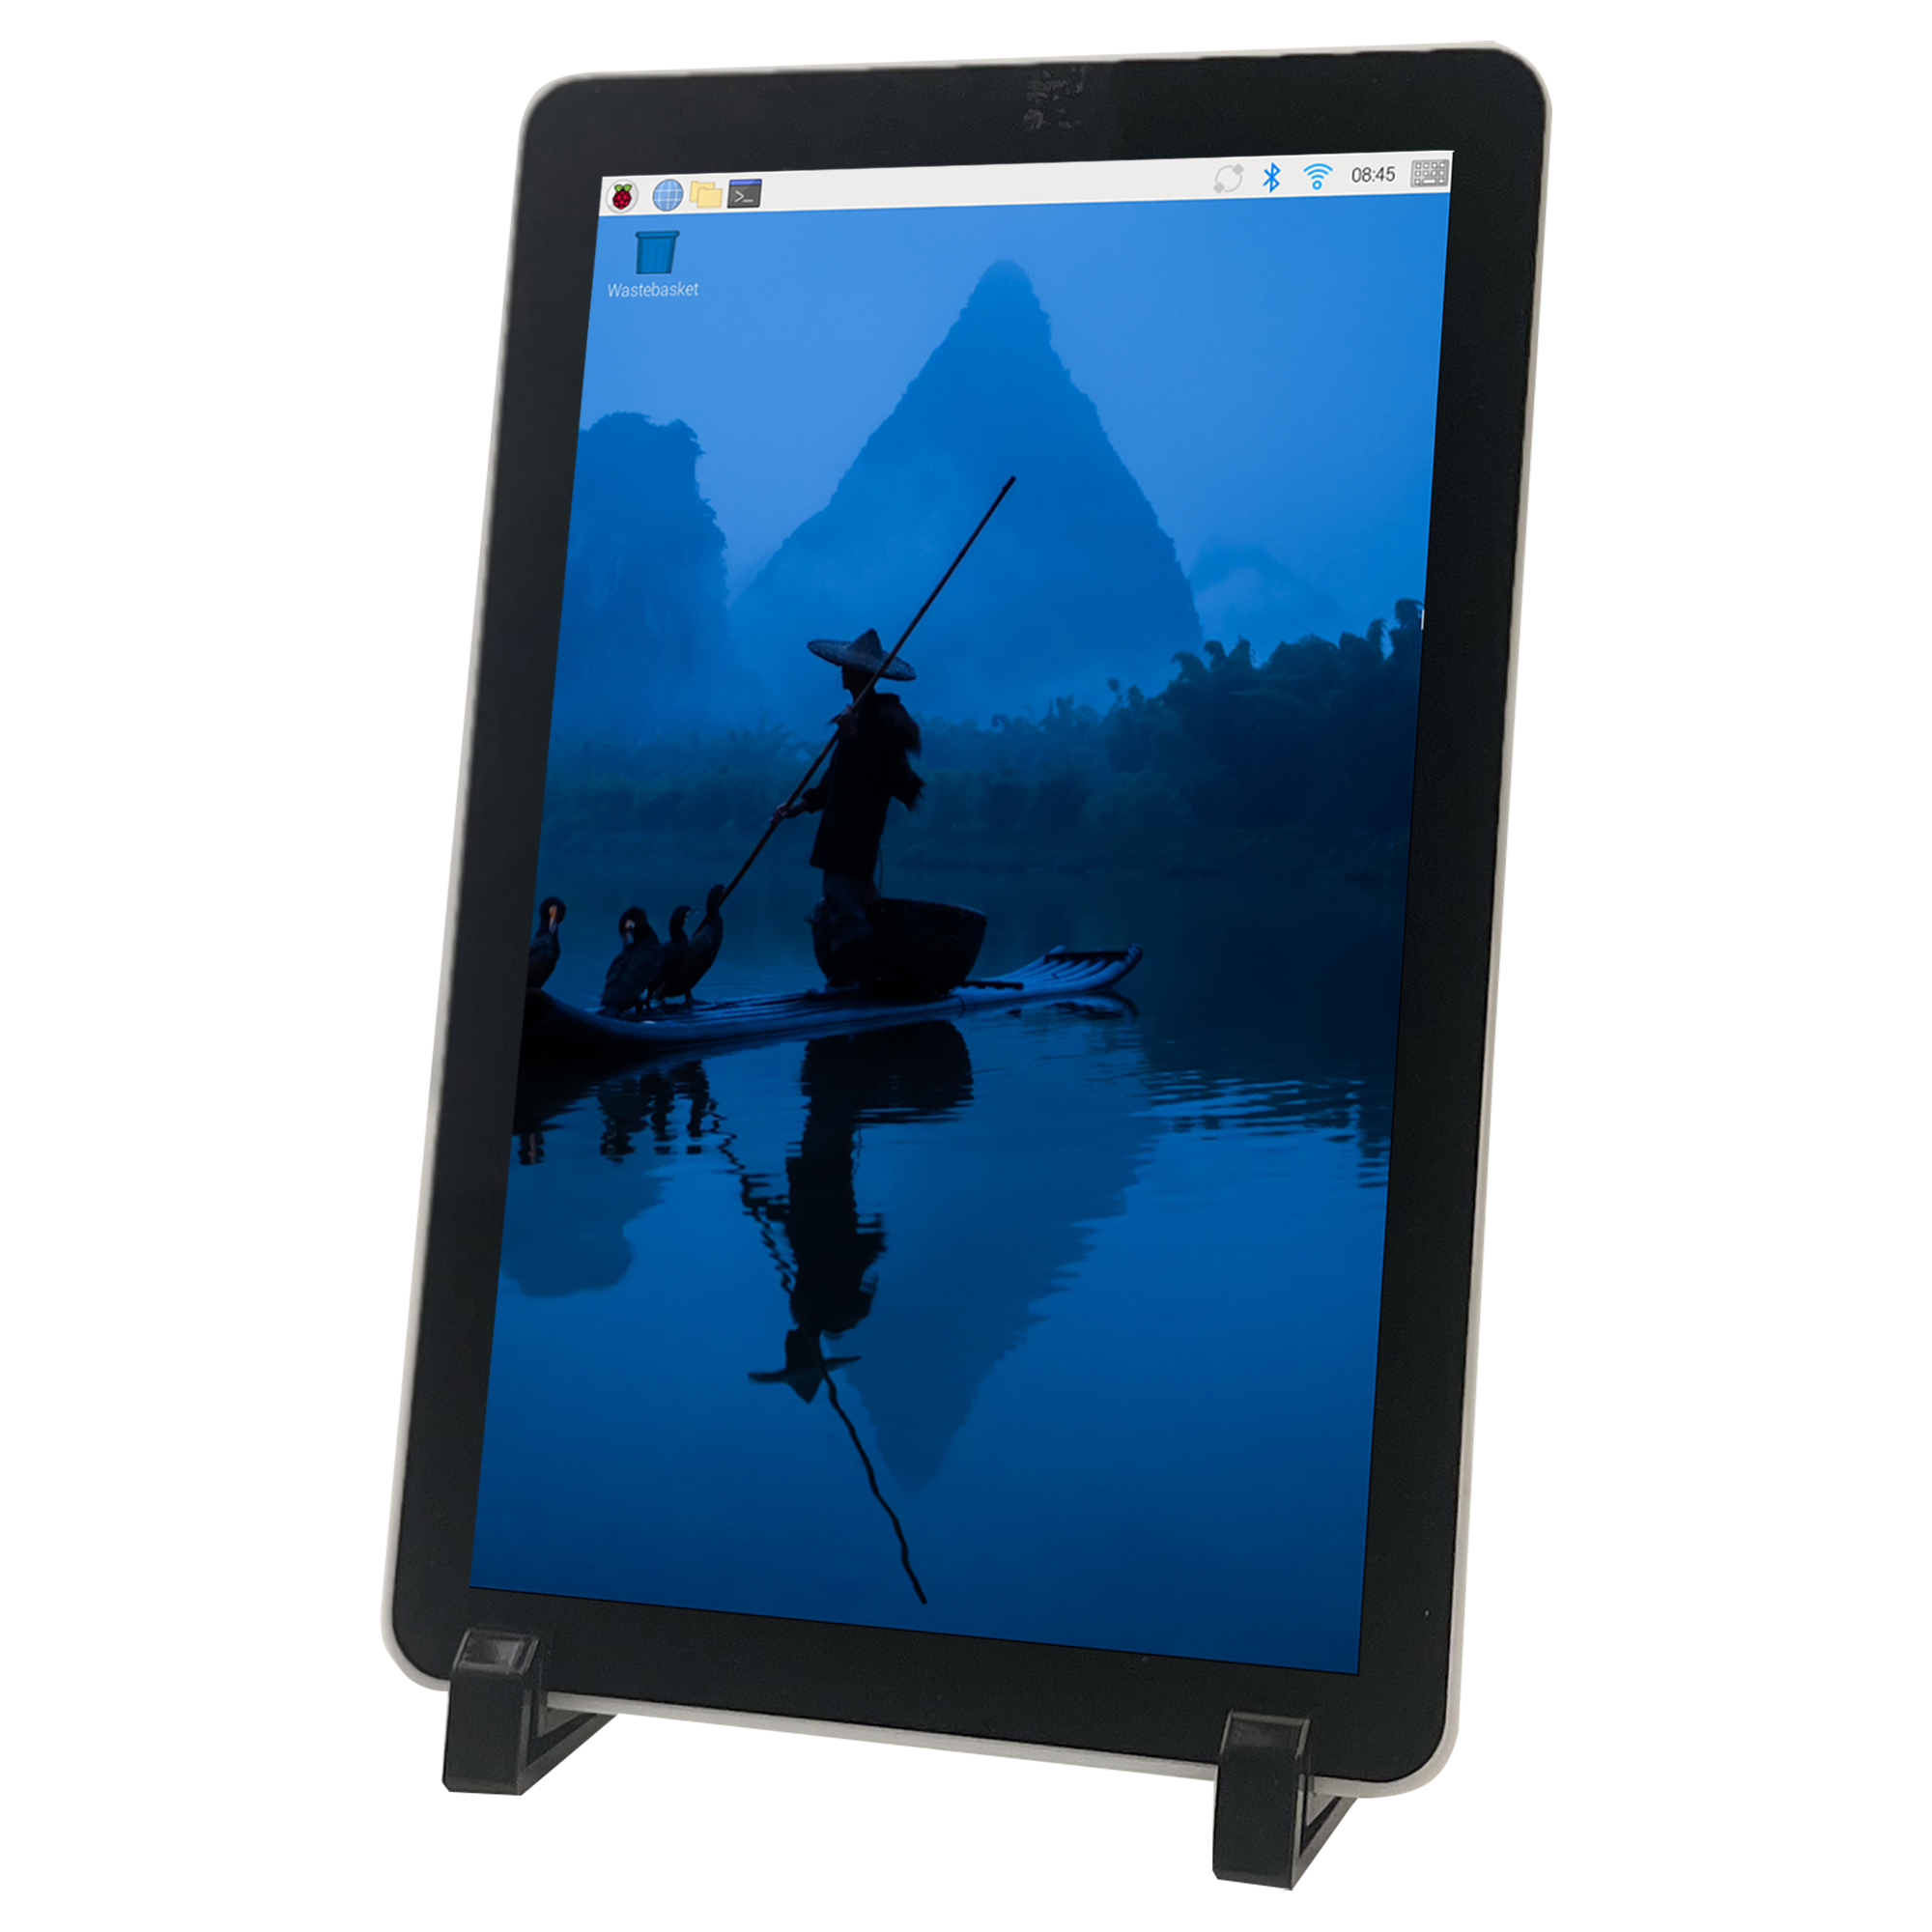
With OSOYOO 10.1″ IPS DSI Touchscreen Display, experience breathtaking visuals on a vibrant 800×1280 IPS screen with an expansive 170° wide viewing angle, ensuring consistent, accurate colors from almost any perspective. Its durable 6H tempered glass panel provides superior scratch resistance and protection for long-lasting clarity. From its native HD portrait resolution perfect for developers, to its compatibility with the latest Bookworm OS, every feature is designed to enhance your workflow. The innovative all-in-one design features a protective back housing and a pair of easy-on, easy-off stands, creating a clean, grab-and-go workstation in seconds.
Whether you’re building a mobile server, a custom tablet, or a compact coding station, this display provides the performance, flexibility, and portability you need to bring your ideas to life.

Features
- 10.1 inch DSI touch screen
- IPS display panel with hardware resolution of 800×1280
- Toughened glass capacitive touch panel, hardness up to 6H
- Support drives the LCD directly via the DSI interface of the Raspberry Pi, and the refresh rate is up to 60Hz.
- Driver needed. Easy driver installation, and only supports the latest Bookworm system (Kernel 6.12 and later versions, Released on 2025-05-13)
- Supports all Raspberry Pi computers with DSI interfaces (Raspberry Pi 5/4/3/2)
- HIGH-SPEED DSI CONNECTION: Experience a flawless, low-latency display with the direct DSI interface. Supporting both 2-lane and 4-lane configurations, it delivers superior performance and lower power consumption compared to HDMI, freeing up your Pi’s HDMI port for other uses.
- ALL-IN-ONE PORTABLE DESIGN: OSOYOO 10.1″ IPS DSI monitor transform your Raspberry Pi into a sleek, portable workstation! Our custom-designed and non-detachable back case securely mounts your Pi (models 2/3/4/5); while the tool-free, detachable stand offers sturdy support anywhere you go. It’s the ultimate solution for a clutter-free, mobile setup.
10.1 IPS screen datasheet:
https://osoyoo.com/picture/10.1DSI/datasheet.pdf
Specifications
| Parameters |
Value |
Unit |
| Input voltage |
5.00 |
V |
| Input current |
0.5 |
A |
| Dot arrangement |
800(H) x3(RGB)x 1280 (V) |
pixels |
| Display mode |
IPS(Normal Black) |
— |
| Viewing Direction |
85/85/85/85 (All) |
° |
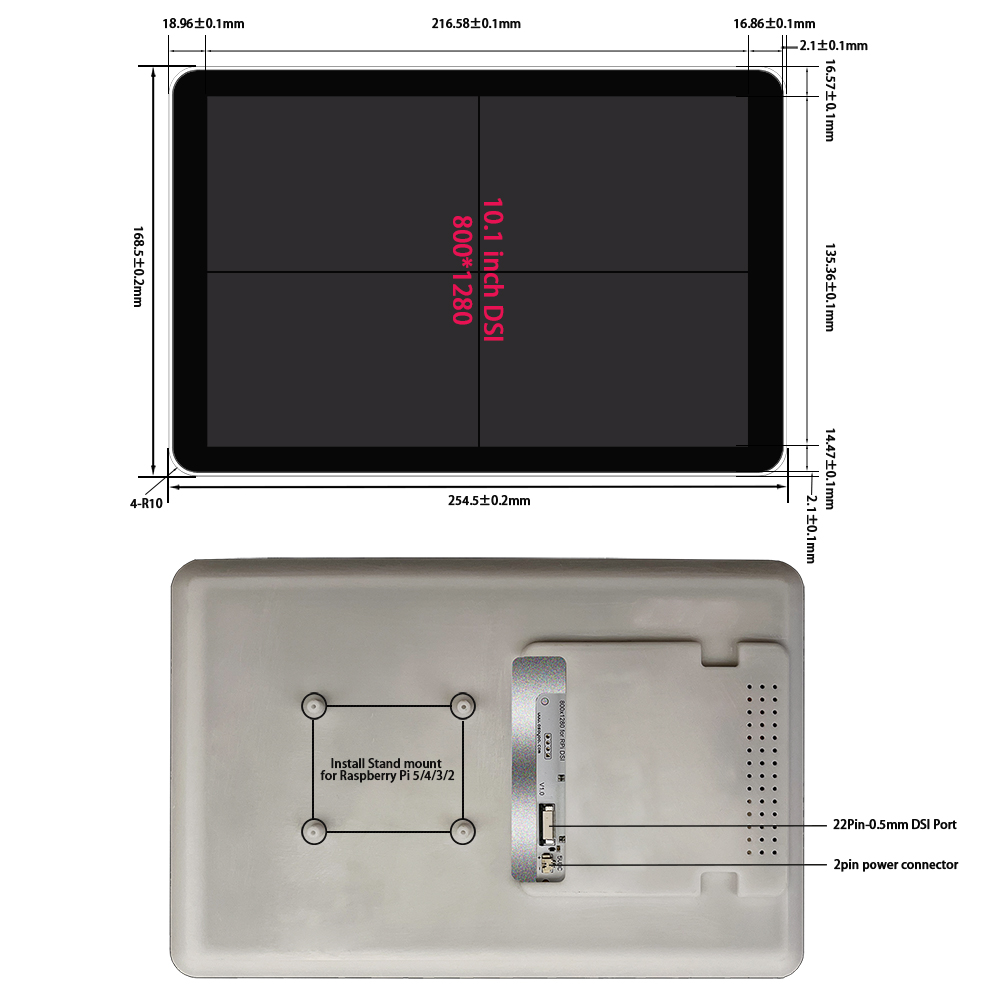
| Module size |
168.5(H) x 254.5(V) x15.5(D) |
mm |
| Active area |
135.36(H) x 216.58 (V) |
mm |
| Interface |
2&4 Lanes MIPI DSI Interface |
— |
| Surface Hardness |
6H |
— |
| Weight |
525 |
g |
| Backlight brightness |
TYP=250 |
nits |
| LCD type |
TFT |
— |
| Panel type |
G+G |
— |
| Operating temperature |
0~50 |
℃ |
| Storage temperature |
-10~70 |
℃ |
Note: Unmarked tolerance: ±0.20
Package includes:
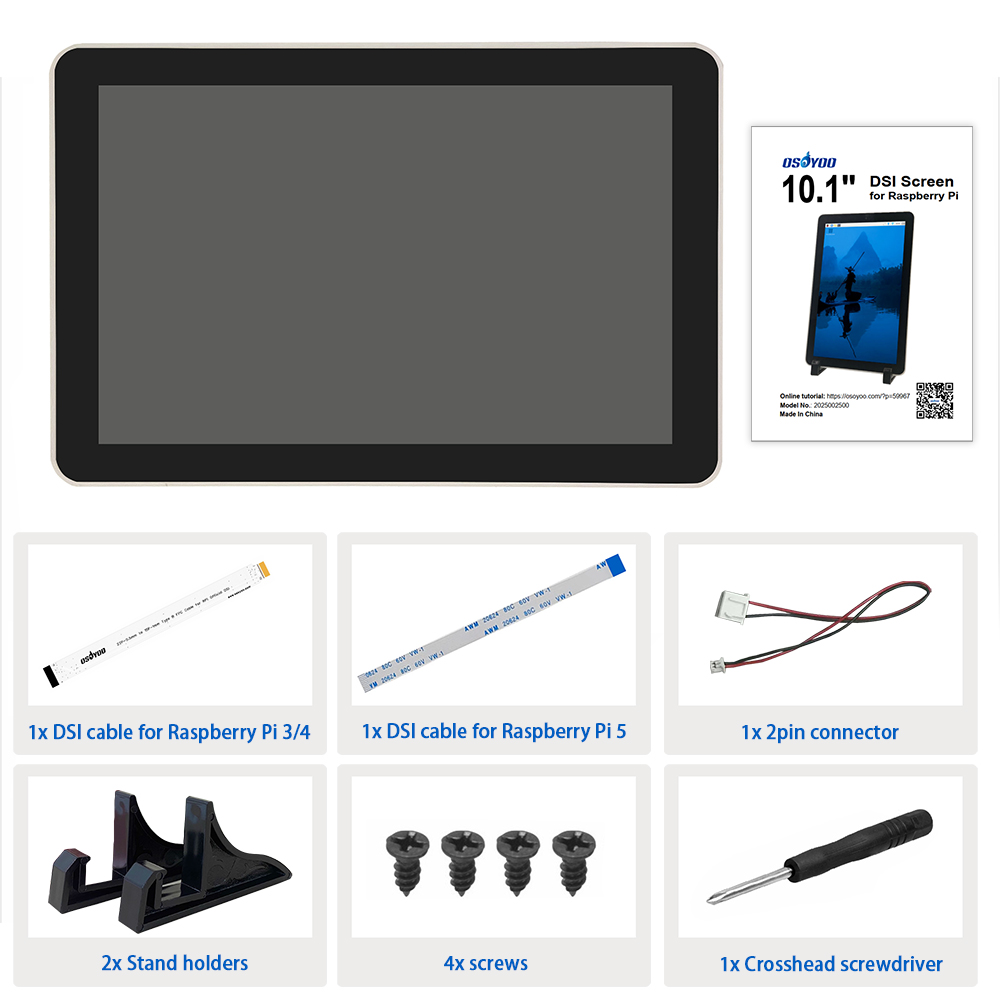
Install
Hardware Connection with Raspberry Pi 5
1. Use the 22pin-0.5mm to 22pin-0.5mm DSI cable (for Pi5) to connect the DSI port of the display to the 22PIN DSI port of the Raspberry Pi motherboard.
2. Use 2pin connector to connect the power connector of the display to the 5V GND pin header of the Raspberry Pi motherboard.
3. Secure the Raspberry Pi to the display with M2.5 screws.
Note: Make sure that the DSI cable is connected in correct direction and 5V power is supplied through the GPIO pins.

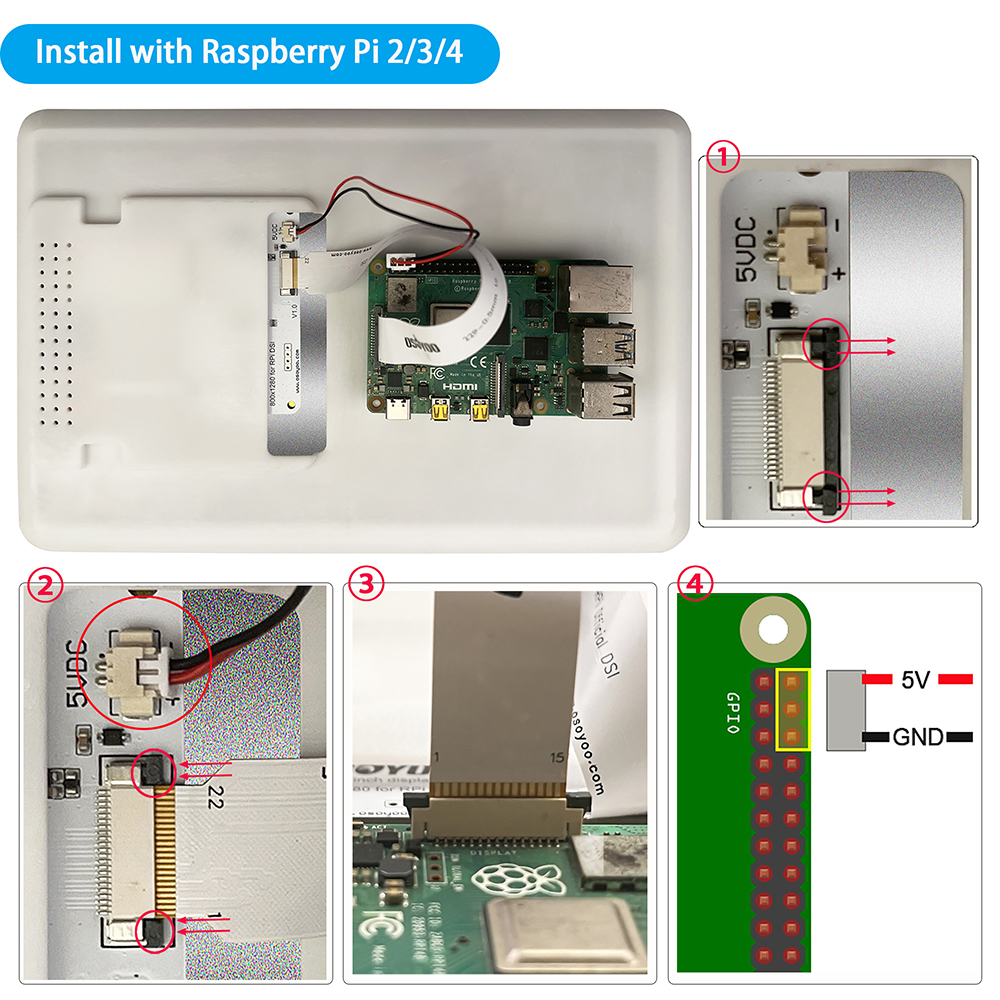
Hardware Connection with Pi4B/3B+/3B/3A+
1. Use the 15pin-1mm to 22pin-0.5mm DSI cable (for Pi3/4) to connect the DSI port of the display to the 15PIN DSI port of the Raspberry Pi motherboard.
2. Use the 2pin connector to connect the power connector of the display to the 5V GND pin header of the Raspberry Pi motherboard.
3. Secure the Raspberry Pi to the display with M2.5 screws.
Note: Make sure that the DSI cable is connected in correct direction and 5V power is supplied through the GPIO pins.
Software Settings
Method 1: Flash the Pre-installed Image (recommended)
Note:
1. This pre-install image is combined touch driver and Raspberry Pi OS with desktop (BOOKWORM version). If you have installed OS image, please don’t following this tutorial.
2. If you want to learn how to install OS image, please follow our tutorial: https://osoyoo.com/?p=60151
Step 1:
# Clone the repository
git clone https://github.com/osoyoo/osoyoo-dsi-panel.git
cd osoyoo-dsi-panel

# Run direct installation script
sudo ./install-direct.sh
The script will:
- Auto-detect your Pi model (Pi 3/4/5)
- Install dependencies
- Build and install the driver using DKMS
- Install device tree overlays
Step 2: configure and reboot
#If you are using Trixie OS, run following command:
sudo nano /boot/firmware/config.txt  #
#If you are using older OS, run following command:
sudo nano /boot/config.txt

#If your screen is 7" DSI screen 720 x 1280 add following line in config.txt
dtoverlay=osoyoo-panel-dsi-7inch
#If your screen is 10.1" DSI screen 720 x 1280 add following line in config.txt
#for Raspberry Pi 5 or CM5
dtoverlay=osoyoo-panel-dsi-10inch,4lane    # for 10.1" panel in dsi0 of Pi 5 or CM5
# for Raspberry Pi 3 or 4
dtoverlay=osoyoo-panel-dsi-10inch   # for 10.1" panel  Pi 3/4 or CM3/4

# Reboot
sudo reboot
Step 3: Insert TF card from step 5 into your raspberry pi. Connect your Raspberry Pi with OSOYOO 10.1inch DSI screen according to the part “Hardware connection” and then power on your Raspberry Pi.
Method 2: Flash Latest Bookworm System Install the Driver Manually
# Clone the repository
git clone https://github.com/osoyoo/osoyoo-dsi-panel.git
cd osoyoo-dsi-panel

# Build the package
./build-on-pi.sh
This creates: ../osoyoo-dsi-panel-dkms_1.0-1_all.deb
Step 2.
sudo dpkg -i ../osoyoo-dsi-panel-dkms_1.0-1_all.deb
sudo apt-get install -f  # if needed
Then configure and reboot as in Method 1.
It will automatically detect the hardware model, kernel version, and install the appropriate driver files, and reboot.
Note
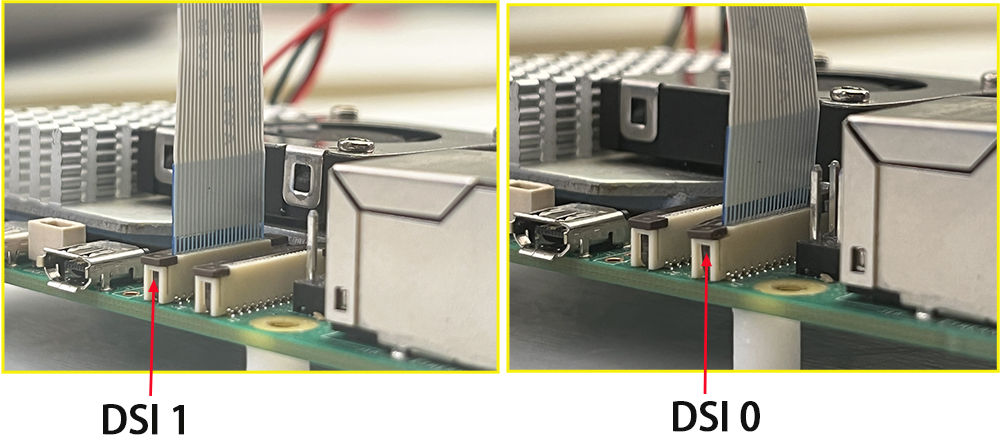
Since Pi5/CM5/CM4/CM3+/CM3 has two mipi DSI interfaces, please note that the correct DSI interfaces and commands are used, DSI1 is recommended by default.
Raspberry Pi5/CM5/CM4/CM3+/CM3 supports mipi dsi 4lanes mode, the 4lanes mode uses lower signal clock, and will reduce the EMI noises, increase the stability. They are recommended to use 4lanes mode.
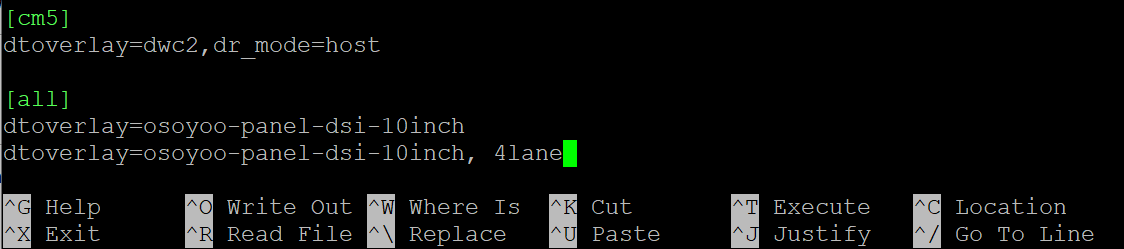
The automatic driver installation uses the 2 Lanes MIPI mode by default. You can change the MIPI channel settings according to the DSI interface you are using by following these steps:
Please open /boot/firmware/config.txt file,
sudo nano /boot/firmware/config.txt
add the following overlay setting to the end of the file:
When using the DSI0 interface
dtoverlay=osoyoo-panel-dsi-10inch, dsi0, 4lane
When using the DSI1 interface
dtoverlay=osoyoo-panel-dsi-10inch, 4lane
Press “Ctrl + X” then “Y”, then enter to save this file, then run the following commend to reboot your Raspberry Pi
sudo reboot
Adjust Rotation
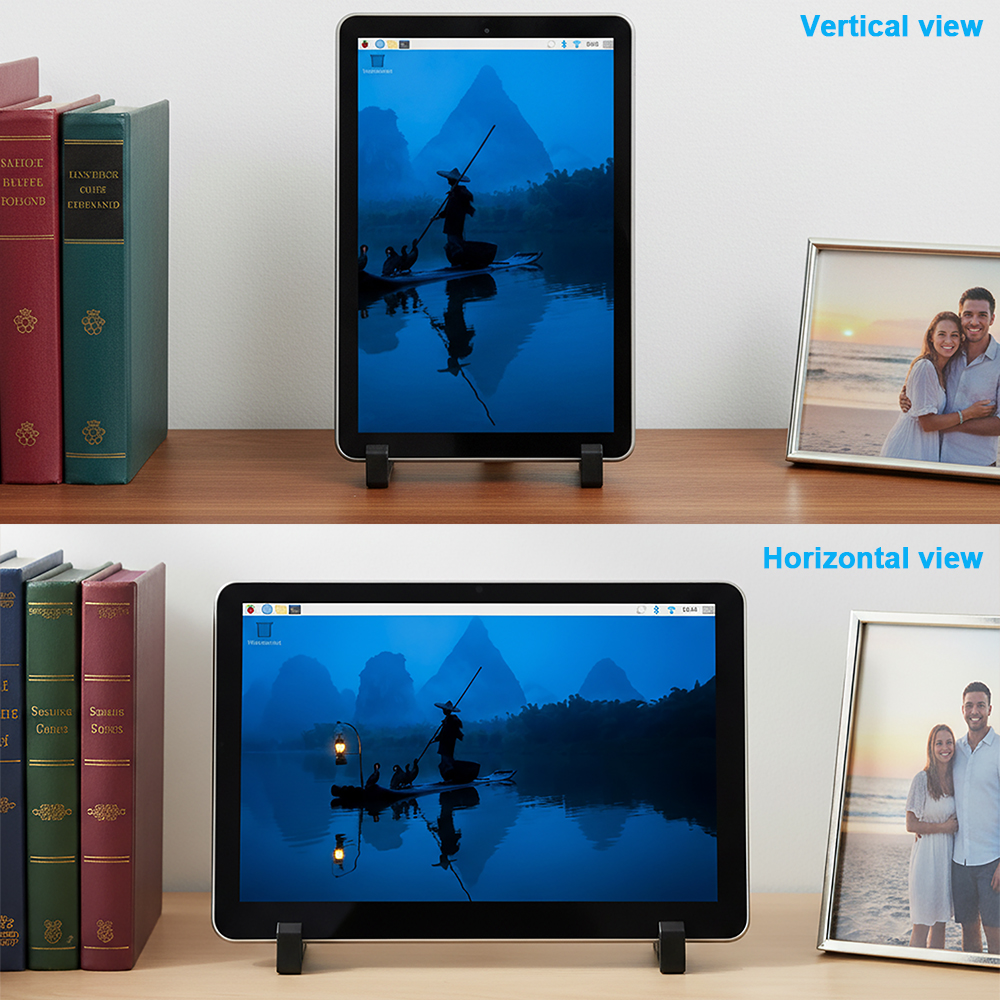
This screen support vertical view and horizontal view. Please follow the steps to change rotation:
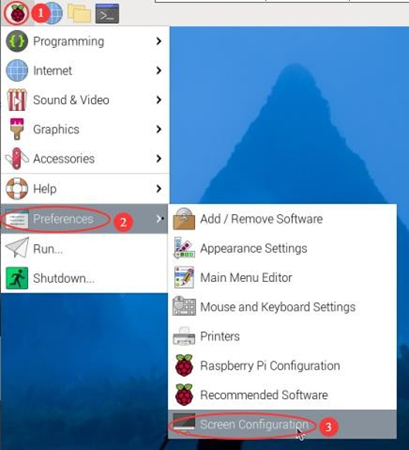
- Click “main menu” icon, then move to “Preferences” then to submenu “Screen Configuration”
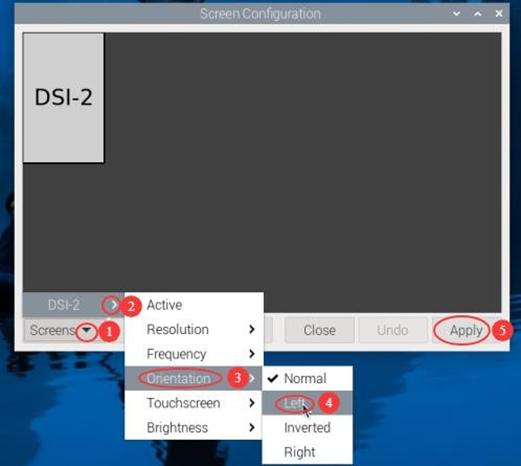
- In the pop window, click “Screens” thenmove to “DSI-2” (It’s different when you connect to different DSI port),then Orientation.Click the direction you need to rotate,and finally click Apply to complete the display and touch synchronous rotation.
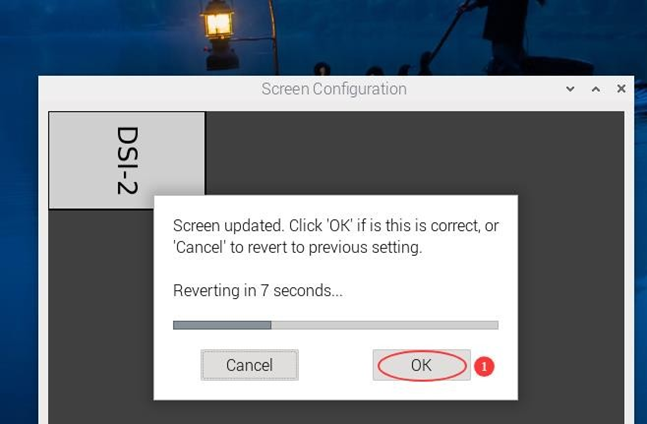
- click “OK” within 10 seconds to confirm your rotation
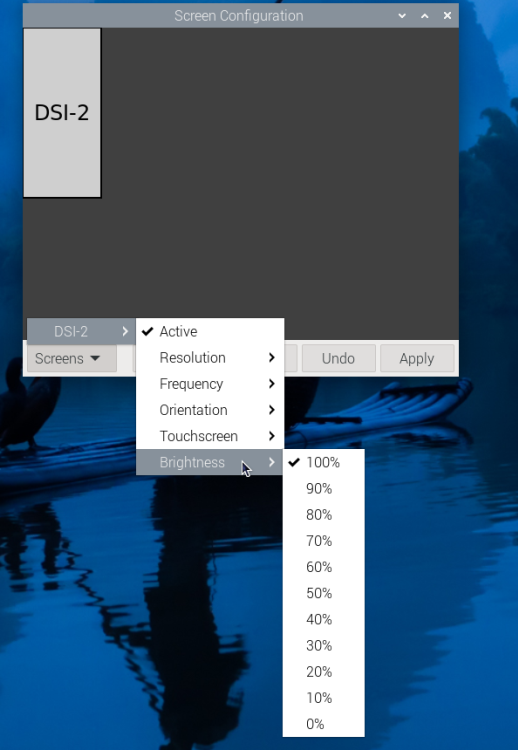
Adjusting Backlight Brightness
- 1. Open the “Screen Configuration” application;
- 2. Go to “Screen” -> “DSI-2” -> “Brightness”, check the backlight brightness you need to set, and finally click “Apply” to complete the backlight setting.
SAFETY INSTRUCTIONS
To avoid malfunction or damage to this product, please observe the following:
• Before connecting the device, shut down your Raspberry Pi computer and disconnect it from external power.
• Input voltages exceeding the maximum or improper operation may cause permanent damage to the device.
• The input current needs to be ≥ 0.5A, otherwise it will cause the startup failure or display abnormality, and staying in an abnormal state for a long time may cause permanent damage to the device.
• If the cable becomes detached, pull the locking mechanism forward on the connector, insert the ribbon cable with the metal contacts facing towards you, then push the locking mechanism back into place.
• This device should be operated in a dry environment at 0–50°C.
• Do not expose it to water or moisture, or place on a conductive surface whilst in operation.
• Do not expose it to excessive heat from any source.
• Care should be taken not to fold or strain the ribbon cable.
• Care should be taken when screwing in parts. A cross-thread can cause irreparable damage and void the warranty.
• Take care whilst handling to avoid mechanical or electrical damage to the printed circuit board and connectors.
• Store in a cool, dry location.
• Avoid rapid changes of temperature, which can cause moisture to build up in the device.
• The display surface is fragile and has the potential to shatter


