| Buy from OSOYOO |
Buy from US |
Buy from UK |
Buy from DE |
Buy from IT |
Buy from FR |
Buy from ES |
Buy from JP |
 |
 |
 |
 |
 |
 |
 |
 |
Hardware Install
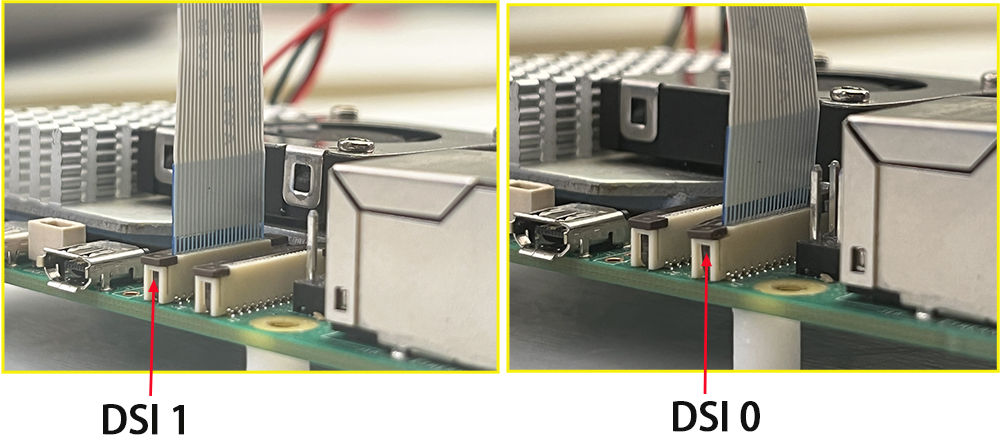
Hardware Connection with Raspberry Pi 5
1. Use the 22-pin 0.5 mm to 22-pin 0.5 mm DSI cable (for Pi 5) to connect the DSI port of the display to the 22-pin DSI1 or DSI0 port of the Raspberry Pi motherboard.
2. Use the 2-pin connector to connect the power connector of the display to the 5V/GND pin header of the Raspberry Pi motherboard.
3. Secure the Raspberry Pi to the display with M2.5 screws.
Note: Make sure the DSI cable is connected in the correct direction and that 5V power is supplied through the GPIO pins.

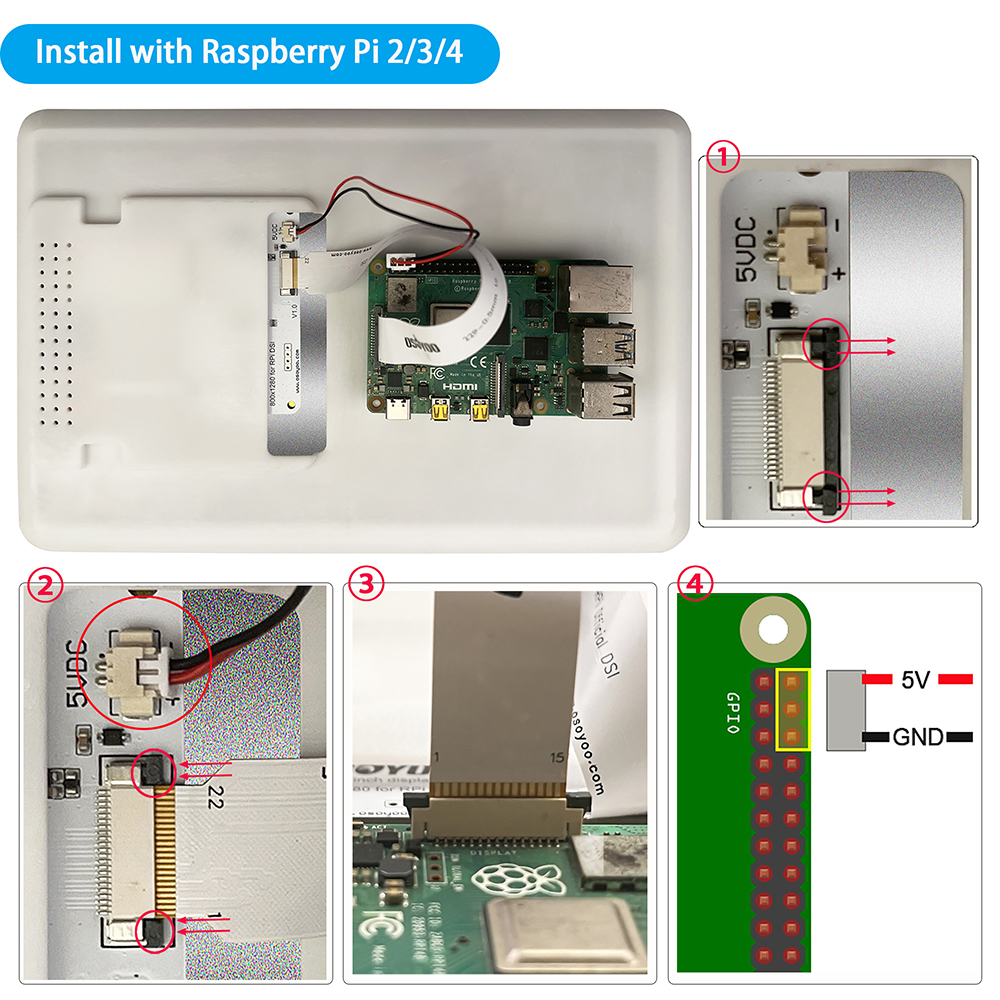
 Hardware Connection with Raspberry Pi 4B/3B+/3B/3A+
1. Use the 15-pin 1 mm to 22-pin 0.5 mm DSI cable (for Pi 3/4) to connect the DSI port of the display to the 15-pin DSI port of the Raspberry Pi motherboard.
2. Use the 2-pin connector to connect the power connector of the display to the 5V/GND pin header of the Raspberry Pi motherboard.
3. Secure the Raspberry Pi to the display with M2.5 screws.
Note: Make sure the DSI cable is connected in the correct direction and that 5V power is supplied through the GPIO pins.
Software Install
Step 1: Flash a TF card with Ubuntu OS. (Download the Ubuntu image from: https://cdimage.ubuntu.com/releases/26.04/release/ubuntu-26.04-preinstalled-desktop-arm64+raspi.img.xz) Connect to Wi-Fi, insert the card into your Raspberry Pi, and then power it on. (Note: We recommend using Raspberry Pi Imager to flash the OS. Please refer to: https://osoyoo.com/?p=60151)
Step 2: Install the driver.
cd ~
sudo apt update
sudo apt install git -y
git clone https://github.com/osoyoo/osoyoo_dsi_ubuntu.git
cd osoyoo_dsi_ubuntu
sudo ./install-direct.sh
The installer will automatically:
- Detect your Ubuntu version and kernel version
- Install dependencies (dkms, device-tree-compiler, kernel headers)
- Patch the driver code for your kernel’s GPIO API (supports kernel 6.8, 6.17, 7.0+)
- Build and install the driver using DKMS
- Copy overlays to the correct Ubuntu paths
Step 3: Configure config.txt. Edit the boot configuration:
sudo nano /boot/firmware/config.txt
Make these changes:
-
Find and change display_auto_detect=1 to:
-
Find dtparam=i2c_arm=on and add after it:
dtparam=i2c_arm_baudrate=100000
-
Add at the end under [all]:
For the 10.1″ panel on DSI1 (most CM5 setups):
dtoverlay=osoyoo-panel-dsi-10inch,dsi1,4lane
For the 10.1″ panel on DSI0:
dtoverlay=osoyoo-panel-dsi-10inch,dsi0,4lane
For the 7″ panel:
dtoverlay=osoyoo-panel-dsi-7inch
Example config.txt:
[all]
arm_64bit=1
kernel=vmlinuz
dtparam=i2c_arm=on
dtparam=i2c_arm_baudrate=100000
disable_overscan=1
dtoverlay=vc4-kms-v3d
display_auto_detect=0

[all]
dtoverlay=osoyoo-panel-dsi-10inch,dsi1,4lane
Save and exit (Ctrl+X, Y, Enter).
Step 4: Reboot.
sudo reboot
After rebooting, your DSI screen should display the Ubuntu desktop.