| Buy from OSOYOO |
Buy from US |
Buy from UK |
Buy from DE |
Buy from IT |
Buy from FR |
Buy from ES |
Buy from JP |
 |
 |
 |
 |
 |
 |
 |
 |
Hardward Install
Hardware Connection with Raspberry Pi 5
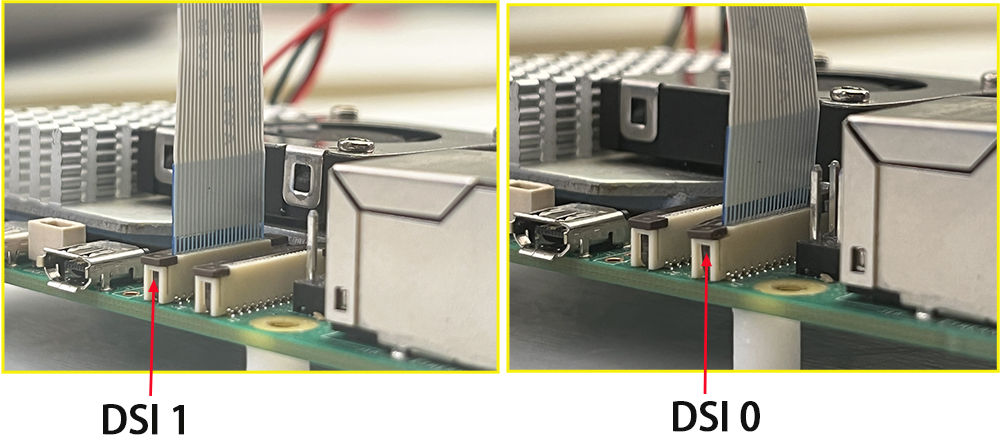
1. Use the 22pin-0.5mm to 22pin-0.5mm DSI cable (for Pi5) to connect the DSI port of the display to the 22PIN DSI1 or DSI0 port of the Raspberry Pi motherboard.
2. Use 2pin connector to connect the power connector of the display to the 5V GND pin header of the Raspberry Pi motherboard.
3. Secure the Raspberry Pi to the display with M2.5 screws.
Note: Make sure that the DSI cable is connected in correct direction and 5V power is supplied through the GPIO pins.

 Hardware Connection with Pi4B/3B+/3B/3A+
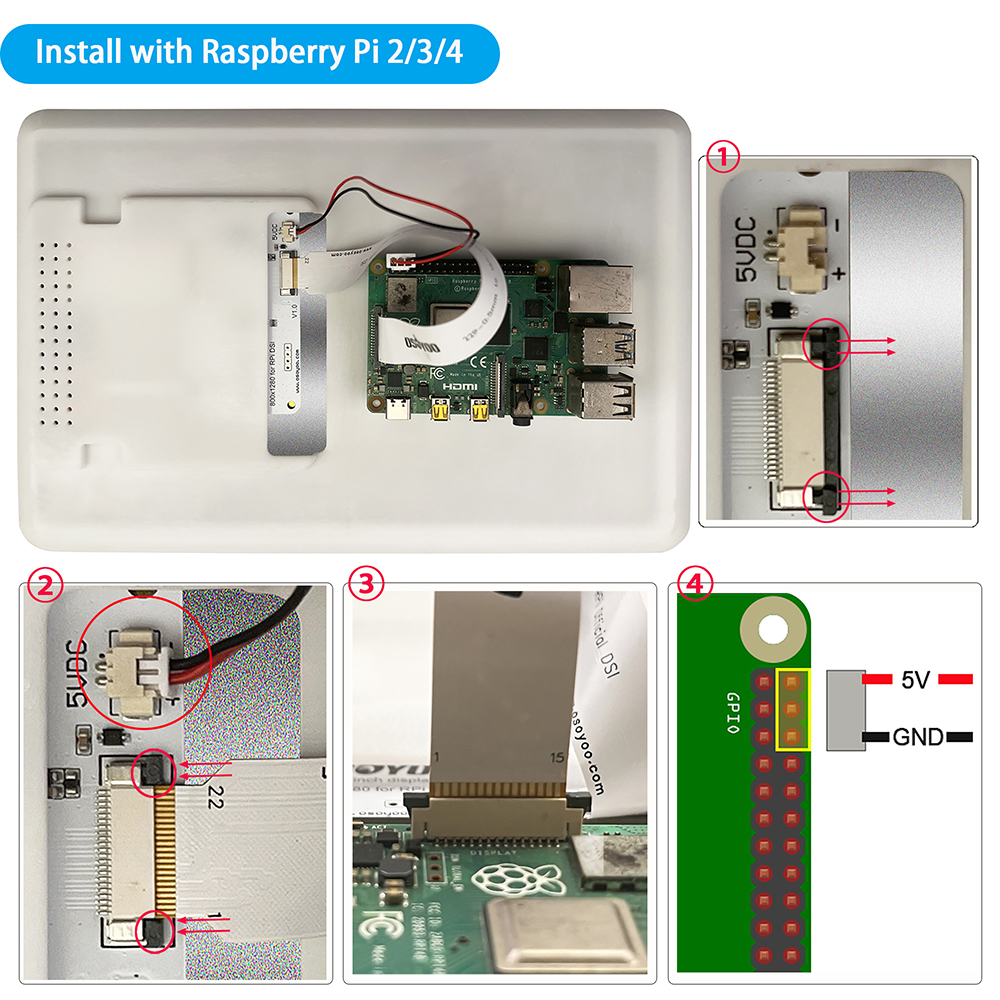
1. Use the 15pin-1mm to 22pin-0.5mm DSI cable (for Pi3/4) to connect the DSI port of the display to the 15PIN DSI port of the Raspberry Pi motherboard.
2. Use the 2pin connector to connect the power connector of the display to the 5V GND pin header of the Raspberry Pi motherboard.
3. Secure the Raspberry Pi to the display with M2.5 screws.
Note: Make sure that the DSI cable is connected in correct direction and 5V power is supplied through the GPIO pins.
Software Settings
Step 1: Prepare a TF card which is installed Ubuntu OS (Note: Please download Ubuntu image from https://cdimage.ubuntu.com/releases/26.04/release/ubuntu-26.04-preinstalled-desktop-arm64+raspi.img.xz) and connect WIFI, and insert it into your raspberry pi, and then power on your Raspberry Pi.(Note: Recommend using Raspberry Pi imager to burn OS , please refer to: https://osoyoo.com/?p=60151)
Step 2: Install the Driver
cd ~
sudo apt update
sudo apt install git -y
git clone https://github.com/osoyoo/osoyoo_dsi_ubuntu.git
cd osoyoo_dsi_ubuntu
sudo ./install-direct.sh
The installer will automatically:
- Detect your Ubuntu version and kernel version
- Install dependencies (dkms, device-tree-compiler, kernel headers)
- Patch driver code for your kernel’s GPIO API (supports kernel 6.8, 6.17, 7.0+)
- Build and install the driver using DKMS
- Copy overlays to the correct Ubuntu paths
Step 3: Configure config.txt, Edit the boot configuration:
sudo nano /boot/firmware/config.txt
Make these changes:
-
Find and change display_auto_detect=1 to:
-
Find dtparam=i2c_arm=on and add after it:
dtparam=i2c_arm_baudrate=100000
-
Add at the end under [all]:
For 10.1″ panel on DSI1 (most CM5 setups):
dtoverlay=osoyoo-panel-dsi-10inch,dsi1,4lane
For 10.1″ panel on DSI0:
dtoverlay=osoyoo-panel-dsi-10inch,dsi0,4lane
For 7″ panel:
dtoverlay=osoyoo-panel-dsi-7inch
Example config.txt:
[all]
arm_64bit=1
kernel=vmlinuz
dtparam=i2c_arm=on
dtparam=i2c_arm_baudrate=100000
disable_overscan=1
dtoverlay=vc4-kms-v3d
display_auto_detect=0

[all]
dtoverlay=osoyoo-panel-dsi-10inch,dsi1,4lane
Save and exit (Ctrl+X, Y, Enter).
Step 4: Reboot.
sudo reboot
After reboot, your DSI screen should display the Ubuntu desktop