


I. Objectif
II.Pièces et Appareils
III.Installation Matérielle
IV. Installation Logicielle
V. Comment Utiliser
VI. Dépannage

| Buy from US |
Buy from UK |
Buy from DE |
Buy from IT |
Buy from FR |
Buy from ES |
ここでご購入を! |
 |
 |
 |
 |
 |
 |
 |

Dans cette leçon, nous réaliserons un projet de conduite autonome avec évitement d’obstacles. Nous utilisons un module ultrasonique pour “voir” l’obstacle, et la voiture s’en écartera automatiquement.
Vous devez terminer la Leçon 1 avant de continuer avec cette leçon.

Composants :
Châssis de voiture robotique à roues Mecanum OSOYOO x1
Roues et moteurs OSOYOO x4 (roues gauche x2 / roues droite x2)
Carte Raspberry Pi 4/5 (non incluse dans le kit)
Shield OSOYOO PWM HAT x1
Carte de contrôle OSOYOO Model Y x1
Voltmètre OSOYOO x1
Servomoteur MG90 OSOYOO x1
Module capteur ultrasonique OSOYOO x1
Support de montage OSOYOO x1
Boîtier à piles OSOYOO x1
Câble jumper femelle-femelle 3 broches OSOYOO x1
Câbles jumper femelle-femelle 6 broches OSOYOO x2
Câble jumper femelle-femelle 10 broches OSOYOO x1
Câble XH2.54 femelle-femelle 2 broches OSOYOO x1
Piles 18650 (3,7 V) x2
Chargeur de piles x1

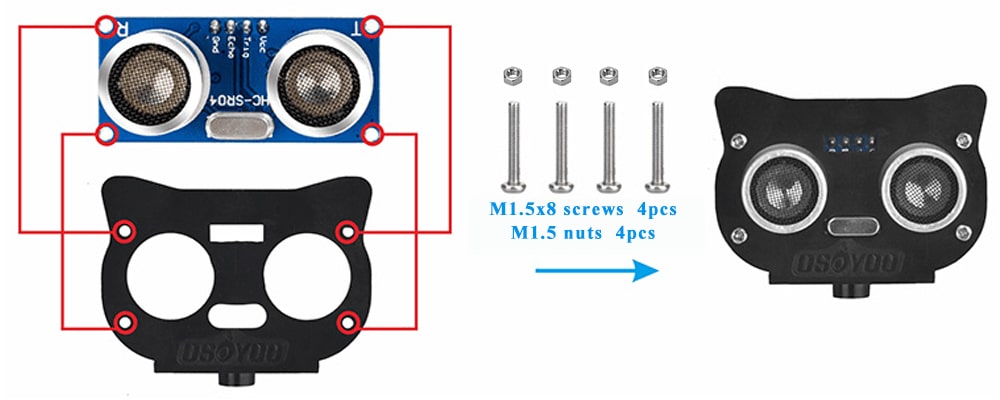
Étape 1. Montez le module ultrasonique sur le support à l’aide de quatre vis M1,5 × 8 mm et de quatre écrous M1,5.
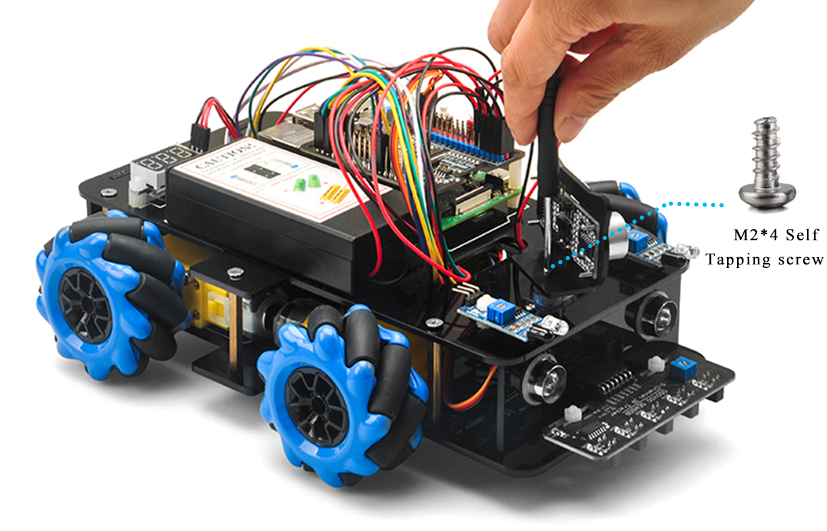
Étape 2. Installez le support pour le module ultrasonique sur le servomoteur SG90 avec des vis autotaraudeuses M2*4 ou les vis du kit de vis du servomoteur SG90.
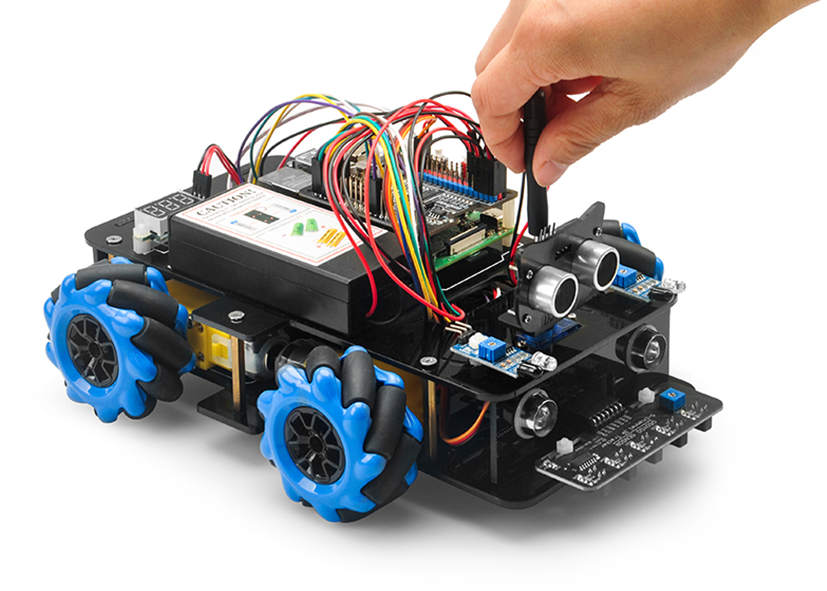
Étape 3. Conservez toutes les connexions de la Leçon 1 telles quelles.
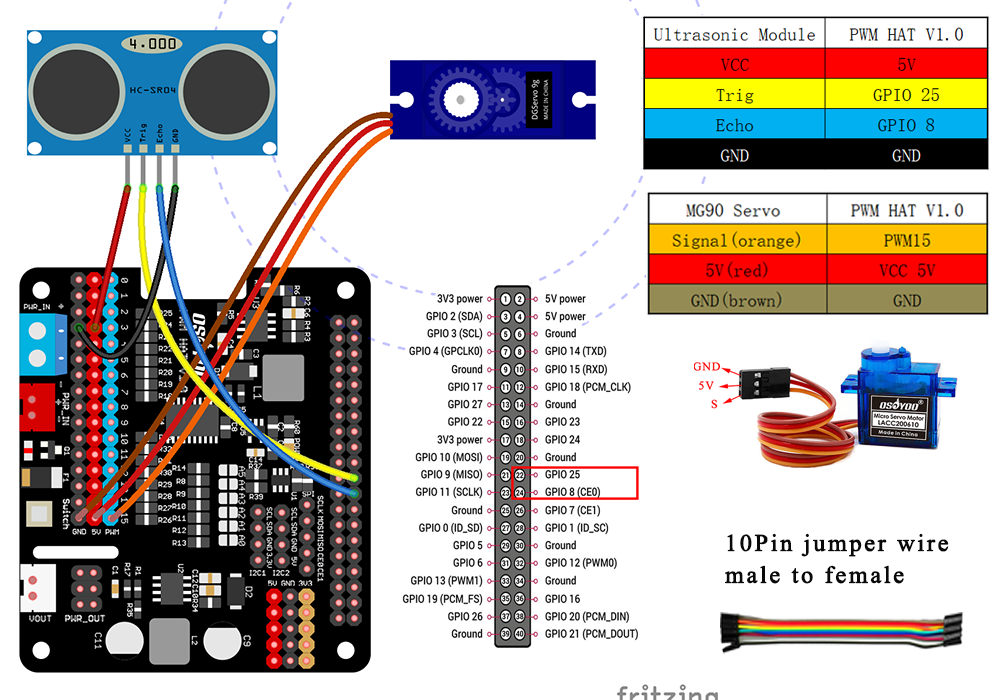
Connectez le servomoteur SG90 et le module ultrasonique au shield OSOYOO PWM HAT comme suit.
Remarque : Vous devez séparer 4 câbles jumper femelle-femelle de notre faisceau de 10 câbles. N’importe quelle couleur du faisceau convient. Les câbles restants servent de pièces de rechange en cas de câbles cassés ou endommagés..

Connectez le Raspberry Pi 4 via un câble USB-C à l’ordinateur. Ouvrez PuTTY et saisissez l’adresse IP (ou le Nom d’hôte “pi”) et 22 sous Port (par défaut 22), puis cliquez sur Ouvrir.
Utilisez l’outil SSH pour contrôler le Raspberry Pi à distance sur un autre PC avec système d’exploitation. Exécutez le Code Exemple avec la commande suivante :
wget https://osoyoo.com/driver/mecanum/mecanum_oa5.py
python mecanum_oa5.py
Alignement Initial du Servo du Capteur Ultrasonique
Le servo effectuera quelques mouvements et s’arrêtera finalement en direction frontale pendant 3 secondes.
Si le capteur ultrasonique n’est pas orienté vers l’avant pendant ces 3 premières secondes, éteignez immédiatement la batterie et retirez le capteur du servo. Réinstallez-le en l’orientant droit vers l’avant comme sur l’image suivante. Sinon, le programme d’évitement d’obstacles ne fonctionnera pas correctement.
Après réglage de la direction du capteur, rallumez la batterie. Le capteur doit être orienté vers l’avant comme sur l’image suivante. Si la direction n’est pas droit devant, éteignez la batterie et répétez l’alignement.
Test Final :
Après avoir allumé l’interrupteur de la batterie, si le module ultrasonique tourne en position frontale, cela signifie que vous n’avez plus besoin d’ajuster la position du capteur. Attendez simplement 3 secondes. Si aucun obstacle n’est détecté, la voiture avancera. Si des obstacles sont détectés, la voiture s’arrêtera et le module ultrasonique tournera de droite à gauche pour détecter les obstacles environnants. Le robot décidera de tourner à gauche, à droite ou de reculer en fonction des données du capteur et de notre algorithme d’évitement d’obstacles.
Parfois, une collision peut déplacer la position du capteur ultrasonique. Dans ce cas, n’oubliez pas de réaligner la direction du capteur comme indiqué dans la section “Alignement Initial du Servo du Capteur Ultrasonique”.

Pour exécuter le code exemple à distance via SSH, utilisez la commande :
python mecanum_oa5.py


