| Buy from US |
Buy from UK |
Buy from DE |
Buy from IT |
Buy from FR |
Buy from ES |
Buy from JP |
 |
 |
 |
 |
 |
 |
 |

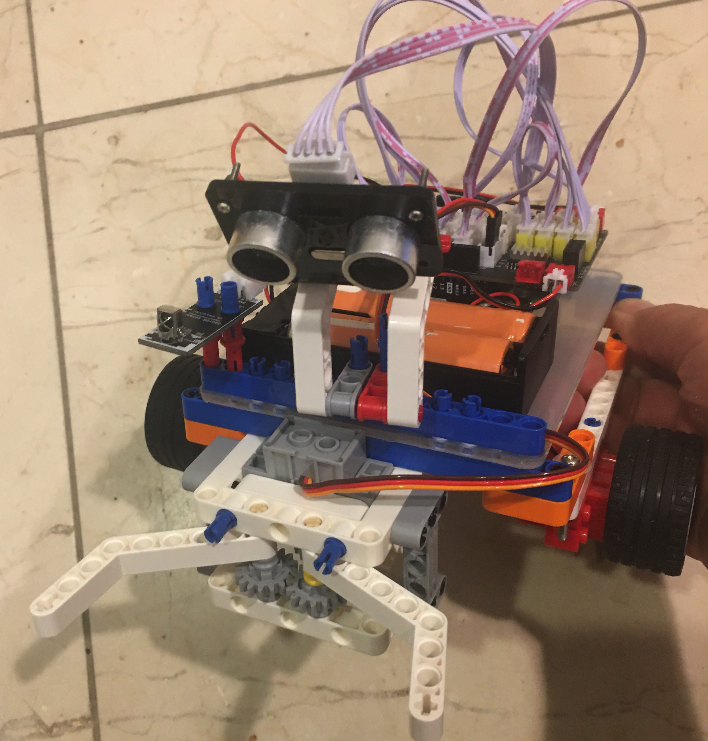
In this project, we will make a smart robot finger and use it to transfer a pingpong ball to another place. We will use obstacle sensor(ultrasonic distance detector) to detect the coming ball. When a ball is detected, the finger will pickup the ball and the car will drop it to another place, then the car will go back to original place to wait for another ball.
- OSOYOO Magic I/O Shield V2.0
- OSOYOO Basic Board(Fully compatible with Arduino UNO )
- OSOYOO building blocks
- OSOYOO Ultrasonic Sensor Module
- OSOYOO 3-Pin PNP Cable 20cm
- OSOYOO 4-Pin PNP Cable 20cm
- OSOYOO Servo Motor
- Wheels
- Motor
- USB Cable
- PC

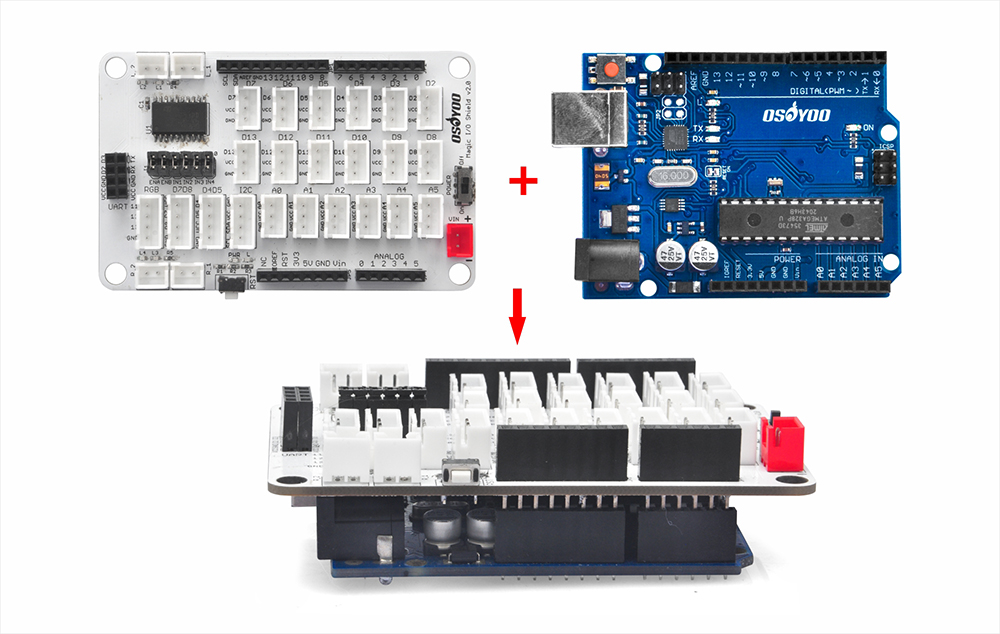
Before you build an elevator with blocks, please install OSOYOO basic board for Arduino under OSOYOO Magic I/O shield as following (Attention please : the pins of I/O shield is aligned with the port of basic the board firstly, then press the shield tightly on the board).
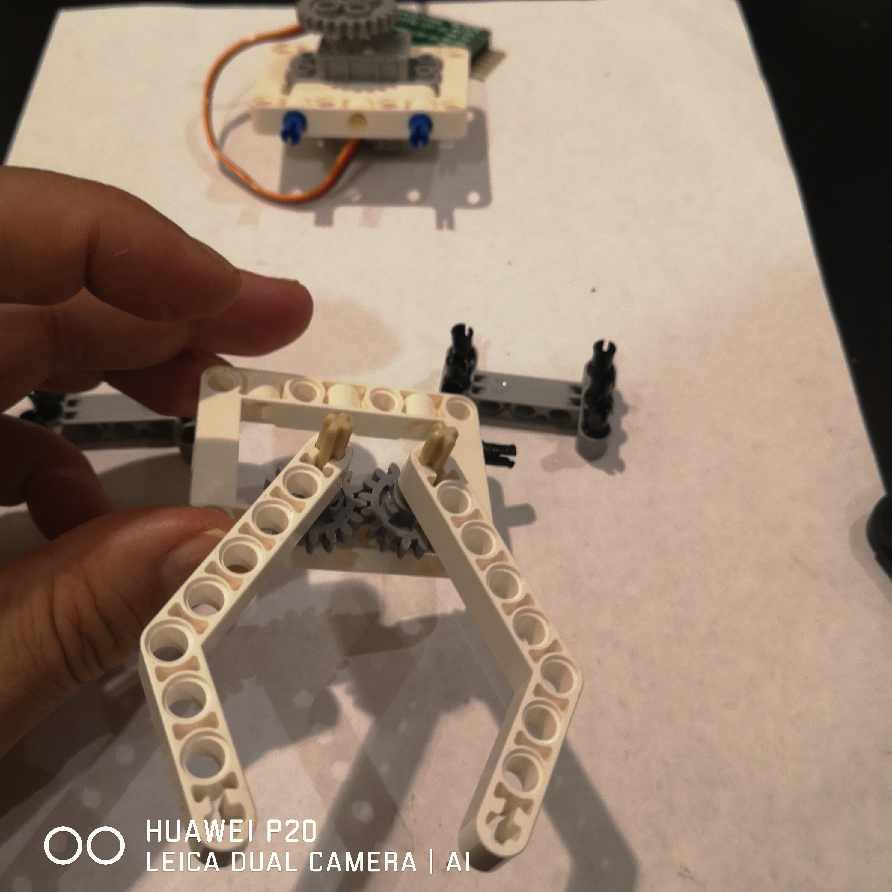
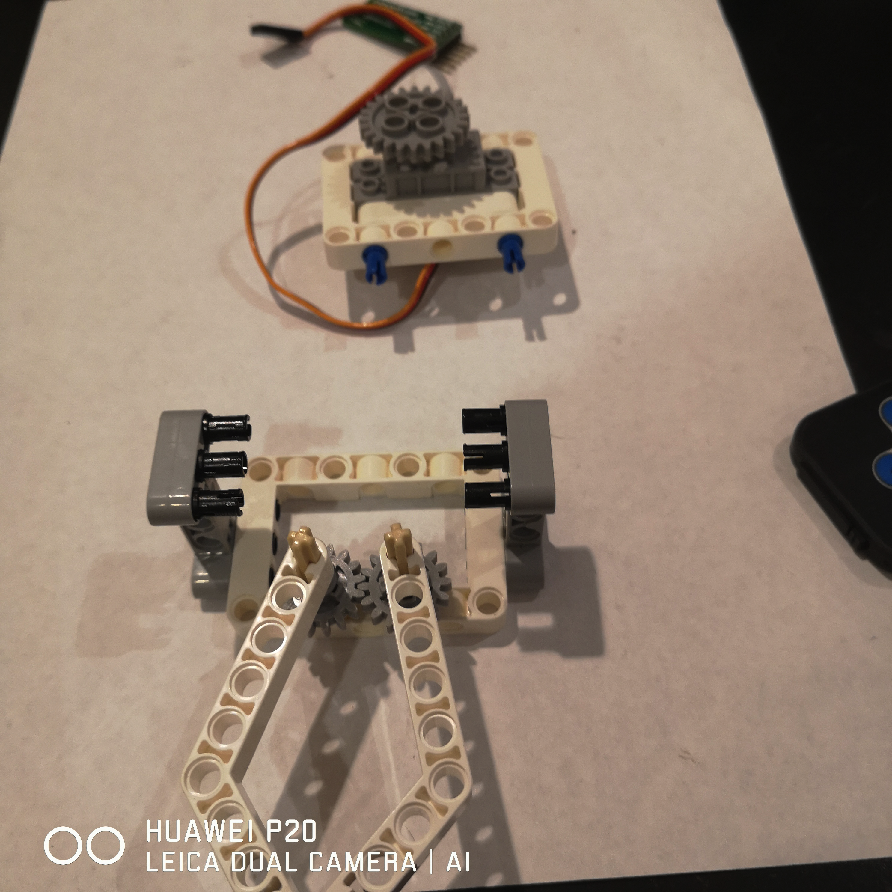
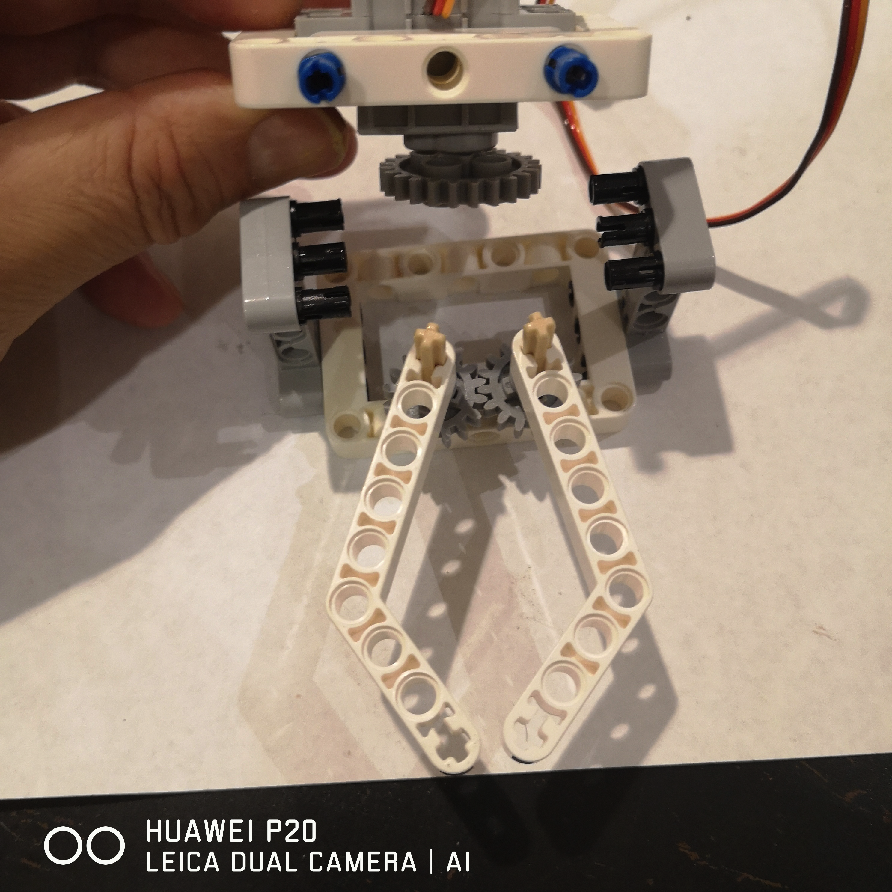
Please follow the building steps to build this robot car, If you want to get clear PDF building steps, please download from https://osoyoo.com/picture/Building_Robot_Car/lesson3/lesson3.pdf

Please connect motors and 9V battery case as lesson1.
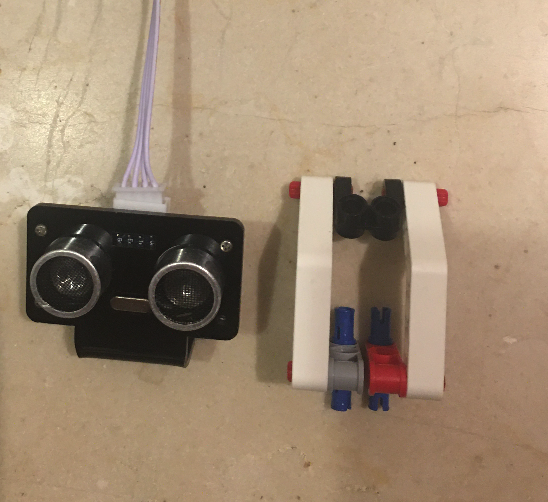
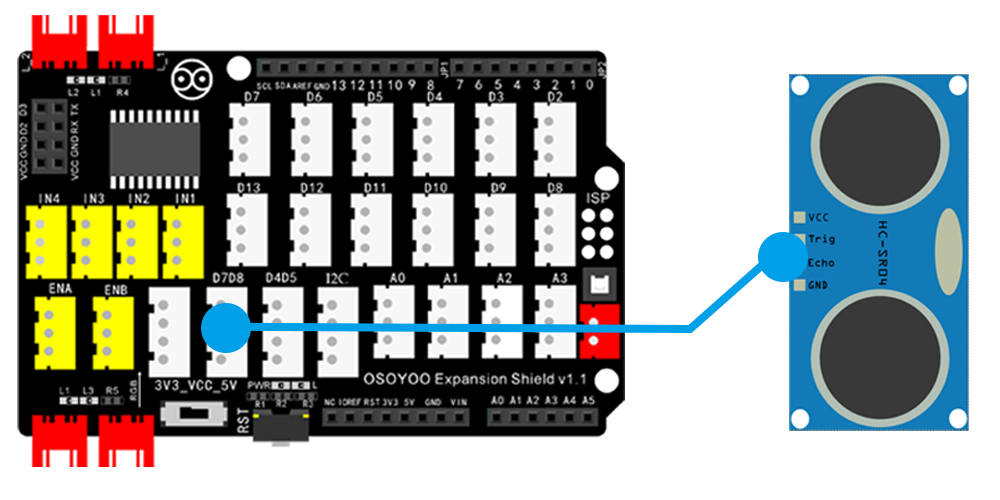
Then Connect SG90 servo motor to D4 port of OSOYOO Magic I/O shield, Ultrasonic module sensor to the D7D8 port of the Magic I/O shield with a 4-pin PNP cable as below:
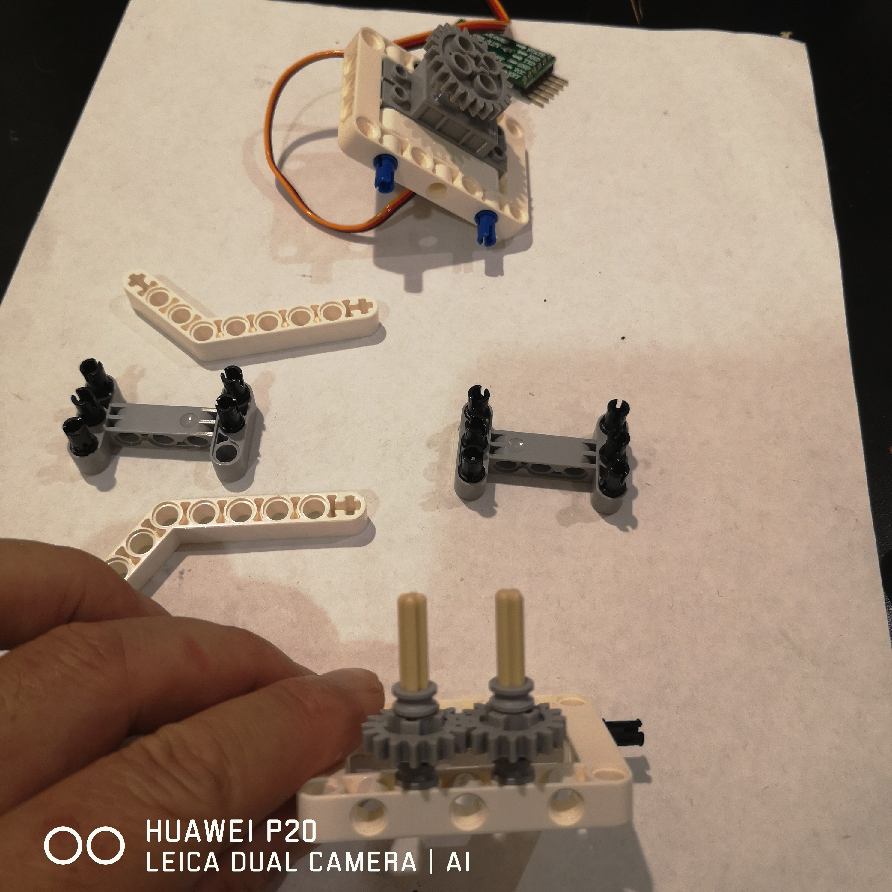
Then Connect SG90 servo motor to OSOYOO to the D4 port of the Magic I/O shield as following graph.

Step 6:Then connect the Ultrasonic module sensor to the D7D8 port of the Magic I/O shield with a 4-pin PNP cable as below:

Note: In this kit, we use mblock as programming tool, if you want to learn more about mblock, please visit preparation before class 1: https://osoyoo.com/2021/12/01/preparation-before-class-1
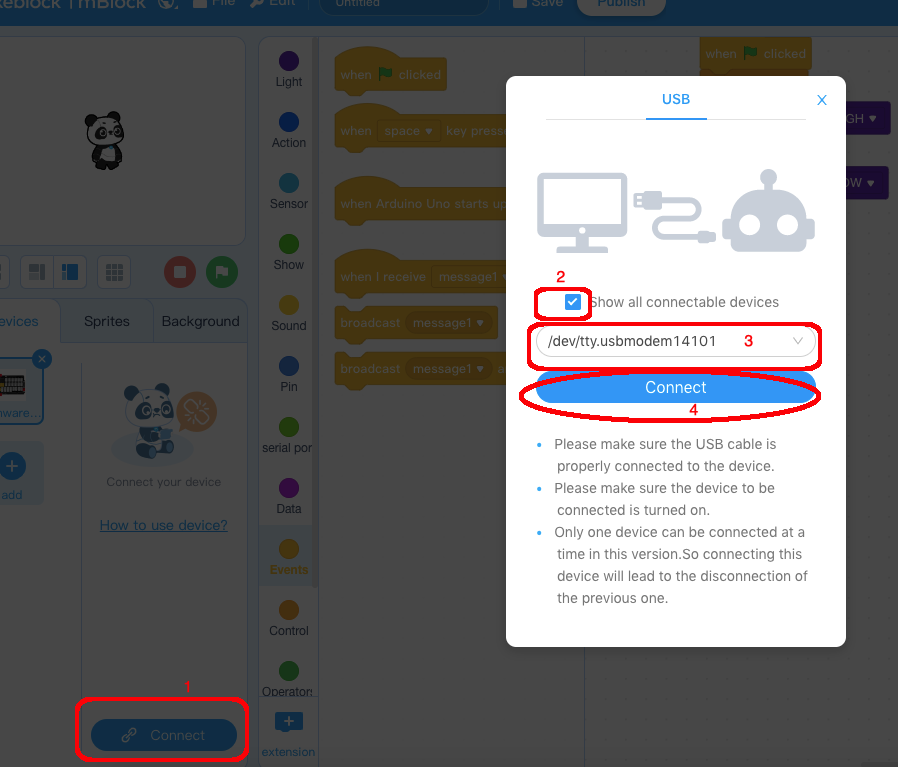
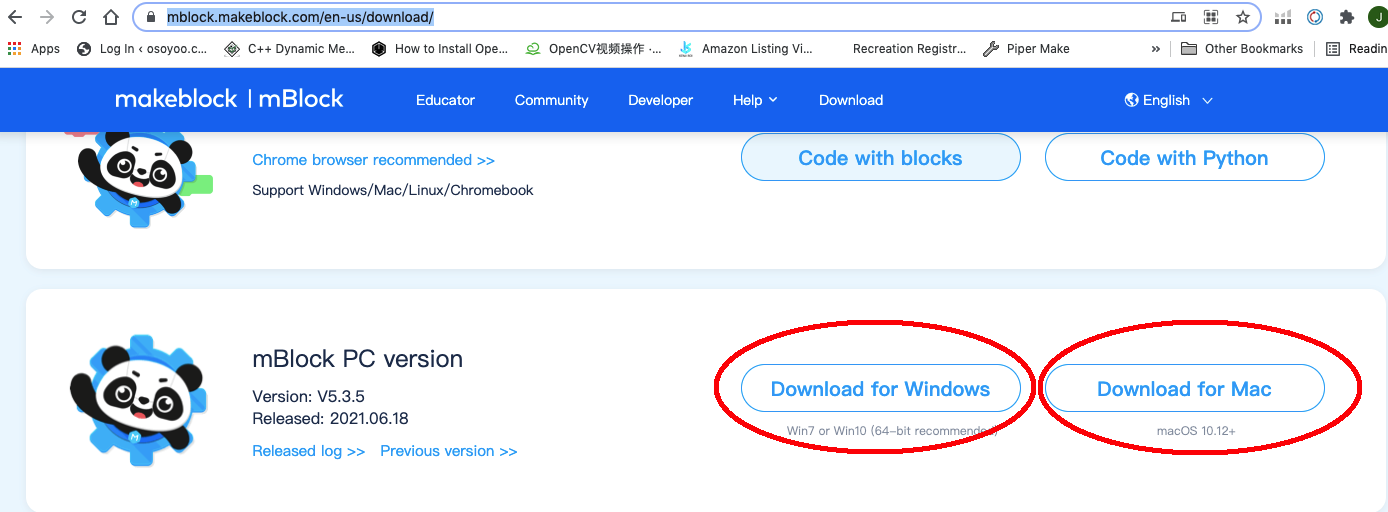
Step 1) Download mBlock PC version from https://mblock.makeblock.com/en-us/download/, select the download file as per your computer OS type (Please don’t use the browser version):
Step 2) Download OSOYOO_UNO.mext device file from https://osoyoo.com/driver/mblock/osoyoo_uno.mext
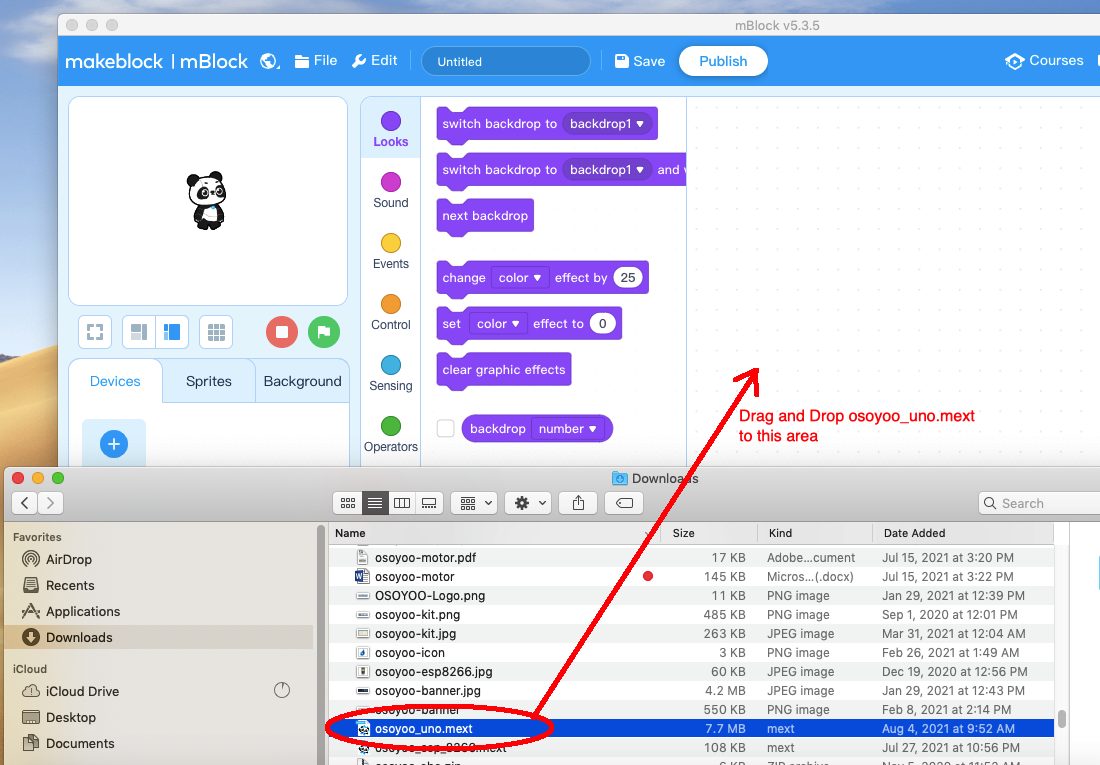
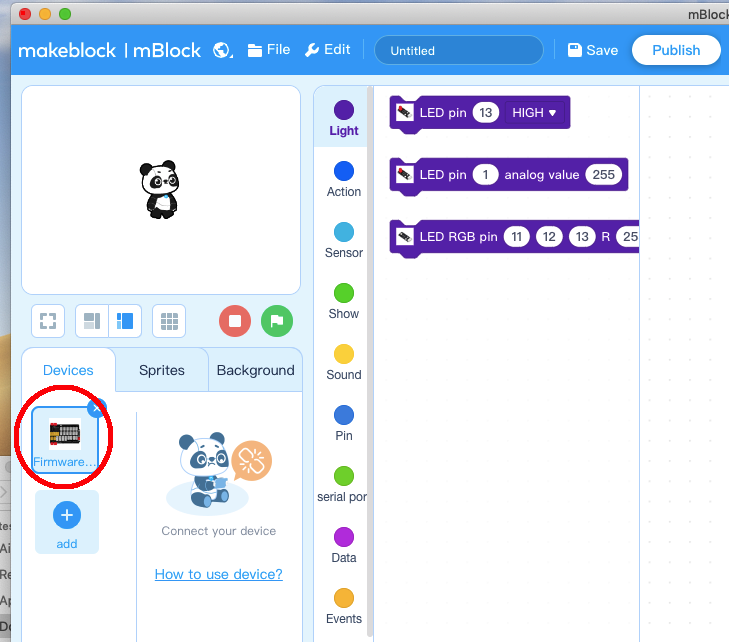
Step 3) Run the mBlock PC software by double click the lovely Panda icon. you will see mBlock UI as following picture. Please delete the default device CyberPi by click the cross in the red circle.

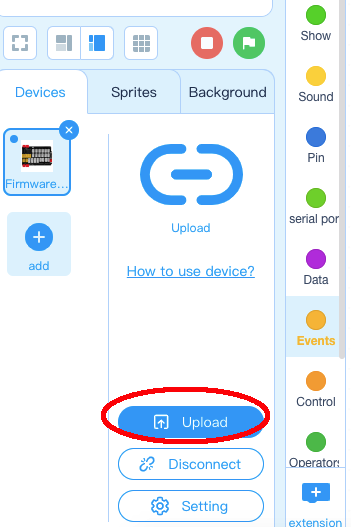
Step 4) Drag and Drop osoyoo_uno_mext file(downloaded in Step 2) to mBlock software as following:
Now you will see a new device firmware in mBlock, see following picture:
Now mBlock software and OSOYOO_UNO device firmware have been successfully installed in our PC!
Now we will show you how to use blocks to turn above idea into reality.
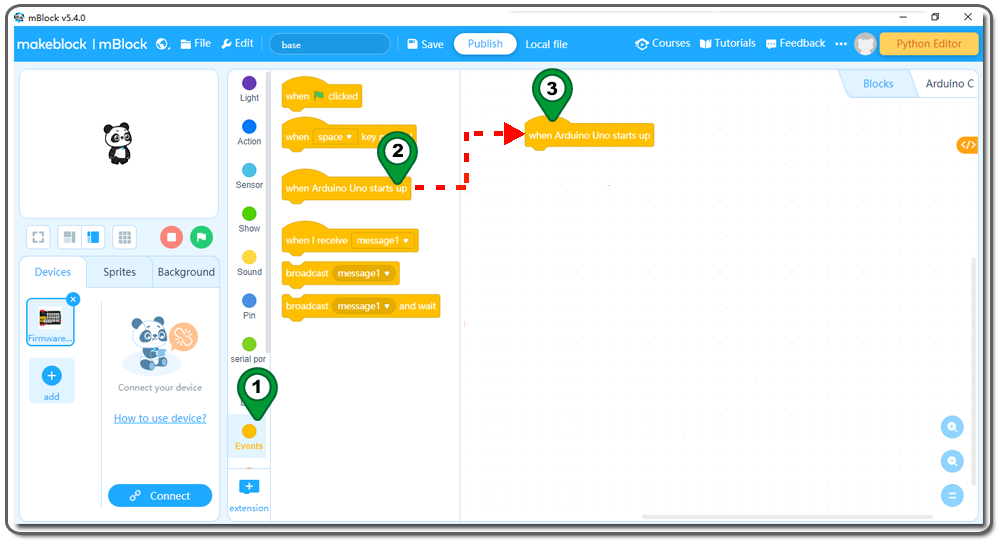
Step 5: Click Events, add when Arduino Uno starts up block to the top:
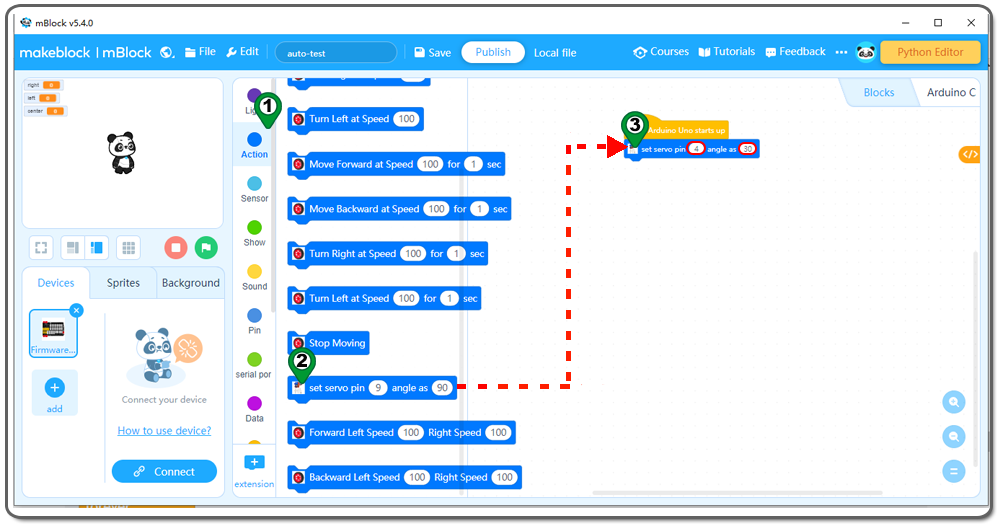
Step 6: Click Action, then Drag and drop set servo pin angle as block to programming area ,change the pin 9 to 4 ,90 to 30 as following;
Step 7: Click Control, then Drag and drop wait seconds block to programming area ,writed 0.5 seconds as following: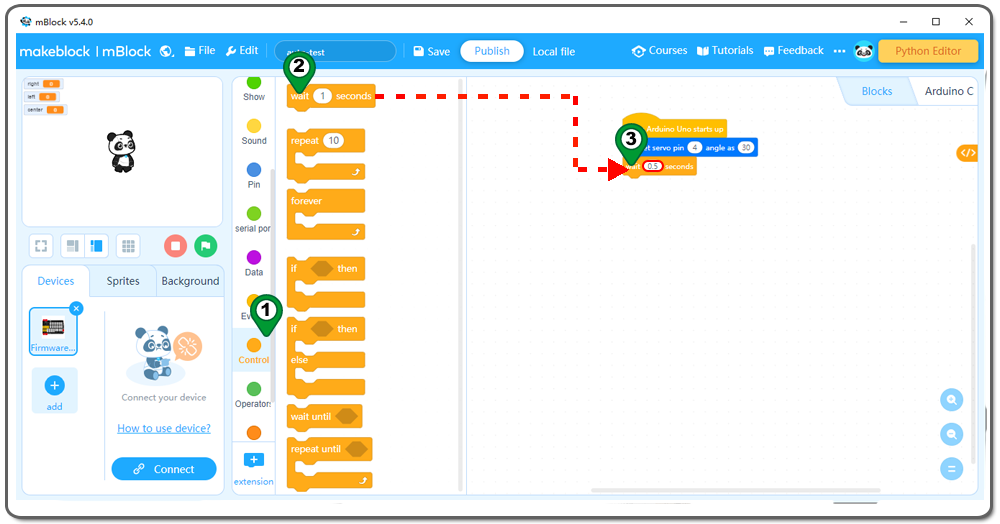
Step 8: Click Action again, then Drag and drop set servo pin angle as block to programming area ,30 to 0as following;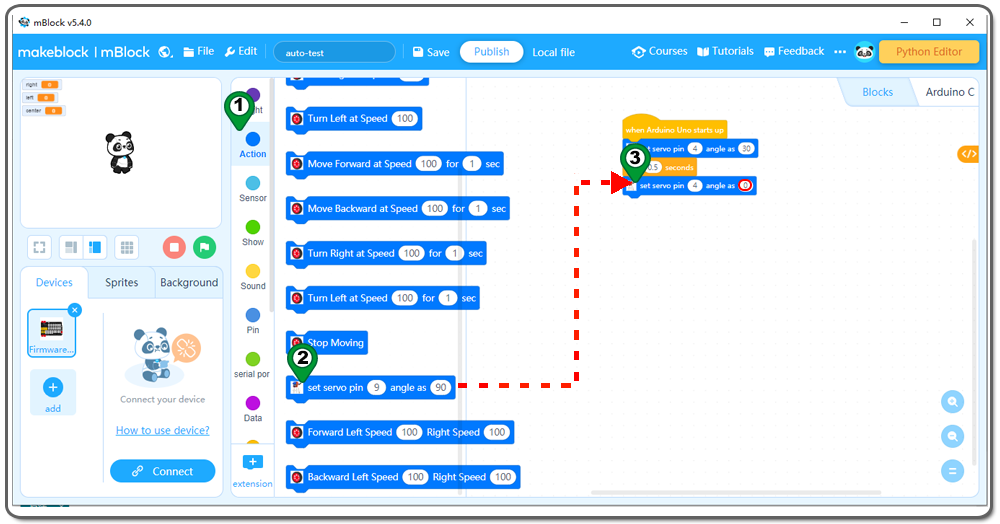
Step 9: Repeat the Step7 as following: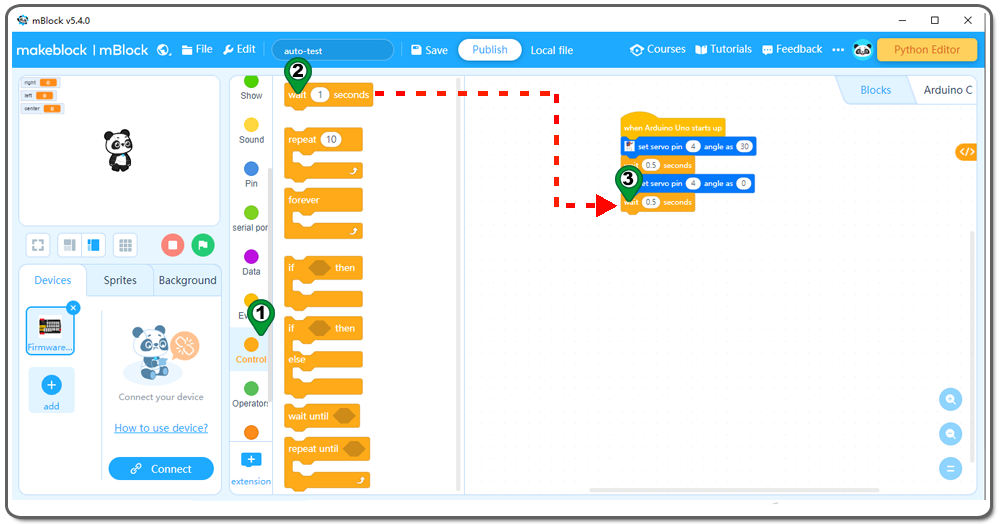
Step 10:Click Action, then Drag and drop set servo pin angle as block to programming area ,0 to 30 as following;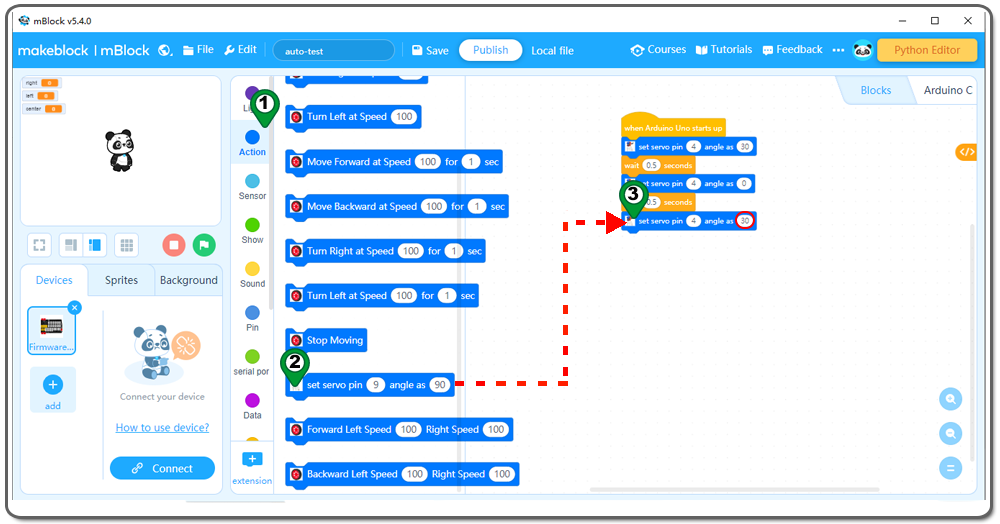
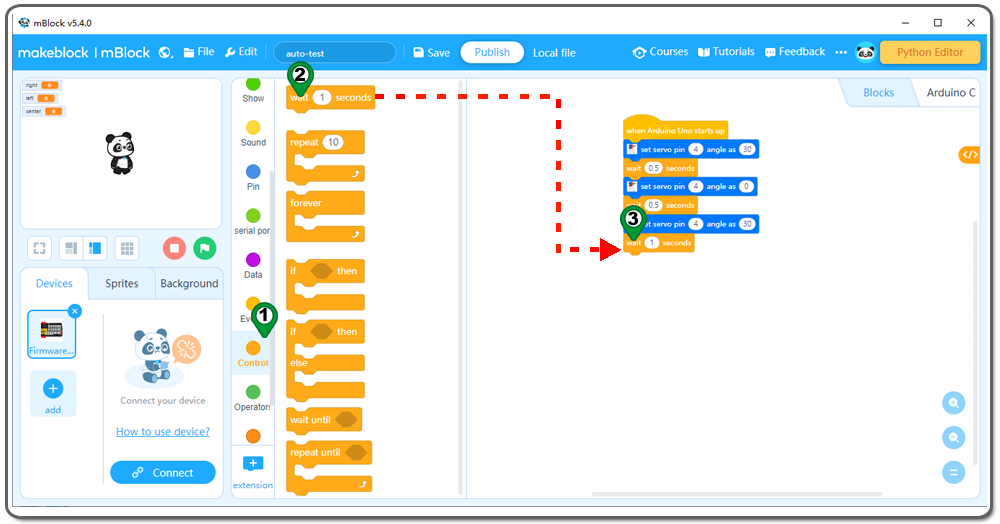
Step 11:Click Control, then Drag and drop wait seconds block to programming area ,writed 1 seconds as following:
Step 12: Click Control, then Drag and drop forever block to programming area as following: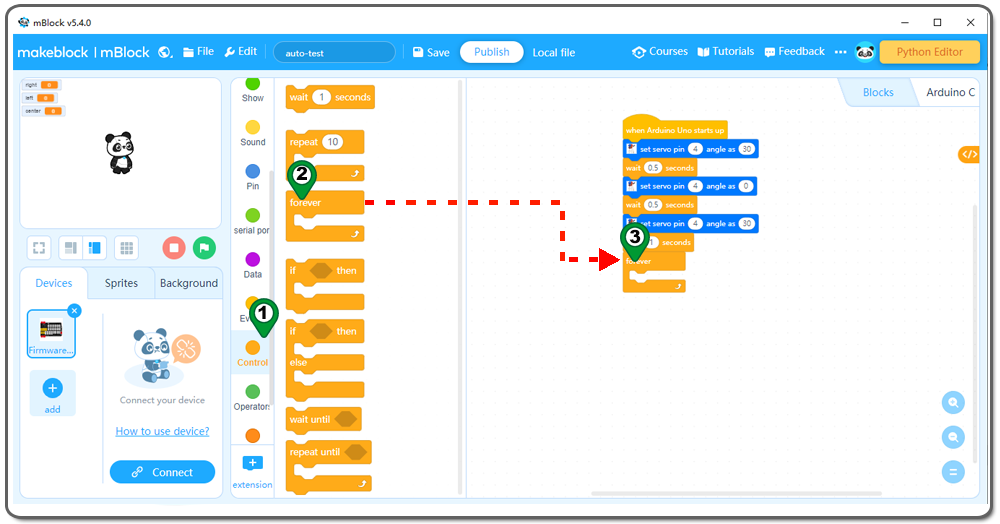
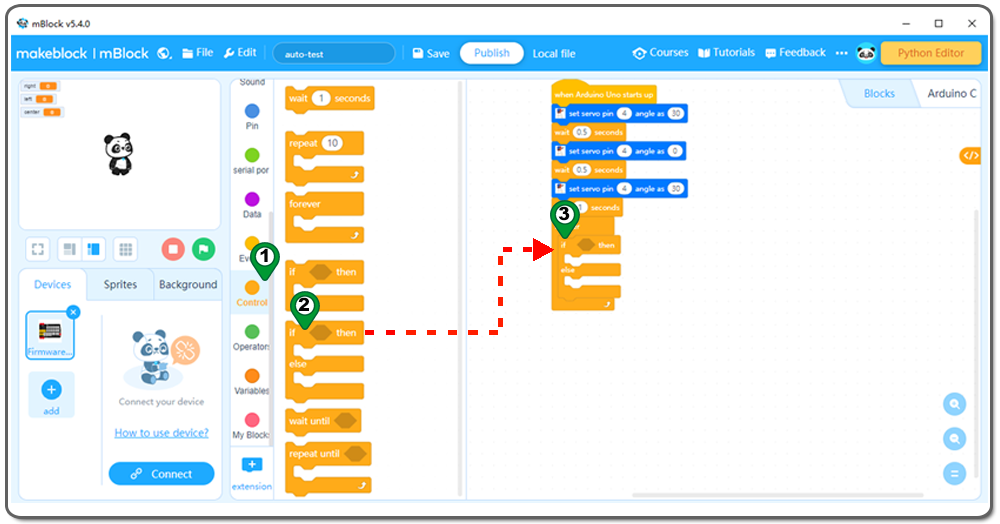
Step 13: Click Control again,then Drag and drop if then else block to programming area as following:
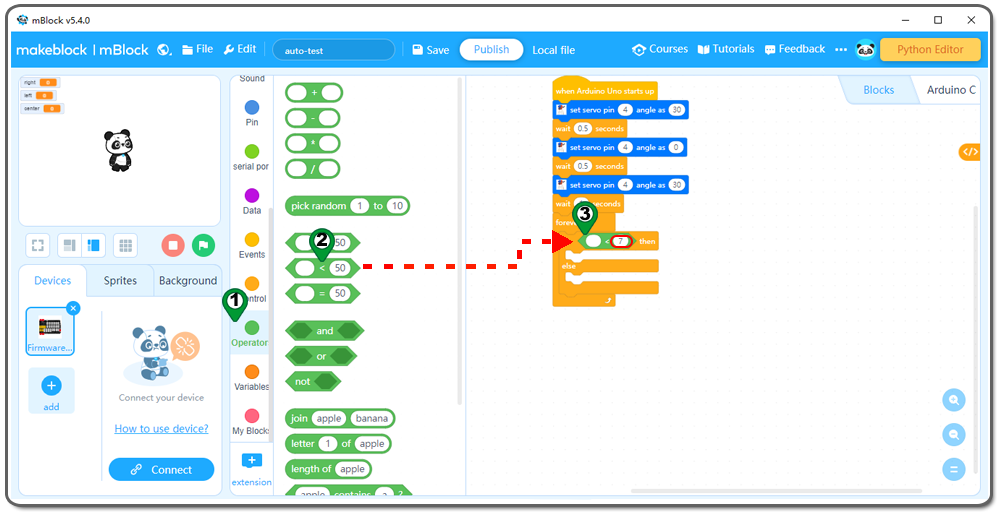
Step 14: Click Operation, then Drag and drop 0<0 block to programming area ,change the 0 to 7 as following:
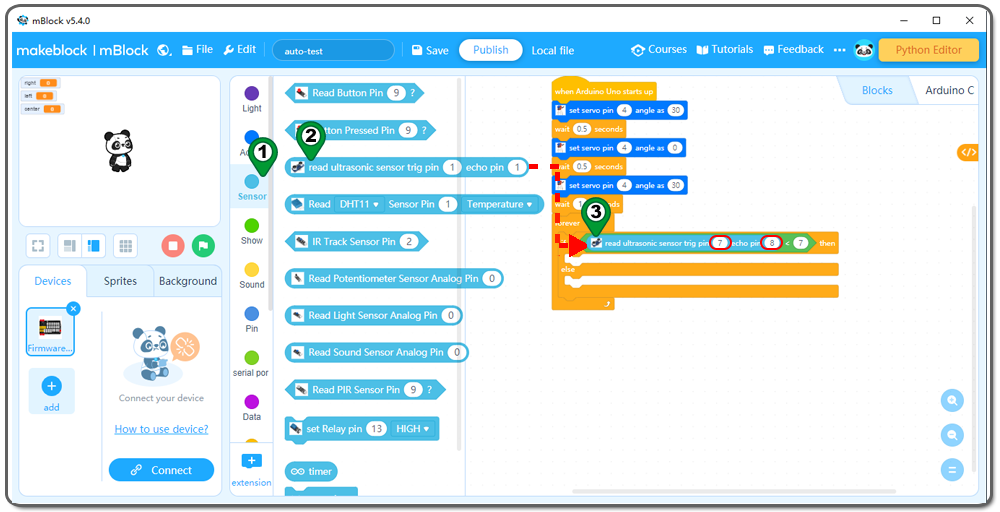
Step 15:Click Sensor, then Drag and drop read ultrasonic sensor trig pin echo pin block to programming area ,writed pin 7 and pin 8 as following;
Step 16: Click Action , then Drag and drop Stop Mowing block to programming area as following;
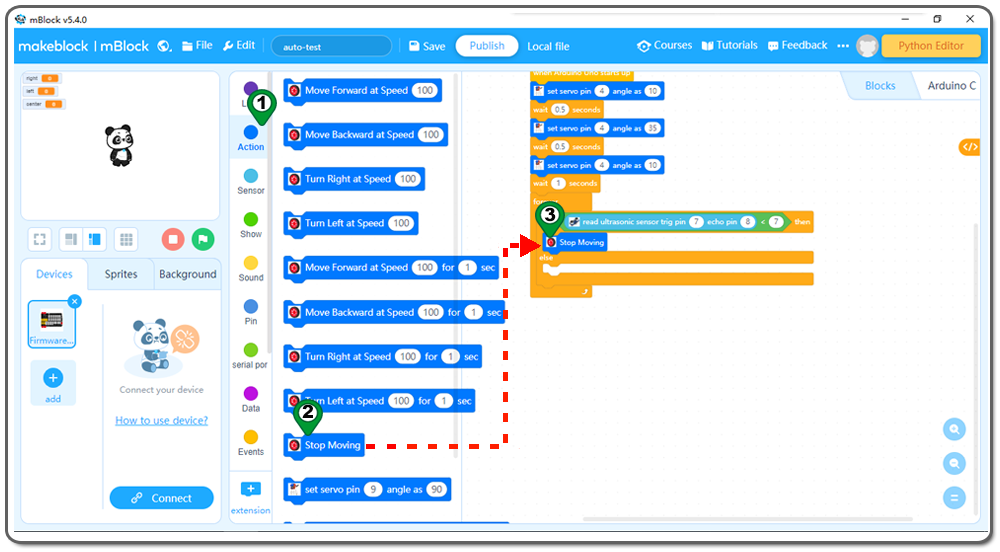
Step 17:Click Control, then Drag and drop wait seconds block to programming area ,writed 0.5 seconds as following: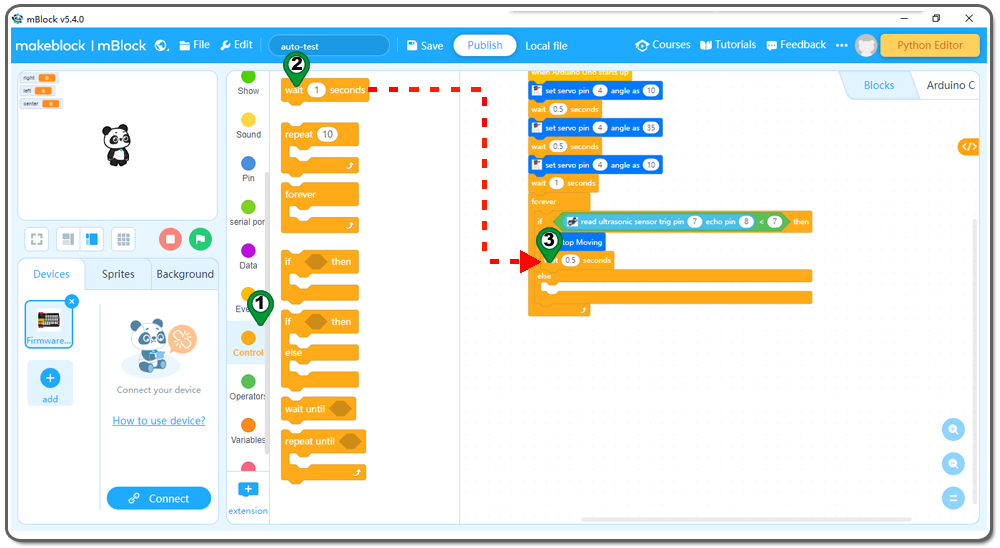
Step 18:Click Action, then Drag and drop set servo pin angle as block to programming area ,0 to 25 as following;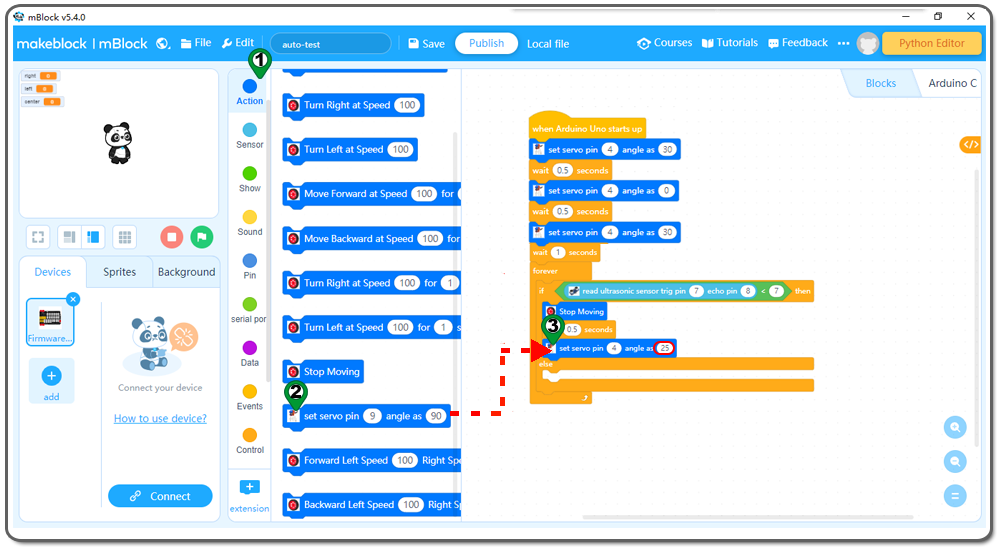
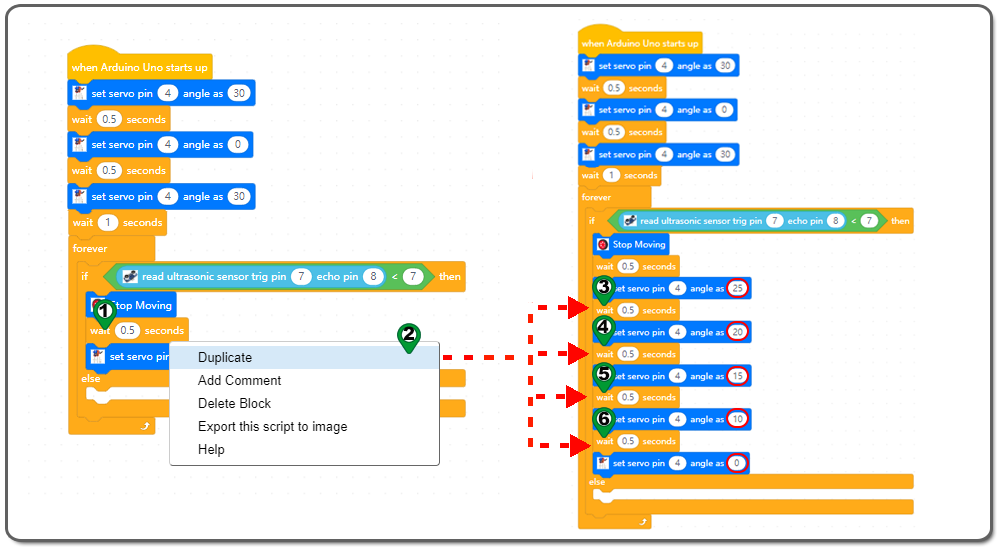
Step 19:Right click Wait seconds block ,Click duplicate from the digital write pin to block over . You will get a duplicated block ,and place it behind Set servo pin angle as block .Change the angle value as following figure.
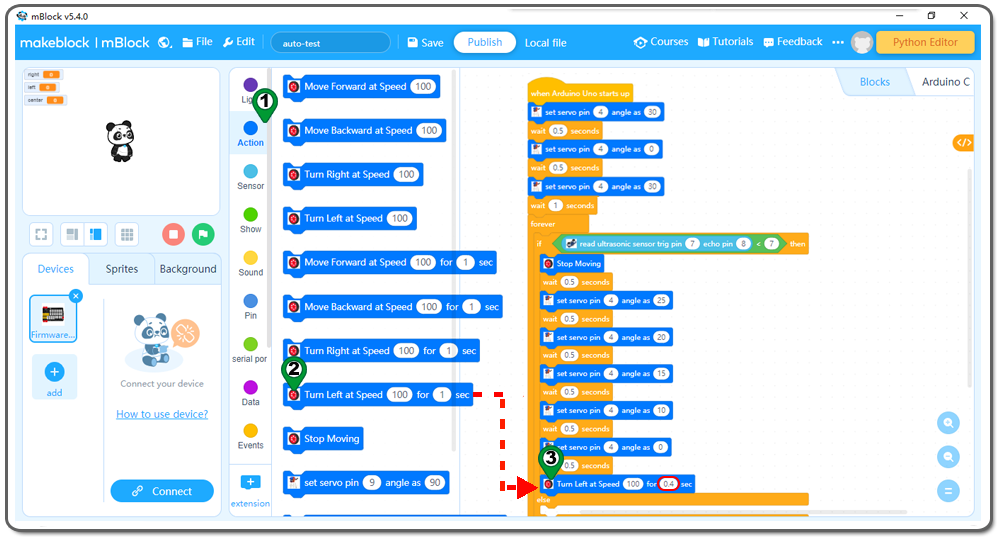
Step 20:Click Control, then Drag and drop wait seconds block to programming area ,writed 0.5 seconds as following: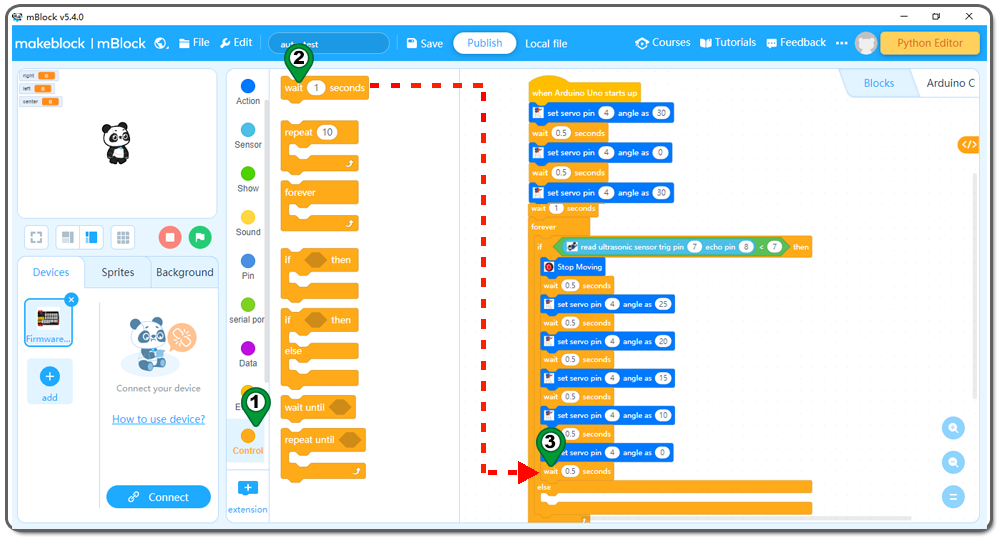
Step 21:Click Action, then Drag and drop Turn Left Speed for block to programming area ,change the 1 sec to 0.4 sec as following;
Step 22: Click Action , then Drag and drop Stop Mowing block to programming area as following;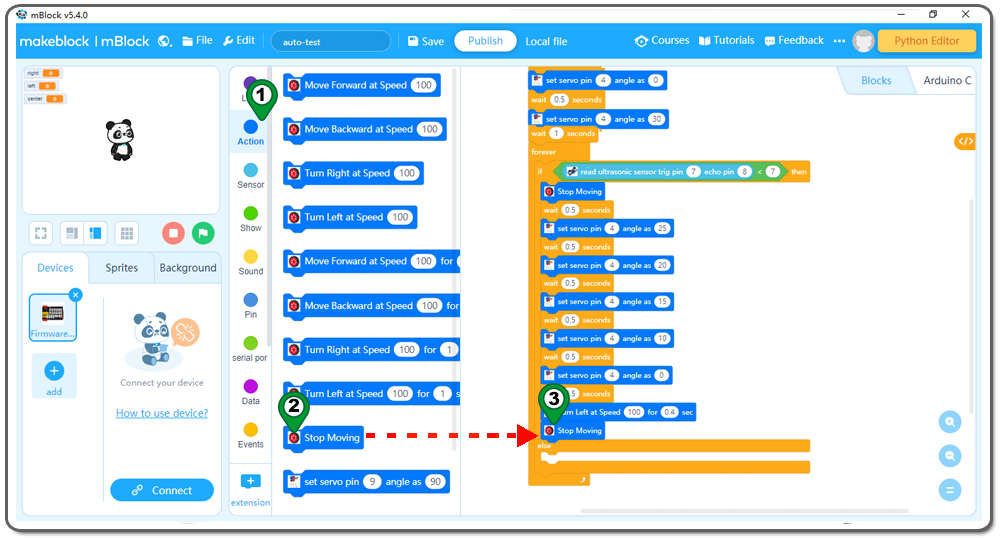
Step 23:Click Action again, then Drag and drop set servo pin angle as block to programming area ,90 to 0 as following;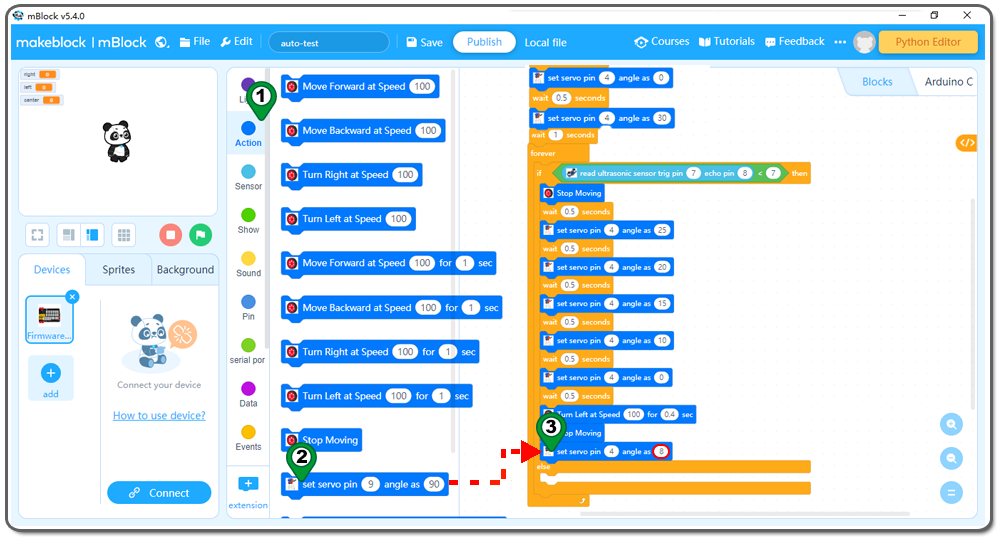
Step 24:Click Control, then Drag and drop wait seconds block to programming area ,writed 0.5 seconds as following: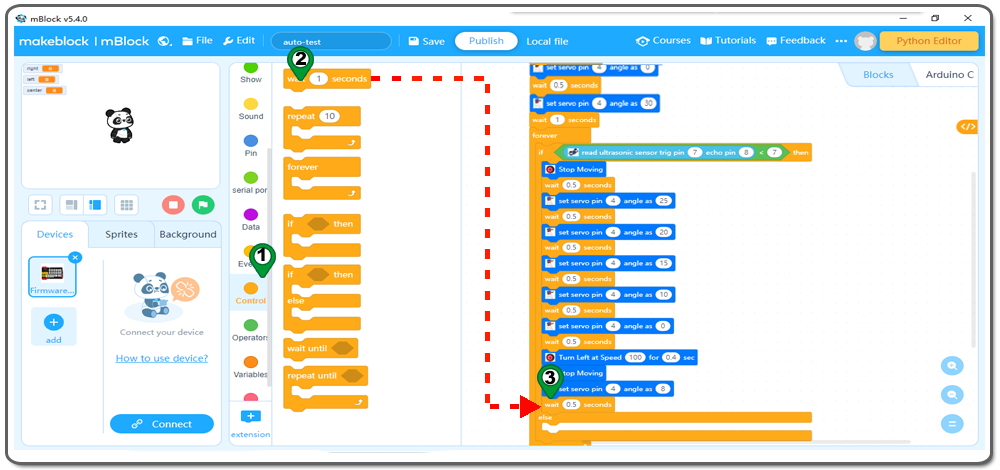
Step 25: Repeat the Step 23,change the 90to 15 as following:
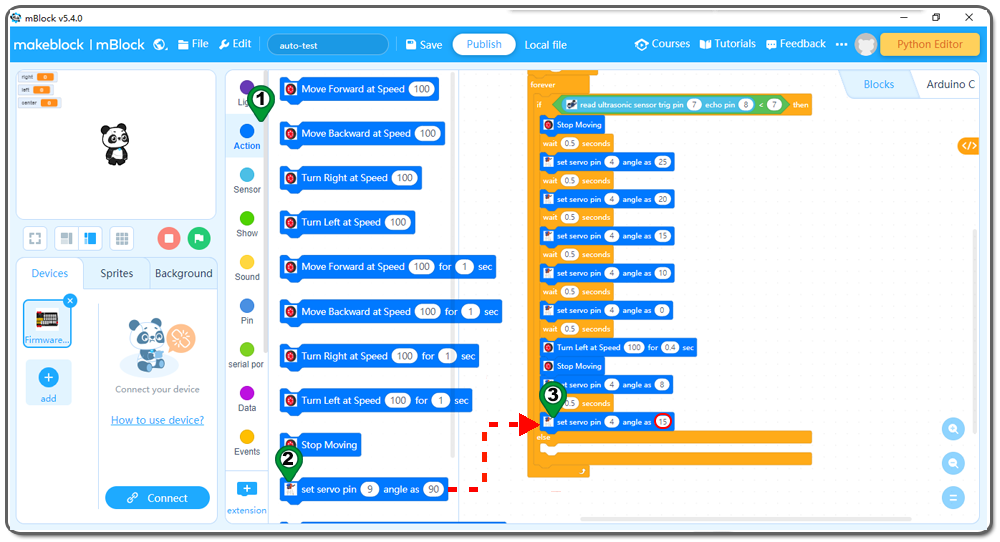
Step 26:Click Control, then Drag and drop wait seconds block to programming area ,writed 0.5 seconds as following: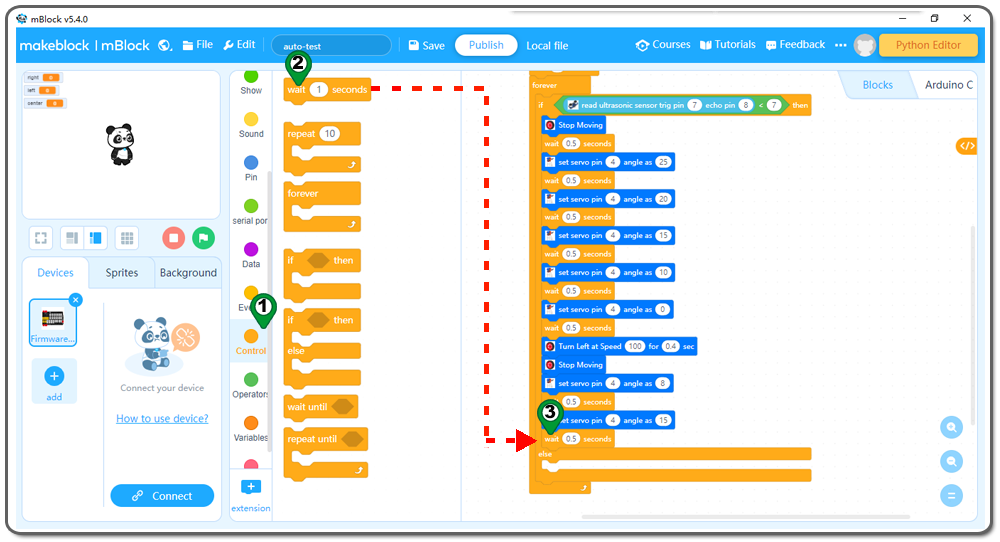
Step 27:Click Action again, then Drag and drop set servo pin angle as block to programming area ,90 to 30 as following;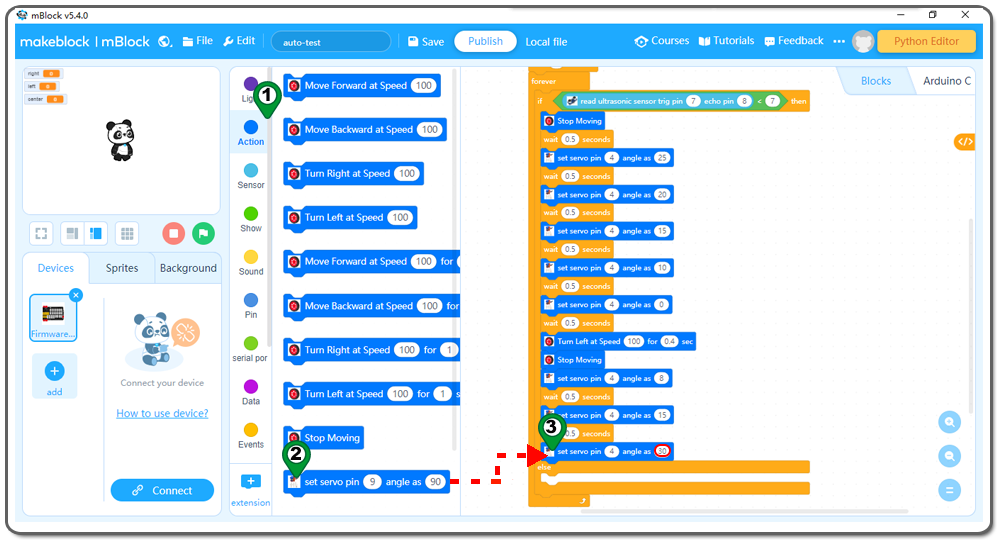
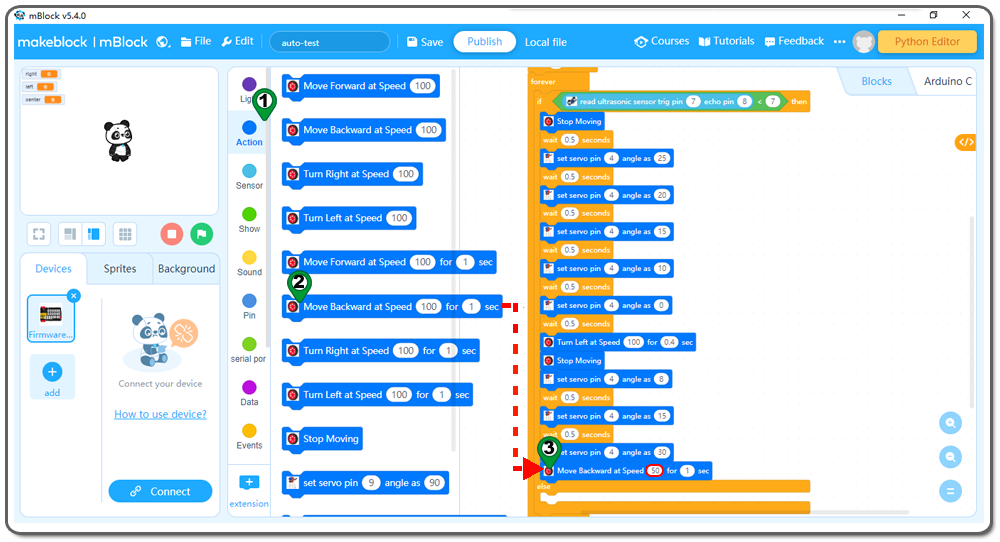
Step 28:Click Action , then Drag and drop Move Backward at speed for sec block to programming area ,change the speed 100 to 50 as following;
Step 29:Also in Action , then Drag and drop Turn Right at speed for sec block to programming area ,change the speed 100 to 50,the 1 sec to 0.5 sec as following;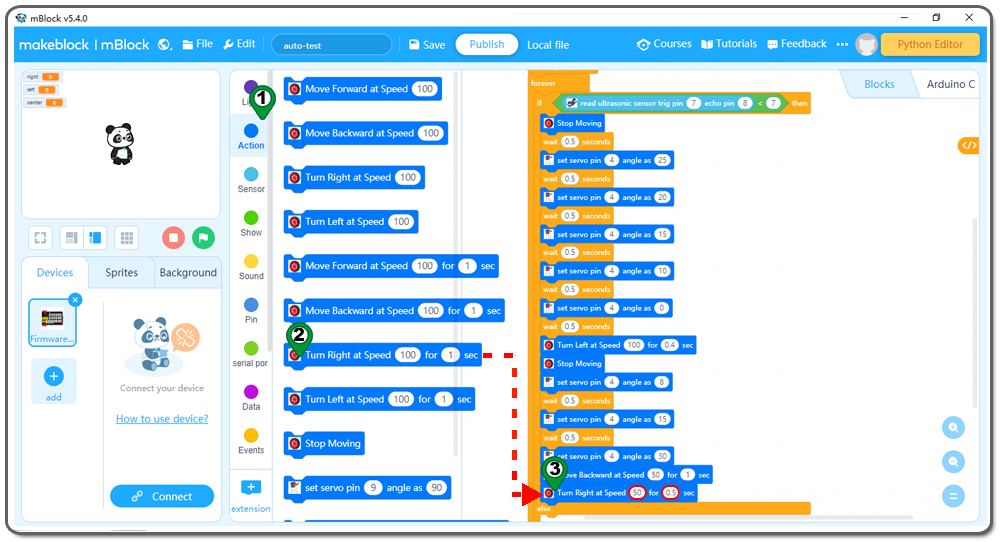
Step 30: Drag and drop Move Forward at speed for sec block to programming area ,change the speed 100 to 50 as following;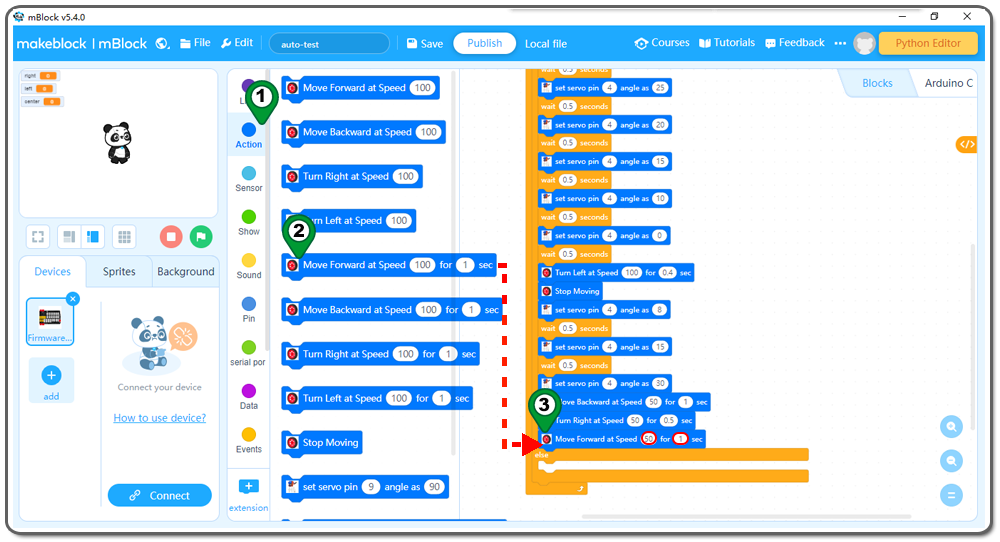
Step 31: Drag and drop Forward Left speed Right speed block to programming area ,change the speed 100 to 30 as following;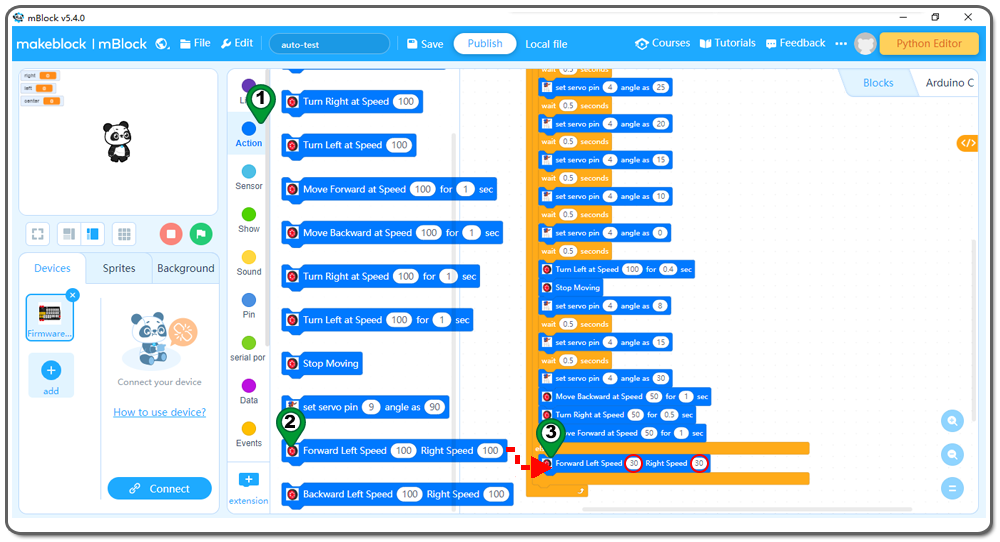
Now we have completed the block programming. The final blocks look like following: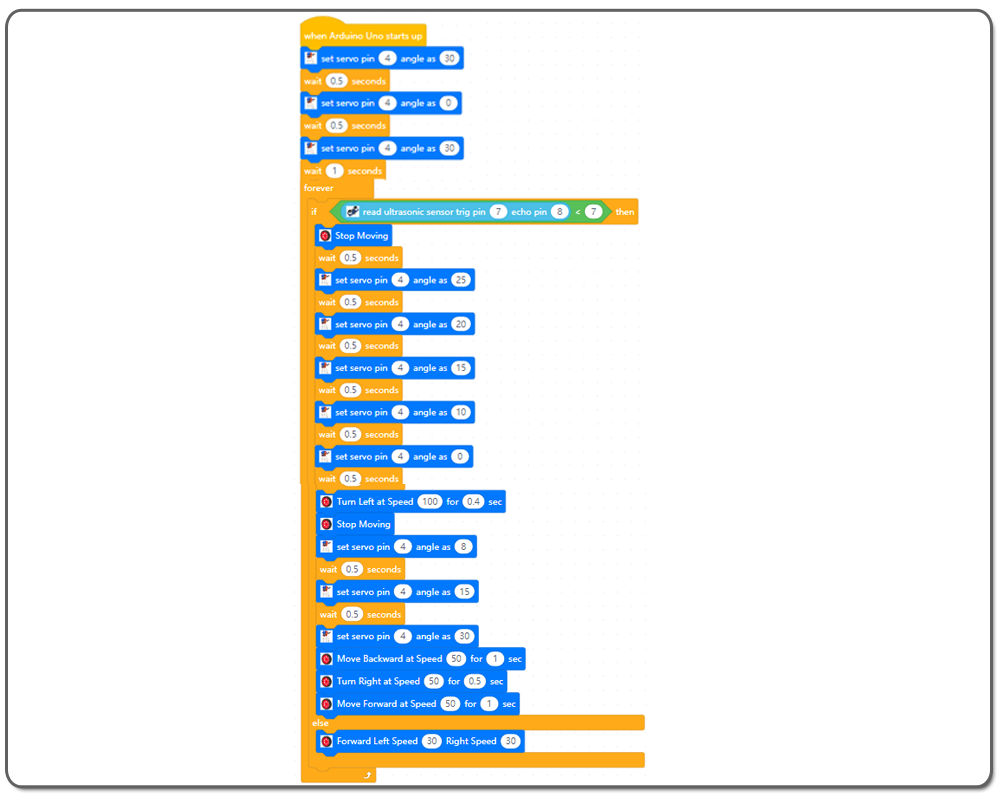
After you have adjusted finger to right position, please turn on the power again. Then put a ball into the open finger. Once the ultrasonic sensor detected the ball, it will catch the ball and move it to left hand location. After transferring the ball, then the car will turn back to its original position.