In this lesson, we will do an obstacle avoidance auto-driving project. We use an ultrasonic module to “see” the obstacle, and the car will turn around from the obstacle automatically.
You must complete lesson 1 before you continue on with this lesson.
OSOYOO Mecanum wheels robotic car chassis x1
OSOYOO Wheels and motors x4 (left-wheels x2/right-wheels x2)
OSOYOO Mega2560 board, fully compatible with Arduino UNO/Mega2560 x1
OSOYOO Uart Wi-Fi shield x1
OSOYOO Model Y driver board x1
OSOYOO Voltage meter x1
OSOYOO MG90 servo motor x 1
OSOYOO Ultrasonic sensor module x1
OSOYOO Mount holder x1
OSOYOO Battery box x1
OSOYOO 3pin female to female jumper wire x1
OSOYOO 6pin male to female jumper wire x2
OSOYOO 10pin male to female jumper wire x1
OSOYOO 2 pin XH2.54 PnP female to female x1
18650 Batteries(3.7V) x2
Battery charger x1
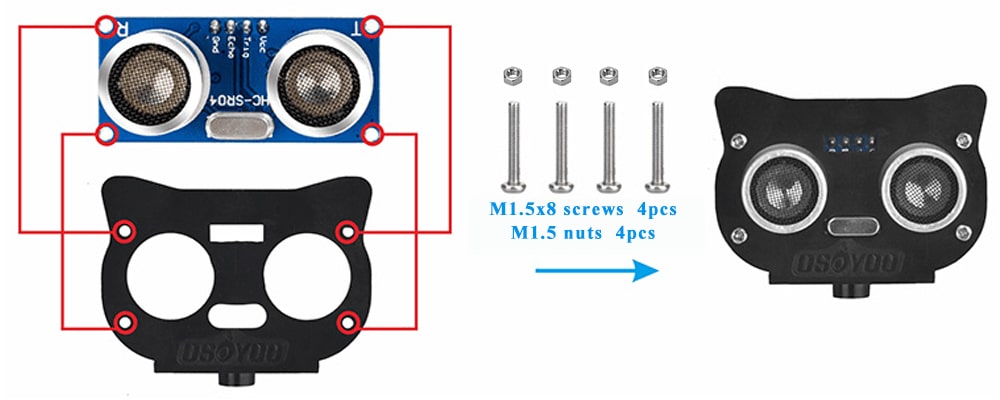
1)Attach the ultrasonic module to the mounting holder using 4 M1.5*8 screws and M1.5 nuts.
2)
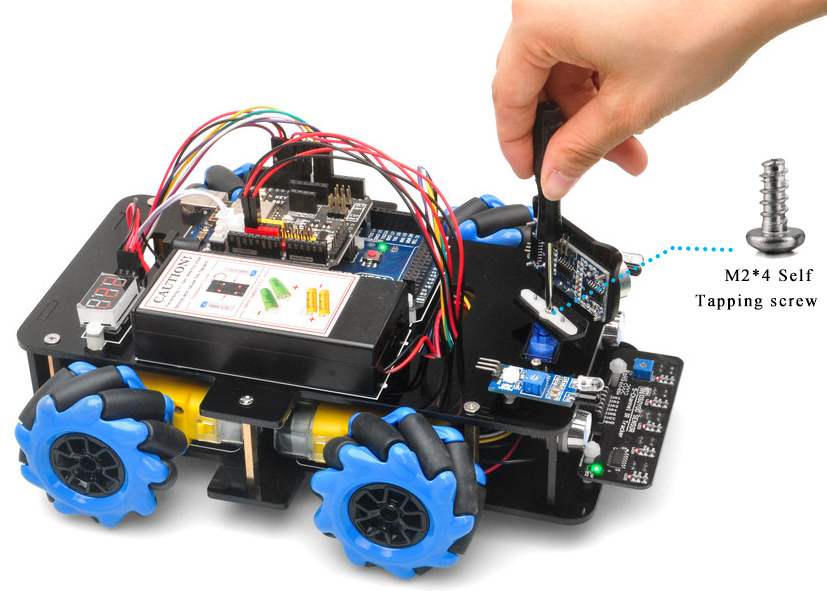
Secure the ultrasonic module’s mounting holder onto the servo motor with M2*4 self-tapping screws Or the screws from the SG90 servo screw kit.
When placing the ultrasonic underneath, as the self-tapping screws easily strip.
A. Support the motor from underneath, as the self-tapping screws easily strip.
B. Do not insert the screw until after the alignment process.
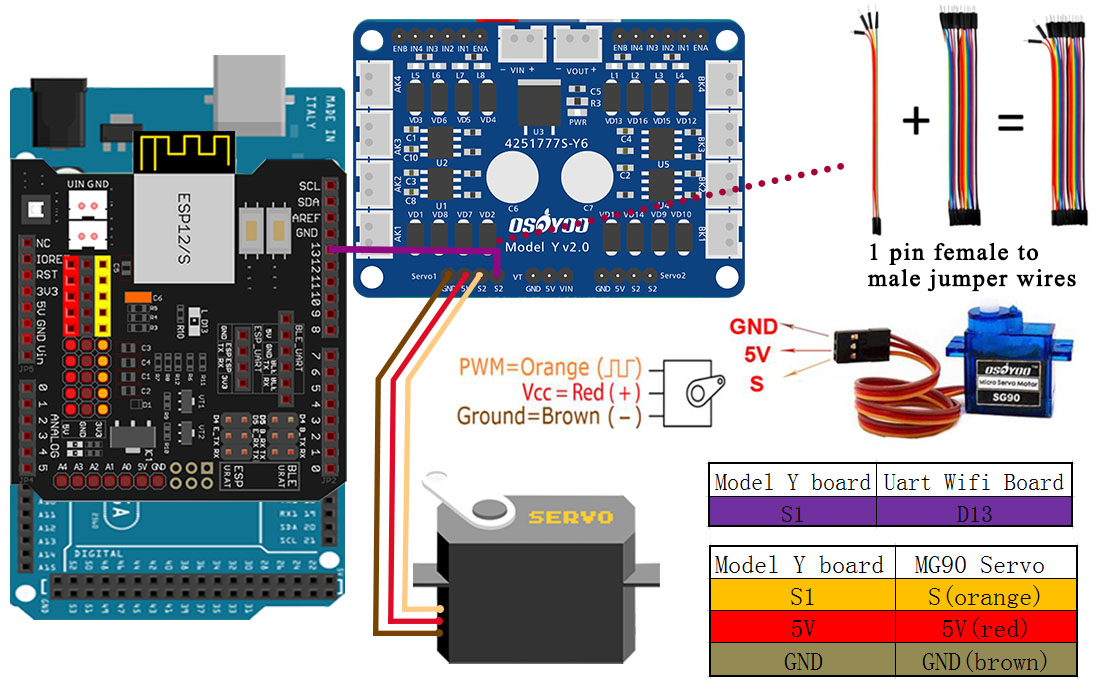
3) Keep all connections from Lesson 1 unchanged. Before connecting additional wires, ensure that the SG90 servo motor is properly connected to both the Model Y board and the OSOYOO UART Wi-Fi Shield as shown in the diagram.
( Note: You will need to split one male-to-female jumper wire from the provided 10-piece jumper wire bundle. Any color can be used. The remaining wires are spare parts in case of damage or failure.)
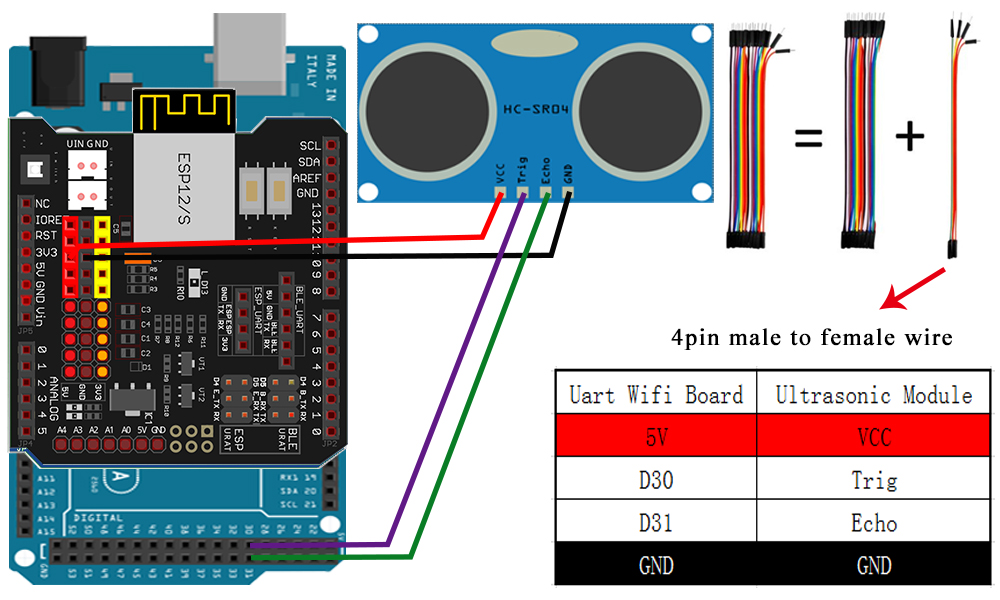
Step4: Connect the ultrasonic module to the OSOYOO UART Wi-Fi Shield as shown in the diagram.
Step 1: Install latest Arduino IDE (If you have Arduino IDE version after 1.1.16, please skip this step). Download Arduino IDE from https://www.arduino.cc/en/Main/Software?setlang=en, then install the software.
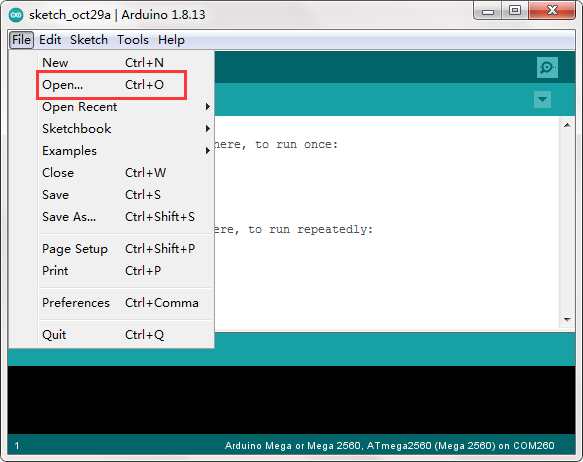
Step 3: Connect Mega2560 board to PC with USB cable, Open Arduino IDE → click file → click Open → choose code “lesson2.ino” in lesson1 folder, load the code into Arduino.
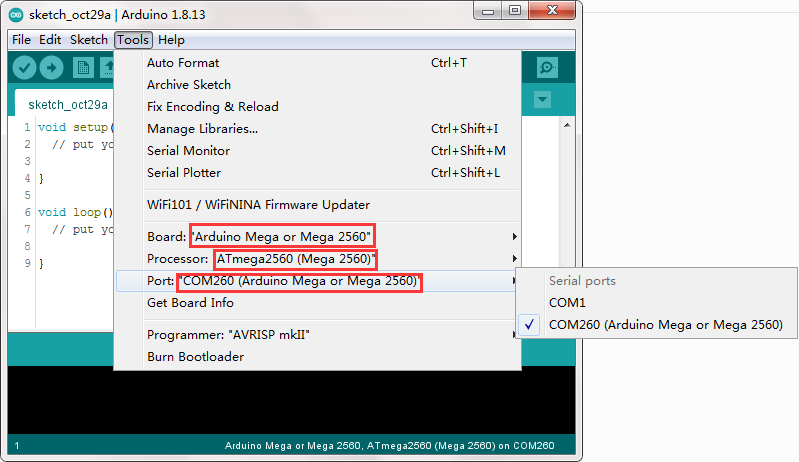
Step 4: Choose MEGA2560 board as the board type and correct port for your project as following picture, upload the sketch to the board.
Ultrasonic sensor servo initial direction alignment
After turning on the battery, the servo will make some movement and finally stops at front direction for 3 seconds.
If the ultrasonic sensor does not face the front during this first 3 seconds, you should turn off battery immediately and remove the sensor from the servo, reinstall it and make it facing straight forward direction as following picture. Otherwise, the obstacle avoidance program will not work properly.
After adjusting sensor direction, turn on battery again, the sensor should face front same as following picture. If its direction is not straight forward, turn off battery and do direction alignment again.
Final Testing :
After turning on the battery switch on the battery box, if the ultrasonic module turn to front view position, that means you don’t need to adjust sensor position anymore. Just wait 3 seconds. If no obstacle is detected, the car will go forward. If any obstacles are detected, the car will stop, the ultrasonic module will turn from right to left to detect surrounding obstacles. The robot car will decide to make left turn, right turn or backward according to obstacle sensor data and our obstacle avoidance algorithm.
Sometimes your car might have collision and make your Ultrasonic sensor position change, you must remember to do sensor direction alignment again as per link Ultrasonic sensor servo initial direction alignment.
Trouble Shooting
Sometimes when you run the lesson 2 sketch code, you might see that the car moves backward even if there is no obstacle in front. This normally means the ultrasonic sensor installation or wire connection has a problem.
To solve the problem, please check hardware installation step 4.
Use 4 new jumper wires to connect sensor to Arduino Wi-Fi board,
make sure:
Ultrasonic Sensor VCC connects to Wi-Fi board 5V
Ultrasonic Sensor TRIG connects to Wi-Fi board D30
Ultrasonic Sensor ECHO connects to Wi-Fi board D31
Ultrasonic Sensor GND connects to Wi-Fi board GND
After sensor wires are properly connected based on above instruction, you can make a test of the sensor.
Please download distance sensor test code from https://osoyoo.com/download/code/distance.zip, keep your Arduino and PC connected with blue cable and then run the distance.ino code.
Now open your Arduino IDE Serial monitor, put your hand in front of the sensor,
You should see a distance value in serial monitor. That value is the distance between your hand and sensor.
If you can only see 0 value in Serial monitor, it means your sensor wire connection is wrong or wire might be broken or sensor is defective. You might need to change 4 new wires or contact OSOYOO support for sensor replacement.


Thank You!