Note: ALL OSOYOO Products for Arduino are Third Party Board which is fully compatible with Arduino
Authorized Online Retailers
With Battery:
| Buy from OSOYOO |
Buy from USA |
Buy from UK |
Buy from DE |
Buy from IT |
Buy from FR |
Buy from ES |
ここでご購入を! |
 |
 |
 |
 |
 |
 |
 |
 |
Without Battery:
| Buy from OSOYOO |
Buy from US |
Buy from UK |
Buy from DE |
Buy from IT |
Buy from FR |
Buy from ES |
ここでご購入を! |
|
|
|
|
|
|
|
|
Description:
Objective:
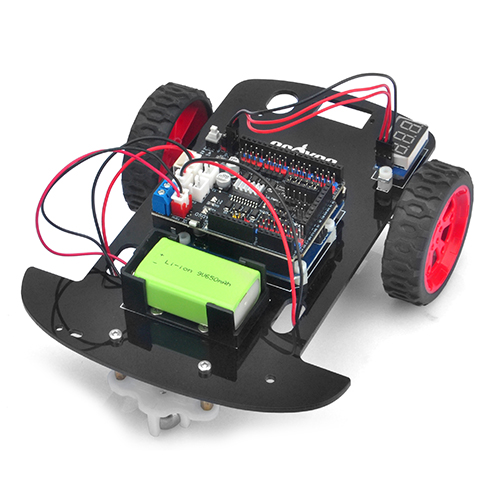
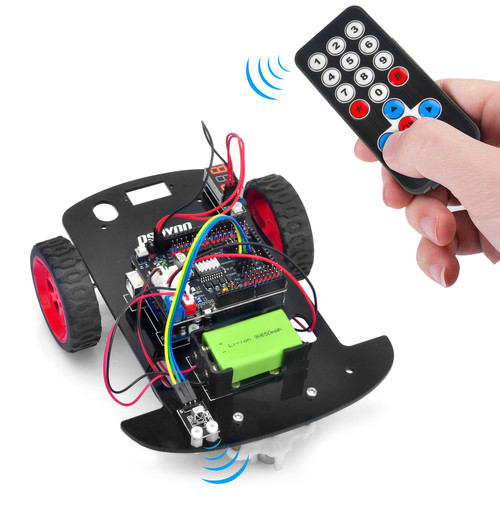
In this tutorial, we will use Osoyoo Model-3 Robot Learning Kit to make a simple remote controlled smart car. Once the car installation is completed, we will use an Infrared Remote to control the car movements including go forward, go back, left turn and right turn.
Parts and Devices:

Hardware Installation:
Step 1: Install the smart car basic frame work as per Lesson 1 . If you have already completed installation in Lesson 1 , just keep it as is.
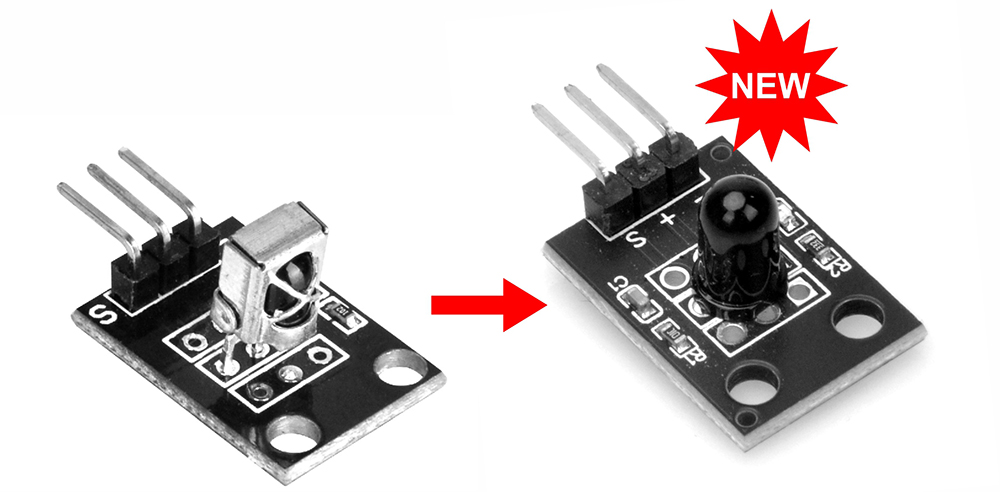
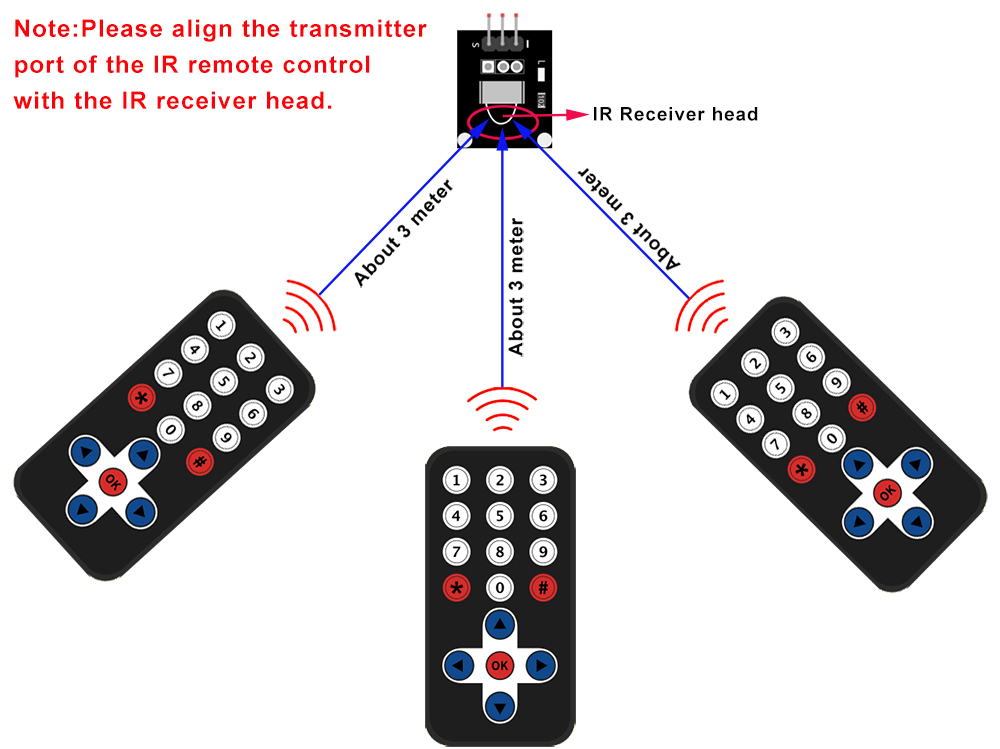
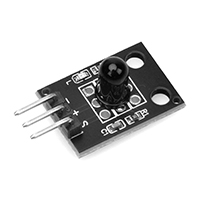
Step 2: Add an IR receiver module onto the car.
Note: There are some differences between two versions for OSOYOO motor shield(V1.0 and V1.1/V1.2),
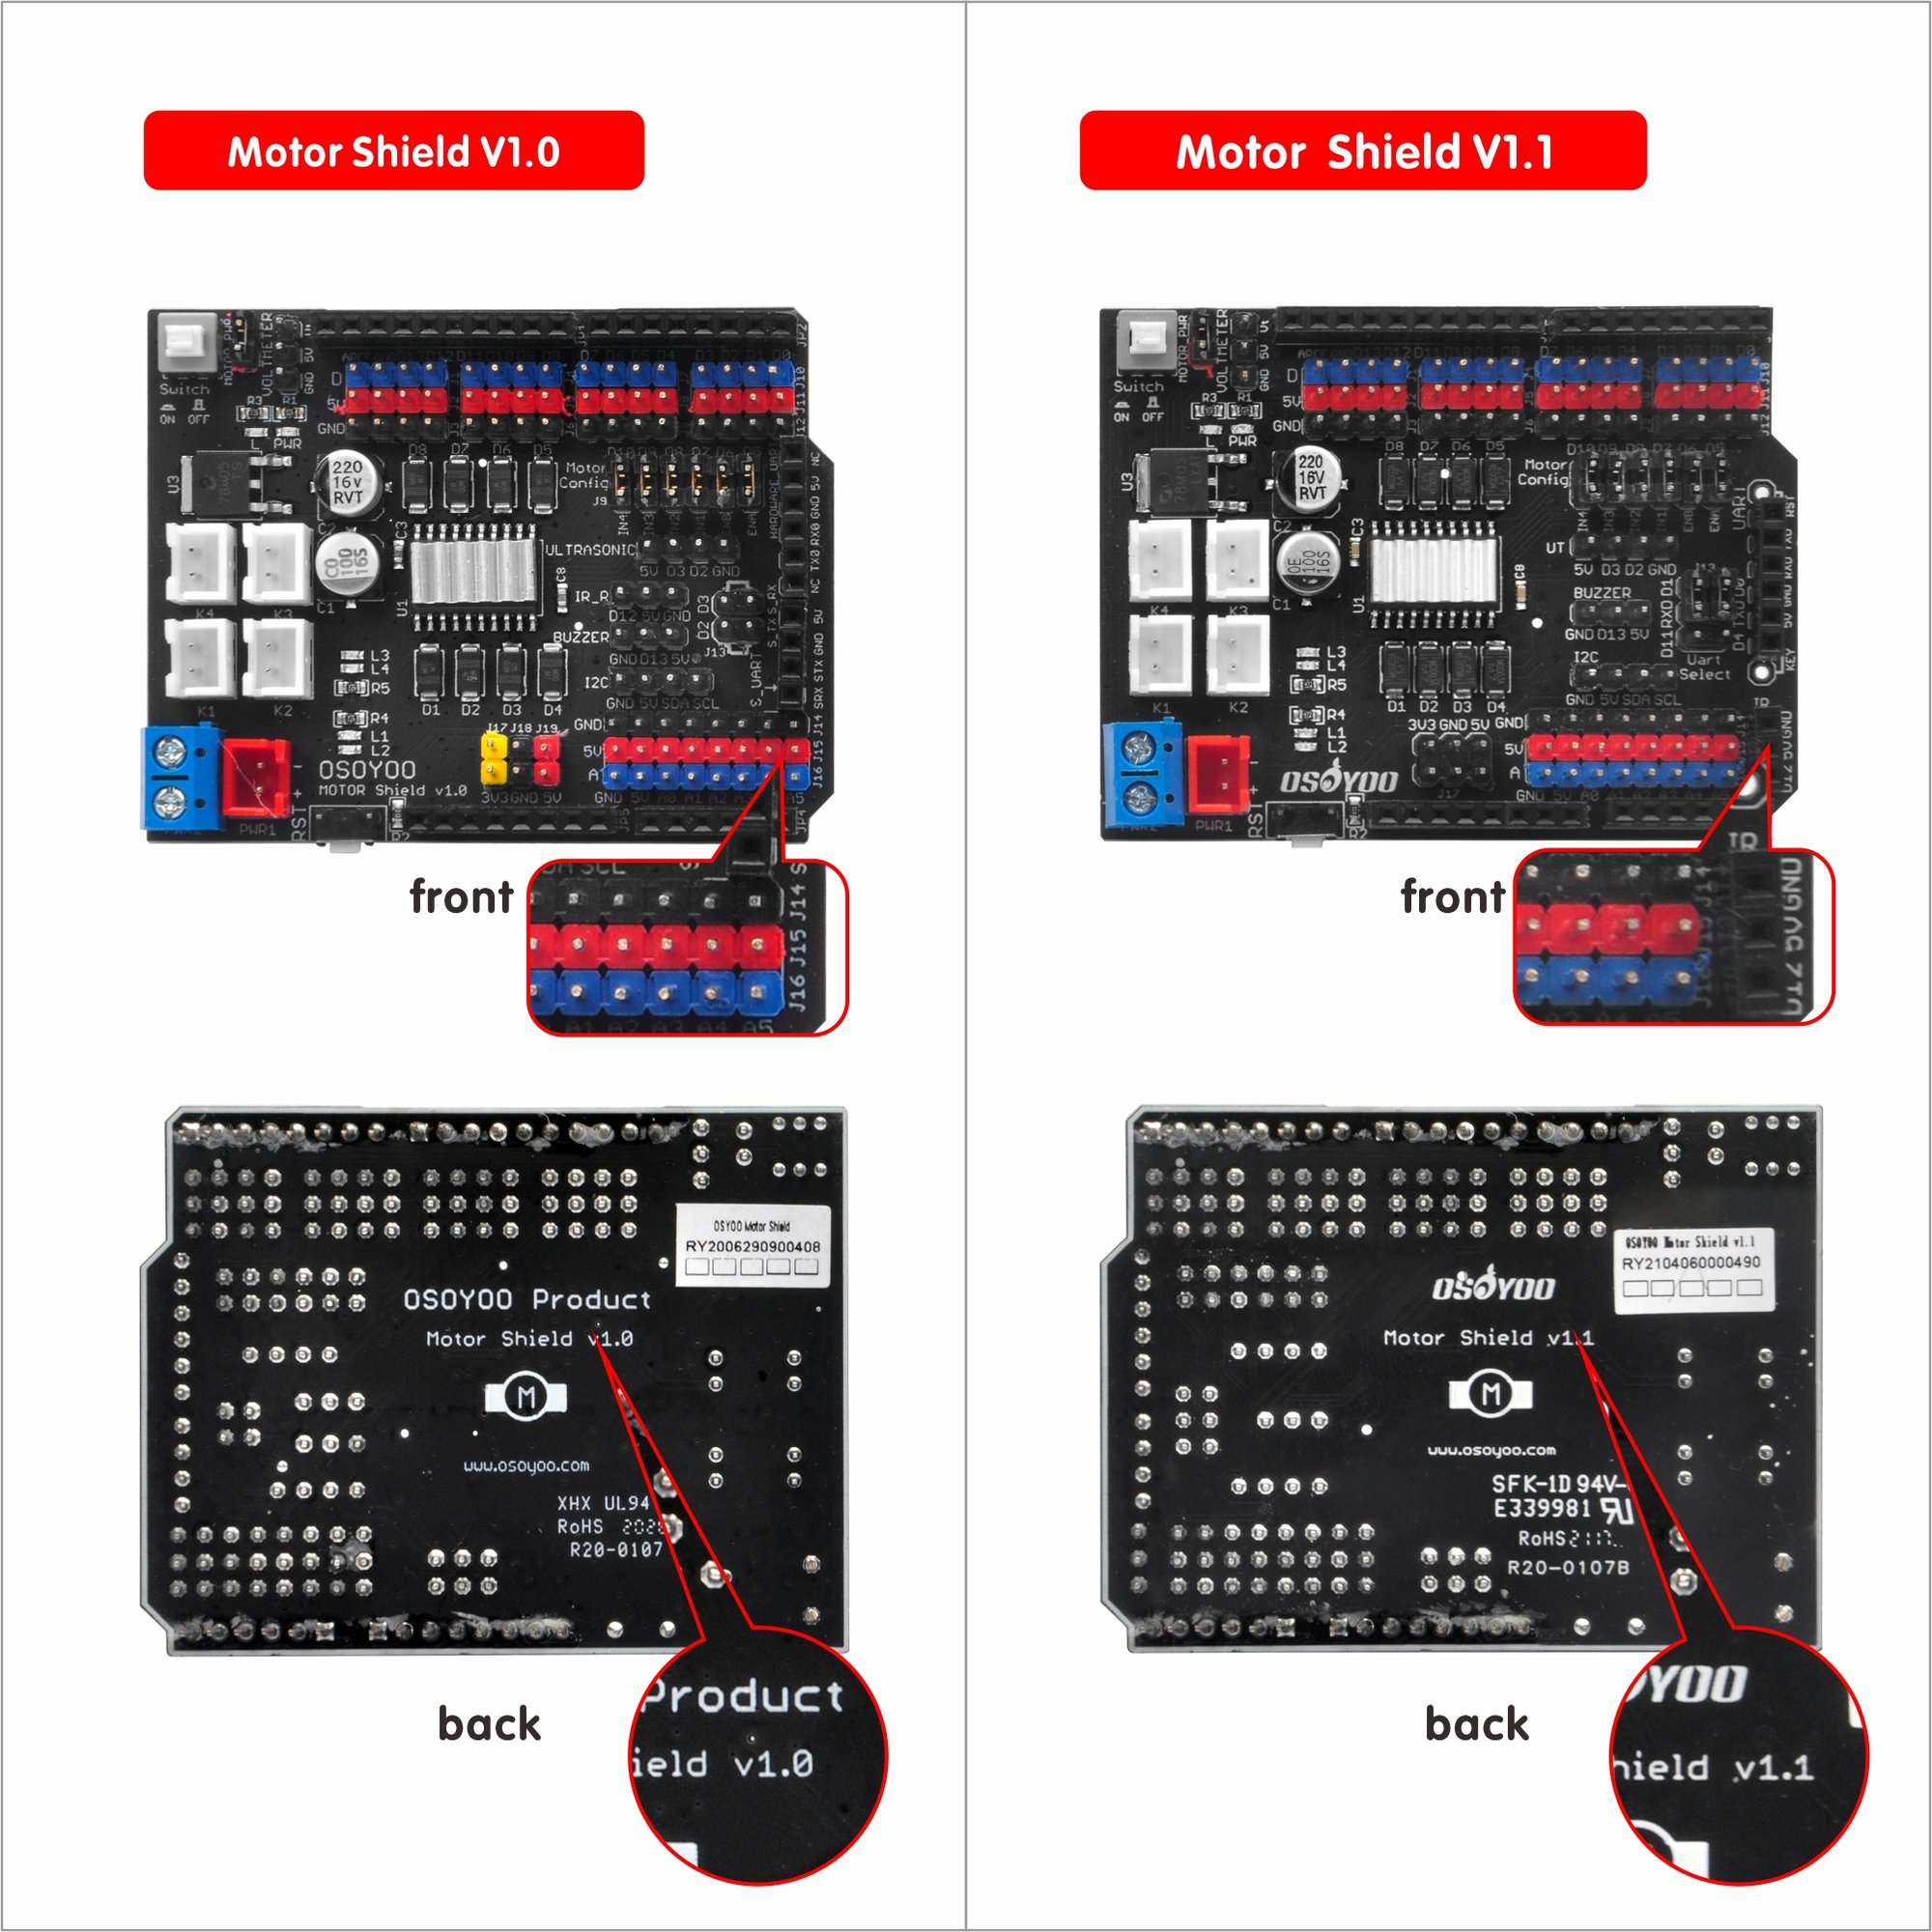
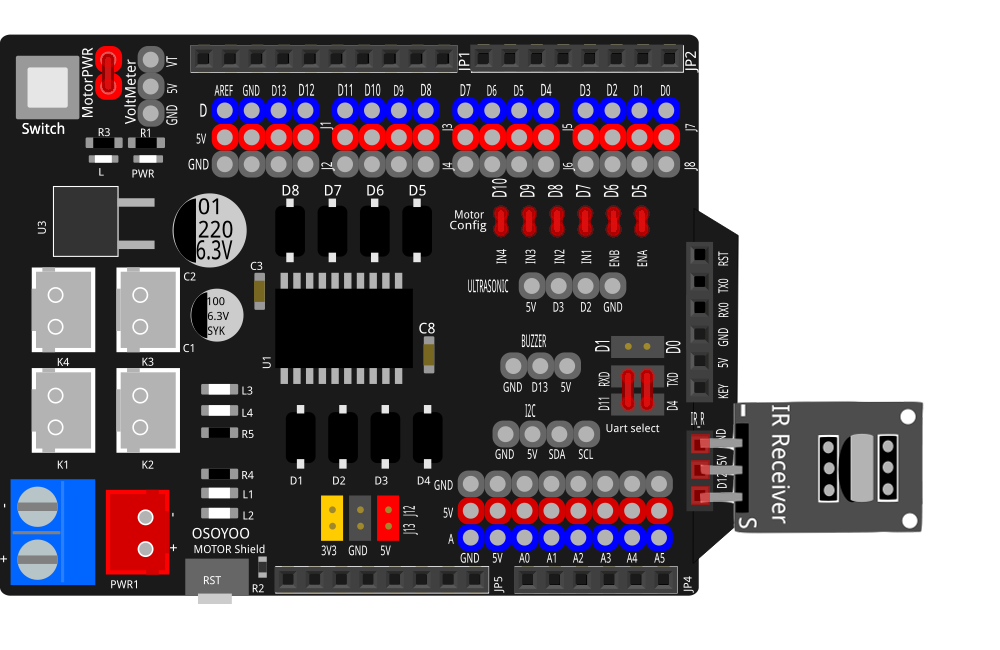
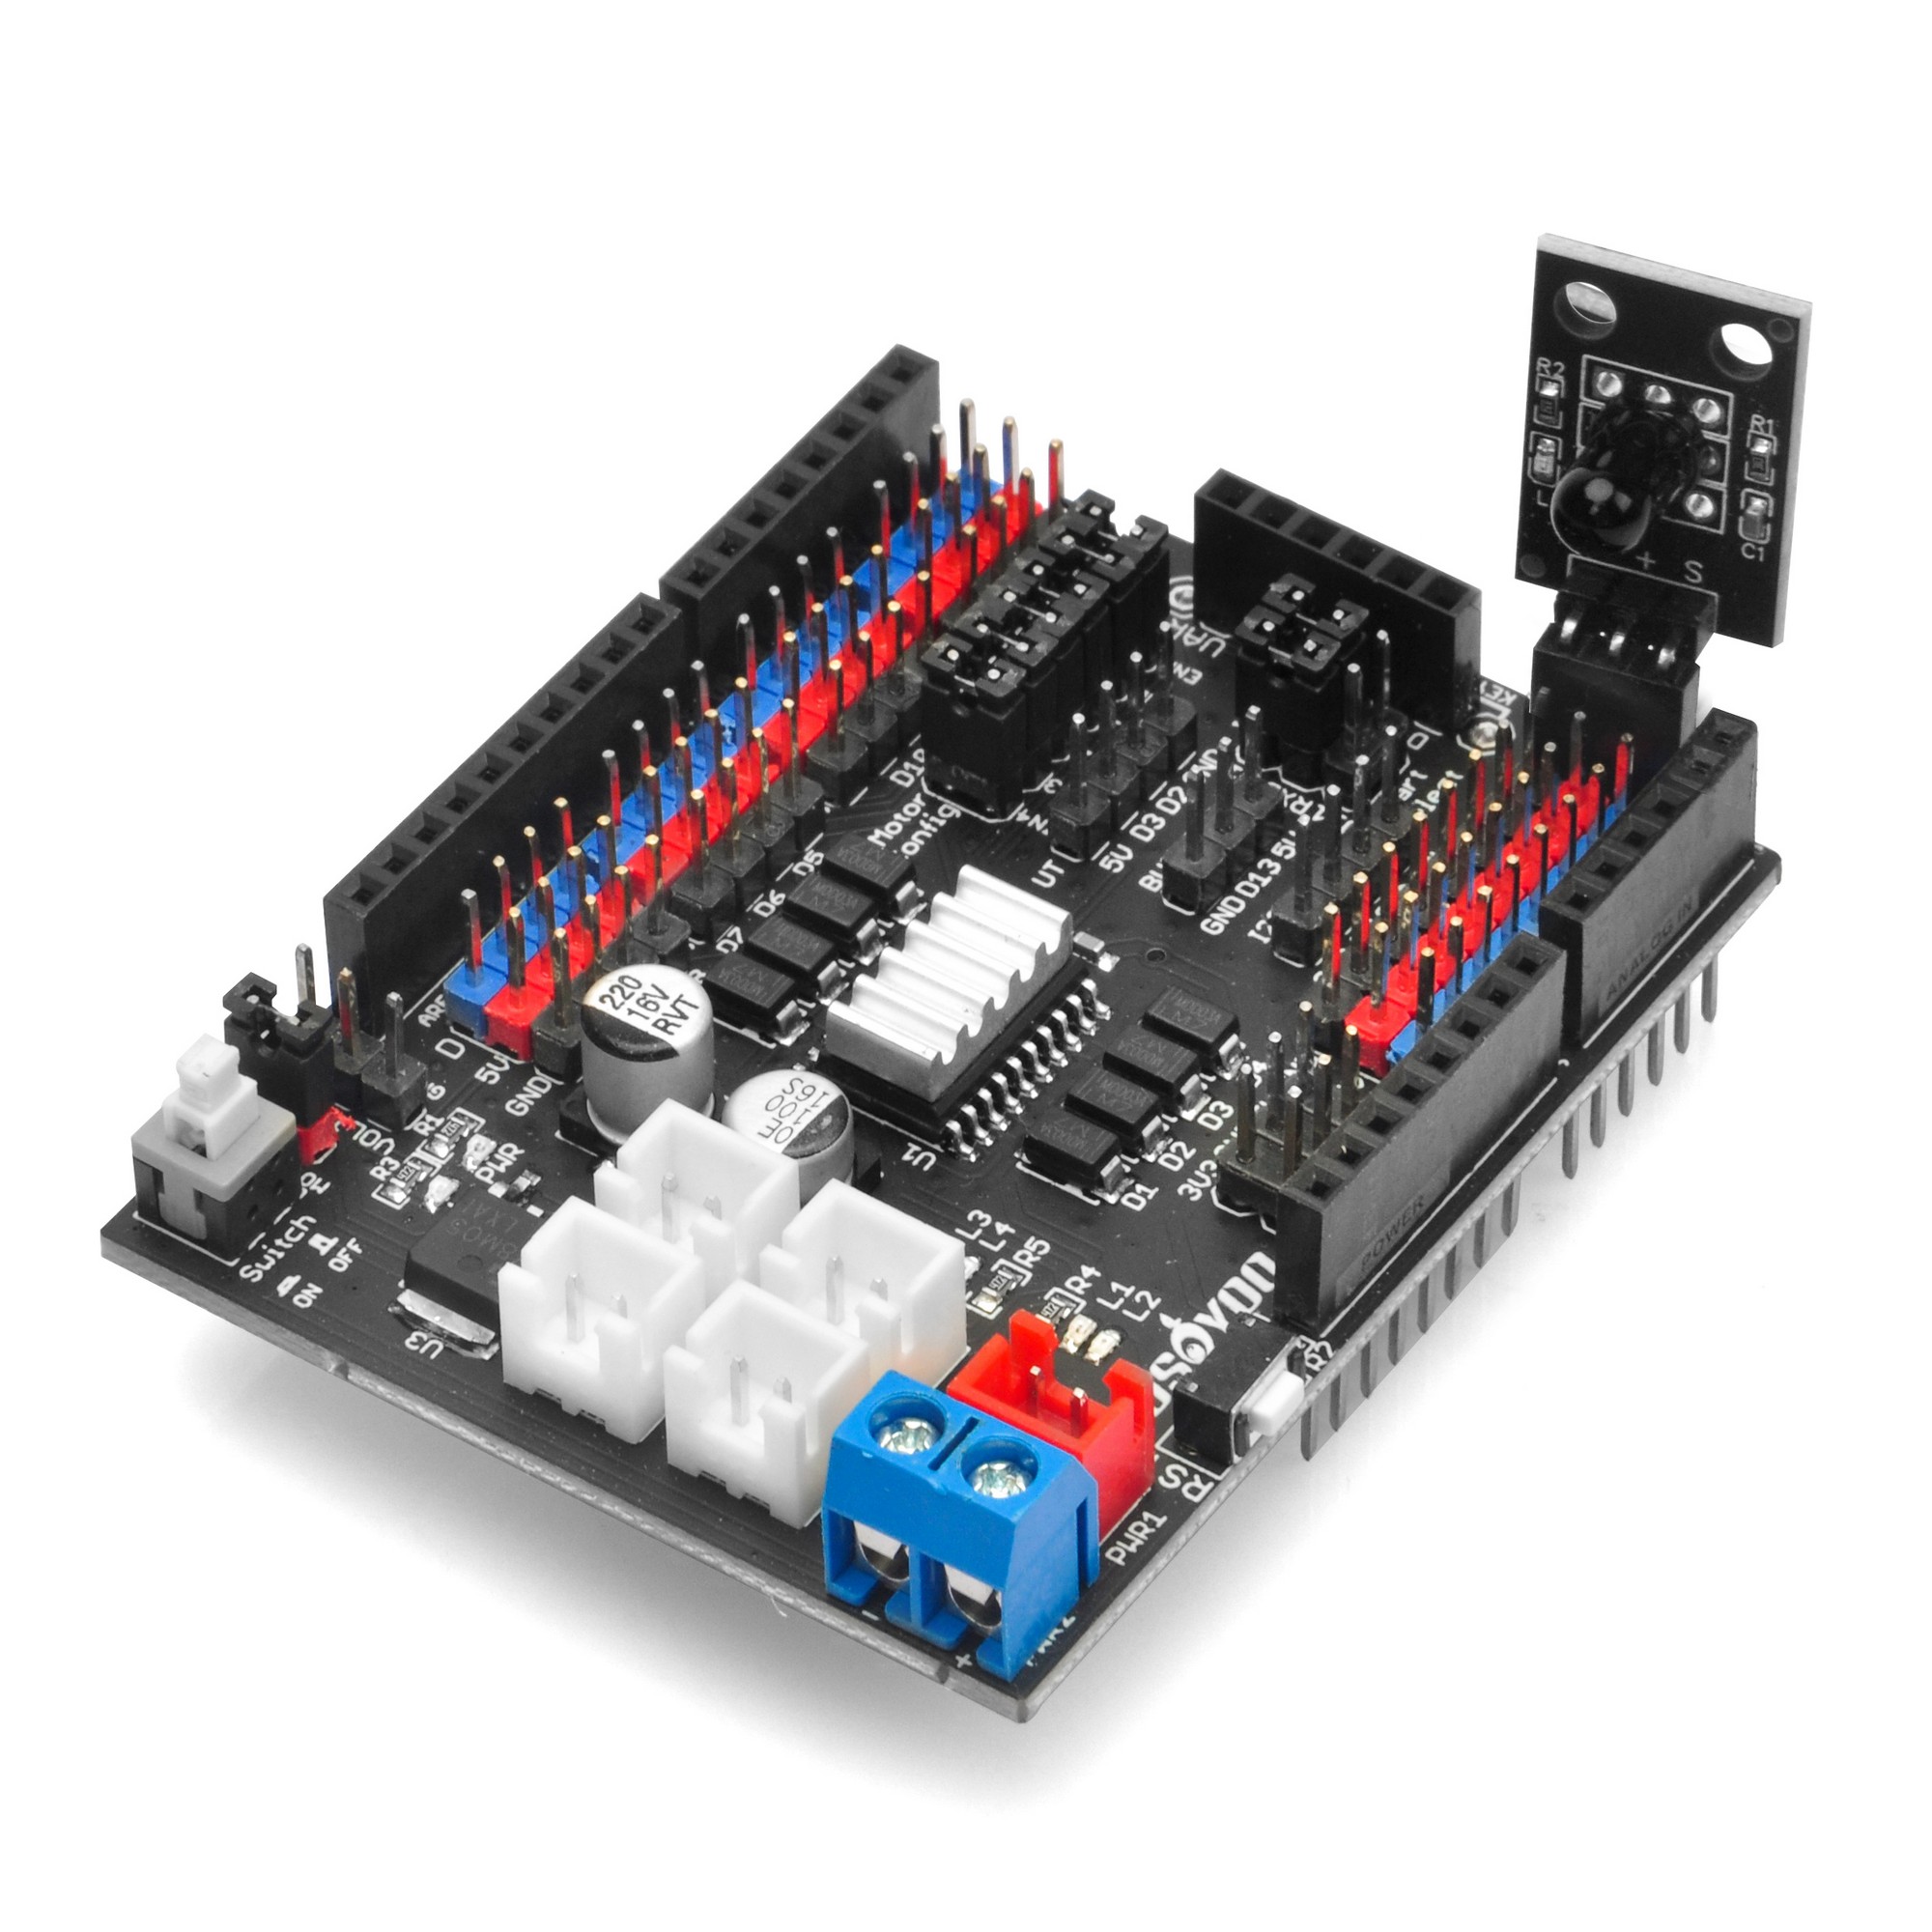
If you get OSOYOO motor shield V1.1/V1.2, please install the IR receiver module on OSOYOO motor shield V1.1/V1.2 as following:
If you get OSOYOO motor shield V1.0, please see this tutorial:
OSOYOO Model-3 V2.0 Robot Car Lesson 2: IR Remote Controlled (OSOYOO Motor Shield V1.0)
Software Installation:
Step 1: Install latest IDE (If you have IDE version after 1.1.16, please skip this step)
Download IDE from https://www.arduino.cc/en/software, then install the software.
Step 2: Install IRremote library into IDE (If you have already installed IRremote library, please skip this step)
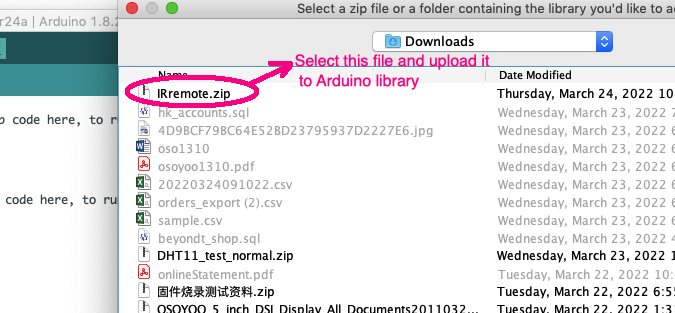
Download IRremote library from https://downloads.arduino.cc/libraries/github.com/z3t0/IRremote-4.3.1.zip, then import the library into IDE
NOTE!!
- If you have a late version of Arduino IDE with a library IRRobotRemote, it may conflict and you may have to remove that library.Make sure to delete Arduino(root)/libraries/RobotIRremote. Where Arduino(root) refers to the install directory of Arduino. The library RobotIRremote has similar definitions to IRremote and causes errors.
- Learn how to install an Arduino library on Arduino IDE, please visit https://osoyoo.com/2017/05/08/how-to-install-additional-arduino-libraries/
In the pop up window, go to your downloads folder, select the IRremote.zip file you downloaded just now.
Step 3: Download Lesson 2 sample code and unzip the download zip file lesson2.zip, you will see a folder called lesson2.
Step 4: Connect OSOYOO Basic Board for Arduino to PC with USB cable, Open IDE -> click file -> click Open -> choose code “lesson2.ino” in lesson2 folder, load the code into the board.
Notice: Shut off your battery or Unplug your power adapter when upload sketch code to OSOYOO Basic Board for Arduino.

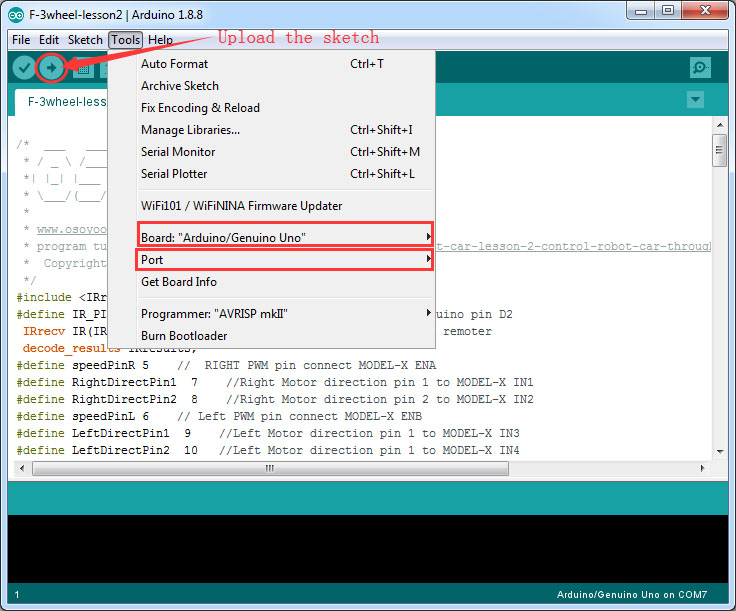
Step 5: Choose corresponding board and port for your project,upload the sketch to the board.
Testing:
Press IR controller keys to control the car movements:
Note:
1) Please try to align the transmitter port of the IR remote control with the IR receiver head as the picture in the attachment.
2) Please press remote control gently and at regular intervals
Trouble shooting:
Some user found that this IR remote does not work. The reason might be the IR remote sends different button code which does not match our sample code. In order to solve this problem. Please take following steps:
Step A) Get the IR code of each button in your IR remote.
https://osoyoo.com/driver/2wd/irtest.zip
Upload above sketch into your OSOYOO Basic Board for Arduino and open the serial monitor in your upper-right corner.

press the ◄ ► ▲ ▼”OK” button in your remote, you will see their IR code as following picture:
Write down the IR code of your control buttons ◄ ► ▲ ▼ “OK” button,
STEP B)replace the IR code in lesson 2 sketch file:
Open your Lesson 2 code again, then you will see following lines define the IR CODE of each button:
#define IR_ADVANCE 24 //code from IR controller “▲” button
#define IR_BACK 82 //code from IR controller “▼” button
#define IR_RIGHT 90 //code from IR controller “>” button
#define IR_LEFT 8 //code from IR controller “<” button
#define IR_STOP 28 //code from IR controller “OK” button
#define IR_turnsmallleft 13 //code from IR controller “#” button
Please change the value of each button in above lines to match the code from
Step A). If you don’t know how to change, just send email to
[email protected] and give us the code of each button from
Step A), I can help you to change the code and email new sketch file to you.
Above method can also allow you to use other IR sending device (i.e TV remote, DVD remote, air conditioner remote etc) to control the car. Just use Step A) to get the key code of your remote and change the sketch file in Step B), it will work.


Hi,
I just got a robot car for Christmas, but the IR sensor doesn’t work, I have confirmed it’s wired correctly but even with the debug code it shows no commands from the remote, even when trying with another IR remote.
David
Do you remove the plastic sheet in the remote controller.
Do you see any indicator turning on when you press remote controller?
If no indicator on, it may be some wrong with remote.
Please give me your order No and address, I’ll send the replacement to you.
Elaine @OSOYOO
buonasera il mio problema con la lezione due che non si carica su arduino err.pinmode(); non definito in attesa di risposta un grazie
Hi, Do you mean you can’t upload the code?
si esatto non carica il codice
Do you test other lessons? Do you get the same error? If so, please confirm whether you install the bluetooth module on the expansion board.
If not, please check whether you install the IRremote library correctly.
il bluetooth si installa e il led del modulo è fissa ma il robot non si muove ho provato con lesson 2 mi da sempre lo stesso errore proverò con le librerie grazie
Please remove the bluetooth and confirm you have install IRremote library. Thanks.
Hi! What can I do if I can not download the IRremote zip file on my Mac?? Or I can’t add it to the library ?? thank you!
It says it is not a supported file
Please check download page of your browser after you open the link: https://osoyoo.com/picture/2WD_Car_V2.0/code/IRremote.zip.
Please unzip this file and copy this folder and paste it to the path: your computer–>document–> arduino
Hi, I’m trying to get the IR codes of my remote’s buttons, but when I open the serial monitor and press the buttons, it won’t display their codes. I removed the protective film, and tried everything, but it still won’t work.
Please provide your order ID and full address to my email address: [email protected].
I’ll send the IR receiver as the replacement to you.
After following the steps for lesson 1 I’m still not able to get the car to move. I turn it on it and does not do anything. When connected to the PC it lights up and makes a noise but that is it. Please assist
Please check whether the battery and battery case install correctly or not.
Could you read the voltage of the battery on voltage meter on the car?
Please take photos about the car and send to my email address: [email protected].
The rechargeable battery that came with the car is no good that’s why I could not get it to move. I had to buy a disposable battery from the store. Are you able to send a replacement since the original one that came with the unit is defective??
Please provide your order No and address.
I just emailed you my information
OK, the battery will be shipped ASAP.
The tracking number is 9400111206203991989505.
If any query, please feel free to contact me.
Elaine
Hi,i can’t connect remote, have message
/Users/sa/Downloads/lesson2/lesson2.ino:11:10: fatal error: IRremote.h: No such file or directory
#include
^~~~~~~~~~~~
compilation terminated.
exit status 1
Compilation error: IRremote.h: No such file or directory
what can I do?
The lesson 2 sketch keeps timing out on the upload so I am unable to upload lesson 2. Please help. Thanks
Hi, the car does not move even if i try with the remote that came with it and the remote i have at home but when i press somthing on the remote i can see the light going on and then when i let go it turns off but the car does not move.
I also tryed the trouble shooting steps but it still did not work
I also tryed the trouble shooting steps but it still did not work
I cannot get my remote control to work with the system. I have uploaded the IR remote button reader to my board, but when i press any buttons, there is nothing appearing in the serial monitor. I have checked and the remote is working (sending out the IR signal), but i am unable to read it on the program. Any help with this would be great
I have tried doing the software installation and uploading it to the car but the remote still will not work. I have testing the battery of the remote and that is not the problem. I have also tried the troubleshooting. What else can I do to make this work?
I recently got this car version 1.2 ir sensor not working red light is on
nothing is displayed on the serial monitor
please send your order number and address to [email protected], our customer service will give you solution.
Right now you can skip lesson 2 and keep doing lesson 3,4,5,6.
Hi,
I have followed all of the above steps, including troubleshooting, to no avail, nothing happens when I press the buttons on the IR controller to control the movements of the car.
when you press a key in IR controller, did you see the LED in the receiver flashing?
Hi,
The LED on the receiver does not flash when I press a button on the IR controller.
please send your order number and address and address to [email protected], the customer service will send you a new IR receiver. Right now you can skip this lesson and do other projects.
Hi,
i sent the order number as requested, any update please ?
yes. We got your order number, we emailed you for your shipping address. but so far you didn’t give us your shipping address. We can’t ship the part to you until you email your shipping address to us ([email protected])
Hi,
I bought the robot car from amazon order # 205-2284870-1037916. I have the v1.1 model of the board. I tried everything that you mentioned in your tutorial. Changed the battery of the remote, but could not get the remote to working, nothing is displayed on the serial monitor. also, the LED on the receiver does not flash when I press a button on the IR controller. I am not sure which one is not good the remote or the receiver. Can you please help?
Regards,
you can send your address and order number to [email protected], tell them that the IR receiver can not work. They will mail you a new IR receiver.
Now you can skip lesson 2 and do other lessons. Once you get the new sensor, you can do lesson 2 again.
El control remoto no funciona aunque lo intente. Por lo demás todo muy correcto. Espero que haya alguna solución me gustaría poder programarlo.
Muchas gracias
Buen día
We need to know if the IR receiver is working properly. Please read trouble shooting section:
https://osoyoo.com/2020/05/22/osoyoo-model-3-v2-0-robot-car-lesson-2-ir-remote-controlled/comment-page-1/#6
Run IRtest.ino file, tell us what did you see in Serial Monitor when you press ▲ key? make sure you put the IR remote very close to the IR receiver(less than 1 meter). If there is no response in Serial monitor, then it means the IR receiver might have problem. Please give us your order number and address, we will mail you a new one.
Hello,
I have done what you said me, but the control doesn’t work. My phone number: 623316182. My adress: Calle Salamanca, n°76, Dos Hermanas, Sevilla (España).
Thanks you very much for your help.
Good day.
please give us your order number, we need send the IR receiver based on your order number.
¿Y como puedo saber cuál es el número de pedido?
are you ordered from Amazon or OSOYOO.Store? If from Amazon, please login to your dashboard, in your order history, you will see your order number.
If you purchased in osoyoo.store, please give us your name and address, we will lookup the order number for you.
Muchas gracias ya lo he encontrado, mi nunero de pedido es: 407-2898795-5185919
please also give us your address of order number 407-2898795-5185919 to [email protected], we will mail you a new IR sensor after we get your address.
Thank you do much I have already send the mail.
I got lost at step 5. What “board” am i supposed to install and which “Port”. Install all the boards?
1)you need select the board which has the word “UNO” in its name.
2)You can select the port name which does Not have Bluetooth in its name. If you have different ports, try each port one by one.