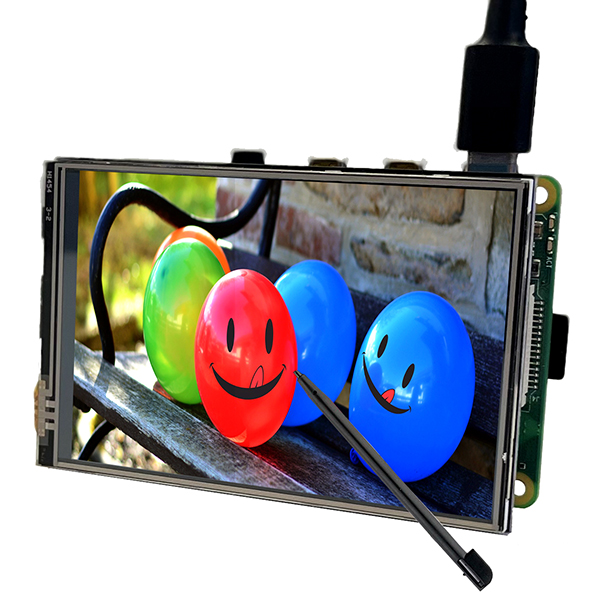
Osoyoo 3.5″ SPI Touch Display for Raspberry Pi
Model: #2022013800
Resolution: 480×320 (Hardware)
Interface: SPI (Fmax: 24MHz)
Compatible: Raspberry Pi 3B/3B+/4/5/Zero 2W/Zero W
Buy 3.5″ SPI Touch Display:
Caution:
- This is a general introduction page. Please select the correct tutorial based on your Pi model and OS version from the table below.
- Without touch driver installed, the screen will show white. Follow the guide to make it work.
- Ensure your SD card has enough space for touch driver installation.
- This screen is only compatible with Raspberry Pi OS.
1Overview
The Osoyoo 3.5 inch SPI Touch Display is designed specifically for Raspberry Pi. It connects directly to the GPIO header and uses SPI interface for display communication. The resistive touchscreen allows full interaction with your Pi without external keyboard or mouse.
Note: This screen requires driver installation. Without the driver, the screen displays white. Follow the tutorials in Section 5 to set up your display.
2Features
- Resolution: 480×320 hardware resolution
- Touch: Resistive touch control (XPT2046)
- Plug & Play: Direct GPIO connection, fits Pi form factor
- FBCP Support: Configurable software resolution, dual-display capable
- Display Rotation: Reversible screen orientation
- Backlight: PWM brightness control
- Software Keyboard: On-screen keyboard for input without peripherals
3Specification
| LCD Type |
TFT |
| LCD Interface |
SPI (Fmax: 24MHz) |
| Touch Controller |
XPT2046 (Resistive) |
| Driver IC |
ILI9488 |
| Resolution |
320×480 pixels |
| Colors |
262K |
| Backlight |
LED (120mA) |
| Power Consumption |
0.13A × 5V |
| Operating Temp. |
-20°C ~ 60°C |
| Active Area |
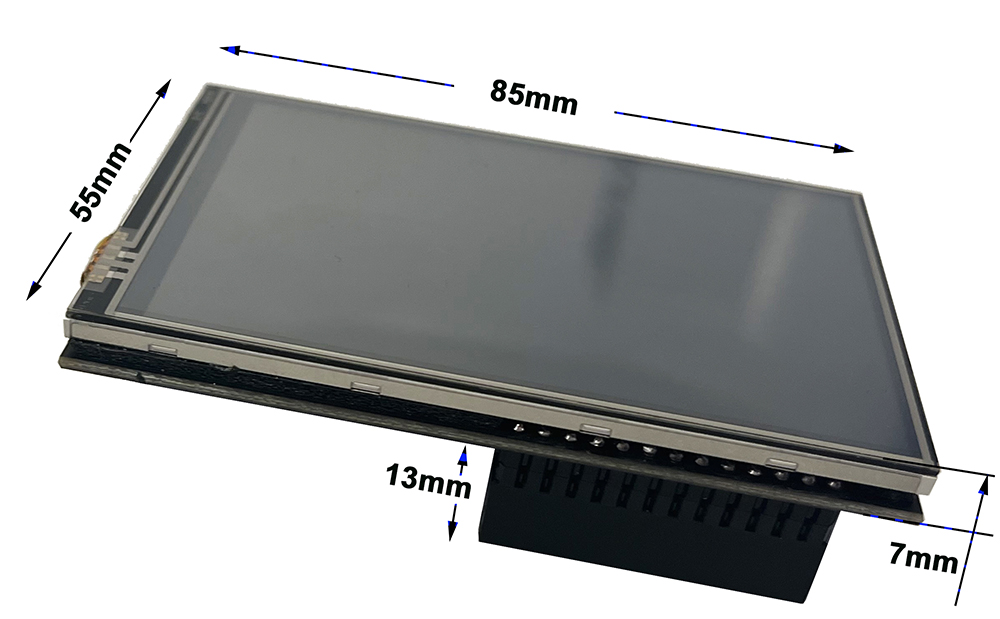
48.96 × 73.44 mm |
| Board Size |
85.5 × 56 mm |
| Net Weight |
55g |
4Interface
The display connects directly to the Raspberry Pi 40-pin GPIO header. Pins marked “NC” (Not Connected) are not used by the LCD and can be used for other applications.
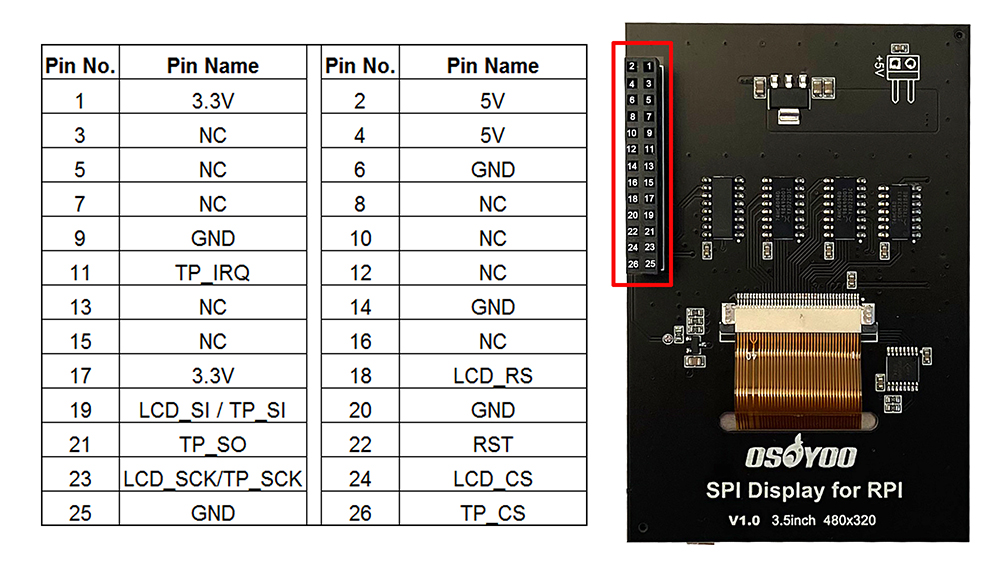
GPIO Pin Assignment
| Pin |
ID |
Description |
| 1 |
3.3V |
Power (3.3V input) |
| 2 |
5V |
Power (5V input) |
| 3 |
NC |
Not Connected |
| 4 |
5V |
Power (5V input) |
| 5 |
NC |
Not Connected |
| 6 |
GND |
Ground |
| 7 |
NC |
Not Connected |
| 8 |
NC |
Not Connected |
| 9 |
GND |
Ground |
| 10 |
NC |
Not Connected |
| 11 |
TP_IRQ |
Touch interrupt (Low when pressed) |
| 12 |
NC |
Not Connected |
| 13 |
NC |
Not Connected |
| 14 |
GND |
Ground |
| 15 |
NC |
Not Connected |
| 16 |
NC |
Not Connected |
| 17 |
3.3V |
Power (3.3V input) |
| 18 |
LCD_RS |
Command/Data register select |
| 19 |
LCD_SI / TP_SI |
SPI data input (LCD & Touch) |
| 20 |
GND |
Ground |
| 21 |
TP_SO |
SPI data output (Touch) |
| 22 |
RST |
Reset signal |
| 23 |
LCD_SCK / TP_SCK |
SPI clock (LCD & Touch) |
| 24 |
LCD_CS |
LCD chip select (Active Low) |
| 25 |
GND |
Ground |
| 26 |
TP_CS |
Touch chip select (Active Low) |
5Getting Started
Choose the tutorial that matches your Raspberry Pi model and OS version (Note: all tutorials work OS with the Raspberry Pi Desktop):
| OS Name |
Support Boards |
Note |
Links |
| Trixie / Bookworm |
Pi 4 / Pi 5 |
2025-05-13 and later |
View Tutorial |
| Trixie / Bookworm |
Pi 3 |
2025-05-13 and later |
View Tutorial |
| Bookworm |
Pi 3 / Pi 4 / Pi 5 |
Before 2025-05-13 |
View Tutorial |
| Bullseye / Buster |
Pi 3 / Pi 4 |
Legacy OS |
View Tutorial |
Not sure which to choose?
• Check your Pi model: cat /proc/device-tree/model
• Check your OS version: cat /etc/os-release
7Tech Support
Need help or have feedback? Submit a ticket and our team will get back to you within 1-2 working days.
Working Time: 9 AM – 6 PM GMT+8 (Monday – Friday)
Contact Us: [email protected]
8List of OSOYOO Screen for Raspberry Pi
| PartNumber |
Display |
Touch |
Audio |
Device Support |
|
Resolu-tion |
Display Port |
Display Panel |
View Angle |
Touch Type |
Touch Port |
Toughened Glass Panel |
Optical Bonding |
Speaker |
Signal Output |
Pi |
JETSON NANO |
PC |
| SPI DISPLAYS |
| PROS: low price. |
| CONS: low refresh rate & resolution, supports Raspberry Pi only, requires Raspberry Pi 40PIN GPIO (the SPI bus), poor compatibility with Raspberry Pi system. |
| 3.5inch RPi SPI LCD |
480×320 |
SPI |
TFT |
– |
Resistive |
SPI |
√ |
× |
× |
× |
√ |
× |
× |
| HDMI / TYPE-C DISPLAYS |
| PROS: high refresh rate, multiple resolution support, multiple devices support, better compatibility with Raspberry Pi system. |
| CONS: somewhat costly. |
| 3.5inch Resistive HDMI LCD |
480*320 |
HDMI |
TFT |
– |
Resistive |
SPI |
√ |
× |
× |
× |
√ |
× |
× |
| 3.5inch Resistive HDMI LCD with case |
480*320 |
HDMI |
TFT |
– |
Resistive |
SPI |
√ |
× |
× |
× |
√ |
× |
× |
| 3.5inch HDMI Capacitive LCD |
480*320 |
HDMI |
IPS |
120° |
Capacitive |
Type-C |
√ |
× |
× |
× |
√ |
√ |
√ |
| DSI DISPLAYS |
| PROS: moderate price, high refresh rate, leaves the Raspberry Pi 40PIN GPIO free, better compatibility with Raspberry Pi system. |
| CONS: supports Raspberry Pi only. |
| 3.5 inch DSI LCD |
800×480 |
DSI |
IPS |
170° |
Capacitive |
I2C |
√ |
× |
× |
× |
√ |
× |
× |
| 4.3inch DSI LCD |
800×480 |
DSI |
IPS |
170° |
Capacitive |
I2C |
√ |
× |
× |
× |
√ |
× |
× |
| 5inch DSI TN LCD |
800×480 |
DSI |
TFT |
– |
Capacitive |
I2C |
√ |
× |
× |
× |
√ |
× |
× |
| 5inch DSI IPS LCD |
800×480 |
DSI |
IPS |
170° |
Capacitive |
I2C |
√ |
× |
× |
× |
√ |
× |
× |
| 5inch DSI IPS LCD with Case |
800×480 |
DSI |
IPS |
170° |
Capacitive |
I2C |
√ |
× |
× |
× |
√ |
× |
× |
| 7inch DSI TN LCD |
800×480 |
DSI |
TFT |
– |
Capacitive |
I2C |
× |
× |
× |
× |
√ |
× |
× |
| 7inch DSI IPS LCD |
800×480 |
DSI |
IPS |
170° |
Capacitive |
I2C |
√ |
× |
× |
× |
√ |
× |
× |
| 7inch DSI IPS LCD with Pistudio Case |
800×480 |
DSI |
IPS |
170° |
Capacitive |
I2C |
√ |
× |
× |
× |
√ |
× |
× |
| 7inch DSI IPS LCD (H) with stand holder |
720×1280 |
DSI |
IPS |
170° |
Capacitive |
I2C |
√ |
× |
× |
× |
√ |
× |
× |
| 10.1inch DSI IPS LCD (H) with stand holder |
800×1280 |
DSI |
IPS |
170° |
Capacitive |
I2C |
√ |
× |
× |
× |
√ |
× |
× |