


| Buy from US |
Buy from UK |
Buy from DE |
Buy from IT |
Buy from FR |
Buy from ES |
ここでご購入を! |
 |
 |
 |
 |
 |
 |
 |
Introduction
In this project we’ll control LEDs using the LilyMini ProtoSnap. With the code stored on the LilyMini, our projects can now have more advanced behaviors, and interactions are even reprogrammable. We’ll sew the LilyPad components on a pennant shape and customize the theme and decoration.
• 1x LilyPad USB
• 1x LilyPad Coin Cell Battery Holder
• 1x LilyPad Light Sensor
• 1x LilyPad Tri-color LED
• 4x Lilypad LEDs
• Conductive Thread and Needle
• Pennant Template (1 piece) – see Planning Your Project for printable downloads
• Felt (one 9″x12″ sheet of craft felt will make one pennant; use scraps of felt to add decorations)
• Embroidery or Sewing Thread
Planning Your Project
Follow along with the circuit diagram on the template, or design your own layout and shape on a piece of paper. Trace onto the felt, and cut. We’ll add the LilyPad USB board to a customized pennant to hang on a wall or sew into a project.
Project 4: Night-Light-Pennant-Template
Understanding Your Circuit
The LilyPad USB is a small computer that can store information and commands to control different sensors and boards connected to it. Programmable boards like the LilyPad USB Board are called microcontrollers. The Lilypad need to been programmed in advance with a set of behaviors called code.
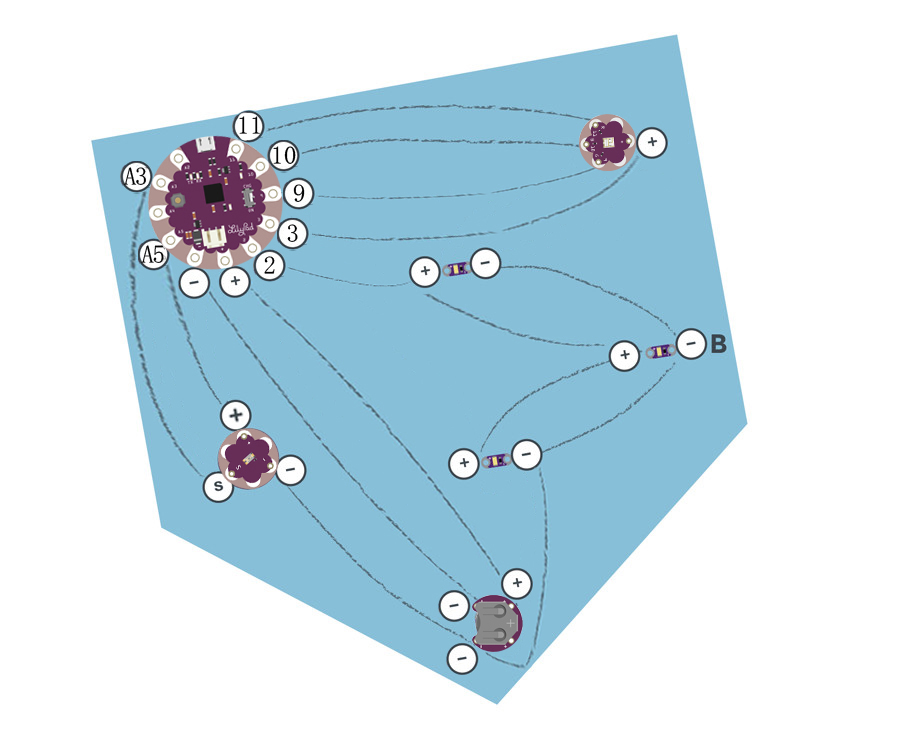
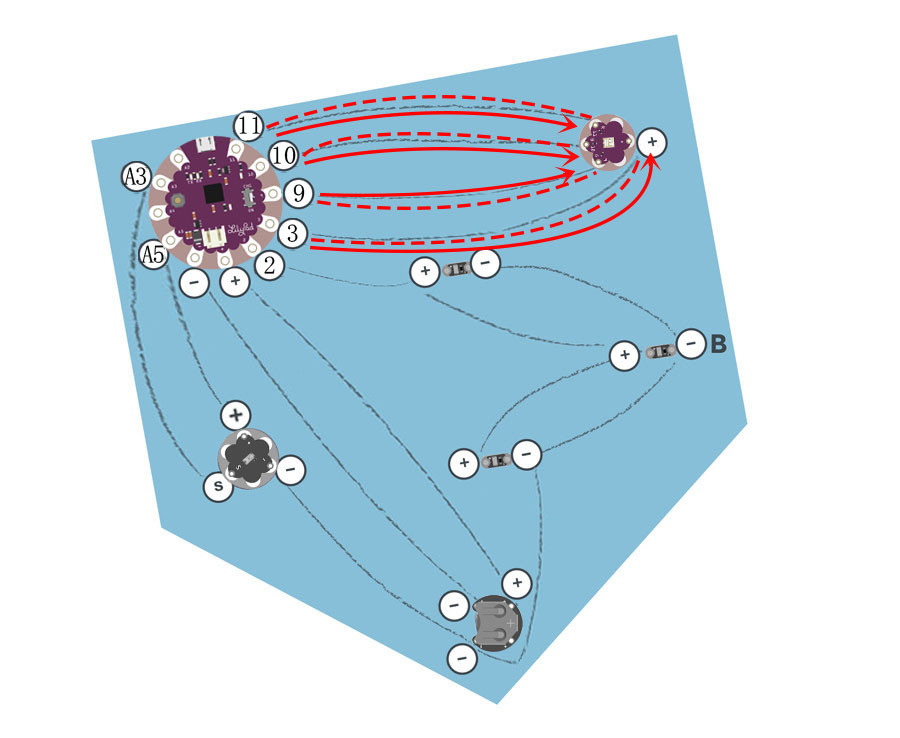
You will need seven LilyPad pieces: the LilyPad USB board, LilyPad Coin Cell Battery holder, three LEDs, a tri-color led and a LilyPad Light Sensor. Arrange the pieces on the felt according to the diagram (or your own custom design). Carefully securing each piece with a dab of glue. Double check the orientation of the LilyPad pieces against the diagram or template before gluing.
Stitching It Together
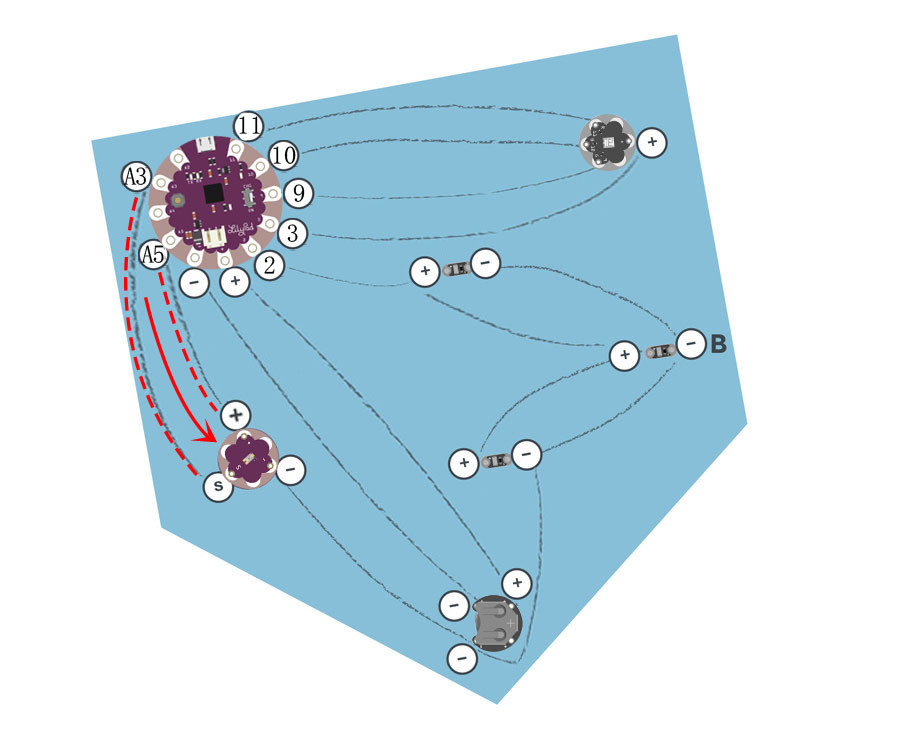
STEP 1:
We’ll begin by stitching a connection between the LilyPad USB Board and the LilyPad light sensor. The light sensor board has three connections: sensor (S), positive (+), and negative (–). Use conductive thread to connect A3 tab on the LilyPad to the (S) tab on the light sensor with three loops at each tab. Connecting the A5 tab on the LilyPad to + tab on the light sensor ;
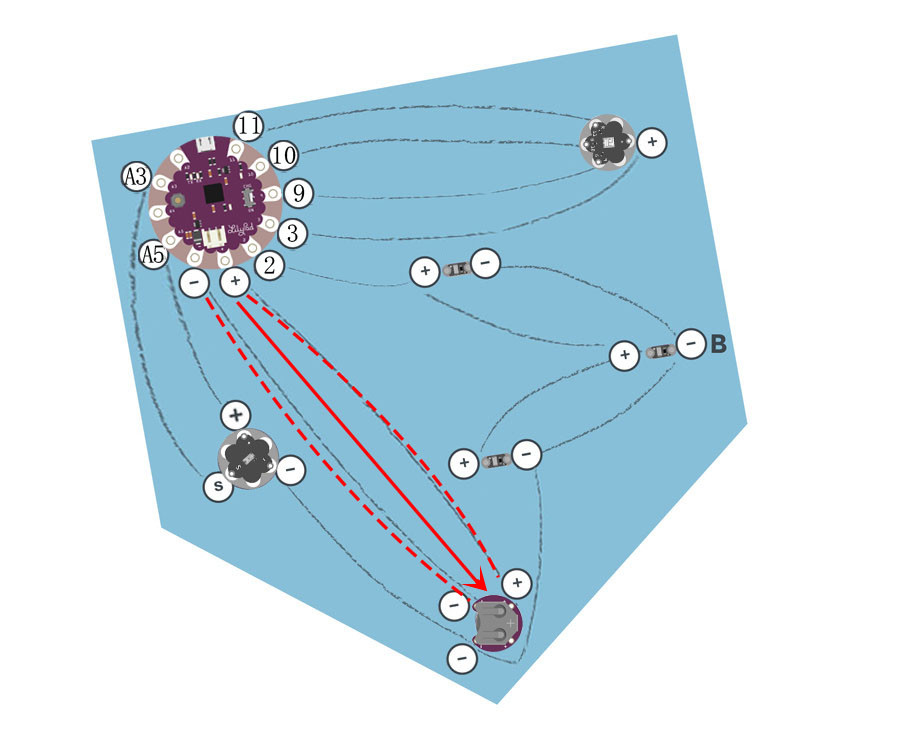
STEP 2:
Next, we’ll connect the LilyPad USB Board to the LilyPad Coin Cell Battery holder. Sewing three to four loops around Tab (-) of the LilyPad USB Board, and then continue stitching to connect Tab (-) of the holder. Tie and cut. With a new piece of thread, Sewing three to four loops around Tab (+) of the LilyPad USB Board, and then continue stitching to connect Tab (+) of the holder. Tie and cut.
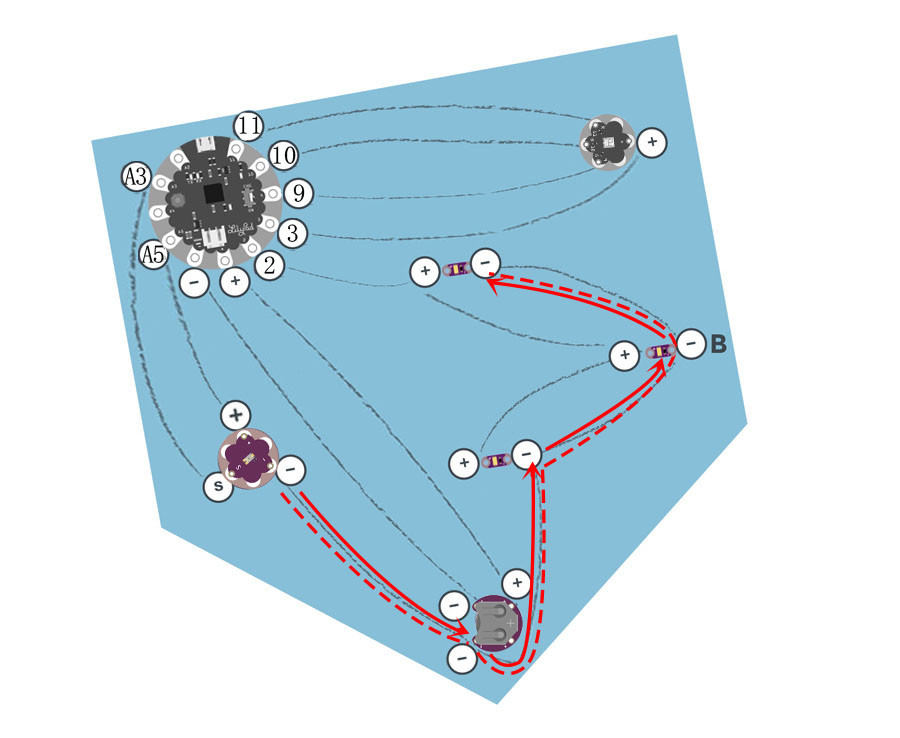
STEP 3:
This will require a much longer piece of thread than in other steps.Begin at the negative (-) sew tab on the light sensor, and continue stitching along the outside edge of the project, connecting the negative tab of each piece (LilyPad coin battery holder,three LEDs).
STEP 4:
We’ll repeat this process with a new piece of thread to connect Tab 2 on the LilyPad USB Board to the positive tabs of three LEDs.

STEP 5:
Finally, we’ll stitch the tab 9, tab 10 and tab 11 on the tri-color LED to the tab 9, tab 10 and tab 11 of LilyPad USB Board, respectively. With a new piece of thread, stitch the tab 3 of the LilyPad USB Board to the positive tab (+) of the light sensor using three to four loops on each tab and a running stitch between. Tie, and cut.
After all the stitching is complete, turn the project over, and trim any loose thread tails before testing.
Install Arduino
You’ll need to have Arduino installed from this point forward. You can grab the most recent version of the software from Arduino’s downloads page (https://www.arduino.cc/en/Main/Software). Check out our Arduino installation guide (Windows, Mac, or Linux) for help installing the IDE.
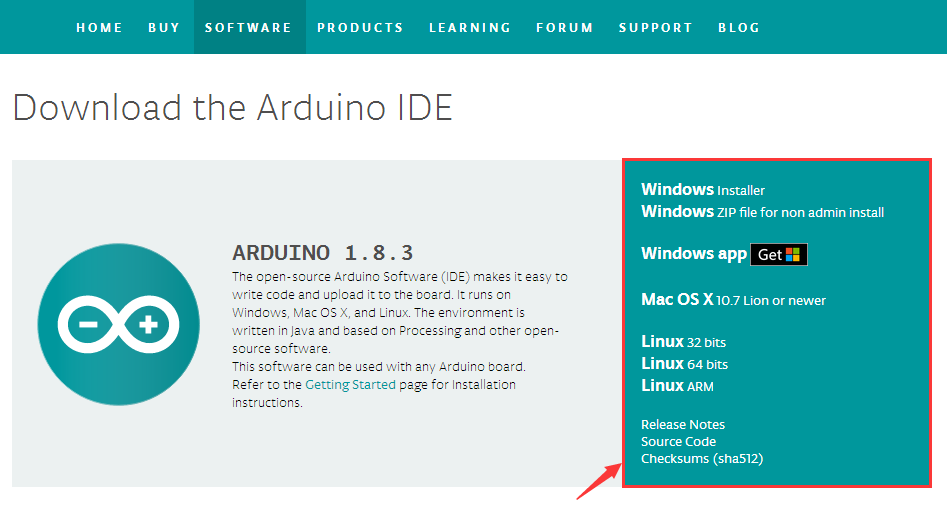

After install Arduino IDE, open the software.
Connect to LilyPad Arduino
When you connect LilyPad Arduino USB board to you computer via the usb data cable (assuming the battery is connected) and slide the switch to “CHG” mode, you should see an red LED light up, to indicate the battery is charging. When the switch in the ON position, the microcontroller receives power and the board runs.
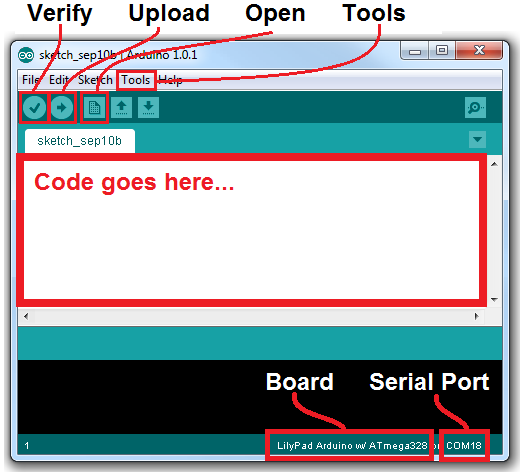
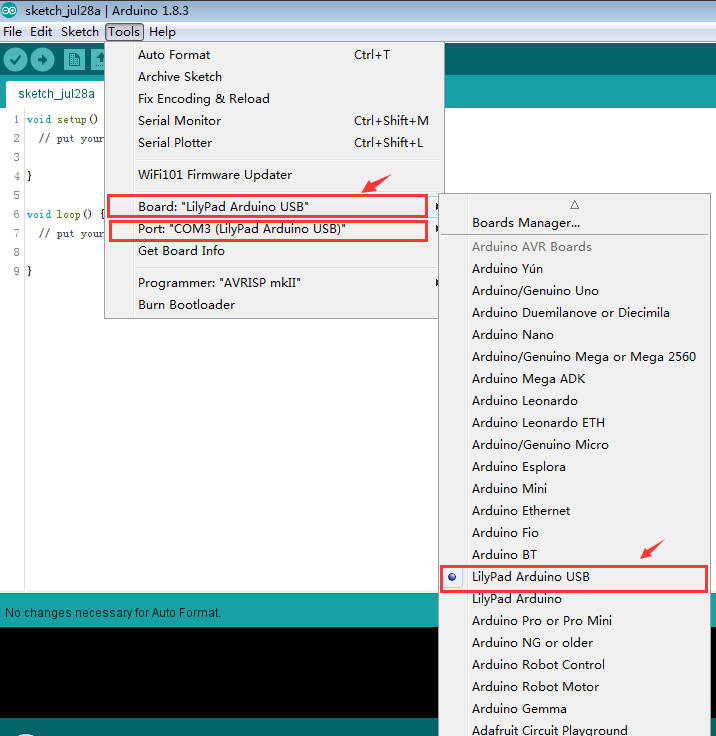
Before you can upload code, there are a few settings to make. Notice that “Board” is correctly set as “LilyPad ArduinoUSB”. To change that, go to the Tools menu, navigate to the Boards dropdown, and select LilyPad Arduino USB.
Upload Code
Visit our kookye website to download the example code we’ll be using in the tutorial. Open it, and then uploading the code, by clicking the right-pointing-arrow-icon button. Give Arduino few seconds to compile the code, and then a few more to upload. The following code is for your reference.
Before your test,you need to use the computer to upload the Arduino code on the LilyPad USB Board, Insert the coin cell battery into the LilyPad USB Board’s battery holder with the positive (+) side facing up. Press the power button on the LilyPad USB Board; Tri-color LED should light up. Cover the light sensor, all leds should light up and tri-color LEDs should change the color. If so, remove the battery and continue to the Finishing Touches section.
Click here to download Project 4 : lilyPad-night-light-pennant.zip
Finishing Touches
Learn more about uploading code in the tutorial: Uploading an Arduino Sketch.
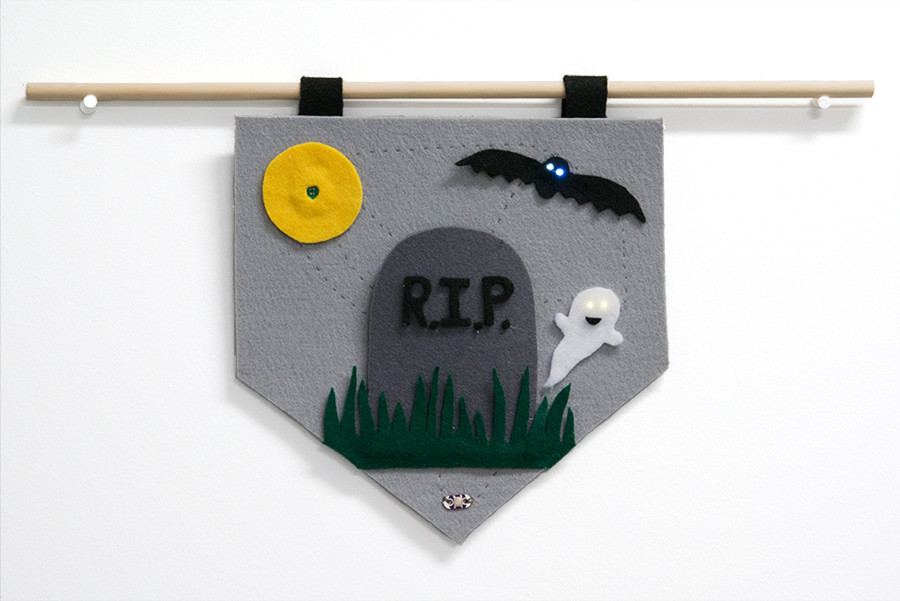
After checking the function of the circuit, it’s time to customize your pennant. Adding light-colored felt over the LEDs can hide the boards and diffuse the light. If covering the light sensor with a felt decoration, make sure to cut a hole above the sensor so it is not blocked/covered.

Here are a few examples of finished pennants with creative themes:

~~~~~~~~~~~~~~~~~~~~~~~~~~~~~~~~~~~~~~~~~~~~~~~~~~~~~~~~~~~~~~~~~~~~~~~~~~~
Lilypad Sewable Electronics Projects:
~~~~~~~~~~~~~~~~~~~~~~~~~~~~~~~~~~~~~~~~~~~~~~~~~~~~~~~~~~~~~~~~~~~~~~~~~~~


